WoW WotLK Classic Horde 70-80 Leveling Guide: 70-72 Howling Fjord

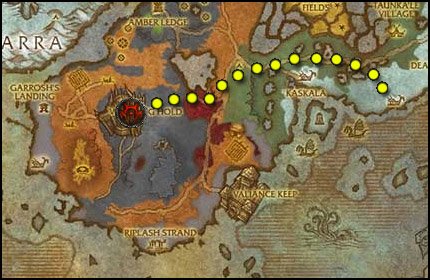
Go to Howling Fjord. Simply take the zeppelin from the Undercity, there’s a new zeppelin tower right next to the old one. It will fly you to Vengeance Landing.

FPicon.jpg Get the new flight path.

Gather all quests:

  • [71] The New Plague
  • [71] Let Them Eat Crow
  • [71] War is Hell
h71circuit1.jpg

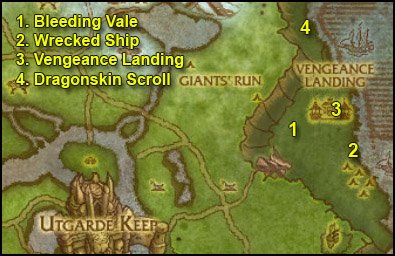
1. Go southwest to the Bleeding Vale (75,33). There you will find two things we need:

1standardtorch.jpg Forsaken Corpses / Alliance Corpses, target them and right-click the Burning Torch.

hb71img1.jpg Right-click the Plaguehound Cage from your inventory. This will summon a Plaguehound acting as your pet.

hb71img2.jpg Use the Sic’em! ability from your hound to fetch Fjord Crows (there are tons of them flying around here). And then help him kill the crow.

Stay in this area until you’ve burned 10 Fallen Combatant and looted 5 Crow Meat.

hb71img3.jpg Right-click the Crow Meat 5 times.

2. Go southeast to the wrecked ship at (81,35).

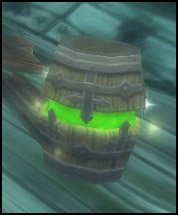
Look for Intact Plague Containers.
hb71img4.jpg

They can be found on the ship’s deck and also inside the ship’s cargo. Loot 10 of them.

3. Ride back to Vengeance Landing. Turn in

  • [71] The New Plague, get [71] Spiking the Mix
  • [71] War is Hell, get [71] Reports from the Field
  • [71] Let Them Eat Crow, get [71] Sniff Out the Enemy

4. Follow the coast northwards while killing Giant Tidecrawlers on your way, they drop the Giant Toxin Glands we need.

Keep going north until you see a yellow “?” on your minimap, labelled “Dragonskin Scroll” (77,20). Go inside the cave, right-click the scroll, turn in [71] Sniff Out the Enemy and get [71] The Dragonskin Map.

Now go back towards Vengeance Landing while killing Giant Tidecrawlers until you have 3 Giant Toxin Glands.

At Vengeance Landing, turn in:

  • [71] Spiking the Mix, get [71] Test at Sea
  • [71] The Dragonskin Map, get [71] The Offensive Begins

hb71img5.jpg Put the Plague Vials on an action bar. We’ll use them during the bombing mission we’re about to do. It’s quite an easy bombing mission really, so I don’t need to explain much. The bat will fly you way south to a fleet of alliance ships, you simply have to bomb the NPCs on those ships with your Plague Vials.

Go talk to the flight master called Bat Handler Camille, dismount, then click on the text. Complete the bombing mission.

Turn in [71] Test at Sea, get [71] New Agamand.
h71circuit2.jpg

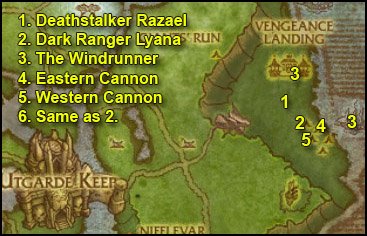
1. Ride south/southwest to Deathstalker Razael (78,35). Talk to him and click on the text.

2. Go about 200 yards southeast to Dark Ranger Lyana (79,37). She’s the only Blood Elf among those NPCs and wears glowing red daggers, easy to spot. She runs off sometimes to fight the alliance forces, but she’ll be back soon.

Talk to her and click on the text.

3. Ride back to Vengeance Landing, turn in [71] Reports from the Field, get [71] The Windrunner Fleet.

Go talk to Bat Handler Camille again, click on the text, this will fly you to the Windrunner. Turn in [71] The Windrunner Fleet at Captain Harker, get [71] Ambushed!.

Kill 15 North Fleet Marines.

Go back to Captain Harker, turn in [71] Ambushed! and get [71] Guide Our Sights.

4. Swim west to the Derelict Strand, go to the eastern cannon (80,38 ).
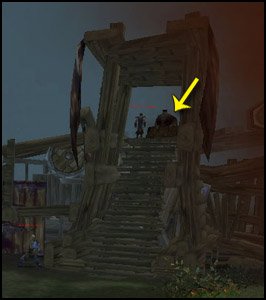
hb71img6.jpg

hb71img7.jpg Right-click the Cannonneer’s Smoke Flare from your inventory while being close to the cannon.

5. Go southwest along the barricades and you’ll find the western cannon (79,40). Use the flare.

6. Go north to Dark Ranger Lyana, turn in [71] Guide Our Sights, get [71] Landing the Killing Blow.
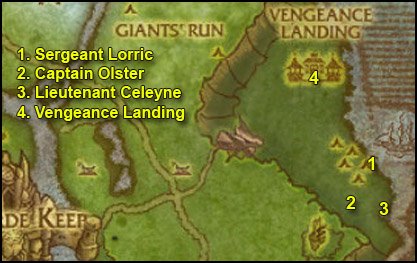
h71circuit3.jpg

1. Go southeast across the barricades, follow the coast until you find Sergeant Lorric (82,41), he stands in between two cannons. If he’s not there, it means someone killed him recently, so just kill stuff in the area while waiting for him to respawn.

2. Face southwest and you should see a hill. Go there and kill Captain Olster (81,43).

3. Go straight east from here you should find Lieutenant Celeyne (83,43). Kill her.
At the same spot you should find Apothecary Hanes, get his quest [71] Trail of Fire and escort him.

This will take you back to Dark Ranger Lyana. Turn in [71] Landing the Killing Blow, get [71] Report to Anselm.

4. Ride back to Vengeance Landing, turn in:

  • [71] Report to Anselm, (cool script happens), get the follow up [71] A Score to Settle
  • [71] Trail of Fire

Sell junk, repair, re-stock food/drink.


Optional – Instance: Utgarde Keep

Now you can start looking for a group for the Utgarde Keep instance.

You already have the quest [71] A Score to Settle.

There are two other quests:

  • [71] Disarmament
  • [71] Ingvar Must Die

They are both given by Dark Ranger Marrah. She stands inside the instance portal, on the first set of stairs leading up.

It’s a very quick instance for level 71-73 players, I recommend it.

If you don’t feel like it or if you don’t find a group, you can abandon the above 3 quests. They can easily be picked up in the future anyway, if you change your mind.
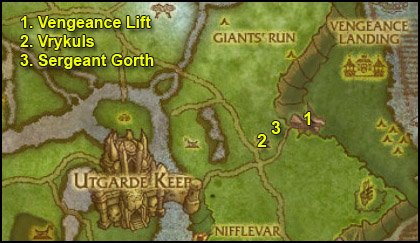

h71circuit4.jpg

1. Ride southwest to Vengeance Lift (73,35). Take the lift and then ride southwest to the Horde Encampment at (71,39).

Turn in [71] The Offensive Begins at Sergeant Gorth, get [71] A Lesson in Fear.
Also get [71] Help for Camp Winterhoof.

2. Go kill Winterskorn Defenders southwest of the blockades (69,39) and keep killing them until their bosses spawn:

  • Oric the Baeful (spawns in the house in rubbles on the northern side of this area)
  • Ulf the Bloodletter (spawns right in the middle of the camp)
  • Gunnar Thorvardsson (spawns next to the tower)

Only kill in this area or it won’t trigger the bosses.

hb71img8.jpg Whenever you kill one of the bosses, right-click the Forsaken Banner next to their corpse.

==Note== You can actually plant the banner in their corpses even if someone else did the killing.

3. Go back to Sergeant Gorth, turn in [71] A Lesson in Fear, get the two follow ups:

  • [71] Baleheim Bodycount
  • [71] Baleheim Must Burn!
h71circuit5.jpg

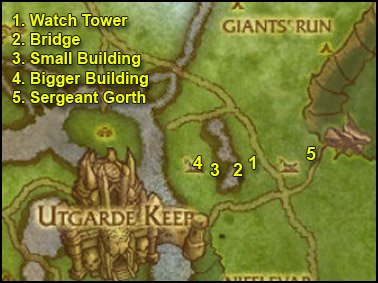
1. Ride straight west to Baleheim and go to the watchtower at (67,40).

1standardtorch.jpg Right-click Gorth’s Torch.

==Note== Kill every Vrykul on your way (Winterskorn SpearmanSkald, etc).

2. Go behind the tower and go west to the bridge (66,40). Use Gorth’s Torch.

3. A little further west past the bridge you should see a small building (65,41). Use Gorth’s Torch.

4. Just a few steps northwest of this dwelling you should find a bigger building (64,40). Use Gorth’s Torch. Be careful not to aggro Bjorn Halgurdsson, the elite mob on a drake which stands next to this building.

Now just kill Vrykuls in this town until you have 16 kills.

5. Go back to Sergeant Gorth, turn in:

  • [71] Baleheim Bodycount
  • [71] Baleheim Must Burn!

Get the follow up [71] The Ambush.
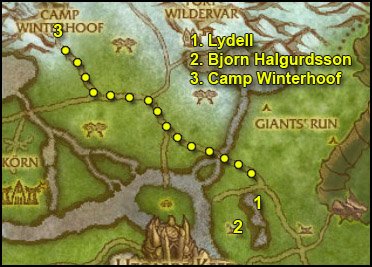
h71circuit6.jpg

1. Ride west/northwest to Lydell (66,37). Turn in [71] The Ambush, get [71] Adding Injury to Insult.

2. Read this whole step before you do anything.

Clear the way southwest to Bjorn Halgurdsson (64,39).

hb71img9.jpg Target him, right-click the Vrykul Insult and run back to Lydell.

Let Lydell tank, do nothing at the start of the fight. If you got any abilities to lower or reset your threat, use them. This should be easy.

If you’re sucessful, turn in [71] Adding Injury to Insult.

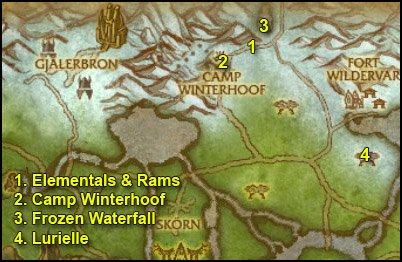
3. Follow the road northwest to Camp Winterhoof (49,12).

Turn in [71] Help for Camp Winterhoof and get all the available quests:

  • [71] Hasty Preparations
  • [71] Making the Horn
  • [71] Suppressing the Elements

FPicon.jpg Get the new flight path.

==Note== From now on, look for Spotted Hippogryph Down while going through the next steps.

a70image63b.jpg
h71circuit7.jpg

1. Go to the snowy hills northeast of Camp Winterhoof, kill the following two things:

  • Frosthorn Rams until you’ve looted 6 Undamaged Ram Horns.
  • 8 Iceshard Elementals

2. Go back to Camp Winterhoof, turn in:

  • [71] Suppressing the Elements
  • [71] Making the Horn, get [71] Mimicking Nature’s Call

A bunch of new quests should be available now, get them all:

  • [71] The Frozen Glade
  • [71] Keeping Watch on the Interlopers
  • [71] The Book of Runes
  • [72] March of the Giants

3. Go northeast to the frozen waterfall in the same area where we just killed rams and elementals (52,4).

hb71img10.jpg Right-click the Carved Horn from your inventory.

Kill Frostgore.

4. Ride southeast to the Frozen Glade where you’ll find Lurielle (62,23). Turn in [71] The Frozen Glade, get [71] Spirits of the Ice.

Kill 15 Ice Elementals and loot 15 Icy Cores. They can be found all around the Frozen Glade.

Go back to Lurielle, turn in [71] Spirits of the Ice, get:

  • [71] The Fallen Sisters
  • [71] Wild Vines.
h71circuit8.jpg

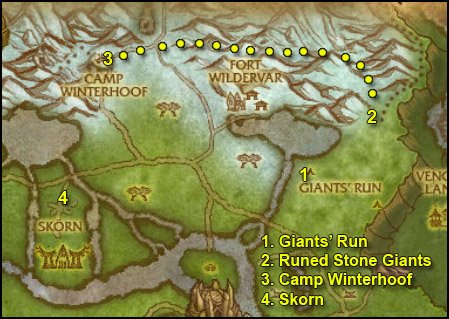
1. Ride east to the other side of the river, until you reach Giant’s Run (67,24).

Kill Every Iron Rune Stonecaller / Binder on your way, they drop the Book of Runes Chapters we need. Keep killing them until you’ve got Chapter 1, 2 & 3.

a70image64.jpg Then right-click one of the chapters to combine them together, you’ll get the Book of Runes.

2. Now let’s find Runed Stone Giants. They spawn at various stone circles in Giant’s Run.
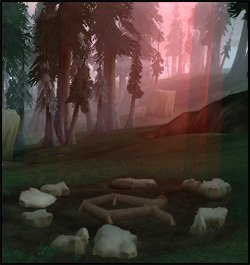
a70image65.jpg

Then they take a walk towards the snowy hills to the north, and they despawn there. It’s easiest to wait for them at the line where the snow starts (72,16).

They’re elite and hit really hard, but can be kited and stunned. Melee classes will probably have troubles to solo them, so they should try to find a group. You really must try hard to finish that quest, because it has several follow ups.

a70image66.jpg Whenever you kill a Runed Stone Giant, loot it, target its corpse and right-click the Runeseeking Pick.

Once you have 4 Runed Stone Giant Corpse Analyzed, move on to the next step.

3. Ride back to Camp Winterhoof, turn in:

  • [71] Mimicking Nature’s Call
  • [71] The Book of Runes, get [71] Mastering the Runes
  • [72] March of the Giants, get [72] The Lodestone

Get [71] Skorn Must Fall! from Chieftain Ashtotem.

4. Ride southwest to Skorn (44,26).

hb71img11.jpg Once you’re in Skorn, right-click the Winterhoof Emblem from your inventory.

A Winterhoof Brave will spawn. Turn in [71] Skorn Must Fall! and get the 3 quests he has:

  • [71] Towers of Certain Doom
  • [71] Gruesome, But Necessary
  • [71] Burn Skorn, Burn!

Go inside Skorn, kill things on your way.

a71image6.jpg Whenever you kill a Vrykul, loot it and then use The Brave’s Machete on their corpse.
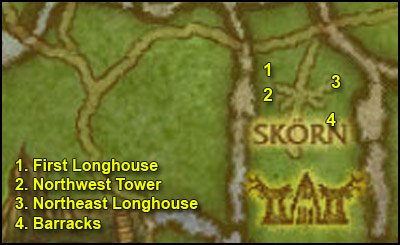
h71circuit9.jpg

1. Go a little southwest to the first longhouse on your right (44,28 ).

a71image7.jpg Go inside the longhouse and right-click the Brave’s Torch.

2. Just south of this you should see a tower, don’t get too close to it or the mages up there will shoot you. You just need to be 90 yards close.

a71image8.jpg Use the Brave’s Flare.

If you’re close enough, you should get the following quest update: “Northwest Tower Targeted“.

3. Go east to the opposite end of the village, where you’ll find the Northeast Longhouse (46,28 ). Go inside and use the Torch.

4. Go a little south and you’ll find the Barracks (46,30). Go inside and use the Torch.
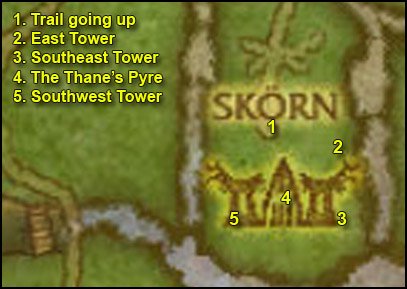
h71circuit10.jpg

1. Go southwest and follow the trail going up. At the intersection go southeast.

2. A little further east you’ll find the East Tower (46,33). Use the Flare.

3. Go a little further south and you’ll find the Southeast Tower (47,36) Use the Flare.

4. Keep following the trail further south and then take a right turn, you’ll soon find The Thane’s Pyre (45,35).
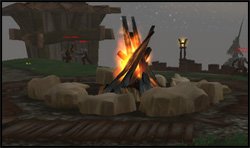
a71image9.jpg

At this point, you should have found a Vrykul Scroll of Ascension from one of the Vrykuls you killed. If not, kill some more Vrykul until it drops.

a71image10.jpg Right-click the Vrykull Scroll of Ascension and get the quest [72] Stop the Ascension!

Stand next to the pyre, right-click the Vrykull Scroll of Ascension and kill Halfdan the ice-Hearted.

5. Go southwest, take a right turn and you’ll find the Southwestern Tower (43,36). Use the Brave’s Flare.

Now clear the way out while finishing [71] Gruesome, But Necessary.

Once you’re back at Skorn’s entrance, use your Winterhoof Emblem to summon the Brave (not needed if he’s still with you).

Turn in:

  • [71] Towers of Certain Doom
  • [71] Gruesome, But Necessary
  • [71] Burn Skorn, Burn!

Get the follow up [72] The Conqueror of Skorn!.
h71circuit11.jpg

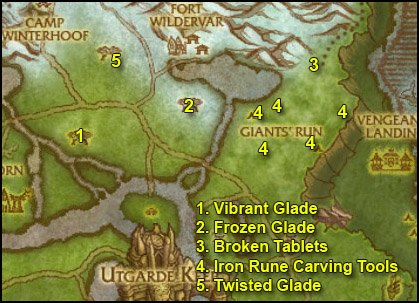
1. Go east to the Vibrant Glade (51,26). We have 2 objectives to complete here:

  • Kill 8 Scarlet Ivy
  • a70image70.jpg Beat down a Chill Nymph below 30% health then use Lurielle’s Pendant. Repeat 7 times.

2. Ride east/northeast back to the Frozen Glade (62,23). Turn in:

  • [71] The Fallen Sisters
  • [71] Wild Vines

Get the two follow ups:

  • [71] Spawn of the Twisted Glade
  • [71] Seeds of the Blacksouled Keepers

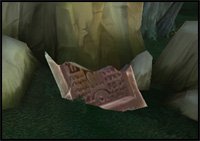
3. Ride east and then northeast back to the spot where we fought Runed Stone Giants. A few steps south of the snow line you should see a Broken Tablet (72,17).
a70image67.jpg

a70image68.jpg Right-click the Rune Sample from your inventory while being close to the tablet.

Watch the script and you should get a quest complete message.

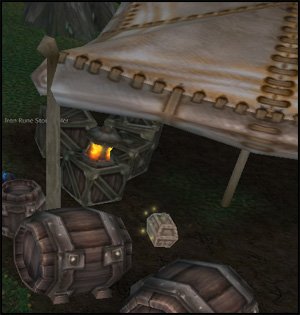
4. Go south back to Giant’s Run and look for Iron Rune Carving Tools.
a70image69.jpg

They spawn randomly under one of the 5 canopies in Giant’s Run (68,23)(69,23)(73,25)(71,29)(67,29). You might have to check them all.

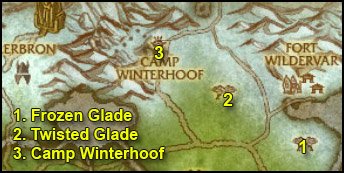
5. Ride west/northwest to the Twisted Glade (55,19). Two objectives here as well:

  • Kill 10 Thornvine Creepers
  • a70image71.jpg Kill 8 Spores and use the Enchanted Ice Core on their corpse
h71circuit11b.jpg

1. Go back to the Frozen Glade (62,23). Turn in:

  • [71] Spawn of the Twisted Glade
  • [71] Seeds of the Blacksouled Keepers

Get the follow up [71] Keeper Witherleaf.

2. Ride back to the Twisted Glade (yes, again). This time we’re looking for a blue/green’ish centaur called Keeper Witherleaf.
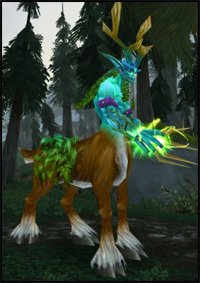
a70image75.jpg

Kill him.

3. Go back to Camp Winterhoof, turn in:

  • [71] Mastering the Runes, get [71] The Rune of Command
  • [72] The Lodestone, get [72] Demolishing Megalith
  • [72] Stop the Ascension!
  • [72] The Conqueror of Skorn!

New quests should be available, get them all:

  • [71] Dealing With Gjalerbron
  • [71] Of Keys and Cage
  • [71] Find Sage Mistwalker

Sell junk, repair and re-stock food/drink.
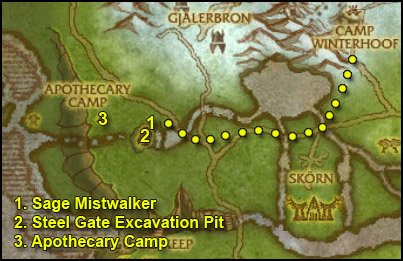
h71circuit12.jpg

1. Go southwest until you hit the road and then follow it west until Steel Gate (31,24). Turn in [71] Find Sage Mistwalker, get [71] The Artifacts of Steel Gate.
Also get [72] Rivenwood Captives from Longrunner Skycloud.

2. Go down to the excavation pit and gather 10 Steel Gate Artifacts.
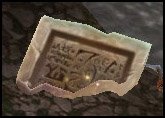
hb71img12.jpg

When you’re done, go back to Sage Mistwalker, turn in [71] The Artifacts of Steel Gate, get [71] The Cleansing.

3. Ride west to Apothecary Camp (26,24). Turn in [71] Keeping Watch on the Interlopers, get all the available quests from here:

  • [71] What’s in That Brew?
  • [71] Brains! Brains! Brains!
  • [71] And You Thought Murlocs Smelled Bad!

FPicon.jpg Get the new flight path.

Fly back to Camp Winterhoof.
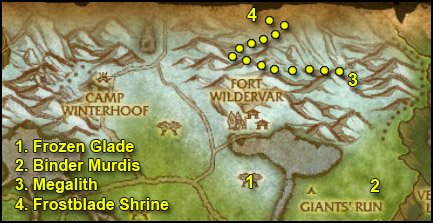
h71circuit13.jpg

1. Ride back to to the Frozen Glade and turn in [71] Keeper Witherleaf.

==Note== Now is your last chance to finish [71] Hasty Preparations.

2. Ride east to (72,25). There you should find Binder Murdis.
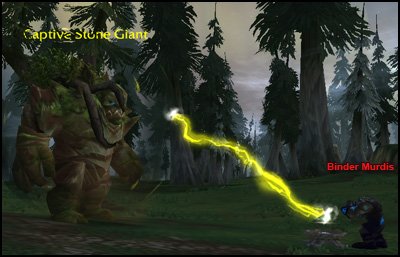
a70image76.jpg

Kill him.

Move a little northwest and you should find a Stone Giant (71,23). It looks just like a Runed Stoned Giant, besides it’s non-aggressive.

Now we’re going to solo [72] Demolishing Megalith, a 3-player quest. To do that, we’re going to use that Stone Giant as a pet. Read the end of this step AND step 3. to find out how:

a70image77.jpg Thanks to the Rune of Command we have from the other quest, we’ll make this stone giant our pet for 5 minutes.

3. After that, mount up, ride north towards the snowy hills while carefully avoiding any aggro. Go all the way up and at (70,12) you should see a snowy path going northwest (as shown on the map). Take this snowy path and you should find Megalith.

Then, let Megalith hit you once and let your stone giant pet tank for you. Give him time to build some aggro, wait till he’s down to 60% HP or so before you start attacking. With the help of the pet, any class should be able to solo megalith.

==Note== If you fail, you can go get a new stone giant pet and try again, every 5 minutes.

Good luck.

4. From there, go west through the mountains, staying as close as possible to the northern side of the mountain. If you do it properly, you should end up on a small frozen path at (60,8 ).

Take the small frozen path going up into the mountains. Follow this path all the way to the top (I warn you it’s long). There you’ll find the Frostblade Shrine.
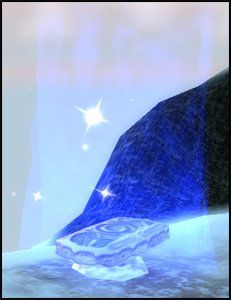
a70image72.jpg

Right-click it and defeat Your Inner Turmoil.

Mount up. You have a 3 minute levitation buff now, so aim for Camp Winterhoof (Hold your mouse right-click, press “M” to open your map, and then simply aim for Camp Winterhoof on the map by moving your mouse). Once you’re pointed towards Camp Winterhoof, just “fly” there.

In Camp Winterhoof, turn in:

  • [72] Demolishing Megalith
  • [71] The Rune of Command
  • [71] Hasty Preparations

Fly to Apothecary Camp.
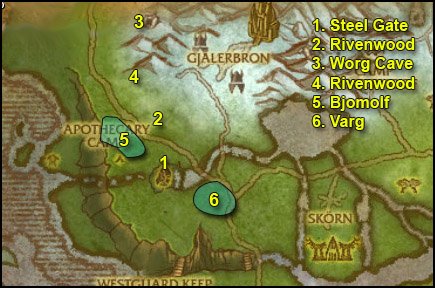
h71circuit14.jpg

1. Ride to Steel Gate, turn in [71] The Cleansing, get [71] In Worg’s Clothing.

2. Ride north/northwest until you enter Rivenwood (30,21). While going through Rivenwood, look for Riven Widow Cocoons and destroy them, this will sometimes free a Winterhoof Longrunner. Don’t finish this quest now though, we’ll go through this forest several times.

Keep going north while you do this, until you get out of the woods.

3. Once you’re out of the woods, mount up and ride north to a cave at (30,6).

a71image4.jpg Right-click the Worg Disguise from your inventory.

Go inside the cave, turn in [71] In Worg’s Clothing, get [71] Brother Betrayers.

4. Get out of the cave, mount up and ride back to Rivenwood. Open cocoons on your way, go southwest until you hit the road.

5. Go to the woods on the other side of the road southwest (27,21). Put on the Worg Disguise and look for a Bjomolf. He’s easy to find, he’s the only agressive worg here while you have the disguise on. He’s also bigger and has a different color. Kill him.

6. Ride east until you hit the road, follow the road south and cross the river, you’ll end up in some woods (34,29). Put on the Worg Disguise and find Varg, kill him.
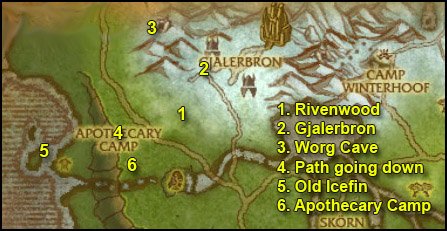
h71circuit15.jpg

1. Go back to Rivenwood, open cocoons until you finish [72] Rivenwood Captives.

2. Go north until you get out of the woods, go to Gjalerbron (35,15). Kill every Vrykul you see on your way and loot their keys. Open cages with those keys.
a71image16.jpg

If you’re lucky you might also get a Large Gjalerbron Cage Key, which you can use on the Large Gjalerbron Cage on the upper platform at (36,12). You can free up to 5 prisoners at once with this cage.

==Warning== A Sepulchral Overseer patrols this area, avoid him. It’s immune to cc and kinda hurts.

Stay here until you finish both quests and find the Gjalerbron Attack Plans.

a71image17.jpg Right-click them to start the quest [72] Gjalerbron Attack Plans.

3. Ride northwest and then north to the cave at (30,6). Put on the Worg Disguise, go inside the cave, turn in [71] Brother Betrayers, get [71] Eyes of the Eagle.

4. Ride southwest to (26,20), where you should see a narrow path going down towards the coast. Go down.

5. ==Note== Kill every murloc/necrotech/shade on your way until one drops a Scourge Device.

a71image13.jpg Right-click it to get the quest [71] It’s a Scourge Device.

Go west/southwest towards the isle at (20,22). There you should find Old Icefin. Get his quest [71] Trident of the Son.

6. Go back to that narrow path, get back on top of the bluffs and ride south to Apothecary Camp. Turn in [71] It’s a Scourge Device, get [71] Bring Down Those Shields.

Fly to Camp Winterhoof.

Turn in:

  • [72] Gjalerbron Attack Plans, get [72] The Frost Wyrm and its Master
  • [71] Of Keys and Cage, get [71] The Walking Dead
  • [71] Dealing With Gjalerbron, get [71] Necro Overlord Mezhen

Also get [71] Sleeping Giants from Ahota Whitefrost.

Sell junk, repair and re-stock food/drink.
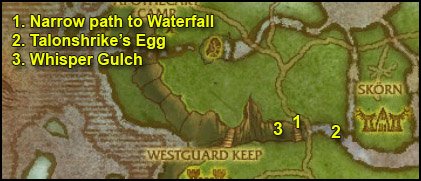
h71circuit16.jpg

1. Ride southwest to the bridge west of Skorn (39,36). There you should see a narrow path going down towards the waterfall east of the bridge.

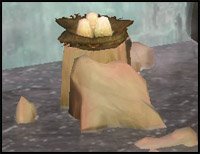
2. Take this path down and ride to the waterfall, you should find Talonshrike’s Egg there (41,38 ).
hb71img13.jpg

Right-click the egg, Talonshrike will swoop down on you and attack you. Kill him and loot the Eyes of the Eagle.

3. Mount up, get back on the narrow path we took to get down here, keep riding west and you should see another narrow path on the other side of the bridge, which will take you to Whisper Gulch (38,36)

In Whisper Gulch, there’s two things we need to do:

  • Find Dwarven Kegs and loot them.
    hb71img14.jpg
  • hb71img15.jpg Kill Deranged Explorers, loot them, target their corpse and use Grick’s Bonesaw on them.

Explore Whisper Gulch until you finish [71] What’s in That Brew? and [71] Brains! Brains! Brains!.
h71circuit17.jpg

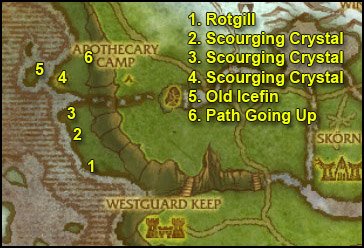
1. Jump down in the water, swim west until you can get back on land. Then ride northwest until the wrecked ship at (23,35). From there go north along the coast and look for Rotgill. He patrols in between the wrecked ship and the murloc camp north at (22,32).
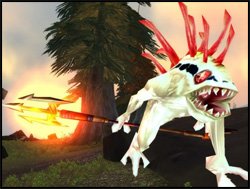
a71image15.jpg

Kill Rotgill and loot Rotgill’s Trident.

2. Follow the coast northwards and you should find a camp with a Scourging Crystal at (23,32).
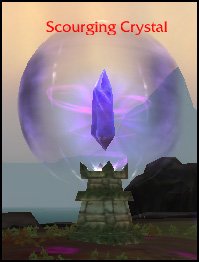
a71image14.jpg

Cleary the way to the Scouring Crystal.

a71image13.jpg Get close to it and use the Scourging Crystal Controller.

This will destroy the shield protecting the crystal, destroy it.

==Note== Pet classes, make sure you destroy the crystal yourself. If your pet does it, you won’t get the credit.

3. Go northwest to the next Scourging Crystal (22,29), destroy it.

4. Further northwest across the water you’ll find another Scourging Crystal (21,24), destroy it.

5. Go west/northwest to Old Icefin, turn in [71] Trident of the Son.

Go back on the coast and kill stuff until you finish [71] And You Thought Murlocs Smelled Bad!.

6. Go east to the narrow path taking you up the bluffs (24,22).

Ride back to Apothecary Camp.

Turn in:

  • [71] Brains! Brains! Brains!
  • [71] And You Thought Murlocs Smelled Bad!
  • [71] Bring Down Those Shields
  • [71] What’s in That Brew?
h71circuit18.jpg

1. Ride northeast to the cave at (30,6). Put on the Worg Disguise, go inside the cave, turn in [71] Eyes of the Eagle, get [71] Alpha Worg.

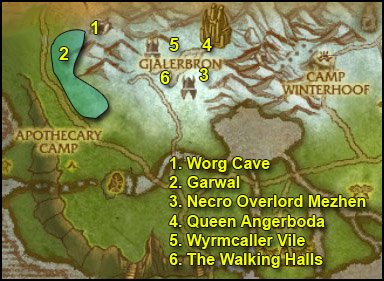
2. Go southwest and look for Garwal while being in the Worg Disguise. He patrols between (27,8 ) and (26,12) and (28,17). As shown on the map.
a71image18.jpg

Kill him.

3. Go to Gjalerbron. Go up to the higher plateau and go northeast until you reach another higher plateau. Take a right turn and go up the slope, you’ll end up on the rear right platform (38,12).

==Note== Kill Deathless Watchers and Putrid Wights on sight from now on.

Kill the 5 Necrolords guarding Necro Overlord Mezhen, they can be pulled solo. Then kill Necro Overlord Mezhen and loot Mezhen’s Writings.

a71img21.jpg Right-click them to start the quest [72] The Slumbering King.

4. Go to the big gate north of here. Enter the building and you should see a bunch of Necrolords trying to awake King Ymiron. Don’t worry, they can’t attack you. Clear the way around that platform and access it from the backdoor. There you should see Queen Angerboda. Kill her. You’ll see a little script involving Arthas.

5. Get out of this building and go west to the rear-west platform (37,8.).

==Warning== We’re about to attempt to solo an elite frost wyrm. It should be doable for every class with normal gear, provided you use everything you got.

Clear the platform and kill Wyrmcaller Vile last, loot the Wyrmcaller’s Horn.

a71img20.jpg Right-click it and eat/drink quickly while the frost wyrm flies to you.

Glacion is immune to all forms of CC, you can’t even interrupt his spells. He hits for about 1000 on cloth and sometimes casts a frost breath which does about 800 damage. If you use all your cooldowns and a pot you should be fine. It might not even been needed depending on your class/gear.

If you can’t solo this one, try to find a friend. If all fails, just abandon the quest and come back to do it later or at level 80. It has no follow up, so no big deal.

In any case, before you go to the next step, you must have killed 10 Deathless Watchers and 2 Putrid Wights. You know where to find them, on the side platforms. There are two other side platforms southwest of the two we just visited, should you run short on Deathless Watchers.

6. Go back to the entrance of Gjalerbron. This time go inside the building right at the entrance. This will take you down to The Walking Halls (35,13).

Go down, turn either left or right. You should have several Awakening Rods already, at least 5. If you have less than 5, you’ll have to kill a few more Necrolords, and there are plenty in these halls.

a71image19.jpg Use the Awakening Rod on a Dormant Vrykul.

Once you’ve awakened 5 Dormant Vrykuls and slain 4 Fearsome Horrors, get out of Gjalerbron.
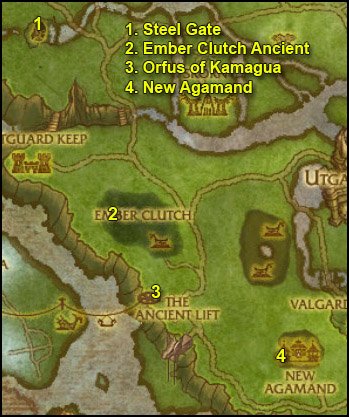
h71circuit19.jpg

1. Ride to Steel Gate (31,24). Turn in:

  • [71] Alpha Worg
  • [72] Rivenwood Captives

You should be level 71 by now.


Level 71


2. Ride south/southeast to the Ember Clutch (37,47). Find the Ember Clutch Ancient. It’s a big treant who patrols this area, he’s easy to find if you look for the yellow “!” on your minimap. Get his quest [71] Root Causes.

3. Ride further south/southeast to The Ancient Lift (40,60). Get [71] The Dead Rise! from Orfus of Kamagua.

4. Ride southeast to New Agamand (52,67).

FPicon.jpg Get the new flight path.

Turn in [71] New Agamand and get all the available quests from here:

  • [71] A Tailor-Made Formula
  • [72] Give it a Name
  • [71] Shield Hill
  • [71] Green Eggs and Whelps

Turn in [72] Give it a Name, do NOT get the follow up.

Sell junk, repair, re-stock food/drink.
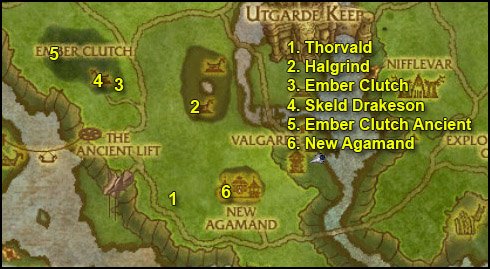
h71circuit20.jpg

1. Go west to Thorvald’s Camp (47,68 ). Kill Thorvald, loot the Dragonflayer Patriarch’s Blood.

Go back to New Agamand, turn in [71] A Tailor-Made Formula, get [71] Apply Heat and Stir.
hb71img16.jpg Right-click the Empty Apothecary Flask from your inventory while standing close to the Cauldron right next to the quest giver.

hb71img17.jpg Right-click the Flask of Vrykul Blood while standing close to the table on the other side of the quest giver.

Repeat these two steps until you obtain a Balanced Concoction.
Turn in [71] Apply Heat and Stir, get [71] Field Test.

2. Get out of New Agamand and ride north to Halgrind (51,58 ).

hb71img18.jpg Use the Plague Spray on 10 Vrykuls.

3. Ride west/northwest to Ember Clutch (42,55).

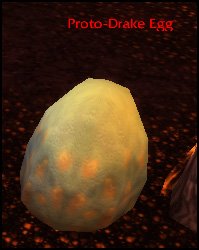
Look for Proto-Drake Eggs while in the area.
a70image34.jpg

hb71img19.jpg Target the egg, right-click Tillinghast’s Plague Canister.

This will spawn a Plagued Proto-Whelp, kill it and loot a Plagued Proto-Whelp Specimen. Repeat this step 10 times while doing the next steps.

4. In this area you should see a couple of buildings. Inside the southern one you’ll find Skeld Drakeson (42,53). Kill him.

Also kill 5 Dragonflayer Handlers.

5. Find the Ember Clutch Ancient (easy to spot with the minimap), turn in [71] Root Causes.

Now finish [71] Green Eggs and Whelps.

6. Go back to New Agamand. Turn in:

  • [71] Green Eggs and Whelps, get [71] Draconis Gastritis
  • [71] Field Test, get [71] Time for Cleanup
  • [71] Time for Cleanup, get [71] Parts for the Job

==Note== From now on, kill every kind of Shoveltusk you see on your way, until you’ve looted 6 Shoveltusk Ligament.
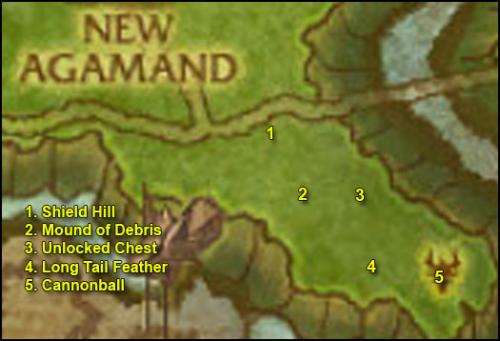
h71circuit21.jpg

1. Ride southeast to Shield Hill (57,74). Kill every Risen Vrykul Ancestor on your way while going through the next step, until you’ve looted 5 Ancient Vrykul Bones.

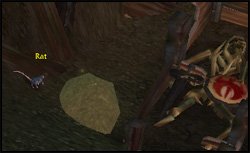
2. First go southeast and look for a Mound of Debris inside a small pit at (58,77).
a70image39.jpg

Right-click it and loot Fengir’s Clue.

3. Go about 100 yard east to another pit, look for an Unlocked Chest (60, 77).
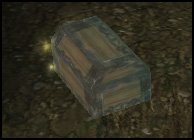
a70image40.jpg

Right-click it and loot Rodin’s Clue.

4. Go another 100 yard south/southeast to another pit. Look for a Long Tail Feather (60,80).
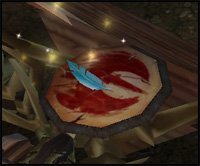
a70image41.jpg

Right-click it and loot Isuldof’s Clue.

5. Go about 150 yards east to a last pit, look for a Cannonball (62,80).
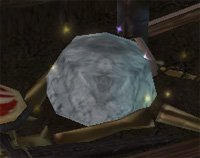
a70image42.jpg

Right-click it and loot Windan’s Clue.

Finish [71] Shield Hill before you get out of here.
h71circuit22.jpg

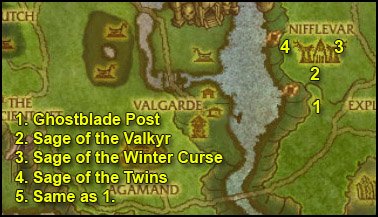
1. Cross the bridge east and then ride northeast to Ghostblade Post (67,61). Get the two quests:

  • [71] Against Nifflevar
  • [71] The Enemy’s Legacy

2. Go north to Nifflevar, kill everything on your way while following the next steps, until you complete [71] Against Nifflevar.

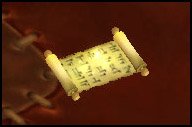
Go to the first building you encounter at (67,57). Inside you should find a scroll on the floor.
hb71img20.jpg

Right-click it and loot the Saga of the Valkyr.

3. Go north/northeast to the small building east of the bonfire (69,53). There you’ll find another scroll. Loot the Saga of the Winter Curse.

4. Go to the longhouse west of the bonfire (65,54). You’ll find the last scroll there. Loot the Saga of the Twins.

Finish killing what you need for [71] Against Nifflevar.

5. Go back to Ghostblade Post, turn in:

  • [71] Against Nifflevar
  • [71] The Enemy’s Legacy

==Optional== If you want to do the achievement Friend or Fowl?, there’s a spot with lots of Fjord Turkeys south of this camp (69.50, 65.00).
h71circuit23.jpg

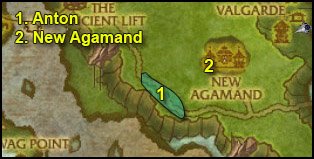
1. Go back across the bridge and follow the road west until you find Anton (47,70). Buy a Fresh Pound of Flesh from him.

By now you should have looted 6 Shoveltusk Ligaments, if you haven’t, go kill Shoveltusks until it’s done.

2. Go back to New Agamand. Turn in:

  • [71] Shield Hill
  • [71] Parts for the Job, get [71] Warning: Some Assembly Required

Go to the flightmaster and dismount.

Get the quest [72] To Venomspite!

This will fly you to Venomspite.

FPicon.jpg Get the new flight path.

In Venomspite, turn in [72] To Venomspite! and get [72] The Forsaken Blight and You: How Not to Die.

Also get [72] Funding the War Effort from Quartermaster Bartlett on your way out.
h71circuit24.jpg

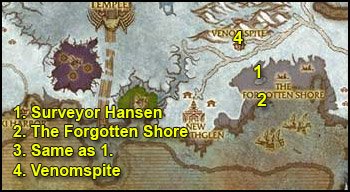
1. Go southeast to Surveyor Hansen (79,65). Get [72] Beachfront Property.

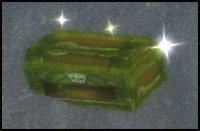
2. Go south to the Forgotten Shore (80,72). Kill ghosts in this area and also look for Forgotten Treasures.
hb71img21.jpg

Stay in this are until you finish:

  • [72] Beachfront Property
  • [72] The Forsaken Blight and You: How Not to Die
  • [72] Funding the War Effort

3. Ride back to Surveyor Hansen, turn in [72] Beachfront Property.

4. Ride to Venomspite, turn in:

  • [72] Funding the War Effort
  • [72] The Forsaken Blight and You: How Not to Die, get [72] Emerald Dragon Tears.

We won’t do [72] Emerald Dragon Tears in this chapter, but keep the quest. It will be used in my Dragonblight Guide.
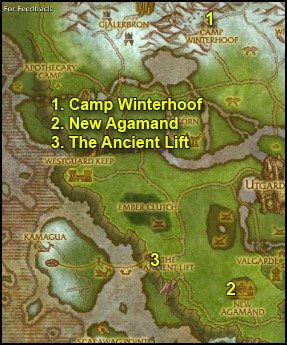
h71circuit25.jpg

1. Fly to Camp Winterhoof, turn in:

  • [72] The Frost Wyrm and its Master (if you did it)
  • [71] Sleeping Giants
  • [71] The Walking Dead
  • [71] Necro Overlord Mezhen
  • [72] The Slumbering King

2. Fly to New Agamand.

Sell junk, repair and re-stock food/drink.

3. Ride northwest to The Ancient Lift, turn in [71] The Dead Rise! and get [71] Elder Atuik and Kamagua.

Take the ancient lift (just stand on the Drakkar). This will take you to the Isle of Spears.
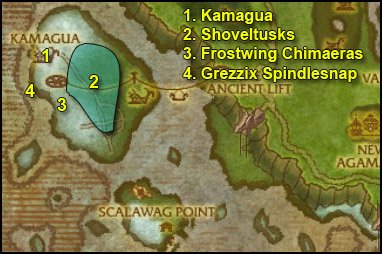
h71circuit26.jpg

1. Ride north to Kamagua (25,58 ).

FPicon.jpg Get the new flight path.

Turn in [71] Elder Atuik and Kamagua, get [71] Grezzix Spindlesnap.
Also get the other quest [71] Feeding the Survivors.

2. Go southeast to the colored area. There you’ll find Island Shoveltusks and Spearfang Worgs. You have to kill both, because if you don’t kill the worgs, they’ll killsteal the Shoveltusks from you. You can find Shoveltusks anywhere on the grass area of this isle, as colored on the map. You can also try to find the Shoveltuk Herd, they walk up and down the snow line:
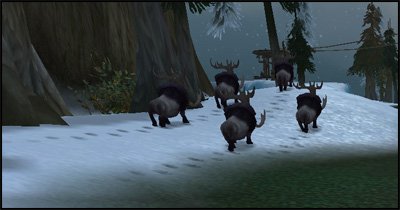
a70image43.jpg

Kill stuff in this area until you have 6 Island Shoveltusk Meat.

Go back to Kamagua, turn in [71] Feeding the Survivors, get [71] Arming Kamagua.

3. Go to the snow hills south of the village (27,65). Kill Frostwing Chimaeras until you get 3 Chimaera Horns.

==Note== If this spot is crowded, there’s another spot with Chimaeras northeast of Kamagua at (27,55).

Go back to Kamagua, turn in [71] Arming Kamagua, get [71] Avenge Iskaal.

4. Swim southwest to a small boat with Grezzix Spindlesnap (23,63). Turn in [71] Grezzix Spindlesnap, get [71] Street “Cred”.

Talk to Lou the Cabin Boy and click on the text. He will ferry you to Scalawag isle.

Once you’re there, go north and find “Silvermoon” Harry under a tent, turn in [71] Street “Cred”, get the follow up [71] “Scoodles”.

Get [71] Forgotten Treasure from Handsome Terry.
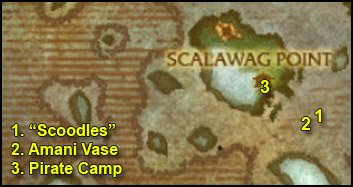
h71circuit27.jpg

1. Swim southeast to (38,84). There you’ll find a big orca named “Scoodles”.

Kill it and loot the Sin’dorei Scrying Crystal.

a70image44.jpg Right-click the Fish Bladder in your inventory.

This will make you breathe underwater, it has 3 charges too, so you can re-use it if needed.

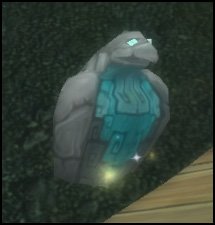
Now dive down and you should see 3 Wrecked Ships under you, go to the middle one (the only one who still got a mast). Go inside the ship and loot the Eagle Figurine (38,85):
a70image45.jpg

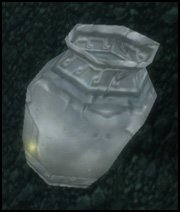
2. Swim to the other wrecked ship southwest of this one, go inside and loot the Amani Vase (37,85):
a70image46.jpg

3. Go back to the pirate camp. Turn in:

  • [71] Forgotten Treasure, get [71] The Fragrance of Money
  • [71] “Scoodles”, get the 4 follow ups:
    • [71] The Ancient Armor of the Kvaldir
    • [71] The Frozen Heart of Isuldof
    • [71] The Lost Shield of the Aesirites
    • [71] The Staff of Storm’s Fury

Get the quest [71] Gambling Debt from Taruk.

Go back to “Silvermoon” Harry. Talk to him, click on the text, beat him. After he gives up, talk to him again, click the text.

Go back to Taruk, turn in [71] Gambling Debt, get [71] Jack Likes His Drink.

Go inside the wooden building, talk to Olga, the Scalawag Wench. Click on the text and give her 1 Gold. Watch her drunk Jack Adams, once he passes out, right-click him and click on the text.

Go back to Taruk, turn in [71] Jack Likes His Drink, get [71] Dead Man’s Debt.

Go a little east and get [71] Swabbin’ Soap from Scuttle Frostprow (38,80)
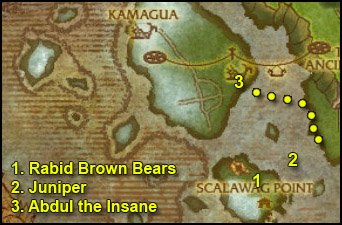
h71circuit28.jpg

1. Follow the little path north, it will take you to a plateau with lots of Rabid Brown Bears (34,78 ). Kill them all until you have 4 Bear Musk (Drop rate is ~40%)

2. Swim northeast to a little isle with a ghost called Juniper on it (38,75). Wait for the boat there and get on it when it comes.

On the boat, turn in [71] The Lost Shield of the Aesirites, get [71] Mutiny on the Mercy.

Go down in the Ship’s Hold, kill 5 Mutinous Sea Dog and loot 5 Barrel of Blasting Powder off them.

Go back to Captain Ellis, turn in [71] Mutiny on the Mercy, get [71] Sorlof’s Booty.

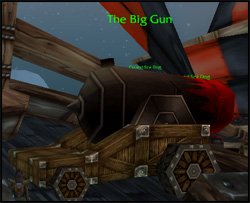
Go to the other side of the ship where you should see The Big Gun.
a70image47.jpg

Wait for the ship to engage Sorlof and when it does, right-click The Big Gun repeatedly until Sorlof dies. Jump off the ship and loot Sorlof’s Booty.
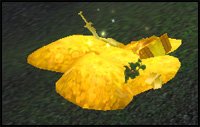
a70image48.jpg

3. Swim north/northwest towards the ship docked on the southeastern side of the Isle of Spears (35,65).

==WARNING== Before you get close to the ship, read the next paragraph.

There’s a tough elite called Abdul the Insane on the ship, he’s immune to cc. You just have to avoid him, wait for him to go to the top deck and go down in the ship’s hold, where you’ll find The Staff of Storm’s Fury.
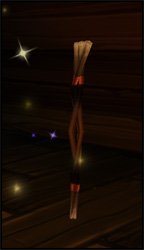
a70image49.jpg

Loot it.

Get out of the ship, run away from Abdul if he jumps you.

a70image50.jpg Right-click the Horn of Kamagua. This will summon a tuskarr to help you kill those pirates.

Kill 8 Crazed Northsea Slaver.
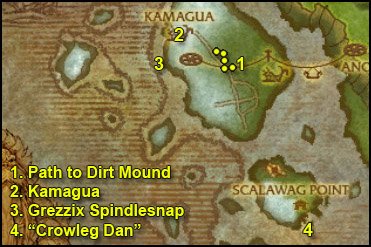
h71circuit29.jpg

1. Go northwest and find the way up a plateau at (29,61), then cross the bridge east to the next plateau. On that plateau you should find a Dirt Mound.

Get full HP/mana before you right-click it, cause you’ll get attacked by 3 ghost pirates when you do.

When ready, righ-click the Dirt Mound, kill Black Conrad’s Ghost and loot Black Conrad’s Treasure.

2. Ride back to Kamagua, turn in [71] Avenge Iskaal.
A new quest should be up in the village, get [72] Travel to Moa’ki Harbor.

Sell junk, repair, re-stock food/drink.

3. Go southwest to Grezzix Spindlesnap (23,63) and once again talk to Lou the Cabin Boy and click on the text.

Back at Scalawag Point, turn in:

  • [71] Dead Man’s Debt
  • [71] The Fragrance of Money, get [71] A Traitor Among Us
  • [71] A Traitor Among Us at Zeh’gehn, get [71] Zeh’gehn Sez
  • [71] Zeh’gehn Sez at Handsome Terry, get [71] A Carver and a Croaker

Look around for a Scalawag Frog and right-click it.
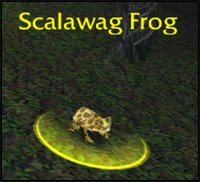
a70image51.jpg

Go to “Silvermoon” Harry and buy a Shiny Knife.

Turn in [71] A Carver and a Croaker, get the follow up [71] “Crowleg” Dan

4. Go to the docked ship just south of here, you’ll find “Crowleg” Dan on the top deck (36,83). Talk to him and kill him.

Go back to Handsome Terry and turn in [71] “Crowleg” Dan, get [71] Meet Number Two.

Go to the top of the wooden building, turn in [71] Meet Number Two, get [71] The Jig is Up.
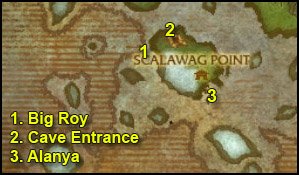
h71circuit30.jpg

1. Follow the path north and then west to the other side of the isle. There in the water you should see Big Roy. Kill it and loot Big Roy’s Blubber.

2. Go northeast and you should find a cave entrance (33,75).

[71] The Jig is Up, one of the two quests we’ll do in this cave, can be easily soloed by classes who can kite (like mages, warlock, hunter). It can also be soloed by other classes with cooldowns/pots, depending on your gear and talent spec. It requires you to beat “Mad” Jonah Sterling down to 30% and then to kill Hozzer, a huge bear. They are both elite and hit kinda hard, but they can be slowed, stunned, feared. If you can’t solo it, try to find help. The rewards for this quest are:

Sailor’s Knotted Charm
First Mate’s Pocket Watch
Strike of the Seas

Don’t forget to loot Jonah Sterling’s Spyglass from Hozzer after you kill it.

If you can’t find help for this quest, just save it for later or abandon it, as you prefer. There’s no follow up.

We still have another quest to do in this cave, and it’s doable even if you can’t kill “Mad” Jonah Sterling.

Inside the cave, you just have to hug the left wall and you can go past “Mad” Jonah without aggroing him, don’t worry about Hozzer either, he’s sleeping, you can run past him and go to the end of the cave, where you’ll find The Frozen Heart of Isuldof.
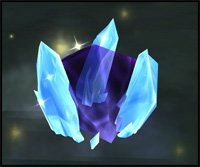
a70image52.jpg

Loot it and get out of the cave.

Ride back to Scalawag Point. Turn in [71] The Jig is Up if you did it.

3. Go south to Alanya (36,82). She stands on the docks next to the flying machine. Talk to her and click on the text.

This will fly you to a small isle with a ghost ship. Go down in the ship’s hold and loot The Ancient Armor of the Kvaldir.
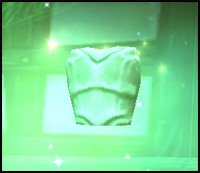
a70image53.jpg

Once you got it, go back to the flying machine fly back to Scalawag Point.
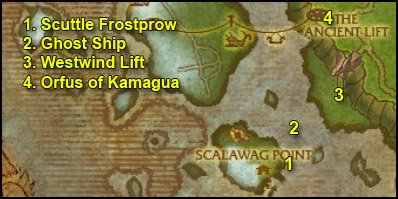
h71circuit31.jpg

1. Go east to Scuttle Frostprow, turn in [71] Swabbin’ Soap.

2. Go northeast, swim to the small isle and wait for the ghost ship to come. Then turn in [71] Sorlof’s Booty, get the follow up [71] The Shield of the Aesirites and get off the ship.

3. Swim northeast to Sorlof’s Strand, mount up and ride further northeast to the Westwind Lift (42,68 ). Take the lift.

4. Once up top, ride northwest to the Ancient Lift (40,60). Turn in the 4 quests:

  • [71] The Ancient Armor of the Kvaldir
  • [71] The Frozen Heart of Isuldof
  • [71] The Lost Shield of the Aesirites
  • [71] The Staff of Storm’s Fury

Get the follow up [71] A Return to Resting
h71circuit32.jpg

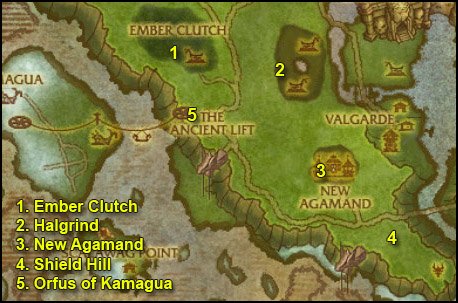
1. Ride north to Ember Clutch.

hb71img22.jpg Right-click Tillinghast’s Plagued Meat.

Proto-Drake will fly down and eat it and you should get a quest complete message shortly after.

2. Go east to Halgrind.

hb71img23.jpg Right-click the Abomination Assembly Kit.

You’ll take control of an abomination. Use it to gather a bunch of Vrykuls (use Ability #2 everytime it’s up to ensure that they keep chasing you). Once you have a decent bunch (at least 5+), use Ability #1 to exterminate them.

Re-summon your abomination and repeat until you have exterminated 20 Plagued Vrykul.

3. Go south to New Agamand. Turn in:

  • [71] Draconis Gastritis
  • [71] Warning: Some Assembly Required

4. Go southeast to Shield Hill (58,77).

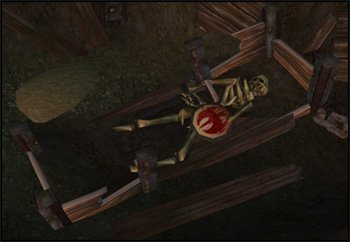
Visit the four ghosts we visited earlier . Besides this time, you have to stand next to their skeleton.
a70image54.jpg

a70image55.jpg And right-click the Bundle of Vrykul Artifacts.

Do this on at the 4 skeletons to complete [71] A Return to Resting.

5. When done, go back to The Ancient Lift, turn in [71] A Return to Resting, get [71] Return to Atuik.

Take lift down and ride to Kamagua, turn in [71] Return to Atuik.

A daily quest should be available now, we won’t do it in this guide because it can take a little too long to complete for what it gives. Feel free to do it if you aren’t in a hurry though: [71] The Way to His Heart…

In Kamagua, go to the docks and board the turtle for Moa’ki Harbor.

In Moa’ki Harbor, turn in [72] Travel to Moa’ki Harbor.

FPicon.jpg Get the new flight path.

Take a turtle ride to Unu’pe, Borean Tundra.

FPicon.jpg Get the new flight path in Unu’pe.

h71circuit33.jpg

Mount up ride to Warsong Hold.

It’s done with this chapter. Don’t worry if you are not level 72 yet, you are not quite supposed to be there if you went without any rested bonus and without doing instances. Time to explore the Borean Tundra.
WoW TBC Classic Alliance 60-70 Leveling Guide: 69-70 Shadowmoon Valley

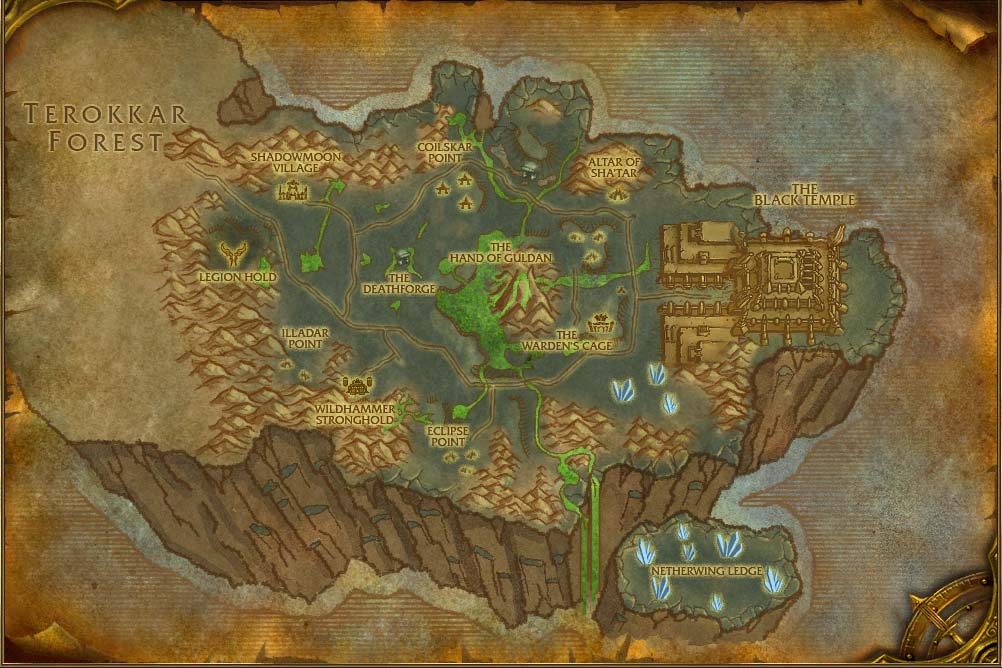
Wildhammer Stronghld

01) NOTE: You should be fairly close to level 70 now, and may hit it at any point in this guide (if you haven’t already). But for the sake of it, I will still continue on and list all the steps to take for Shadowmoon Valley.
02) After entering Shadowmoon Valley go SE to Wildhammer Stronghold and at the entrance to the town accept “Besieged!” 39.54.
03) Just inside the town by the steam roller accept “The Sketh’lon Wreckage” 39.54.
04) Across the path (from the Wanted Poster) “Wanted: Uvuros, Scourge of Shadowmoon” 30.31.
05) Get the Flight Path in the middle of the town from the Gryphon Master /target 38.55.
06) Near you in town at the flying mount stables turn in “Building a Better Gryphon” 38.56.  
NOTE: When you hit 70, you can buy flying mounts from this NPC (along with the Riding Trainer /target next to you), which will allow you to do some of the quests listed in this guide throughout Shadowmoon Valley and many others throughout Outland. You should generally get your flying mount ASAP once after hitting 70.
07) Find Zorus the Judicator /target (he patrols around the middle of the town), from him accept “A Ghost in the Machine“.
08) West in town on the bleachers, accept “Spleendid!” 37.55.
09) South in town 36.57 accept “Put On Yer Kneepads…“, “The Path of Conquest” and (next to you) “The Hand of Gul’dan“.
10) SE in town go in the Inn and talk to the Innkeeper /target 37.58 to make Wildhammer Stronghold your new home.

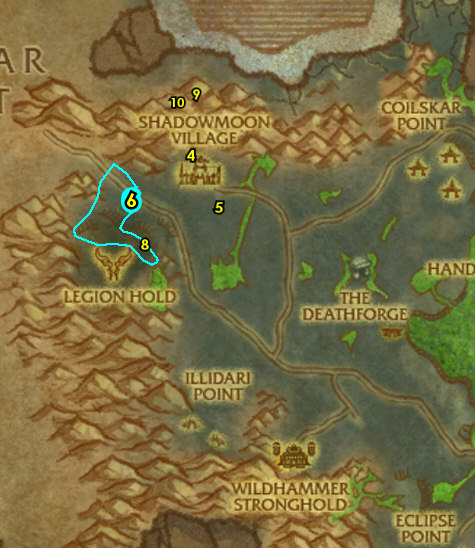
01) Just north of Wildhammer Stronghold around 40.53 do “Besieged!“: kill 10 Infernal Attackers.
02) At the entrance to Wildhammer Stronghold turn in “Besieged!” 39.54, accept “To Legion Hold“.
03) Go NW to Legion Hold, up on a ledge to the exact coords of 23.6, 36.9 do “To Legion Hold“: use the Box o’ Tricks quest item at the small purple infernal image.
04) Hearth, then go to the entrance to Wildhammer Stronghold and turn in “To Legion Hold” (39.54, #2 on map), accept “Setting Up the Bomb“.
05) Go NW to The Fetid Pool and do “Setting Up the Bomb“: pick up the Fel Reaver Power Core underneath the green water 26.41. See next step for the armor:
06) NW at Legion Hold loot the Fel Reaver Armor Plating 22.36.
07) While at Legion Hold kill/loot an Overseer Ripsaw /target and an item will drop which starts “Illidari-Bane Shard“, accept it.
08) Hearth (or go back SE) to the entrance of Wildhammer Stronghold and turn in “Setting Up the Bomb” (39.54, #2 on map), accept “Blast the Infernals!“.
09) Inside Wildhammer Stronghold (at the forge) turn in “Illidari-Bane Shard” 37.55, “Capture the Weapons“.
10) Go NW to Legion Hold and do “Blast the Infernals!“: use the Fel Bomb quest item on the green circle 23.40.
11) GROUP: 2+ Players (or soloable): Around Legion Hold do “Capture the Weapons“: kill/loot the two Elite mobs at Legion Hold. Morgroron /target patrols around the immediate area there (near the green circle), he is a huge dragon with a green sword. And Makazradon /target patrols just north around 23.34, he is a huge dragon with a spear.  
NOTE: If you cannot solo these or find help, then it can be skipped.
12) Hearth (or go back SE) to the entrance to Wildhammer Stronghold and turn in “Blast the Infernals!” (39.54, #2 on map), accept “The Deathforge“.
13) Inside Wildhammer Stronghold (at the forge, 37.55, #9 on map) turn in (if you did it) “Capture the Weapons“.  
NOTE: The follow up quest “The Hermit Smith” will not be covered in my guide as it requires a lot of running around at various places. The final quest in this chain leads to some decent demon fighting weapons to obtain if you would like to do this on your own.

01) Go north to Sketh’lon Wreckage around 38.32 and do “The Sketh’lon Wreckage“: keep kill/looting the Dark Conclave arakkoa mobs until you get the 3 pages (they can drop randomly from any arakkoa mob).
02) Do the following 3 quests together around western Shadowmoon Valley, mostly around the green lake 31.39:
03) “Put On Yer Kneepads…“: kill 20 wildlife. Focus mostly on the Felboar and Vilewing Chimaera 34.40.
04) “Spleendid!“: kill/loot Felfire Diemetradons (mobs around the green water, around 31.39.
05) “A Ghost in the Machine“: pick up 15 Ever-burning Ash from the ground. There is a lot around the green lake 31.39. These are mostly around #4 on map.
06) Back at Wildhammer Stronghold, just in the entrance by the steam roller, turn in “The Sketh’lon Wreckage” 39.54, accept “Find the Deserter“.
07) Find Zorus the Judicator /target (he patrols around town), from him turn in “A Ghost in the Machine“, accept “Harbingers of Shadowmoon“.
08) West in town on the bleachers, turn in “Spleendid!” 37.55 , accept “The Second Course…“.
09) South in town 36.57 turn in “Put On Yer Kneepads…“.
10) In the immediate area around Wildhammer Stronghold do “Harbingers of Shadowmoon“: use the Spectrecles quest item (it acts as a Head armor), then kill 12 Shadowmoon Harbingers /target.  
TIP: You can spot them easily by the yellow mist coming off of them.
11) Find Zorus the Judicator /target (he patrols around town), from him turn in “Harbingers of Shadowmoon“, accept “Teron Gorefiend – Lore and Legend“.
12) Go north to the main path and find Parshah /target (he patrols north and south on the path, around 35.39 then turn in “Find the Deserter“, accept “Asghar’s Totem“.
13) Go NE to Sketh’lon Wreckage and do “Asghar’s Totem“: kill/loot Asghar /target. This arakkoa patrols around the area around 40.29.
14) Back SW on the main path, find Parshah /target (around 35.39, #12 on map) and turn in “Asghar’s Totem“, accept “The Rod of Lianthe“.

01) Go east to Deathforge Tower and turn in “The Deathforge” (at the top of the building 40.41), accept “Minions of the Shadow Council“.
02) In the immediate area around The Deathforge do “Minions of the Shadow Council“: kill 10 DeathforgeGuardians and 5 Summoners.
03) Back on top of the building at Deathforge Tower turn in “Minions of the Shadow Council” (40.41, #1 on map). Accept “The Fate of Flanis” and “The Summoning Chamber“.
04) Go down the path and enter The Deathforge (entrance at 40.38).
05) Do “The Fate of Flanis“: grind your way deep into The Deathforge and talk to Flanis Swiftwing’s /target corpse on the ground 35.40.
06) Do “The Summoning Chamber“: first you need to obtain an Elemental Displacer, which you should have already done so by now from the Deathforge mobs in The Deathforge, it should be in your backpack. Use the Elemental Displacer item down at the Summoning Ritual (the green water down in The Deathforge, 38.39, then kill the Infernal Oversoul that spawns.
07) Leave The Deathforge then turn in (on top of the building 40.41, #1 on map) “The Fate of Flanis” and “The Summoning Chamber“. Accept “Bring Down the Warbringer!“.
08) Go down back inside The Deathforge (entrance at 40.38, #4 on map).
09) Inside The Deathforge click on the Heavy Iron Portcullis (gate, 37.43) to open it, then..
10) At the end of the room do “Bring Down the Warbringer!“: kill/loot Warbringer Razuun /target 39.46.
11) Leave The Deathforge, then go SE to The Altar of Damnation and turn in “The Hand of Gul’dan” 42.45, accept “Enraged Spirits of Fire and Earth“.
12) Just to the east at The Fel Pits around 45.45 do “Enraged Spirits of Fire and Earth“: use the Totem of Spirits quest item near 8 Enraged Earth Spirits and 8 Enraged Fire Spirit, then kill these mobs to collect their spirits.
13) Back west at The Altar of Damnation turn in “Enraged Spirits of Fire and Earth” (42.45, #11 on map), accept “Enraged Spirits of Water“.
14) Go SE to Eclipse Point and do “The Rod of Lianthe“: kill/loot the Eclipsion blood elf mobs until the Lianthe’s Key drops, then open Lianthe’s Strongbox 48.72.

SCRYER ONLY – Sanctum of the Stars

01) NOTE: If you are not focusing on Scryers then skip to the next section below! The Aldor town (Altar of Shatar) is NE 62.30, which is not covered in this guide yet, but they have a lot of the same quests, which you can use the Scryer Only stuff as a reference for them as well.
02) Get the Flight Path at the Flight Master /target 56.58.
03) Just outside of the Inn’s entrance you can turn in any Sunfury Signets you may have 56.59.
04) In the Inn accept “Tablets of Baa’ri” 56.60.
05) Inside the other building accept “Karabor Training Grounds” 56.58.
06) Just west up on the hill accept “The Ashtongue Broken” 55.58.

LVL 70 ONLY – Netherdrake

01) NOTE: This section requires that you are level 70 and step #5 requires you to have a flying mount. If you do not meet these requirements then skip to the next section below. Doing these quests will help you become Neutral with Netherdrake allowing you to get the Netherdrake Epic Flying Mount. You can always do this section later if you like.
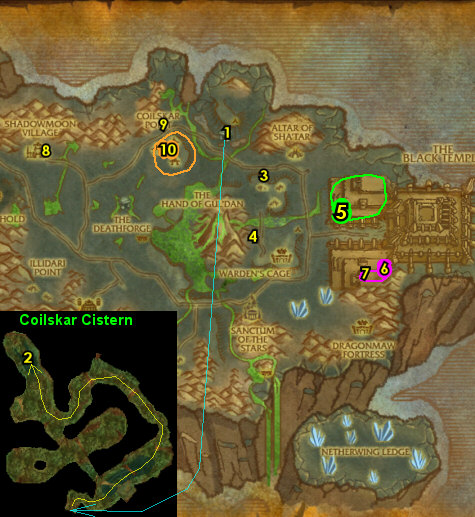
02) East at Netherwing Fields accept from Mordenai /target (he patrols around 63.60) “Kindness“.
03) In the immediate area around Netherwing Fields do “Kindness“: kill/loot Rocknail Flayers for their carcasses, then use the carcasses near the Mature Netherwing Drakes (flying in the air).
04) At Netherwing Fields find Mordenai /target (he patrols around 63.60, #2 on map) and turn in “Kindness“, accept “Seek Out Neltharaku“.
05) At Netherwing Fields find Neltharaku /target flying up in the air (see his patrol path on map) and turn in (you need a flying mount) “Seek Out Neltharaku“, accept “Neltharaku’s Tale“.
06) Do “Neltharaku’s Tale“: simply talk to Neltharaku. Once done turn it in and accept “Infiltrating Dragonmaw Fortress“.
07) Go SE to Dragonmaw Fortress around 67.61 and do “Infiltrating Dragonmaw Fortress“: kill 15 Dragonmaw orcs (any type).
08) At Netherwing Fields find Neltharaku /target flying up in the air (see his patrol path on map, #5 on map) and turn in “Infiltrating Dragonmaw Fortress“, accept “To Netherwing Ledge!“.
09) Go SE to Netherwing Ledge around 70.81 and do “To Netherwing Ledge!“: loot Nethervine Crystals. These are mostly found around the outer edges of the island.
10) Back at Netherwing Fields find Neltharaku /target flying up in the air (#5 on map) and turn in “To Netherwing Ledge!“, accept “The Force of Neltharaku“.
11) Go SE to Dragonmaw Fortress (around 67.61, #7 on map) and do “The Force of Neltharaku“: use the Enchanted Nethervine Crystal quest item on the Enslaved Netherwing Drakes /target.  
NOTE:  The quest item has a fairly long range of about 35 yards.
12) Back at Netherwing Fields find Neltharaku /target flying up in the air (#5 on map) and turn in “The Force of Neltharaku“, accept “Karynaku
13) GROUP: 3+ Players: If you can find a group you can go up into Dragonmaw Fortress and from Karynaku turn in “Karynaku” 70.61. Accept “Zuluhed the Whacked“.
14) GROUP: 3+ Players: In the immediate area do “Zuluhed the Whacked“: kill/loot Zuluhed the Whacked (lvl 72 Elite, 70.62). He drops a key that is used on Karynaku’sZuluhed’s Chains, then turn in “Zuluhed the Whacked“, accept “Ally of the Netherwing“.
15) Talk to Karynaku to send you to Mordenai /target (he patrols around 63.60, #2 on map) and turn in “Ally of the Netherwing“.

Shadowmoon Valley

01) If you do not have a flying mount then go to Netherwing Pass (entrance at 62.63.
02) Go to The Altar of Shadows 58.71 and turn in “Teron Gorefiend – Lore and Legend“.  Accept “Divination: Gorefiend’s Cloak“, “Divination: Gorefiend’s Truncheon” and “Divination: Gorefiend’s Armor“.

The Path of Conquest (Group)

01) GROUP: 2+ Players (or soloable): SW at The Path of Conquest do “The Path of Conquest“: simply go to the coords of 52.64 to get it discovered, then use the Wildhammer Flare Gun quest item at a safe spot (anywhere in Shadowmoon Valley) to turn this in and accept “Breaching the Path“.
02) GROUP: 2+ Players (or soloable): At The Path of Conquest around 52.64 do “Breaching the Path“: kill the required amount of Eclipsion blood elf mobs. This is soloable but could take awhile.
03) At a safe spot anywhere in Shadowmoon Valley use your Wildhammer Flare Gun quest item to turn in “Breaching the Path“, accept “Blood Elf + Giant = ???“.
04) GROUP: 2+ Players: Back deeper in The Path of Conquest do “Blood Elf + Giant = ???“: kill Corok the Mighty /target (lvl 70 Elite teal colored rock giant) and Chancellor Bloodleaf /target (lvl 70 Elite female blood elf). Both these mobs patrols around the red wagon 53.70.
05) At a safe spot anywhere in Shadowmoon Valley use your Wildhammer Flare Gun quest item to turn in “Blood Elf + Giant = ???“, accept “Tabards of the Illidari“.
06) GROUP: 2+ Players: At The Path of Conquest do “Tabards of the Illidari“: kill/loot any of the blood elf mobs (#2 on map).
07) At a safe spot anywhere in Shadowmoon Valley use your Wildhammer Flare Gun quest item to turn in “Tabards of the Illidari“, accept “Dissension Amongst the Ranks…“.
08) GROUP: 2+ Players: Go SW to Eclipsion Fields around 43.72 and do “Dissension Amongst the Ranks…“: use Enchanted Illidari Tabard quest item (it acts as a Tabard) and then kill 5 Crazed Colossus.

Shadowmoon Valley

01) Do “Divination: Gorefiend’s Truncheon“: kill/loot the 4 Ghostrider of Karabors /target, they circle around the main path in Shadowmoon Valley counter-clockwise (see map), so to find them just go to the main path, and keep following the main path clockwise around until you get to them (they are 4 non-elite mobs on horses). And you need to wear the Spectrecles to see them!  They spawn at 62.32.
02) GROUP: 2+ Players: If you can find one or two other players, you can do “Wanted: Uvuros, Scourge of Shadowmoon“: kill/loot Uvuros (elite, 55.49).  
NOTE: He is nearly impossible to solo. If you can’t find a group, then skip it.
03) Go to Ruins of Baa’ri around 60.41 and do “The Second Course…“: kill/loot Greater Felfire Diemetradons in the green water until you get the gizzard.  
NOTE: If you run out of mobs, see map for other locations.
04) Go east a bit and do “Divination: Gorefiend’s Cloak“: kill/loot the Cleric of Karabors /target around 64.40 until one of them drops the cloak. You need to wear the Spectrecles to see them. Low drop rate.
05) SCRYER ONLY: Go just east to Ruins of Karabor (entrance at 67.47) and do “Karabor Training Grounds“: kill/loot Demon Hunter Supplicants or Demon Hunter Initiates.  
NOTE: The Initiates have a much higher % drop rate.
06) SCRYER ONLY: Go NW to Ruins of Baa’ri around 59.37 and do “Tablets of Baa’ri” along with “The Ashtongue Broken“: kill/loot Ashtongue Workers or loot the green objects from the ground for the 12 fragments. And kill the required amount of Ashtongue mobs.
07) Go NW and do “Enraged Spirits of Water“: use the Totem of Spirits quest item near Enraged Water Spirits around 50.25, then kill them to collect their spirit.

01) Go SW to the main path and find Parshah /target (he patrols north and south on the path, around 35.39) then turn in “The Rod of Lianthe“, accept “Sketh’lon Feathers“.
02) South at the entrance to Wildhammer Stronghold turn in “Bring Down the Warbringer!” 39.54 , accept “Gaining Access“.
03) Just inside the entrance of Wildhammer Stronghold turn in (if you did it) “Wanted: Uvuros, Scourge of Shadowmoon” 38.54.
04) In town on the bleachers, turn in “The Second Course…” 37.55 , accept “The Main Course!“.
05) South in town turn in (if you did it) “Dissension Amongst the Ranks…” 36.57.
06) Go SE to Sketh’lon Base Camp around 43.55 and do “Sketh’lon Feathers“: pick up 8 Sketh’lon Feathers from the ground.
07) Back NW at the main path, find Parshah /target (around 35.39, #1 on map) and turn in “Sketh’lon Feathers“, accept “Imbuing the Headpiece“.
08) East at The Altar of Damnation turn in “Enraged Spirits of Water” 42.45, accept “Enraged Spirits of Air“.
09) Do “Imbuing the Headpiece“: wear the Unfinished Headpiece quest item (acts as a Trinket), then use it at the Altar 43.45.
10) Back west at the main path, find Parshah /target (around 35.39, #1 on map) and turn in “Imbuing the Headpiece“, accept “Thwart the Dark Conclave“.
11) Go SE to Sketh’lon Base Camp around 41.60 and do “Thwart the Dark Conclave“: kill all the Dark Conclave Ritualists (the ones with the purple beams on the thing in the green water), then use the Staff of Parshah quest item close to the water.
12) Back west at the main path, find Parshah /target (around 35.39, #1 on map) and turn in “Thwart the Dark Conclave“.
13) NO FLYING MOUNT?: If you do not have a flying mount, go to Netherwing Pass (entrance at 62.63).
14) At The Altar of Shadows 58.71 turn in “Divination: Gorefiend’s Cloak” and “Divination: Gorefiend’s Truncheon“.
15) In the immediate area do “Enraged Spirits of Air“: use the Totem of Spirits quest item near Enraged Air Spirits, then kill them to collect their spirit. You can find more of these mobs throughout Netherwing Pass.
16) SCRYER ONLY: Go to Sanctum of the Stars and up on a hill turn in “The Ashtongue Broken” 55.58, accept “The Great Retribution“.
17) SCRYER ONLY: Down in the building turn in “Karabor Training Grounds” 56.58, accept “A Necessary Distraction“.
18) SCRYER ONLY: In the other building/Inn turn in “Tablets of Baa’ri” 56.60, accept “Oronu the Elder“.
19) Go NW to The Altar of Damnation and turn in “Enraged Spirits of Air” (42.45, #4 on map). Accept “Oronok Torn-heart“.

01) Go west to Legion Hold around 24.32 and do “Gaining Access“: kill/loot the Mo’arg Weaponsmiths /target until you obtain the Legion Teleporter Control.  
NOTE: There are a few of them in the area.
02) Hearth (or go SE) to the entrance of Wildhammer Stronghold and turn in “Gaining Access” 39.54, accept “Invasion Point: Cataclysm“.
03) NW at Legion Hold, enter the green teleporter at 26.36. Once teleported, go down and turn in “Invasion Point: Cataclysm“, accept “The Art of Fel Reaver Maintenance“.
04) Go down and do “The Art of Fel Reaver Maintenance“: kill/loot Doctor Gutrick /target 39.20, then use his key to open/loot the strongbox right next to him.
05) Back up the ramp turn in “The Art of Fel Reaver Maintenance” 41.22, accept “The Fel and the Furious“.
06) Go half-way down and do “The Fel and the Furious“: use the Fel Reaver Control Console 41.22 to control a Fel Reaver, and use it to kill 60 Deathforged Infernals.  
NOTE: If you have a pet, you need to dismiss it first.
07) Go back up the ramp and turn in “The Fel and the Furious” (41.22, #5 on map), accept “News of Victory“.
08) Go through the green portal up the ramp 41.24.
09) Hearth (or go SE) to Wildhammer Stronghold and south in town go down in the building to turn in “News of Victory” 36.58 .

Oronok’s Farm

01) No Flying Mount?:  Go NE to the ramp (starting at 50.19).
02) Go up into Oronok’s Farm and turn in “Oronok Torn-heart” 54.23, accept “I Was A Lot Of Things…“.
03) Just NE at Shattered Plains around 54.16 do “I Was A Lot Of Things…“: use the Oronok’s Boar Whistle near Shadowmoon Tuber Mounds so that a Domesticated Felboar makes it lootable, then loot it.  
TIPS: Kill the Ravenous Flayers in the area so they don’t kill the boars. And don’t attack the boars yourself.
04) Back SW at Oronok’s Farm turn in “I Was A Lot Of Things…” (54.23, #2 on map), accept “A Lesson Learned“.
05) Back NE at Shattered Plains around 57.16 do “A Lesson Learned“: click on 10 Ravenous Flayer Eggs  
NOTE:  Watch out for the elite /target patrolling the area.
06) Back SW at Oronok’s Farm turn in “A Lesson Learned” (54.23, #2 on map), accept “The Cipher of Damnation – Truth and History “.
07) Do “The Cipher of Damnation – Truth and History “: simply talk to the quest giver. Once done turn in in. Then accept “Grom’tor, Son of Oronok“, “Ar’tor, Son of Oronok” and “Borak, Son of Oronok“.

Shadowmoon Valley

01) GROUP: 2+ Players (or soloable): Go into Coilskar Cistern (cave entrance at 53.25).  
NOTE: I easily soloed this escort as a lvl 70 Hunter.
02) GROUP: 2+ Players (or soloable): Work your way deep into the cave then accept and do the escort “Escape from Coilskar Cistern” 52.18: escort Earthmender Wilda /target out of the cave.
03) Go SE to Ruins of Baa’ri and do “Oronu the Elder“: kill/loot Oronu the Elder /target (up at 57.33).
04) Go south a bit at Ruins of Baa’ri and do “The Main Course!“: kill/loot Felspine the Greater /target 56.44.
05) SCRYER ONLY: Go east to Ata’mal Terrace (entrance at 67.41) and do “The Great Retribution“: kill the required amount of Shadowmoon orc mobs.
06) SCRYER ONLY: Go south to Ruins of Karabor (entrance at 67.47) and do “A Necessary Distraction“: kill/loot Sunfury Warlocks for a Scroll of Demonic Unbanishing, then use it at the next step:
07) SCRYER ONLY: Use the scroll on Azaloth /target 70.51.  NOTE:  You don’t have to kill him once freed, but he will attack anything including you so watch out.
08) Hearth to Wildhammer Stronghold and on the bleachers turn in “The Main Course!” 37.55.

Illidari Point

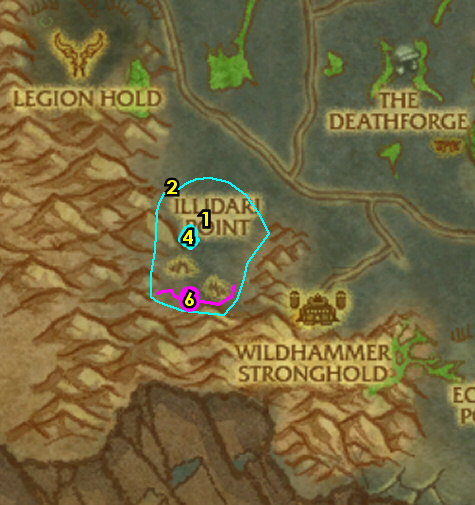
01) Go west to Illidari Point and at the purple circle turn in “Ar’tor, Son of Oronok” (30.50), accept “Demonic Crystal Prisons“.
02) Just NW in Illidari Point do “Demonic Crystal Prisons“: kill/loot Painmistress Gabrissa (big succubus demon, 28.48).
03) back SE at the purple circle turn in “Demonic Crystal Prisons” (30.50, #1 on map). Then next to you accept “Lohn’goron, Bow of the Torn-heart“.
04) In the immediate area around Illidari Point do “Lohn’goron, Bow of the Torn-heart“: kill/loot any of the demons until you get the Lohn’goron, Bow of the Torn-Heart.
05) Back at the purple circle turn in “Lohn’goron, Bow of the Torn-heart” (30.51, #1 on map), accept “The Cipher of Damnation – Ar’tor’s Charge“.
06) Do “The Cipher of Damnation – Ar’tor’s Charge“: lead the Spirit Hunter south into Illidari Point and then kill/loot Veneratus the Many /target around 29.57.  
NOTE: This can be soloable by clearing the mobs along the path first before doing the quest and healing the Spirit Hunter while doing this.
07) Back north at the purple circle turn in (if you did it) “The Cipher of Damnation – Ar’tor’s Charge” (30.51, #1 on map), accept “The Cipher of Damnation – The Second Fragment Recovered “.

01) Go east to The Altar of Damnation and turn in (if you did it) “Escape from Coilskar Cistern” 42.45.
02) Go SE next to the bridge turn in “Borak, Son of Oronok” 48.57, accept “Of Thistleheads and Eggs…“.
03) Just west at Sketh’lon Base Camp around 44.56 do “Of Thistleheads and Eggs…“: loot Rotten Arakkoa Eggs until you get an actual Rotten Arakkoa Egg.
04) SCRYER ONLY: Go east to Sanctum of the Stars and up on the hill turn in “The Great Retribution” 55.58.
05) SCRYER ONLY: Down in the building turn in “A Necessary Distraction” 56.58, accept “Altruis“.
06) SCRYER ONLY: In the other building/Inn turn in “Oronu the Elder” 56.60, “The Ashtongue Corruptors“.
07) GROUP 5 Players: I assume by now most players should be level 70 in this guide, if so you can get a 5 man group (when you can) to go SE to Netherwing Ledge. Your group will either need flying mounts or warlock summons to the island. Then do “Divination: Gorefiend’s Armor“: make sure your Spectrecles are on then kill/loot Vhel’kur /target. This 70 Elite undead dragon patrols in a circle clockwise around the island. Spawns at 65.84. If you cant do it then skip it for now.
08) At The Altar of Shadows turn in (if you did it) “Divination: Gorefiend’s Armor” 58.71. Accept (if you can) “Teron Gorefiend, I am…“.
09) If you have it do “Teron Gorefiend, I am…“: first talk to the quest giver to begin. You will then transform into the quest giver. Use your new abilities on the pet bar to kill Karsius the Ancient Watcher right there in the immediate area.
10) SCRYER ONLY: Do “The Ashtongue Corruptors“: kill/loot the following 4 mobs spread around Shadowmoon Valley:
11) SCRYER ONLY: Kill/loot Haalum /target 57.74.
12) SCRYER ONLY: Kill/loot Eykenen /target 51.53.
13) SCRYER ONLY: Kill/loot Uylaru /target 48.40.  
NOTE:  We will do Lakaan later.
14) Go north to Coilskar Point and turn in “Grom’tor, Son of Oronok” 44.24, accept “The Cipher of Damnation – Grom’tor’s Charge“.
15) In the immediate area around Coilskar Point do “The Cipher of Damnation – Grom’tor’s Charge“: kill/loot Coilskar naga for the Coilskar Chest Keys, then open the Coilskar Chests until you get the First Fragment of the Cipher of Damnation.
16) Back north turn in “The Cipher of Damnation – Grom’tor’s Charge” (44.24, #14 on map), accept “The Cipher of Damnation – The First Fragment Recovered “.
17) SCRYER ONLY: Kill/loot Lakaan /target 50.23.
18) No Flying Mount?: Go east to the ramp (starting at 50.19).
19) Go up into Oronok’s Farm 54.23 and turn in “The Cipher of Damnation – The First Fragment Recovered ” and “The Cipher of Damnation – The Second Fragment Recovered “.

01) SCRYER ONLY: Go south to Sanctum of the Stars and in the Inn turn in “The Ashtongue Corruptors” 56.60, accept “The Warden’s Cage“.
02) SCRYER ONLY: Go north to Warden’s Cage, drop down in the hole at 57.50 and turn in “The Warden’s Cage“, accept “Proof of Allegiance“.
03) SCRYER ONLY: Go back up out of the hole, then up further on the ledges do “Proof of Allegiance“: kill Zandras /target. This satyr demon patrols around on top of the ledges.  Spawns at 57.49.  
TIP:  You can pull him down from below if you want to.
04) SCRYER ONLY: Back down in the hole turn in “Proof of Allegiance” (57.50, #2 on map), accept “Akama“.
05) SCRYER ONLY: Go into the sewer to 58.48, then go down into the water through a passage to get to Akama, then turn in “Akama“, wait a moment then accept “Seer Udalo“.  
NOTE: “Seer Udalo” is a dungeon quest done at Tempest Keep, so hold on to this quest for when you are ready to do this with a full group later.
06) Hearth (or go back) to Wildhammer Stronghold and outside of the Inn find Zorus the Judicator /target (he patrols around town), from him turn in (if you have it) “Teron Gorefiend, I am…“.
07) Shadowmoon Valley is now FINISHED! 
At this point, you should be level 70 by now, if not, then you can grind the rest of the way to 70 on anything you like, preference is the Shadow Council Warlocks at Legion Hold 22.38 since they die very fast.

WoW TBC Classic Horde 60-70 Leveling Guide: 69-70 Shadowmoon Valley

Shadowmoon Village

01) As you enter Shadowmoon Valley you will run into the Horde town Shadowmoon Village just north. At the entrance to the town accept “Besieged!” 30.32.
02) Just inside the town accept (from the Wanted Poster) “Wanted: Uvuros, Scourge of Shadowmoon” 30.31.
03) Just to the NE at the large catapult accept “The Sketh’lon Wreckage” 31.30.
04) Go up in town and at the flying mount stables turn in “The Apprentice’s Request” (29.29, #1 on map).  
FLYING MOUNTS: You should be fairly close to level 70 now, and may hit it at any point in this guide (if you haven’t already). When you hit 70, you can buy flying mounts from this NPC which will allow you to do some of the quests listed in this guide throughout Shadowmoon Valley and many others throughout Outland. When you turn 70 you should get your flying mount ASAP.
05) Near you at the bottom of the watch tower/Inn (by the mailbox) accept “What Strange Creatures…” 30.28 .
06) Next to you accept “A Haunted History” 30.28.
07) Go inside the Inn next to you and talk to the Innkeeper 30.28 to make Shadowmoon Village your new home.
08) NW in town, in the hut, accept “The Hand of Gul’dan“, “A Grunt’s Work…” and “The Path of Conquest” 28.26.
09) Get the Flight Path in the middle of the town from the Wind Rider Master /target 30.29.

01) Just south of Shadowmoon Village around 31.35 do “Besieged!“: kill 10 Infernal Attackers.
02) At the southern entrance to Shadowmoon Village turn in “Besieged!” 30.32, accept “To Legion Hold“.
03) Go SW to Legion Hold, up on a ledge to the exact coords of 23.6 36.9 do “To Legion Hold“: use the Box o’ Tricks quest item at the small purple infernal image.
04) Back at the southern entrance to Shadowmoon Village turn in “To Legion Hold” (30.32, #2 on map), accept “Setting Up the Bomb“.
05) Go SW up to The Fetid Pool and do “Setting Up the Bomb“: pick up the Fel Reaver Power Core underneath the green water 26.41.
06) NW at Legion Hold loot the Fel Reaver Armor Plating 22.36.
07) While at Legion Hold kill/loot an Overseer Ripsaw /target and an item will drop which starts “Illidari-Bane Shard“, accept it.
08) Back at the southern entrance to Shadowmoon Village turn in “Setting Up the Bomb” (30.32, #2 on map), accept “Blast the Infernals!“.
09) Just inside Shadowmoon Village (at the forge) turn in “Illidari-Bane Shard” 30.31, “Capture the Weapons“.
10) Go SW to Legion Hold and do “Blast the Infernals!“: use the Fel Bomb quest item on the green circle 23.40.
11) GROUP: 2+ Players (or soloable):  Around Legion Hold do “Capture the Weapons“: kill/loot the two Elite mobs at Legion Hold. Morgroron /target patrols around the immediate area there (near the green circle), he is a huge dragon with a green sword. And Makazradon /target patrols just north around 23.34, he is a huge dragon with a spear.
NOTE: If you cannot solo these or find help, then it can be skipped.]
12) Back at the southern entrance to Shadowmoon Village turn in “Blast the Infernals!” (30.32, #2 on map), accept “The Deathforge“.
13) Just inside Shadowmoon Village (at the forge, 30.31, #9 on map) turn in (if you did it) “Capture the Weapons“.  
NOTE: The follow up quest “The Hermit Smith” will not be covered in my guide as it requires a lot of running around at various places. The final quest in this chain leads to some decent demon fighting weapons to obtain if you would like to do this on your own.

01) Just east above the main path at Sketh’lon Wreckage around 36.32 do “The Sketh’lon Wreckage“: keep kill/looting the Dark Conclave arakkoa mobs until you get the 3 pages (they can drop randomly from any arakkoa mob).
02) Do the following 3 quests together around western Shadowmoon Valley, mostly around the green lake 31.39:
03) “A Grunt’s Work…“: kill 20 wildlife. Focus mostly on the Felboar and Vilewing Chimaera 34.40.
04) “What Strange Creatures…“: kill/loot Felfire Diemetradons (mobs around the green water, around 31.39.
05) “A Haunted History“: pick up 15 Ever-burning Ash from the ground.  There is a lot around the green lake 31.39.  These are mostly around #4 on map.
06) Back at Shadowmoon Village, in front of the big catapult, turn in “The Sketh’lon Wreckage” 31.30, accept “Find the Deserter“.
07) Up by the mailbox/Inn turn in “What Strange Creatures…” 30.28, accept “Frankly, It Makes No Sense…“.
08) Next to you turn in “A Haunted History” 30.28, accept “Spectrecles“.
09) NW at the hut turn in “A Grunt’s Work…” 28.26.
10) In the immediate area around Shadowmoon Village do “Spectrecles“: use the Spectrecles quest item (it acts as a Head armor), then kill 12 Shadowmoon Zealots /target.  
TIP: You can spot them easily by the yellow mist coming off of them.
11) In front of the Inn’ entrance turn in “Spectrecles” 30.28, accept “Teron Gorefiend – Lore and Legend“.
12) Go SE to the main path and find Parshah /target (he patrols north and south on the path, around 35.39 then turn in “Find the Deserter“, accept “Asghar’s Totem“.
13) Go NE to Sketh’lon Wreckage and do “Asghar’s Totem“: kill/loot Asghar /target.  This arakkoa patrols around the area around 40.29.
14) Back SW on the main path, find Parshah /target (around 35.39, #12 on map) and turn in “Asghar’s Totem“, accept “The Rod of Lianthe“.

01) Go east to Slag Watch and turn in “The Deathforge” (at the top of the building 39.38), accept “Minions of the Shadow Council“.
02) In the immediate area around The Deathforge do “Minions of the Shadow Council“: kill 10 DeathforgeGuardians and 5 Summoners.
03) Back on top of the building at Slag Watch turn in “Minions of the Shadow Council” (39.38, #1 on map). Accept “The Fate of Kagrosh” and “The Summoning Chamber“.
04) Go down the path and enter The Deathforge (entrance at 40.38).
05) Do “The Fate of Kagrosh“: grind your way deep into The Deathforge and talk to Kagrosh’s /target corpse on the ground 35.40.
06) Do “The Summoning Chamber“: first you need to obtain an Elemental Displacer, which you should have already done so by now from the Deathforge mobs in The Deathforge, it should be in your backpack. Use the Elemental Displacer item down at the Summoning Ritual (the green water down in The Deathforge, 38.39, then kill the Infernal Oversoul that spawns.
07) Leave The Deathforge then turn in (on top of the building, 39.38, #1 on map) “The Fate of Kagrosh” and “The Summoning Chamber“. Accept “Bring Down the Warbringer!“.
08) Go down back inside The Deathforge (entrance at 40.38, #4 on map).
09) Inside The Deathforge click on the Heavy Iron Portcullis (gate, 37.43) to open it, then..
10) At the end of the room do “Bring Down the Warbringer!“: kill/loot Warbringer Razuun /target 39.46.
11) Leave The Deathforge, then go SE to The Altar of Damnation and turn in “The Hand of Gul’dan” 42.45, accept “Enraged Spirits of Fire and Earth“.
12) Just to the east at The Fel Pits around 45.45 do “Enraged Spirits of Fire and Earth“: use the Totem of Spirits quest item near 8 Enraged Earth Spirits and 8 Enraged Fire Spirit, then kill these mobs to collect their spirits.
13) Back west at The Altar of Damnation turn in “Enraged Spirits of Fire and Earth” (42.45, #11 on map), accept “Enraged Spirits of Water“.
14) Go SE to Eclipse Point and do “The Rod of Lianthe“: kill/loot the Eclipsion blood elf mobs until the Lianthe’s Key drops, then open Lianthe’s Strongbox 48.72.

SCRYER ONLY – Sanctum of the Stars

01) NOTE: If you are not focusing on Scryers then skip to the next section below! The Aldor town (Altar of Shatar) is NE 62.30, which is not covered in this guide yet, but they have a lot of the same quests, which you can use the Scryer Only stuff as a reference for them as well.
02) Get the Flight Path at the Flight Master /target 56.58.
03) Just outside of the Inn’s entrance you can turn in any Sunfury Signets you may have 56.59.
04) In the Inn accept “Tablets of Baa’ri” 56.60.
05) Inside the other building accept “Karabor Training Grounds” 56.58.
06) Just west up on the hill accept “The Ashtongue Broken” 55.58.

LVL 70 ONLY – Netherdrake

01) NOTE: This section requires that you are level 70 and step #5 requires you to have a flying mount. If you do not meet these requirements then skip to the next section below. Doing these quests will help you become Neutral with Netherdrake allowing you to get the Netherdrake Epic Flying Mount. You can always do this section later if you like.
02) East at Netherwing Fields accept from Mordenai /target (he patrols around 63.60) “Kindness“.
03) In the immediate area around Netherwing Fields do “Kindness“: kill/loot Rocknail Flayers for their carcasses, then use the carcasses near the Mature Netherwing Drakes (flying in the air).
04) At Netherwing Fields find Mordenai /target (he patrols around 63.60, #2 on map) and turn in “Kindness“, accept “Seek Out Neltharaku“.
05) At Netherwing Fields find Neltharaku /target flying up in the air (see his patrol path on map) and turn in (you need a flying mount) “Seek Out Neltharaku“, accept “Neltharaku’s Tale“.
06) Do “Neltharaku’s Tale“: simply talk to Neltharaku.  Once done turn it in and accept “Infiltrating Dragonmaw Fortress“.
07) Go SE to Dragonmaw Fortress around 67.61 and do “Infiltrating Dragonmaw Fortress“: kill 15 Dragonmaw orcs (any type).
08) At Netherwing Fields find Neltharaku /target flying up in the air (see his patrol path on map, #5 on map) and turn in “Infiltrating Dragonmaw Fortress“, accept “To Netherwing Ledge!“.
09) Go SE to Netherwing Ledge around 70.81 and do “To Netherwing Ledge!“: loot Nethervine Crystals. These are mostly found around the outer edges of the island.
10) Back at Netherwing Fields find Neltharaku /target flying up in the air (#5 on map) and turn in “To Netherwing Ledge!“, accept “The Force of Neltharaku“.
11) Go SE to Dragonmaw Fortress (around 67.61, #7 on map) and do “The Force of Neltharaku“: use the Enchanted Nethervine Crystal quest item on the Enslaved Netherwing Drakes /target.  
NOTE:  The quest item has a fairly long range of about 35 yards.
12) Back at Netherwing Fields find Neltharaku /target flying up in the air (#5 on map) and turn in “The Force of Neltharaku“, accept “Karynaku“.
13) GROUP: 3+ Players: If you can find a group you can go up into Dragonmaw Fortress and from Karynaku turn in “Karynaku” 70.61. Accept “Zuluhed the Whacked“.
14) GROUP: 3+ Players:  In the immediate area do “Zuluhed the Whacked“: kill/loot Zuluhed the Whacked (lvl 72 Elite, 70.62). He drops a key that is used on Karynaku’sZuluhed’s Chains, then turn in “Zuluhed the Whacked“, accept “Ally of the Netherwing“.
15) Talk to Karynaku to send you to Mordenai /target (he patrols around 63.60, #2 on map) and turn in “Ally of the Netherwing“.

Shadowmoon Valley

01) If you do not have a flying mount then go to Netherwing Pass (entrance at 62.63.
02) Go to The Altar of Shadows 58.71 and turn in “Teron Gorefiend – Lore and Legend“. Accept “Divination: Gorefiend’s Cloak“, “Divination: Gorefiend’s Truncheon” and “Divination: Gorefiend’s Armor“.

The Path of Conquest (Group)

01) GROUP: 2+ Players (or soloable): SW at The Path of Conquest do “The Path of Conquest“: simply go to the coords of 52.64 to get it discovered, then use the Kor’kron Flare Gun quest item at a safe spot (anywhere in Shadowmoon Valley) to turn this in and accept “Breaching the Path“.
02) GROUP: 2+ Players (or soloable): At The Path of Conquest around 52.64 do “Breaching the Path“: kill the required amount of Eclipsion blood elf mobs. This is soloable but could take awhile.
03) At a safe spot anywhere in Shadowmoon Valley use your Kor’kron Flare Gun quest item to turn in “Breaching the Path“, accept “When Worlds Collide“.
04) GROUP: 2+ Players: Back deeper in The Path of Conquest do “When Worlds Collide“: kill Corok the Mighty /target (lvl 70 Elite teal colored rock giant) and Chancellor Bloodleaf /target (lvl 70 Elite female blood elf). Both these mobs patrols around the red wagon 53.70.
05) At a safe spot anywhere in Shadowmoon Valley use your Kor’kron Flare Gun quest item to turn in “When Worlds Collide“, accept “Tabards of the Illidari“.
06) GROUP: 2+ Players: At The Path of Conquest do “Tabards of the Illidari“: kill/loot any of the blood elf mobs (#2 on map).
07) At a safe spot anywhere in Shadowmoon Valley use Kor’kron Flare Gun quest item to turn in “Tabards of the Illidari“, accept “Dissension Amongst the Ranks…“.
08) GROUP: 2+ Players: Go SW to Eclipsion Fields around 43.72 and do “Dissension Amongst the Ranks…“: use Enchanted Illidari Tabard quest item (it acts as a Tabard) and then kill 5 Crazed Colossus.

Shadowmoon Valley

01) Do “Divination: Gorefiend’s Truncheon“: kill/loot the 4 Ghostrider of Karabors /target, they circle around the main path in Shadowmoon Valley counter-clockwise (see map), so to find them just go to the main path, and keep following the main path clockwise around until you get to them (they are 4 non-elite mobs on horses). And you need to wear the Spectrecles to see them! They spawn at 62.32.
02) GROUP: 2+ Players: If you can find one or two other players, you can do “Wanted: Uvuros, Scourge of Shadowmoon“: kill/loot Uvuros (elite, 55.49).  
NOTE: He is nearly impossible to solo. If you can’t find a group, then skip it.
03) Go to Ruins of Baa’ri and do “Frankly, It Makes No Sense…“: use the Arcano Control Unit 62.40 to control an Arcano-Scorp, then use it to Tag the Greater Felfire Diemetradons in the green water.  
NOTE: Once they’re all tagged, you can leave the scorp by right-clicking the buff at the top of the screen.
04) Go east a bit and do “Divination: Gorefiend’s Cloak“: kill/loot the Cleric of Karabors /target around 64.40 until one of them drops the cloak. You need to wear the Spectrecles to see them. Low drop rate.
05) SCRYER ONLY: Go just east to Ruins of Karabor (entrance at 67.47) and do “Karabor Training Grounds“: kill/loot Demon Hunter Supplicants or Demon Hunter Initiates.  
NOTE:  The Initiates have a much higher % drop rate.
06) SCRYER ONLY: Go NW to Ruins of Baa’ri around 59.37 and do “Tablets of Baa’ri” along with “The Ashtongue Broken“: kill/loot Ashtongue Workers or loot the green objects from the ground for the 12 fragments. And kill the required amount of Ashtongue mobs.
07) Go NW and do “Enraged Spirits of Water“: use the Totem of Spirits quest item near Enraged Water Spirits around 50.25, then kill them to collect their spirit.

01) Go SW to the main path and find Parshah /target (he patrols north and south on the path, around 35.39) then turn in “The Rod of Lianthe“, accept “Sketh’lon Feathers“.
02) Go SE to Sketh’lon Base Camp around 43.55 and do “Sketh’lon Feathers“: pick up 8 Sketh’lon Feathers from the ground.
03) Back NW at the main path, find Parshah /target (around 35.39, #1 on map) and turn in “Sketh’lon Feathers“, accept “Imbuing the Headpiece“.
04) East at The Altar of Damnation turn in “Enraged Spirits of Water” 42.45, accept “Enraged Spirits of Air“.
05) Do “Imbuing the Headpiece“: wear the Unfinished Headpiece quest item (acts as a Trinket), then use it at the Altar 43.45.
06) Back west at the main path, find Parshah /target (around 35.39, #1 on map) and turn in “Imbuing the Headpiece“, accept “Thwart the Dark Conclave“.
07) Go SE to Sketh’lon Base Camp around 41.60 and do “Thwart the Dark Conclave“: kill all the Dark Conclave Ritualists (the ones with the purple beams on the thing in the green water), then use the Staff of Parshah quest item close to the water.
08) Back west at the main path, find Parshah /target (around 35.39, #1 on map) and turn in “Thwart the Dark Conclave“.
09) NO FLYING MOUNT?: If you do not have a flying mount, go to Netherwing Pass (entrance at 62.63).
10) At The Altar of Shadows 58.71 turn in “Divination: Gorefiend’s Cloak” and “Divination: Gorefiend’s Truncheon“.
11) In the immediate area do “Enraged Spirits of Air“: use the Totem of Spirits quest item near Enraged Air Spirits, then kill them to collect their spirit. You can find more of these mobs throughout Netherwing Pass.
12) SCRYER ONLY: Go to Sanctum of the Stars and up on a hill turn in “The Ashtongue Broken” 55.58, accept “The Great Retribution“.
13) SCRYER ONLY: Down in the building turn in “Karabor Training Grounds” 56.58, accept “A Necessary Distraction“.
14) SCRYER ONLY: In the other building/Inn turn in “Tablets of Baa’ri” 56.60, accept “Oronu the Elder“.
15) Go NW to The Altar of Damnation and turn in “Enraged Spirits of Air” (42.45, #4 on map). Accept “Oronok Torn-heart“.

01) Hearth to Shadowmoon Village.
02) Go to the top of the Inn and turn in (if you did it) “Wanted: Uvuros, Scourge of Shadowmoon” 30.28.
03) Just outside of the Inn, by the Mailbox, turn in “Frankly, It Makes No Sense…” 30.28, accept “Felspine the Greater“.
04) NW at the hut, turn in (if you did it) “Dissension Amongst the Ranks…” 28.26.
05) At the southern entrance of Shadowmoon Village turn in “Bring Down the Warbringer!” 30.32, accept “Gaining Access“.
06) Go SW to Legion Hold around 24.32 and do “Gaining Access“: kill/loot the Mo’arg Weaponsmiths /target until you obtain the Legion Teleporter Control.  
NOTE: There are a few of them in the area.
07) Back at the southern entrance of Shadowmoon Village turn in “Gaining Access” (30.32, #5 on map), accept “Invasion Point: Cataclysm“.
08) SW at Legion Hold, enter the green teleporter at 26.36.  Once teleported turn in “Invasion Point: Cataclysm“, accept “The Art of Fel Reaver Maintenance“.
09) Go down and do “The Art of Fel Reaver Maintenance“: kill/loot Doctor Maleficus /target 29.20, then use his key to open/loot the strongbox right next to him.
10) Back up the ramp turn in “The Art of Fel Reaver Maintenance” 27.21, accept “The Fel and the Furious“.
11) Go half-way down and do “The Fel and the Furious“: use the Fel Reaver Control Console 28.20 to control a Fel Reaver, and use it to kill 60 Deathforged Infernals.  
NOTE:  If you have a pet, you need to dismiss it first.
12) Go back up the ramp and turn in “The Fel and the Furious” (27.21, #10 on map), accept “News of Victory“.
13) Go through the green portal next to you 27.22.  
NOTE:  If you have a flying mount skip this step and just fly to the next step.
14) At the hut NW in Shadowmoon Village turn in “News of Victory” (28.26, #4 on map).

Oronok’s Farm

01)No Flying Mount?: Go east to the ramp (starting at 50.19).
02) Go up into Oronok’s Farm and turn in “Oronok Torn-heart” 54.23, accept “I Was A Lot Of Things…“.
03) Just NE at Shattered Plains around 54.16 do “I Was A Lot Of Things…“: use the Oronok’s Boar Whistle near Shadowmoon Tuber Mounds so that a Domesticated Felboar makes it lootable, then loot it.  
TIP:  Kill the Ravenous Flayers in the area so they don’t kill the boars. And don’t attack the boars yourself.
04) Back SW at Oronok’s Farm turn in “I Was A Lot Of Things…” (54.23, #2 on map), accept “A Lesson Learned“.
05) Back NE at Shattered Plains around 57.16 do “A Lesson Learned“: click on 10 Ravenous Flayer Eggs.  
NOTE:  Watch out for the elite /target patrolling the area.
06) Back SW at Oronok’s Farm turn in “A Lesson Learned” (54.23, #2 on map), accept “The Cipher of Damnation – Truth and History “.
07) Do “The Cipher of Damnation – Truth and History “: simply talk to the quest giver. Once done turn in in. Then accept “Grom’tor, Son of Oronok“, “Ar’tor, Son of Oronok” and “Borak, Son of Oronok“.

Shadowmoon Valley

01) GROUP: 2+ Players (or soloable): Go into Coilskar Cistern (cave entrance at 53.25).  
NOTE: I easily soloed this escort as a lvl 70 Hunter.
02) GROUP: 2+ Players (or soloable): Work your way deep into the cave then accept and do the escort “Escape from Coilskar Cistern” 52.18: escort Earthmender Wilda /target out of the cave.
03) Go SE to Ruins of Baa’ri and do “Oronu the Elder“: kill/loot Oronu the Elder /target (up at 57.33).
04) Go south a bit at Ruins of Baa’ri and do “Felspine the Greater“: kill/loot Felspine the Greater /target 56.44.
05) SCRYER ONLY: Go east to Ata’mal Terrace (entrance at 67.41) and do “The Great Retribution“: kill the required amount of Shadowmoon orc mobs.
06) SCRYER ONLY: Go south to Ruins of Karabor (entrance at 67.47) and do “A Necessary Distraction“: kill/loot Sunfury Warlocks for a Scroll of Demonic Unbanishing, then use it at the next step:
07) SCRYER ONLY: Use the scroll on Azaloth /target 70.51.  
NOTE: You don’t have to kill him once freed, but he will attack anything including you so watch out.
08) Hearth (or go back) to Shadowmoon Village and just outside of the Inn, by the Mailbox, turn in “Felspine the Greater” 30.28.
09) Go east to Coilskar Point and turn in “Grom’tor, Son of Oronok” 44.24, accept “The Cipher of Damnation – Grom’tor’s Charge“.
10) In the immediate area around Coilskar Point do “The Cipher of Damnation – Grom’tor’s Charge“: kill/loot Coilskar naga for the Coilskar Chest Keys, then open the Coilskar Chests until you get the First Fragment of the Cipher of Damnation.
11) Back north turn in “The Cipher of Damnation – Grom’tor’s Charge” (44.24, #9 on map), accept “The Cipher of Damnation – The First Fragment Recovered “.
12) Stop at Shadowmoon Village (or hearth there if you can) and stock back up/repair if you need to (30.31, #8 on map).

Illidari Point

01) Go south to Illidari Point and at the purple circle turn in “Ar’tor, Son of Oronok” (30.50), accept “Demonic Crystal Prisons“.
02) Just NW in Illidari Point do “Demonic Crystal Prisons“: kill/loot Painmistress Gabrissa (big succubus demon, 28.48).
03) back SE at the purple circle turn in “Demonic Crystal Prisons” (30.50, #1 on map).  Then next to you accept “Lohn’goron, Bow of the Torn-heart“.
04) In the immediate area around Illidari Point do “Lohn’goron, Bow of the Torn-heart“: kill/loot any of the demons until you get the Lohn’goron, Bow of the Torn-Heart.
05) Back at the purple circle turn in “Lohn’goron, Bow of the Torn-heart” (30.51, #1 on map), accept “The Cipher of Damnation – Ar’tor’s Charge“.
06) Do “The Cipher of Damnation – Ar’tor’s Charge“: lead the Spirit Hunter south into Illidari Point and then kill/loot Veneratus the Many /target around 29.57.  
NOTE: This can be soloable by clearing the mobs along the path first before doing the quest and healing the Spirit Hunter while doing this.
07) Back north at the purple circle turn in (if you did it) “The Cipher of Damnation – Ar’tor’s Charge” (30.51, #1 on map), accept “The Cipher of Damnation – The Second Fragment Recovered “.

01) Go east to The Altar of Damnation and turn in (if you did it) “Escape from Coilskar Cistern” 42.45 .
02) Go SE next to the bridge turn in “Borak, Son of Oronok” 48.57, accept “Of Thistleheads and Eggs…“.
03) Just west at Sketh’lon Base Camp around 44.56 do “Of Thistleheads and Eggs…“: loot Rotten Arakkoa Eggs until you get an actual Rotten Arakkoa Egg.
04) SCRYER ONLY: Go east to Sanctum of the Stars and up on the hill turn in “The Great Retribution” 55.58.
05) SCRYER ONLY: Down in the building turn in “A Necessary Distraction” 56.58, accept “Altruis“.
06) SCRYER ONLY: In the other building/Inn turn in “Oronu the Elder” 56.60, “The Ashtongue Corruptors“.
07) GROUP 5 Players: I assume by now most players should be level 70 in this guide, if so you can get a 5 man group (when you can) to go SE to Netherwing Ledge. Your group will either need flying mounts or warlock summons to the island. Then do “Divination: Gorefiend’s Armor“: make sure your Spectrecles are on then kill/loot Vhel’kur /target. This 70 Elite undead dragon patrols in a circle clockwise around the island. Spawns at (65.84). If you cant do it then skip it for now.
08) At The Altar of Shadows turn in (if you did it) “Divination: Gorefiend’s Armor” 58.71.  Accept (if you can) “Teron Gorefiend, I am…“.
09) If you have it do “Teron Gorefiend, I am…“: first talk to the quest giver to begin. You will then transform into the quest giver. Use your new abilities on the pet bar to kill Karsius the Ancient Watcher right there in the immediate area.
10) SCRYER ONLY: Do “The Ashtongue Corruptors“: kill/loot the following 4 mobs spread around Shadowmoon Valley:
11) SCRYER ONLY: Kill/loot Haalum /target 57.74.
12) SCRYER ONLY: Kill/loot Eykenen /target 51.53.
13) SCRYER ONLY: Kill/loot Uylaru /target 48.40.
14) SCRYER ONLY: Kill/loot Lakaan /target 50.23.
15) No Flying Mount?: Go east to the ramp (starting at 50.19).
16) Go up into Oronok’s Farm 54.23 and turn in “The Cipher of Damnation – The First Fragment Recovered ” and “The Cipher of Damnation – The Second Fragment Recovered “.

01) SCRYER ONLY: Go south to Sanctum of the Stars and in the Inn turn in “The Ashtongue Corruptors” 56.60, accept “The Warden’s Cage“.
02) SCRYER ONLY: Go north to Warden’s Cage, drop down in the hole at 57.50 and turn in “The Warden’s Cage“, accept “Proof of Allegiance“.
03) SCRYER ONLY: Go back up out of the hole, then up further on the ledges do “Proof of Allegiance“: kill Zandras /target. This satyr demon patrols around on top of the ledges. Spawns at 57.49.  
TIP: You can pull him down from below if you want to.
04) SCRYER ONLY: Back down in the hole turn in “Proof of Allegiance” (57.50, #2 on map), accept “Akama“.
05) SCRYER ONLY: Go into the sewer to 58.48, then go down into the water through a passage to get to Akama, then turn in “Akama“, wait a moment then accept “Seer Udalo“.  
NOTE:  “Seer Udalo” is a dungeon quest done at Tempest Keep, so hold on to this quest for when you are ready to do this with a full group later.
06) Hearth (or go back) to Shadowmoon Village and just outside of the Inn, turn in (if you have it) “Teron Gorefiend, I am…“.
07) Shadowmoon Valley is now FINISHED! 
At this point, you should be level 70 by now, if not, then you can grind the rest of the way to 70 on anything you like, preference is the Shadow Council Warlocks at Legion Hold 22.38 since they die very fast.

WoW TBC Classic Alliance 60-70 Leveling Guide: 68-69 Netherstorm

Area 52

01) As you enter Netherstorm, on Gyro-Plank Bridge, accept (from the patrolling goblin /target) “Off To Area 52” 21.55.  
NOTE: If you cannot accept it, make sure you abandon any quests that are currently in your quest log that takes you to Netherstorm, as you will then be able to accept this quest and reap more rewards from it.
02) Head SE to Area 52 and just at the NE outskirts of the town get the Flight Path from the Flight Master /target 34.64.
03) Go into Area 52 and turn in “Off To Area 52” 33.65, accept “You’re Hired!“.
04) Go in the Inn (the northern hut in town) and from the Innkeeper /target 32.64 make Area 52 your new home.
05) In the Inn, accept (SCRYER ONLY) “Manaforge B’naar” 32.64.
06) Just outside of the Inn, on your right, from the Wanted Poster 32.65, accept “Wanted: Annihilator Servo!” and “Breaking Down Netherock“.
07) On the east outside of the Inn, from the ethereal 32.64 accept “Consortium Crystal Collection“.
08) Next to you from the goblin under the red canopy, accept “Securing the Shaleskin Shale“32.64.
09) SW in town accept “The Archmage’s Staff” 31.66.
10) Go SE to Arklon Ruins and do “The Archmage’s Staff“: use the Conjuring Powder quest item near the Arklon Brazier 41.72, then kill/loot Ekkorash the Inquisitor when she spawns.
11) Just east a bit do “Consortium Crystal Collection“: kill/loot Pentatharon /target (big dread lord demon 42.73).
12) Go back NW to Area 52 and next to the Inn turn in “Consortium Crystal Collection” (32.64, #4 on map), accept “A Heap of Ethereals“.
13) SW in town turn in “The Archmage’s Staff” (31.66, #9 on map), accept “Rebuilding the Staff“.
14) NE in town accept “Pick Your Part” (33.65, #3 on map).

Ruins of Enkaat

01) Go north to the Ruins of Enkaat and accept (from the goblin) “Recharging the Batteries” 31.57.
02) From the orange robot right next to you accept and do the long but easy escort “Mark V is Alive!“: escort the robot /target around the ruins.  
NOTE: If the robot is not there, that means someone else is currently doing the escort, if so keep checking back as you are doing the next few steps.  
ALSO NOTE:  While doing the escort, work on the following step as well:
03) At the the Ruins of Enkaat do “Rebuilding the Staff” along with “You’re Hired!“: kill/loot the Disembodied (ghost mobs) for the 4 crystals and pick up 10 red Etherlithium Matrix Crystals.
04) Back at the goblin at Ruins of Enkaat turn in (if you did it) “Mark V is Alive!” (31.57, #1 on map).
05) Go to the northern edges of Ruins of Enkaat around 30.52 and do “Recharging the Batteries“: use the Battery Recharging Blaster quest item on Phase Hunters right when they have very little health left.
06) Back at the goblin at Ruins of Enkaat turn in “Recharging the Batteries” (31.57, #1 on map).  
NOTE:  You can check to see if you can do the “Mark V is Alive!” escort here if you haven’t yet.

Area 52

01) Go back south to Area 52 and in the middle of town turn in “You’re Hired!” 33.65.  Accept “Invaluable Asset Zapping” and “Report to Engineering“.
02) South in town turn in “Report to Engineering” 32.67, accept “Essence for the Engines“.
03) SW in town turn in “Rebuilding the Staff” 31.66, accept “Curse of the Violet Tower“.
04) Use Archmage Vargoth’s Staff (in your backpack) anywhere to summon Image of Archmage Vargoth, then turn in “Curse of the Violet Tower“, accept “The Sigil of Krasus“.
05) All around the outskirts of Area 52 do “Securing the Shaleskin Shale” along with “Essence for the Engines“: kill/loot the Shaleskin Flayers and Mana Wraiths.
06) Go south to The Heap around 31.75 and do “A Heap of Ethereals” along with “Pick Your Part“: kill/loot the Zaxxis ethereal mobs, and pick up 10 Ethereal Technology objects on the ground.
07) Go SW to Manaforge B’naar around 26.67 and do “Wanted: Annihilator Servo!“: kill/loot an Arcane Annihilator (lvl 68 Elite yellow robot /target).  
NOTES:  There are a few patrolling around the area. These should be soloable with good skill, but be prepared.
08) SCRYER ONLY:  At Manaforge B’naar do “Manaforge B’naar“: kill/loot Captain Arathyn /target 28.65.
09)GROUP 3+ Players (or soloable): South at The Heap you can accept “It’s a Fel Reaver, But with Heart” 27.77, then do it just south a bit by using the Fel Zapper quest item on the huge Scrapped Fel Reaver (lvl 70 Elite) then kill/loot it. Then turn it in.  
NOTES: The Fel Reaver itself does not attack, but the adds keep coming. This quest can be soloable by avoiding the adds. You can accomplish that easily with a flying mount at 70 by landing on the rock next to him (if you choose to wait to do it then), or there are is a trick where you start the event (shock it first), then move back to the tent where you got the quest, wait about 4-5 minutes until the adds despawn then the fel reaver is a free kill at that point.
10) GROUP 2+ Players (or soloable): South at The Heap do “Breaking Down Netherock“: kill Netherock /target (lvl 68 Elite). This big black rock giant with purple spikes patrols at the southern edge of the island.  
NOTES:  Most classes should be able to solo this with good skill, a good tip would be to clear the mobs around him first and kill his mini rock adds last. If you cant do it then skip it.

Arklon Ruins

01) Go east to Arklon Ruins and do “Invaluable Asset Zapping“: click on these 4 objects around the ruins:
02) Click on Multi-Spectrum Terrain Analyzer 40.73.
03) Click on Hyper Rotational Dig-A-Matic 41.74.
04) Click on Servo-Pneumatic Dredging Claw 41.72.
05) Click on Big Wagon Full of Explosives 42.72.

Area 52

01) Go back NW to Area 52 and down in the ravine turn in “Invaluable Asset Zapping” 34.68 . Accept “Dr. Boom!“.
02) Go into the NE part of town and turn in “Pick Your Part” and “Wanted: Annihilator Servo!” 33.65. Accept “In A Scrap With The Legion” and “Help Mama Wheeler“.
03) Next to you in the middle of town, turn in (if you did it) “Breaking Down Netherock” 33.65.
04) From the ethereal north in town turn in “A Heap of Ethereals” 32.64.  Accept “Warp-Raider Nesaad“.  
NOTE: “Another Heap of Ethereals” is a repeatable rep quest for The Consortium, but no XP.
05) Next to you from the goblin under the red canopy, turn in “Securing the Shaleskin Shale” 32.64, accept “That Little Extra Kick“.
06) SCRYER ONLY: In the Inn next to you turn in “Manaforge B’naar” 32.64, accept “High Value Targets“. And next to you accept “BloodGem Crystals“.  
NOTE: My guide will not list and continue these quest chains, but you can do them if you are going to increase scryer rep along with some more XP, but this is not needed to get to level 70.
07) South in town turn in “Essence for the Engines” 32.67, accept “Elemental Power Extraction“.
08) Do “That Little Extra Kick“: kill/loot Nether Rays. There is a large concentration of these SE around 44.71, and you can find more sporadically spaced out around the island.
09) South at the island around 35.77 do “Elemental Power Extraction“: use the Elemental Power Extractor quest item on living Warp Aberrations or Sundered Rumblers, then loot the blue object dropped with the corpse.
10) West at The Heap do “Warp-Raider Nesaad“: kill Warp-Raider Nesaad /target (ethereal standing at 28.79).
11) Hearth to Area 52.
12) Outside of the Inn on your left, from the ethereal turn in “Warp-Raider Nesaad” (32.64, #4 on map), accept “Request for Assistance“.
13) Next to you from the goblin under the red canopy, turn in “That Little Extra Kick” 32.64.
14) South in town turn in “Elemental Power Extraction” (32.67, #7 on map).
15) Go NE to Camp of Boom 35.60 and do “Dr. Boom!“: use the Boom’s Doom quest item to kill Dr. Boom /target.  
NOTE: Watch out for his bombs, they do a lot of damage, you can also manually attack him, but he has a LOT of hit points. A big trick is to stand on the spikes next to him and the bombs won’t touch you, See Image.
16) Go to the SE outskirts of Area 52, in the ravine, turn in “Dr. Boom!” (34.68, #1 on map).

Town Square

01) Head SE to the southern island in Netherstorm and at Manaforge Coruu do “The Sigil of Krasus“: kill/loot Spellbinder Maryana /target around 52.82.  
NOTE: She has a bright white staff, and patrols all around the outside of Manaforge Coruu.
02) Use Archmage Vargoth’s Staff (in your backpack) to turn in “The Sigil of Krasus“, accept “Krasus’s Compendium“.
03) Head east to Town Square and at the stables accept “Needs More Cowbell” and “Indispensable Tools” 58.85.
04) South a bit at the tower 58.86 accept “The Unending Invasion“, “A Fate Worse Than Death“, “The Sunfury Garrison” and “Malevolent Remnants“.
05) Follow the path east, then north across a bridge to Chapel Yard and at the farm turn in (if Bessy /target is there) “Needs More Cowbell” 59.79. Accept and do the easy escort “When the Cows Come Home” by escorting Bessy /target to the next step:
06) At the stables turn in “When the Cows Come Home” (58.85, #3 on map).  
NOTE:  If Bessy was not there, then consider checking back at the Chapel Yard farm later to see if you can do this!
07) SE around Town Square do “Krasus’s Compendium“: pick up the 3 Chapters of the Compendium located in the small houses listed below:
08) Pick up Chapter 3 (in the hut 59.88).
09) Pick up Chapter 1 (in the hut 59.89).
10) Pick up Chapter 2 (in the hut 57.90).
11) Use Archmage Vargoth’s Staff (in your backpack) to turn in “Krasus’s Compendium“, accept “Unlocking the Compendium“.
12) Find and kill these 3 mobs, they all drop an item which starts a quest.  They all patrol outside of buildings:
13) Find and kill Abjurist Belmara /target (female human with an orange staff, 58.89), drops a tome that starts “Abjurist Belmara“, accept it.
14) Find and kill Cohlien Frostweaver /target (male gnome dressed in blue, 60.87), drops a cap that starts “Cohlien Frostweaver“, accept it.
15) Find and kill Conjurer Luminrath /target (male blood elf with an orange sword, 60.85), drops a mantle that starts “Conjurer Luminrath“, accept it.

01) East around the forge building around 61.85 do “Indispensable Tools“: kill/loot Kirin’Var Apprentices /target (worker mobs) until one drops the Smithing Hammer.
02) All around Town Square finish up “Malevolent Remnants“: kill 20 Severed Spirits /target (ghosts).
03) Back west at the tower turn in “Malevolent Remnants” 57.86, accept “The Annals of Kirin’Var“. And next to you accept “Torching Sunfury Hold“.
04) Down by the stables turn in “Indispensable Tools” 58.85, accept “Master Smith Rhonsus“.
05) SE do “The Annals of Kirin’Var“: kill/loot Battle-Mage Dathric /target (in the Town Hall Building, 60.88). He also drops an item, which starts “Battle-Mage Dathric“, accept it.
06) NE a bit do “Master Smith Rhonsus“: kill Rhonsus /target. He patrols around the old forge and spawns at 61.85.
07) Back west at the stables turn in “Master Smith Rhonsus” (58.85, #4 on map).
08) At the tower turn in “The Annals of Kirin’Var” (57.86, #3 on map), accept “Searching for Evidence“.
09) Go NE to Chapel Yard and in the barn click on the Necromantic Focus 60.78 to turn in “Searching for Evidence“, accept “A Lingering Suspicion“.
10) All around the immediate area of the Chapel Yard do “A Lingering Suspicion“: kill/loot TormentedSouls and Citizens.
11) Back SW at the tower turn in “A Lingering Suspicion” (57.86, #3 on map), accept “Capturing the Phylactery“.
12) Go NE to Chapel Yard and behind the old Inn building do “Capturing the Phylactery“: click on the middle outhouse 60.80 to get the Phylactery.
13) Back SW at the tower turn in “Capturing the Phylactery” (57.86, #3 on map), accept “Destroy Naberius!“.
14) GROUP 2+ Players (or soloable): At the very NE of the island, in the church do “Destroy Naberius!“: kill Naberius /target (lvl 69 Elite undead lich, 63.79).  
NOTE: If he is too hard to solo for you, then either find help or simply skip it, there is no follow up quest. 
TIP: This mob casts Death Coil on the ground that does a lot of damage quickly overtime, when he casts this you should move away from it immediately!
15) Back SW at the tower turn in (if you did it) “Destroy Naberius!” (57.86, #3 on map).

Wizard Row

01) Just west at Wizard Row start working on “A Fate Worse Than Death” by killing Mana Seekers and Mageslayers. While working on this do the next 5 quests:
02) “The Unending Invasion“: pick up the Mana Bomb Fragment (in the middle of the area, 56.87).
03) “Cohlien Frostweaver“: use Cohlien’s Cap at the Footlocker 55.88.
04) “Abjurist Belmara“: use Belmara’s Tome at the Bookshelf 55.86.
05) “Battle-Mage Dathric“: use Dathric’s Blade at the Weapon Rack (in the hut, 57.87).
06) “Conjurer Luminrath“: use Luminrath’s Mantle at the Dresser 56.88.
07) Make sure “A Fate Worse Than Death” is finished: kill 10 Mana Seekers and 10 Mageslayers around Wizard Row (#1 on map).
08) Back east at the tower 57.86 turn in all quests and accept new ones:  Turn in “A Fate Worse Than Death“, “Cohlien Frostweaver“, “Abjurist Belmara“, “Conjurer Luminrath“, “Battle-Mage Dathric” and “The Unending Invasion“, accept “Potential Energy Source“.

Town Square

01) West at Manaforge Coruu around 52.82 do “Potential Energy Source“: pick up 10 Energy Isolation Cubes on the ground.
02) Back east at the tower turn in “Potential Energy Source” 57.86, accept “Building a Perimeter“.
03) Around SE of the island do “Building a Perimeter“: use the Rune Activation Device quest item at these 3 runes (they look like floating blue circles):
04) Activate Eastern Rune 59.85.
05) Activate Northeastern Rune (up at 57.83).
06) Activate Western Rune 54.86.
07) Up north at Sunfury Hold around 55.80 do the following 3 quests together:
08) “Torching Sunfury Hold“: kill/loot a Sunfury Flamekeeper /target to obtain a Flaming Torch, then use it on 4 Ballistas and 4 Tents.
09) “The Sunfury Garrison“: kill 10 Sunfury Archers.
10) “Unlocking the Compendium“: kill/loot Spellreaver Marathelle /target, she patrols around everywhere here. She is the only one with a blue sword and a long brown cape. She spawns at 56.79.
11) Use Archmage Vargoth’s Staff (in your backpack) to turn in “Unlocking the Compendium“, accept “Summoner Kanthin’s Prize“.
12) Back south at the tower (57.86, #2 on map) turn in “Building a Perimeter“, “Torching Sunfury Hold” and “The Sunfury Garrison“, accept “Down With Daellis“.

01) Go north across the bridge to Manaforge Duro and do “Down With Daellis“: kill Master Daellis Dawnstrike /target. He runs around in that area and dressed in black and red.  He spawns at 56.66.
02) Also around Manaforge Duro do “Summoner Kanthin’s Prize“: kill/loot Summoner Kanthin /target. Dressed in a purple robe with a water elemental pet. He patrols around. You can pull him away from other mobs at certain points along his patrol path.
03) Use Archmage Vargoth’s Staff (in your backpack) to turn in “Summoner Kanthin’s Prize“, accept “Ar’kelos the Guardian“.
04) Back south at the tower turn in “Down With Daellis” 58.86.
05) In the bottom of the tower next to you do “Ar’kelos the Guardian“: kill Ar’kelos /target 58.86.
06) Climb the stairs to the top of the tower and turn in “Ar’kelos the Guardian” (at Archmage Vargoth himself, not the image). Wait a few seconds then accept “Finding the Keymaster“.
07) GROUP 2+ Players (or soloable): North just across the bridge then on your right do “Finding the Keymaster“: kill/loot Apex /target. This lvl 67 Elite purple giant wonders around 52.67. 
NOTE: I think most classes should be able to solo this, if you can’t do it, then skip to the Midrealm Post section below.
08) Go back to the top of the Violet Tower (58.86, #4 on map) and use the Apex’s Crystal Focus item (in your backpack) at Archmage Vargoth’s Orb (at the top of the tower). Then turn in “Finding the Keymaster“.  
NOTE: “Capturing the Keystone” is a dungeon quest that my guide will not cover.

Midrealm Post

01) Hearth to Area 52 and stock back up/repair.
02) Head east across the bridge to Midrealm Post 47.56 and turn in all quests and accept new ones there: Turn in (from the orange ethereal) “Request for Assistance“, accept “Rightful Repossession” and “Drijya Needs Your Help“.
03) From the female goblin 47.57 turn in “Help Mama Wheeler“, accept “One Demon’s Trash…“.
04) From the purple ethereal 46.56 accept “Run a Diagnostic!” and “New Opportunities“.
05) From the male goblin 46.56 accept “Keeping Up Appearances“.
06) GROUP 3+ Players (or soloable): Go south and turn in “Drijya Needs Your Help” 48.63. Accept and try to do the escort quest “Sabotage the Warp-Gate!“. 
NOTE: Escort Drijya /target at the warp gate. This escort is not easy, but can be soloed with good skill. If you can’t do it or find help for it, then simply skip it, or try again later if you find a group.
07) Go east to Manaforge Duro around 57.64 and do “Rightful Repossession“: pick up 10 Boxes of Surveying Equipment from the ground.  
TIP: There are a lot of easy ones to pick up inside the big building there.
08) Go NW to The Scrap Fields around 50.59 and do “In A Scrap With The Legion” along with “One Demon’s Trash…“: kill 15 Gan’arg Engineers, 5 Mo’arg Doomsmiths. And pick up 10 Fel Reaver Parts on the ground.
09) Back NW at Midrealm Post (47.56, #2 on map) turn in (from the orange ethereal) “Rightful Repossession“, accept “An Audience with the Prince“. And turn in (if you did it) “Sabotage the Warp-Gate!“.
10) From the female goblin turn in “One Demon’s Trash…” 47.57, accept “Declawing Doomclaw“.
11) Go SE to The Scrap Fields and do “Declawing Doomclaw“: kill/loot Doomclaw /target 51.57.
12) Back NW at Midrealm Post (47.56, #2 on map) turn in (from the female goblin) “Declawing Doomclaw“, accept “Warn Area 52!“.
13) Slightly east at Eco-Dome Midrealm do “Run a Diagnostic!“: click on the Diagnostic Equipment 48.55.
14) Back west from the purple ethereal turn in “Run a Diagnostic!” (46.56, #2 on map), accept “Deal With the Saboteurs“.
15) All around the Eco-Dome Midrealm do the following 3 quests together (doesn’t matter what order):
16) “Deal With the Saboteurs“: kill 8 Barbscale Crocolisks (around the pond, 46.53).
17) “New Opportunities“: loot 15 Ivory Bells.
18) “Keeping Up Appearances“: kill/loot Ripfang Lynx (cats, also #17 on map).
19) Once all 3 are done, go back to Midrealm Post (46.56, #2 on map) and turn them all in and accept new quests: Turn in (at the male goblin) “Keeping Up Appearances“, accept “The Dynamic Duo“.
20) From the purple ethereal 46.56 turn in “New Opportunities” and “Deal With the Saboteurs“, accept “To the Stormspire“.

The Stormspire

01) Head north to The Stormspire and right before you go up the lift to the spire accept “Flora of the Eco-Domes” 42.33.
02) In the immediate area do “Flora of the Eco-Domes“: use the Energy Field Modulator on 10 Farahlon Lashers, then kill them.
03) Back at the The Stormspire lift turn in “Flora of the Eco-Domes” (42.33, #1 on map), accept “Creatures of the Eco-Domes“.
04) In the immediate area do “Creatures of the Eco-Domes“: use the Talbuk Tagger on 12 Talbuks (of any type) when their health is below 20%.
05) Back at the The Stormspire lift turn in “Creatures of the Eco-Domes” (42.33, #1 on map), accept “When Nature Goes Too Far“.
06) Just NE at the lake do “When Nature Goes Too Far“: kill/loot Markaru /target (big hydra in the water, 44.28).
07) Back at the The Stormspire lift turn in “When Nature Goes Too Far” (42.33, #1 on map).
08) Go up the lift next to you to take you up to The Stormspire. Once up there turn in “To the Stormspire” 43.35, accept “Diagnosis: Critical“.
09) In the middle of town accept “In Search of Farahlite” 44.36.
10) Go up the ramp and at the southern part of town turn in “The Dynamic Duo” 45.37, accept “Retrieving the Goods“.
11) East in the building next to you turn in “An Audience with the Prince” 46.36, accept “Triangulation Point One“.
12) Exit the building and on your right get the Flight Path from the Flight Master /target 45.35.
13) Go down the ramp and make a sharp right to accept “Surveying the Ruins“, “The Minions of Culuthas” and “Fel Reavers, No Thanks!” 45.35.
14) On the west side of town go in the Inn and talk to the Innkeeper /target 43.36 to make The Stormspire your new home.

01) NW in town go down the lift and then head NE to do “Diagnosis: Critical“: use the Diagnostic Device quest item at those generators 48.27.
02) Hearth to The Stormspire.
03) West in town turn in “Diagnosis: Critical” 43.35, accept “Testing the Prototype“.
04) Go NW to Forge Base: Oblivion around 39.28 and do “Fel Reavers, No Thanks!“: kill/loot Gan’arg Mekgineers /target to collect 5 Condensed Nether Gas, then turn in the collection of gas at an Inactive Fel Reaver (large robots).
05) Head NE to Eco-Dome Farfield and turn in “Testing the Prototype” 45.14, accept “All Clear!“.
06) All around the immediate area at Eco-Dome Farfield do “Retrieving the Goods” along with “All Clear!“: pick up 10 Dome Generator Segments from the ground. And kill 12 Scythetooth Raptors.
07) Back SW in Eco-Dome Farfield turn in “All Clear!” (45.14, #5 on map). Wait a few seconds then accept “Success!“.
08) GROUP 2+ Players (or soloable): Just south at Netherstone around 46.19 do “In Search of Farahlite“: kill/loot the Farahlon Breakers (Elite purple giants).  
NOTE: If they are too hard for you to kill, then you can simply skip this quest or try again later if you find help. Drop rate is 100%. Try to pick off the lvl 69s.
09) Go east to Ruins of Farahlon and do “The Minions of Culuthas” along with “Surveying the Ruins“: kill 10 Hound of Culuthas and 5 Eye of Culuthas. And use the Surveying Markers quest item at these 3 locations:
10) Place Surveying Marker One 52.20.
11) Place Surveying Marker Two 55.23.
12) Place Surveying Marker Three 56.20.

Protectorate Watch Post

01) Head SE to Protectorate Watch Post 58.32 and accept ALL quests there (use the minimap to find the exclamation marks): “A Not-So-Modest Proposal“, “Electro-Shock Goodness!“, “Recipe for Destruction“, “Captain Tyralius” and “The Ethereum” (this one requires lvl 70 to accept).
02) Follow the path south to Access Shaft Zeon and accept “The Flesh Lies…” 59.45.
03) Just east enter Access Shaft Zeon (entrance at 61.45).
04) When entering the mine, make a sharp left, then keep making left turns continuously until you get to the ethereal Agent Ya-Six and accept “Arconus the Insatiable” 61.41.  While working your way there start working on “The Flesh Lies…” by using the Protectorate Igniter quest item on Withered Corpses /target on the ground.
05) Next to you do “A Not-So-Modest Proposal“: click on the Teleporter Power Pack (its behind Agent Ya-Six).
06) Go north through the mine and then do “Arconus the Insatiable“: kill Arconus the Insatiable (big void walker demon, 60.40).
07) As you work your way south to exit the mine (exit at 61.45) finish “The Flesh Lies…“: use the Protectorate Igniter quest item on 12 Withered Corpses /target on the ground.
08) Outside the mine, go west slightly to turn in “The Flesh Lies…” (59.45, #2 on map).
09) Go NE to the exact coords of 66.7 33.8 and do part of “Triangulation Point One“: at those coords use the Triangulation Device quest item at this spot, then make sure you walk underneath the red arrow.
10) Go SE down the path to Celestial Ridge and click the Ethereal Teleport Pad 71.39 to summon an NPC to turn in “A Not-So-Modest Proposal“, accept “Getting Down to Business
11) In the immediate area around Celestial Ridge do “Getting Down to Business“: kill/loot the NetherDrakes and Dragons.
12) At the Shrouded Figure (behind the Ethereal Teleport Pad, #10 on map) turn in “Getting Down to Business” 71.39, accept “Formal Introductions“.
13) Go north in Celestial Ridge and turn in “Formal Introductions” 71.35, accept “A Promising Start“.
14) In the immediate area around Celestial Ridge (#11 on map) do “A Promising Start“: pick up 15 Nether Dragonkin Eggs from the ground.
15) Back north in Celestial Ridge turn in “A Promising Start” (71.35, #13 on map), accept “Troublesome Distractions“.

01) Go NW to Protectorate Watch Post and turn in “Arconus the Insatiable” 60.32.
02) NW in town turn in “Triangulation Point One” 58.31, accept “Triangulation Point Two“.
03) Do “Troublesome Distractions“: right next to you, talk to Wind Trader Marid /target 58.32, follow him, then kill him.
04) Go back east down into the northern part of Celestial Ridge and turn in “Troublesome Distractions” 71.35, accept “Securing the Celestial Ridge“.
05) GROUP 2+ Players (or soloable): South in Celestial Ridge at the Dragon Skeleton 72.43 do “Securing the Celestial Ridge“: use the Challenge of the Blue Flight quest item to call down Veraku /target (lvl 70 Elite) then kill him.  
NOTE:  This elite is not that hard, just be prepared and kill the mobs around the area first.
06) Back north in Celestial Ridge turn in “Securing the Celestial Ridge” (71.35, #4 on map).
07) Go up west around Manaforge Ultris around 66.42 and do “Recipe for Destruction” (kill/loot Unstable Voidwraiths and Voidshriekers) along with the first part of “Electro-Shock Goodness!“: drink Navuud’s Concoction quest item, then attack Seeping Sludges then kill the Seeping Sludge Globule that spawn (use Explosive trap and Volley to kill multiple globules at once.  NOTE: we will do the Void Wastes later.
08) Go north to Protectorate Watch Post and turn in “Recipe for Destruction” 60.32, accept “On Nethery Wings“.
09) Do “On Nethery Wings“: use the Protectorate Nether Drake (right next to the quest giver) to fly up to the top of Manaforge Ultris, then keep spamming the Phase Disruptor quest item until the Void Conduit is destroyed.  Easy quest.
10) Turn in “On Nethery Wings” 60.32.  NOTE:  “Dimensius the All-Devouring” can be done if you can find a group.  It involves first talking to Captain Saeed /target 61.32 to start an escort quest that leads into Manaforge Ultris, then killing Dimensius the All-Devouring /target (lvl 70 Elite).

Ethereum Staging Grounds

01) NOTE: Sometimes there is an escort quest at the Ethereum Staging Grounds started by Captured Protectorate Vanguard /target 57.37 called “Escape from the Staging Grounds“. This becomes available if the Vanguard defeats the Ethereum Gladiator /target (or you help kill the Gladiator). If you see it, accept it and do it. If he’s not there then you can simply skip this, and move on to the next quests:
02) Start working on the last part of “Electro-Shock Goodness!“: drink Navuud’s Concoction quest item, attack Void Wastes then kill the Void Waste Globules that spawn (use Explosive trap and Volley to kill multiple globules at once. While working on this do the next steps:
03) Do “Captain Tyralius“: kill/loot Warden Icoshock /target for the key (patrols around 55.41). Then see the next step for where to use the key:
04) Click on Captain Tyralius’s Prison (the pink sphere on purple rug, 53.41).
05) Finish “Electro-Shock Goodness!“: drink Navuud’s Concoction quest item, attack Void Wastes, then kill 30 Void Waste Globules that spawn.
06) Back NE at Protectorate Watch Post 59.33 turn in “Captain Tyralius“, “Electro-Shock Goodness!” and (if you did it) “Escape from the Staging Grounds“.

Ethereum Staging Grounds (LVL 70 ONLY)

01) If you are level 70 you can accept this quest at Protectorate Watch Post “The Ethereum” 59.32. If not then skip to the Cosmowrench section below.
02) At Ethereum Staging Grounds do “The Ethereum“: kill 5 EthereumAssassins, 5 Shocktroopers, 2 Researchers and Captain Zovax /target (orange ethereal patrols at the bottom of the entrance ramp around 57.37).
03) At Ethereum Staging Grounds use the Ethereum Transponder Zeta 57.39 to turn in “The Ethereum“, accept “Ethereum Data“.
04) Do “Ethereum Data“: loot the Ethereum Data Cell on the ground 56.40.
05) Use the Ethereum Transponder Zeta (57.39, #3 on map) to turn in “Ethereum Data“, accept “Potential for Brain Damage = High“.
06) Do “Potential for Brain Damage = High“: kill/loot Ethereum Relay /target.
07) Use the Ethereum Transponder Zeta (57.39, #3 on map) to turn in “Potential for Brain Damage = High“, accept “S-A-B-O-T-A-G-E“.
08) Do “S-A-B-O-T-A-G-E“: keep kill/looting EthereumOverlords /target or Archons /target until the Prepared Ethereum Wrapping drops.
09) Use the Ethereum Transponder Zeta (57.39, #3 on map) to turn in “S-A-B-O-T-A-G-E“, accept “Delivering the Message“.
10) Do “Delivering the Message“: escort Protectorate Demolitionist /target to Manaforge Ultris.
11) Use the Ethereum Transponder Zeta (57.39, #3 on map) to turn in “Delivering the Message“.
12) GROUP 5 Players:  If you can find a group, you can accept and do “Nexus-King Salhadaar“: use the Protectorate Disruptor quest item on the 3 energy generators surrounding Nexus-King Salhadaar /target (lvl 72 Elite, 54.42), then kill him.
13) Use the Ethereum Transponder Zeta (57.39, #3 on map) to turn in (if you did it) “Nexus-King Salhadaar“.

Cosmowrench

01) Head south to Cosmowrench and get the Flight Path from the Flight Master /target 65.67.
02) Inside the building accept “Bloody Imp-ossible!” 66.67.
03) All around the immediate area of The Vortex Fields do “Bloody Imp-ossible!“: use Zeppit’s Crystal quest item to summon an imp, then kill Warp Chasers and let the imp obtain the blood.
04) Back SE in the building at Cosmowrench turn in “Bloody Imp-ossible!” (66.67, #2 on map).

The Stormspire

01) Hearth to The Stormspire.
02) At The Stormspire turn in all quests and accept all new ones (use the minimap to help you find the question marks): Just outside of the Inn turn in (if you did it) “In Search of Farahlite” 44.36, accept “Hitting the Motherlode“.
03) NW in town turn in “Success!” 43.35.
04) Up the ramp south in town turn in “Retrieving the Goods” 45.37.
05) Down in the middle of town 45.35 turn in “Surveying the Ruins“, “The Minions of Culuthas“, “Fel Reavers, No Thanks!“, accept “The Best Defense“.
06) Go north to Forge Base: Gehenna around 40.25 and do “The Best Defense“: kill 12 Wrathbringers.
07) Go SW to Tuluman’s Landing 35.38 and accept “Dealing with the Foreman” and “Neutralizing the Nethermancers“.
08) Go west inside the Trelleum Mine (down below) and turn in “Dealing with the Foreman” 26.42, accept “Dealing with the Overmaster“.
09) At the northern most end of the mine do “Dealing with the Overmaster“: kill Overmaster Grindgarr /target 27.36.
10) Leave the mine south then go east to Manaforge Ara around 30.44 and do “Neutralizing the Nethermancers“: kill 15 Sunfury Nethermancers. Work your way up to do the next quest in the same area:
11) Up at Manaforge Ara go to the exact coords of 28.7 41.3 and do part of “Triangulation Point Two“: at those coords use the Triangulation Device quest item at this spot, then make sure you walk underneath the red arrow.
12) Go NE across the bridge to Tuluman’s Landing (35.38, #7 on map) and turn in “Neutralizing the Nethermancers“, “Triangulation Point Two” (accept “Full Triangle“) and “Dealing with the Overmaster“.
13) GROUP 2+ Players (or soloable): Go NE to Netherstone and do “Hitting the Motherlode“: kill/loot Cragskaar /target (elite, 48.20).  
NOTES: He is a big purple giant that looks just like the other ones in the area, except he has bigger spikes on his back. If you can’t find him, or if you can’t kill him, then skip it!
14) GROUP 2+ Players (or soloable): Go east up at Ruins of Farahlon and do “Full Triangle“: kill/loot Culuthas /target (elite, 53.21).  
NOTE: He isn’t to hard to solo. If you can’t do it, then skip it.

01) Hearth to The Stormspire.
02) Just outside of the Inn turn in (if you did it) “Hitting the Motherlode” 44.36.
03) Down in the middle of town turn in “The Best Defense” 45.35, accept “Teleport This!“.
04) Go up in the building and turn in “Full Triangle” 46.36.  Wait a moment then accept “Special Delivery to Shattrath City“.
05) OPTIONAL: You can skip or do “Teleport This!” north at Forge Base: Gehenna, especially if you want to just get to Shadowmoon Valley sooner or don’t desire the quest reward for it. This can also be not so easy going solo with so many mobs crammed together. This is done by using the Mental Interference Rod quest item on a Cyber-Rage Forgelord /target (they are around the teleporters listed below) then use its Detonate Teleporter ability to destroy these 3 teleporters:
06) Western Gehenna Teleporter 39.20.
07) Central Gehenna Teleporter 41.20.
08) Eastern Gehenna Teleporter 42.21.
09) Hearth (or go back) to The Stormspire and down in the middle of town turn in (if you did it) “Teleport This!” (45.35, #3 on map).
10) Go up to the Flight Master /target 45.35 and fly to Area 52.

01) Go into Area 52 and on your right turn in “In A Scrap With The Legion” 33.65.
02) Next to you turn in “Warn Area 52!“, accept “Doctor Vomisa, Ph.T.” 33.65.
03) Go east to The Proving Grounds and turn in “Doctor Vomisa, Ph.T.” 37.64.
04) GROUP 3+ Players: If you can find a group, you can do “You, Robot“: use the Scrap Reaver X6000 Controller quest item (right next to the quest giver) to control a Scrap Reaver X6000, and then kill the mobs that come.  
NOTE: Unless you want a really tough solo challenge then don’t even attempt to solo this, it will take to long, and you probably won’t be able to do it. If you can’t find a group then skip it.
05) Turn in (if you did it) “You, Robot” (37.64, #3 on map), accept “Back to the Chief!“.
06) Back west at Area 52 turn in (if you have it) “Back to the Chief!” (33.65, #1 on map).
07) Netherstorm is now FINISHED! 
NOTE: You can safely abandon any quests that are currently in your Quest Log for Netherstorm. You should keep “Special Delivery to Shattrath City” and “The Apprentice’s Request“.
08) On the NE outskirts of Area 52 go to the Flight Master /target 34.64 and fly to Shattrath City.

Shattrath City

01) At A’dal directly in the middle of the city turn in “Special Delivery to Shattrath City” 54.45.  
NOTE: “How to Break Into the Arcatraz” is a Dungeon quest that my guide will not cover.
02) SCRYER ONLY: Go south to Scryer’s Tier and turn in any Signets you may have 45.81.
03) SCRYER ONLY: If you happen to have any Arcane Tomes with you, you can turn them in for some Scryer reputation points (south in the city at 43.92). Only the first Arcane Tome gives XP (but no XP after turning the first one in).
04) Since you should be at least lvl 68 its highly recommended to port to a Major City (portals are down at 52.53 in Shattrath City) to get new spells/abilities if you haven’t yet, THEN/OR..
05) Go to the Flight Master /target (64.41 in Shattrath City) and fly to Allerian Stronghold, Terokkar Forest.
06) From Allerian Stronghold, head east into Shadowmoon Valley…

WoW TBC Classic Horde 60-70 Leveling Guide: 68-69 Netherstorm

Area 52

01) As you enter Netherstorm, on Gyro-Plank Bridge, accept (from the patrolling goblin /target) “Off To Area 52” 21.55.  
NOTE: If you cannot accept it, make sure you abandon any quests that are currently in your quest log that takes you to Netherstorm, as you will then be able to accept this quest and reap more rewards from it.
02) Head SE to Area 52 and just at the NE outskirts of the town get the Flight Path from the Flight Master /target 34.64.
03) Go into Area 52 and turn in “Off To Area 52” 33.65, accept “You’re Hired!“.
04) Go in the Inn (the northern hut in town) and from the Innkeeper /target 32.64 make Area 52 your new home.
05) In the Inn, accept (SCRYER ONLY) “Manaforge B’naar” 32.64.
06) Just outside of the Inn, on your right, from the Wanted Poster 32.65, accept “Wanted: Annihilator Servo!” and “Breaking Down Netherock“.
07) On the east outside of the Inn, from the ethereal 32.64, accept “Consortium Crystal Collection“.
08) Next to you from the goblin under the red canopy, accept “Securing the Shaleskin Shale“32.64.
09) SW in town accept “The Archmage’s Staff” 31.66.
10) Go SE to Arklon Ruins and do “The Archmage’s Staff“: use the Conjuring Powder quest item near the Arklon Brazier 41.72, then kill/loot Ekkorash the Inquisitor when she spawns.
11) Just east a bit do “Consortium Crystal Collection“: kill/loot Pentatharon /target (big dread lord demon 42.73).
12) Go back NW to Area 52 and next to the Inn turn in “Consortium Crystal Collection” (32.64, #4 on map), accept “A Heap of Ethereals“.
13) SW in town turn in “The Archmage’s Staff” (31.66, #9 on map), accept “Rebuilding the Staff“.
14) NE in town accept “Pick Your Part” (33.65, #3 on map).

Ruins of Enkaat

01) Go north to the Ruins of Enkaat and accept (from the goblin) “Recharging the Batteries” 31.57.
02) From the orange robot right next to you accept and do the long but easy escort “Mark V is Alive!“: escort the robot /target around the ruins.  
NOTE: If the robot is not there, that means someone else is currently doing the escort, if so keep checking back as you are doing the next few steps.  
ALSO NOTE: While doing the escort, work on the following step as well:
03) At the the Ruins of Enkaat do “Rebuilding the Staff” along with “You’re Hired!“: kill/loot the Disembodied (ghost mobs) for the 4 crystals and pick up 10 red Etherlithium Matrix Crystals.
04) Back at the goblin at Ruins of Enkaat turn in (if you did it) “Mark V is Alive!” (31.57, #1 on map).
05) Go to the northern edges of Ruins of Enkaat around 30.52 and do “Recharging the Batteries“: use the Battery Recharging Blaster quest item on Phase Hunters right when they have very little health left.
06) Back at the goblin at Ruins of Enkaat turn in “Recharging the Batteries” (31.57, #1 on map).  
NOTE:  You can check to see if you can do the “Mark V is Alive!” escort here if you haven’t yet.

Area 52

01) Go back south to Area 52 and in the middle of town turn in “You’re Hired!” 33.65. Accept “Invaluable Asset Zapping” and “Report to Engineering“.
02) South in town turn in “Report to Engineering” 32.67, accept “Essence for the Engines“.
03) SW in town turn in “Rebuilding the Staff” 31.66, accept “Curse of the Violet Tower“.
04) Use Archmage Vargoth’s Staff (in your backpack) anywhere to summon Image of Archmage Vargoth, then turn in “Curse of the Violet Tower“, accept “The Sigil of Krasus“.
05) All around the outskirts of Area 52 do “Securing the Shaleskin Shale” along with “Essence for the Engines“: kill/loot the Shaleskin Flayers and Mana Wraiths.
06) Go south to The Heap around 31.75 and do “A Heap of Ethereals” along with “Pick Your Part“: kill/loot the Zaxxis ethereal mobs, and pick up 10 Ethereal Technology objects on the ground.
07) Go SW to Manaforge B’naar around 26.67 and do “Wanted: Annihilator Servo!“: kill/loot an Arcane Annihilator (lvl 68 Elite yellow robot /target).  
NOTES: There are a few patrolling around the area.  These should be soloable with good skill, but be prepared.  Keep the next step in mind:
08) SCRYER ONLY: At Manaforge B’naar do “Manaforge B’naar“: kill/loot Captain Arathyn /target 28.65.
09) GROUP 3+ Players (or soloable): South at The Heap you can accept “It’s a Fel Reaver, But with Heart” 27.77, then do it just south a bit by using the Fel Zapper quest item on the huge Scrapped Fel Reaver (lvl 70 Elite) then kill/loot it. Then turn it in.  
NOTES:  The Fel Reaver itself does not attack, but the adds keep coming. This quest can be soloable by avoiding the adds. You can accomplish that easily with a flying mount at 70 by landing on the rock next to him (if you choose to wait to do it then), or there are is a trick where you start the event (shock it first), then move back to the tent where you got the quest, wait about 4-5 minutes until the adds despawn then the fel reaver is a free kill at that point.
10) GROUP 2+ Players (or soloable?): South at The Heap do “Breaking Down Netherock“: kill Netherock /target (lvl 68 Elite). This big black rock giant with purple spikes patrols at the southern edge of the island.  
NOTES: Most classes should be able to solo this with good skill, a good tip would be to clear the mobs around him first and kill his mini rock adds last. If you cant do it then skip it.

Arklon Ruins

01) Go east to Arklon Ruins and do “Invaluable Asset Zapping“: click on these 4 objects around the ruins:
02) Click on Multi-Spectrum Terrain Analyzer 40.73.
03) Click on Hyper Rotational Dig-A-Matic 41.74.
04) Click on Servo-Pneumatic Dredging Claw 41.72.
05) Click on Big Wagon Full of Explosives 42.72.

Area 52

01) Go back NW to Area 52 and down in the ravine turn in “Invaluable Asset Zapping” 34.68. Accept “Dr. Boom!“.
02) Go into the NE part of town and turn in “Pick Your Part” and “Wanted: Annihilator Servo!” 33.65. Accept “In A Scrap With The Legion” and “Help Mama Wheeler“.
03) Next to you in the middle of town, turn in (if you did it) “Breaking Down Netherock” 33.65.
04) From the ethereal north in town turn in “A Heap of Ethereals” 32.64. Accept “Warp-Raider Nesaad“. NOTE: “Another Heap of Ethereals” is a repeatable rep quest for The Consortium, but no XP.
05) Next to you from the goblin under the red canopy, turn in “Securing the Shaleskin Shale” 32.64, accept “That Little Extra Kick“.
06) SCRYER ONLY: In the Inn next to you turn in “Manaforge B’naar” 32.64, accept “High Value Targets“. And next to you accept “BloodGem Crystals“.  
NOTE: My guide will not list and continue these quest chains, but you can do them if you are going to increase scryer rep along with some more XP, but this is not needed to get to level 70.
07) South in town turn in “Essence for the Engines” 32.67, accept “Elemental Power Extraction“.
08) Do “That Little Extra Kick“: kill/loot Nether Rays. There is a large concentration of these SE around 44.71, and you can find more sporadically spaced out around the island.
09) South at the island around 35.77 do “Elemental Power Extraction“: use the Elemental Power Extractor quest item on living Warp Aberrations or Sundered Rumblers, then loot the blue object dropped with the corpse.
10) West at The Heap do “Warp-Raider Nesaad“: kill Warp-Raider Nesaad /target (ethereal standing at 28.79).
11) Hearth to Area 52.
12) Outside of the Inn on your left, from the ethereal turn in “Warp-Raider Nesaad” (32.64, #4 on map), accept “Request for Assistance“.
13) Next to you from the goblin under the red canopy, turn in “That Little Extra Kick” 32.64.
14) South in town turn in “Elemental Power Extraction” (32.67, #7 on map).
15) Go NE to Camp of Boom 35.60 and do “Dr. Boom!“: use the Boom’s Doom quest item to kill Dr. Boom /target.  
NOTE: Watch out for his bombs, they do a lot of damage, you can also manually attack him, but he has a LOT of hit points. A big trick is to stand on the spikes next to him and the bombs won’t touch you, See Image.
16) Go to the SE outskirts of Area 52, in the ravine, turn in “Dr. Boom!” (34.68, #1 on map).

Town Square

01) Head SE to the southern island in Netherstorm and at Manaforge Coruu do “The Sigil of Krasus“: kill/loot Spellbinder Maryana /target around 52.82.  
NOTE: She has a bright white staff, and patrols all around the outside of Manaforge Coruu.
02) Use Archmage Vargoth’s Staff (in your backpack) to turn in “The Sigil of Krasus“, accept “Krasus’s Compendium“.
03) Head east to Town Square and at the stables accept “Needs More Cowbell” and “Indispensable Tools” 58.85.
04) South a bit at the tower 58.86 accept “The Unending Invasion“, “A Fate Worse Than Death“, “The Sunfury Garrison” and “Malevolent Remnants“.
05) Follow the path east, then north across a bridge to Chapel Yard and at the farm turn in (if Bessy /target is there) “Needs More Cowbell” 59.79. Accept and do the easy escort “When the Cows Come Home” by escorting Bessy /target to the next step:
06) At the stables turn in “When the Cows Come Home” (58.85, #3 on map).  
NOTE:  If Bessy was not there, then consider checking back at the Chapel Yard farm later to see if you can do this!
07) SE around Town Square do “Krasus’s Compendium“: pick up the 3 Chapters of the Compendium located in the small houses listed below:
08) Pick up Chapter 3 (in the hut 59.88).
09) Pick up Chapter 1 (in the hut 59.89).
10) Pick up Chapter 2 (in the hut 57.90).
11) Use Archmage Vargoth’s Staff (in your backpack) to turn in “Krasus’s Compendium“, accept “Unlocking the Compendium“.
12) Find and kill these 3 mobs, they all drop an item which starts a quest.  They all patrol outside of buildings:
13) Find and kill Abjurist Belmara /target (female human with an orange staff, 58.89), drops a tome that starts “Abjurist Belmara“, accept it.
14) Find and kill Cohlien Frostweaver /target (male gnome dressed in blue, 60.87), drops a cap that starts “Cohlien Frostweaver“, accept it.
15) Find and kill Conjurer Luminrath /target (male blood elf with an orange sword, 60.85), drops a mantle that starts “Conjurer Luminrath“, accept it.

01) East around the forge building around 61.85 do “Indispensable Tools“: kill/loot Kirin’Var Apprentices /target (worker mobs) until one drops the Smithing Hammer.
02) All around Town Square finish up “Malevolent Remnants“: kill 20 Severed Spirits /target (ghosts).
03) Back west at the tower turn in “Malevolent Remnants” 57.86, accept “The Annals of Kirin’Var“. And next to you accept “Torching Sunfury Hold“.
04) Down by the stables turn in “Indispensable Tools” 58.85, accept “Master Smith Rhonsus“.
05) SE do “The Annals of Kirin’Var“: kill/loot Battle-Mage Dathric /target (in the Town Hall Building, 60.88). He also drops an item, which starts “Battle-Mage Dathric“, accept it.
06) NE a bit do “Master Smith Rhonsus“: kill Rhonsus /target. He patrols around the old forge and spawns at 61.85.
07) Back west at the stables turn in “Master Smith Rhonsus” (58.85, #4 on map).
08) At the tower turn in “The Annals of Kirin’Var” (57.86, #3 on map), accept “Searching for Evidence“.
09) Go NE to Chapel Yard and in the barn click on the Necromantic Focus 60.78 to turn in “Searching for Evidence“, accept “A Lingering Suspicion“.
10) All around the immediate area of the Chapel Yard do “A Lingering Suspicion“: kill/loot TormentedSouls and Citizens.
11) Back SW at the tower turn in “A Lingering Suspicion” (57.86, #3 on map), accept “Capturing the Phylactery“.
12) Go NE to Chapel Yard and behind the old Inn building do “Capturing the Phylactery“: click on the middle outhouse 60.80 to get the Phylactery.
13) Back SW at the tower turn in “Capturing the Phylactery” (57.86, #3 on map), accept “Destroy Naberius!“.
14) GROUP 2+ Players (or soloable): At the very NE of the island, in the church do “Destroy Naberius!“: kill Naberius /target (lvl 69 Elite undead lich, 63.79).  
NOTE: If he is too hard to solo for you, then either find help or simply skip it, there is no follow up quest. 
TIP: This mob casts Death Coil on the ground that does a lot of damage quickly overtime, when he casts this you should move away from it immediately!
15) Back SW at the tower turn in (if you did it) “Destroy Naberius!” (57.86, #3 on map).

Wizard Row

01) Just west at Wizard Row start working on “A Fate Worse Than Death” by killing Mana Seekers and Mageslayers. While working on this do the next 5 quests:
02) “The Unending Invasion“: pick up the Mana Bomb Fragment (in the middle of the area, 56.87).
03) “Cohlien Frostweaver“: use Cohlien’s Cap at the Footlocker 55.88.
04) “Abjurist Belmara“: use Belmara’s Tome at the Bookshelf 55.86.
05) “Battle-Mage Dathric“: use Dathric’s Blade at the Weapon Rack (in the hut, 57.87).
06) “Conjurer Luminrath“: use Luminrath’s Mantle at the Dresser 56.88.
07) Make sure “A Fate Worse Than Death” is finished: kill 10 Mana Seekers and 10 Mageslayers around Wizard Row (#1 on map).
08) Back east at the tower 57.86 turn in all quests and accept new ones:  Turn in “A Fate Worse Than Death“, “Cohlien Frostweaver“, “Abjurist Belmara“, “Conjurer Luminrath“, “Battle-Mage Dathric” and “The Unending Invasion“, accept “Potential Energy Source“.

Town Square

01) West at Manaforge Coruu around 52.82 do “Potential Energy Source“: pick up 10 Energy Isolation Cubes on the ground.
02) Back east at the tower turn in “Potential Energy Source” 57.86, accept “Building a Perimeter“.
03) Around SE of the island do “Building a Perimeter“: use the Rune Activation Device quest item at these 3 runes (they look like floating blue circles):
04) Activate Eastern Rune 59.85.
05) Activate Northeastern Rune (up at 57.83).
06) Activate Western Rune 54.86.
07) Up north at Sunfury Hold around 55.80 do the following 3 quests together:
08) “Torching Sunfury Hold“: kill/loot a Sunfury Flamekeeper /target to obtain a Flaming Torch, then use it on 4 Ballistas and 4 Tents.
09) “The Sunfury Garrison“: kill 10 Sunfury Archers.
10) “Unlocking the Compendium“: kill/loot Spellreaver Marathelle /target, she patrols around everywhere here.  She is the only one with a blue sword and a long brown cape.  She spawns at 56.79.
11) Use Archmage Vargoth’s Staff (in your backpack) to turn in “Unlocking the Compendium“, accept “Summoner Kanthin’s Prize“.
12) Back south at the tower (57.86, #2 on map) turn in “Building a Perimeter“, “Torching Sunfury Hold” and “The Sunfury Garrison“, accept “Down With Daellis“.

01) Go north across the bridge to Manaforge Duro and do “Down With Daellis“: kill Master Daellis Dawnstrike /target. He runs around in that area and dressed in black and red. He spawns at 56.66. Keep the next step in mind:
02) Also around Manaforge Duro do “Summoner Kanthin’s Prize“: kill/loot Summoner Kanthin /target. Dressed in a purple robe with a water elemental pet. He patrols around. You can pull him away from other mobs at certain points along his patrol path.
03) Use Archmage Vargoth’s Staff (in your backpack) to turn in “Summoner Kanthin’s Prize“, accept “Ar’kelos the Guardian“.
04) Back south at the tower turn in “Down With Daellis” 58.86.
05) In the bottom of the tower next to you do “Ar’kelos the Guardian“: kill Ar’kelos /target 58.86.
06) Climb the stairs to the top of the tower and turn in “Ar’kelos the Guardian” (at Archmage Vargoth himself, not the image). Wait a few seconds then accept “Finding the Keymaster“.
07 )GROUP 2+ Players (or soloable): North just across the bridge then on your right do “Finding the Keymaster“: kill/loot Apex /target. This lvl 67 Elite purple giant wonders around 52.67. 
NOTE: I think most classes should be able to solo this, if you can’t do it, then skip to the Midrealm Post section below.
08) Go back to the top of the Violet Tower (58.86, #4 on map) and use the Apex’s Crystal Focus item (in your backpack) at Archmage Vargoth’s Orb (at the top of the tower). Then turn in “Finding the Keymaster“.  
NOTE: “Capturing the Keystone” is a dungeon quest that my guide will not cover.

Midrealm Post

01) Hearth to Area 52 and stock back up/repair.
02) Head east across the bridge to Midrealm Post 47.56 and turn in all quests and accept new ones there: Turn in (from the orange ethereal) “Request for Assistance“, accept “Rightful Repossession” and “Drijya Needs Your Help“.
03) From the female goblin 47.57 turn in “Help Mama Wheeler“, accept “One Demon’s Trash…“.
04) From the purple ethereal 46.56 accept “Run a Diagnostic!” and “New Opportunities“.
05) From the male goblin 46.56 accept “Keeping Up Appearances“.
06) GROUP 3+ Players (or soloable):  Go south and turn in “Drijya Needs Your Help” 48.63. Accept and try to do the escort quest “Sabotage the Warp-Gate!“. 
NOTE:  Escort Drijya /target at the warp gate. This escort is not easy, but can be soloed with good skill. If you can’t do it or find help for it, then simply skip it, or try again later if you find a group.
07) Go east to Manaforge Duro around 57.64 and do “Rightful Repossession“: pick up 10 Boxes of Surveying Equipment from the ground.  
TIP: There are a lot of easy ones to pick up inside the big building there.
08) Go NW to The Scrap Fields around 50.59 and do “In A Scrap With The Legion” along with “One Demon’s Trash…“: kill 15 Gan’arg Engineers, 5 Mo’arg Doomsmiths. And pick up 10 Fel Reaver Parts on the ground.
09) Back NW at Midrealm Post (47.56, #2 on map) turn in (from the orange ethereal) “Rightful Repossession“, accept “An Audience with the Prince“. And turn in (if you did it) “Sabotage the Warp-Gate!“.
10) From the female goblin turn in “One Demon’s Trash…” 47.57, accept “Declawing Doomclaw“.
11) Go SE to The Scrap Fields and do “Declawing Doomclaw“: kill/loot Doomclaw /target 51.57.
12) Back NW at Midrealm Post (47.56, #2 on map) turn in (from the female goblin) “Declawing Doomclaw“, accept “Warn Area 52!“.
13) Slightly east at Eco-Dome Midrealm do “Run a Diagnostic!“: click on the Diagnostic Equipment 48.55.
14) Back west from the purple ethereal turn in “Run a Diagnostic!” (46.56, #2 on map), accept “Deal With the Saboteurs“.
15) All around the Eco-Dome Midrealm do the following 3 quests together (doesn’t matter what order):
16) “Deal With the Saboteurs“: kill 8 Barbscale Crocolisks (around the pond, 46.53).
17) “New Opportunities“: loot 15 Ivory Bells.
18) “Keeping Up Appearances“: kill/loot Ripfang Lynx (cats, also #17 on map).
19) Once all 3 are done, go back to Midrealm Post (46.56, #2 on map) and turn them all in and accept new quests: Turn in (at the male goblin) “Keeping Up Appearances“, accept “The Dynamic Duo“.
20) From the purple ethereal 46.56 turn in “New Opportunities” and “Deal With the Saboteurs“, accept “To the Stormspire“.

The Stormspire

01) Head north to The Stormspire and right before you go up the lift to the spire accept “Flora of the Eco-Domes” 42.33.
02) In the immediate area do “Flora of the Eco-Domes“: use the Energy Field Modulator on 10 Farahlon Lashers, then kill them.
03) Back at the The Stormspire lift turn in “Flora of the Eco-Domes” (42.33, #1 on map), accept “Creatures of the Eco-Domes“.
04) In the immediate area do “Creatures of the Eco-Domes“: use the Talbuk Tagger on 12 Talbuks (of any type) when their health is below 20%.
05) Back at the The Stormspire lift turn in “Creatures of the Eco-Domes” (42.33, #1 on map), accept “When Nature Goes Too Far“.
06) Just NE at the lake do “When Nature Goes Too Far“: kill/loot Markaru /target (big hydra in the water, 44.28).
07) Back at the The Stormspire lift turn in “When Nature Goes Too Far” (42.33, #1 on map).
08) Go up the lift next to you to take you up to The Stormspire. Once up there turn in “To the Stormspire” 43.35, accept “Diagnosis: Critical“.
09) In the middle of town accept “In Search of Farahlite” 44.36.
10) Go up the ramp and at the southern part of town turn in “The Dynamic Duo” 45.37, accept “Retrieving the Goods“.
11) East in the building next to you turn in “An Audience with the Prince” 46.36, accept “Triangulation Point One“.
12) Exit the building and on your right get the Flight Path from the Flight Master /target 45.35.
13) Go down the ramp and make a sharp right to accept “Surveying the Ruins“, “The Minions of Culuthas” and “Fel Reavers, No Thanks!” 45.35.
14) On the west side of town go in the Inn and talk to the Innkeeper /target 43.36 to make The Stormspire your new home.

01) NW in town go down the lift and then head NE to do “Diagnosis: Critical“: use the Diagnostic Device quest item at those generators 48.27.
02) Hearth to The Stormspire.
03) West in town turn in “Diagnosis: Critical” 43.35, accept “Testing the Prototype“.
04) Go NW to Forge Base: Oblivion around 39.28 and do “Fel Reavers, No Thanks!“: kill/loot Gan’arg Mekgineers /target to collect 5 Condensed Nether Gas, then turn in the collection of gas at an Inactive Fel Reaver (large robots).
05) Head NE to Eco-Dome Farfield and turn in “Testing the Prototype” 45.14, accept “All Clear!“.
06) All around the immediate area at Eco-Dome Farfield do “Retrieving the Goods” along with “All Clear!“: pick up 10 Dome Generator Segments from the ground.  And kill 12 Scythetooth Raptors.
07) Back SW in Eco-Dome Farfield turn in “All Clear!” (45.14, #5 on map). Wait a few seconds then accept “Success!“.
08) GROUP 2+ Players (or soloable): Just south at Netherstone around 46.19 do “In Search of Farahlite“: kill/loot the Farahlon Breakers (Elite purple giants).  
NOTE: If they are too hard for you to kill, then you can simply skip this quest or try again later if you find help. Drop rate is 100%. Try to pick off the lvl 69s.
09) Go east to Ruins of Farahlon and do “The Minions of Culuthas” along with “Surveying the Ruins“: kill 10 Hound of Culuthas and 5 Eye of Culuthas. And use the Surveying Markers quest item at these 3 locations:
10) Place Surveying Marker One 52.20.
11) Place Surveying Marker Two 55.23.
12) Place Surveying Marker Three 56.20.

Protectorate Watch Post

01) Head SE to Protectorate Watch Post 58.32 and accept ALL quests there (use the minimap to find the exclamation marks): “A Not-So-Modest Proposal“, “Electro-Shock Goodness!“, “Recipe for Destruction“, “Captain Tyralius” and “The Ethereum” (this one requires lvl 70 to accept).
02) Follow the path south to Access Shaft Zeon and accept “The Flesh Lies…” 59.45.
03) Just east enter Access Shaft Zeon (entrance at 61.45).
04) When entering the mine, make a sharp left, then keep making left turns continuously until you get to the ethereal Agent Ya-Six and accept “Arconus the Insatiable” 61.41. While working your way there start working on “The Flesh Lies…” by using the Protectorate Igniter quest item on Withered Corpses /target on the ground.
05) Next to you do “A Not-So-Modest Proposal“: click on the Teleporter Power Pack (its behind Agent Ya-Six).
06) Go north through the mine and then do “Arconus the Insatiable“: kill Arconus the Insatiable (big void walker demon, 60.40).
07) As you work your way south to exit the mine (exit at 61.45) finish “The Flesh Lies…“: use the Protectorate Igniter quest item on 12 Withered Corpses /target on the ground.
08) Outside the mine, go west slightly to turn in “The Flesh Lies…” (59.45, #2 on map).
09) Go NE to the exact coords of 66.7 33.8 and do part of “Triangulation Point One“: at those coords use the Triangulation Device quest item at this spot, then make sure you walk underneath the red arrow.
10) Go SE down the path to Celestial Ridge and click the Ethereal Teleport Pad 71.39 to summon an NPC to turn in “A Not-So-Modest Proposal“, accept “Getting Down to Business
11) In the immediate area around Celestial Ridge do “Getting Down to Business“: kill/loot the Nether Drakes and Dragons.
12) At the Shrouded Figure (behind the Ethereal Teleport Pad, #10 on map) turn in “Getting Down to Business” 71.39, accept “Formal Introductions“.
13) Go north in Celestial Ridge and turn in “Formal Introductions” 71.35, accept “A Promising Start“.
14) In the immediate area around Celestial Ridge (#11 on map) do “A Promising Start“: pick up 15 Nether Dragonkin Eggs from the ground.
15) Back north in Celestial Ridge turn in “A Promising Start” (71.35, #13 on map), accept “Troublesome Distractions“.

01) Go NW to Protectorate Watch Post and turn in “Arconus the Insatiable” 60.32.
02) NW in town turn in “Triangulation Point One” 58.31, accept “Triangulation Point Two“.
03) Do “Troublesome Distractions“: right next to you, talk to Wind Trader Marid /target 58.32, follow him, then kill him.
04) Go back east down into the northern part of Celestial Ridge and turn in “Troublesome Distractions” 71.35, accept “Securing the Celestial Ridge“.
05) GROUP 2+ Players (or soloable): South in Celestial Ridge at the Dragon Skeleton 72.43 do “Securing the Celestial Ridge“: use the Challenge of the Blue Flight quest item to call down Veraku /target (lvl 70 Elite) then kill him.  
NOTE:  This elite is not that hard, just be prepared and kill the mobs around the area first.
06) Back north in Celestial Ridge turn in “Securing the Celestial Ridge” (71.35, #4 on map).
07) Go up west around Manaforge Ultris around 66.42 and do “Recipe for Destruction” (kill/loot Unstable Voidwraiths and Voidshriekers) along with the first part of “Electro-Shock Goodness!“: drink Navuud’s Concoction quest item, then attack Seeping Sludges then kill the Seeping Sludge Globule that spawn.  
NOTE: we will do the Void Wastes later.
08) Go north to Protectorate Watch Post and turn in “Recipe for Destruction” 60.32, accept “On Nethery Wings“.
09) Do “On Nethery Wings“: use the Protectorate Nether Drake (right next to the quest giver) to fly up to the top of Manaforge Ultris, then keep spamming the Phase Disruptor quest item until the Void Conduit is destroyed.
10) Turn in “On Nethery Wings” 60.32.  
NOTE:  “Dimensius the All-Devouring” can be done if you can find a group. It involves first talking to Captain Saeed /target 61.32 to start an escort quest that leads into Manaforge Ultris, then killing Dimensius the All-Devouring /target (lvl 70 Elite).

Ethereum Staging Grounds

01) NOTE: Sometimes there is an escort quest at the Ethereum Staging Grounds started by Captured Protectorate Vanguard /target 57.37 called “Escape from the Staging Grounds“.  This becomes available if the Vanguard defeats the Ethereum Gladiator /target (or you help kill the Gladiator). If you see it, accept it and do it. If he’s not there then you can simply skip this, and move on to the next quests:
02) Start working on the last part of “Electro-Shock Goodness!“: drink Navuud’s Concoction quest item, attack Void Wastes then kill the Void Waste Globules that spawn. While working on this do the next steps:
03) Do “Captain Tyralius“: kill/loot Warden Icoshock /target for the key (patrols around 55.41). Then see the next step for where to use the key:
04) Click on Captain Tyralius’s Prison (the pink sphere on purple rug, 53.41).
05) Finish “Electro-Shock Goodness!“: drink Navuud’s Concoction quest item, attack Void Wastes, then kill 30 Void Waste Globules that spawn.
06) Back NE at Protectorate Watch Post 59.33 turn in “Captain Tyralius“, “Electro-Shock Goodness!” and (if you did it) “Escape from the Staging Grounds“.

Ethereum Staging Grounds (LVL 70 ONLY)

01) If you are level 70 you can accept this quest at Protectorate Watch Post “The Ethereum” 59.32. If not then skip to the Cosmowrench section below.
02) At Ethereum Staging Grounds do “The Ethereum“: kill 5 EthereumAssassins, 5 Shocktroopers, 2 Researchers and Captain Zovax /target (orange ethereal patrols at the bottom of the entrance ramp around 57.37).
03) At Ethereum Staging Grounds use the Ethereum Transponder Zeta 57.39 to turn in “The Ethereum“, accept “Ethereum Data“.
04) Do “Ethereum Data“: loot the Ethereum Data Cell on the ground 56.40.
05) Use the Ethereum Transponder Zeta (57.39, #3 on map) to turn in “Ethereum Data“, accept “Potential for Brain Damage = High“.
06) Do “Potential for Brain Damage = High“: kill/loot Ethereum Relay /target.
07) Use the Ethereum Transponder Zeta (57.39, #3 on map) to turn in “Potential for Brain Damage = High“, accept “S-A-B-O-T-A-G-E“.
08) Do “S-A-B-O-T-A-G-E“: keep kill/looting EthereumOverlords /target or Archons /target until the Prepared Ethereum Wrapping drops.
09) Use the Ethereum Transponder Zeta (57.39, #3 on map) to turn in “S-A-B-O-T-A-G-E“, accept “Delivering the Message“.
10) Do “Delivering the Message“: escort Protectorate Demolitionist /target to Manaforge Ultris.
11) Use the Ethereum Transponder Zeta (57.39, #3 on map) to turn in “Delivering the Message“.
12) GROUP 5 Players:  If you can find a group, you can accept and do “Nexus-King Salhadaar“: use the Protectorate Disruptor quest item on the 3 energy generators surrounding Nexus-King Salhadaar /target (lvl 72 Elite, 54.42), then kill him.
13) Use the Ethereum Transponder Zeta (57.39, #3 on map) to turn in (if you did it) “Nexus-King Salhadaar“.

Cosmowrench

01) Head south to Cosmowrench and get the Flight Path from the Flight Master /target 65.67.
02) Inside the building accept “Bloody Imp-ossible!” 66.67.
03) All around the immediate area of The Vortex Fields do “Bloody Imp-ossible!“: use Zeppit’s Crystal quest item to summon an imp, then kill Warp Chasers and let the imp obtain the blood.
04) Back SE in the building at Cosmowrench turn in “Bloody Imp-ossible!” (66.67, #2 on map).

The Stormspire

01) Hearth to The Stormspire.
02) At The Stormspire turn in all quests and accept all new ones (use the minimap to help you find the question marks): Just outside of the Inn turn in (if you did it) “In Search of Farahlite” 44.36, accept “Hitting the Motherlode“.
03) NW in town turn in “Success!” 43.35.
04) Up the ramp south in town turn in “Retrieving the Goods” 45.37.
05) Down in the middle of town 45.35 turn in “Surveying the Ruins“, “The Minions of Culuthas“, “Fel Reavers, No Thanks!“, accept “The Best Defense“.
06) Go north to Forge Base: Gehenna around 40.25 and do “The Best Defense“: kill 12 Wrathbringers.
07) Go SW to Tuluman’s Landing 35.38 and accept “Dealing with the Foreman” and “Neutralizing the Nethermancers“.
08) Go west inside the Trelleum Mine (down below) and turn in “Dealing with the Foreman” 26.42, accept “Dealing with the Overmaster“.
09) At the northern most end of the mine do “Dealing with the Overmaster“: kill Overmaster Grindgarr /target 27.36.
10) Leave the mine south then go east to Manaforge Ara around 30.44 and do “Neutralizing the Nethermancers“: kill 15 Sunfury Nethermancers. Work your way up to do the next quest in the same area:
11) Up at Manaforge Ara go to the exact coords of 28.7 41.3 and do part of “Triangulation Point Two“: at those coords use the Triangulation Device quest item at this spot, then make sure you walk underneath the red arrow.
12) Go NE across the bridge to Tuluman’s Landing (35.38, #7 on map) and turn in “Neutralizing the Nethermancers“, “Triangulation Point Two” (accept “Full Triangle“) and “Dealing with the Overmaster“.
13) GROUP 2+ Players (or soloable): Go NE to Netherstone and do “Hitting the Motherlode“: kill/loot Cragskaar /target (elite, 48.20).  
NOTES: He is a big purple giant that looks just like the other ones in the area, except he has bigger spikes on his back. If you can’t find him, or if you can’t kill him, then skip it!
14) GROUP 2+ Players (or soloable):  Go east up at Ruins of Farahlon and do “Full Triangle“: kill/loot Culuthas /target (elite, 53.21).  
NOTE: He isn’t to hard to solo.  If you can’t do it, then skip it.

01) Hearth to The Stormspire.
02) Just outside of the Inn turn in (if you did it) “Hitting the Motherlode” 44.36.
03) Down in the middle of town turn in “The Best Defense” 45.35, accept “Teleport This!“.
04) Go up in the building and turn in “Full Triangle” 46.36. Wait a moment then accept “Special Delivery to Shattrath City“.
05) OPTIONAL: You can skip or do “Teleport This!” north at Forge Base: Gehenna, especially if you want to just get to Shadowmoon Valley sooner or don’t desire the quest reward for it. This can also be not so easy going solo with so many mobs crammed together. This is done by using the Mental Interference Rod quest item on a Cyber-Rage Forgelord /target (they are around the teleporters listed below) then use its Detonate Teleporter ability to destroy these 3 teleporters:
06) Western Gehenna Teleporter 39.20.
07) Central Gehenna Teleporter 41.20.
08) Eastern Gehenna Teleporter 42.21.
09) Hearth (or go back) to The Stormspire and down in the middle of town turn in (if you did it) “Teleport This!” (45.35, #3 on map).
10) Go up to the Flight Master /target 45.35 and fly to Area 52.

01) Go into Area 52 and on your right turn in “In A Scrap With The Legion” 33.65.
02) Next to you turn in “Warn Area 52!“, accept “Doctor Vomisa, Ph.T.” 33.65.
03) Go east to The Proving Grounds and turn in “Doctor Vomisa, Ph.T.” 37.64.
04) GROUP 3+ Players: If you can find a group, you can do “You, Robot“: use the Scrap Reaver X6000 Controller quest item (right next to the quest giver) to control a Scrap Reaver X6000, and then kill the mobs that come.  
NOTE: Unless you want a really tough solo challenge then don’t even attempt to solo this, it will take to long, and you probably won’t be able to do it. If you can’t find a group then skip it.
05) Turn in (if you did it) “You, Robot” (37.64, #3 on map), accept “Back to the Chief!“.
06) Back west at Area 52 turn in (if you have it) “Back to the Chief!” (33.65, #1 on map).
07) Netherstorm is now FINISHED!  
NOTE: You can safely abandon any quests that are currently in your Quest Log for Netherstorm. You should keep “Special Delivery to Shattrath City” and “The Apprentice’s Request“.
08) On the NE outskirts of Area 52 go to the Flight Master /target 34.64 and fly to Shattrath City.

Shattrath City

01) At A’dal directly in the middle of the city turn in “Special Delivery to Shattrath City” 54.45.  
NOTE: “How to Break Into the Arcatraz” is a Dungeon quest that my guide will not cover.
02) SCRYER ONLY: Go south to Scryer’s Tier and turn in any Signets you may have 45.81.
03) SCRYER ONLY: If you happen to have any Arcane Tomes with you, you can turn them in for some Scryer reputation points (south in the city at 43.92). Only the first Arcane Tome gives XP (but no XP after turning the first one in).
04) Since you should be at least lvl 68 its highly recommended to port to a Major City (portals are down at 52.53 in Shattrath City) to get new spells/abilities if you haven’t yet, THEN/OR..
05) Go to the Flight Master /target (64.41 in Shattrath City) and fly to Stonebreaker Hold, Terokkar Forest.
06) From Stonebreaker Hold, head east into Shadowmoon Valley…

WoW TBC Classic Alliance 60-70 Leveling Guide: 67-68 Blade’s Edge Mountains

Sylvanaar

01) From Orebor Harborage follow the path NE through Blade Tooth Canyon and at the cave entrance accept “Killing the Crawlers” 32.91.
02) Go through the cave while doing “Killing the Crawlers“: kill 6 Cavern Crawlers. Work your way to the next step:
03) Work your way north to Sylvanaar, make a left at the entrance and in the building turn in “No Time for Curiosity” 36.68.  
NOTE: If he is not in there, he patrols over to the Wanted Poster near by 37.67.
04) Just outside to your left accept “The Encroaching Wilderness” 36.67.
05) Next to you at the Wanted Poster accept “The Den Mother” 37.67.
06) Go up to the entrance of the tree tower and turn in “Killing the Crawlers” 36.66. Accept “The Bloodmaul Ogres“.
07) Across the path from the female dryad accept “Malaise” 37.66.
08) At the entrance of the merchant building next to you accept “Strange Brew” 37.65.
09) Next to you accept “Into the Draenethyst Mine” 37.65.
10) Go in the Inn NW in town and talk to the Innkeeper 36.64 to make Sylvanaar your new home.
11) Go up to the Hippogryph Master NE in town to get the Flight Path 38.61.
12) South of Sylvanaar start working on “The Encroaching Wilderness” by killing any Grovestalker Lynx you see along the way:
13) Go SW to Veil Lashh (around 36.74) and do “Malaise“: kill/loot the Lashh’an arakkoa mobs.  
NOTE:  When this is almost done, work your way to the next step:
14) Go to the tree ramp (at 35.77).
15) Go to the top of the tree houses at Veil Lashh and click on a Lashh’am Tome (there’s several of them sitting on tables through out the tree tops) to turn in “Malaise” 34.77, accept “Scratches“.
16) West in Veil Lashh do “Scratches“: use your Fistful of Feathers quest item at the spell circle 35.77.  
NOTE: After using the feather you will get a pet bird which lasts for 10 minutes, during that time you need to bring that pet bird to the next step before the timer ends.
17) Back north at Sylvanaar turn in (from the female dryad) “Scratches” (#7 on map 37.66).
18) South of Sylvanaar around 38.71 finish “The Encroaching Wilderness“: kill 12 Grovestalker Lynx (#12 on map).
19) SW in Sylvanaar turn in “The Encroaching Wilderness” 36.67 , accept “Marauding Wolves“.
20) Go east across the bridge then south (see path on map) and do “The Den Mother“: kill Rema (gray wolf 52.75). 
21) Around the immediate area around Jagged Ridge do “Marauding Wolves“: kill/loot Thunderlord Dire Wolves.
22) Hearth (or go back) to Sylvanaar and turn in (at the tree tower entrance) “The Den Mother” (#6 on map 36.66).
23) SW in town turn in “Marauding Wolves” 36.67 , accept “Protecting Our Own“.
24) Just south of Sylvanaar around 37.70 do “Protecting Our Own“: click on the Grove Seedlings on the ground (around #12 on map).
25) Back at Sylvanaar, SW in town, turn in “Protecting Our Own” 36.67, accept “A Dire Situation“.

Bloodmaul Outpost

01) Go to the ramp down (entrance at 39.75).
02) Around Bloodmaul Ravine start working on “A Dire Situation” by using Rina’s Diminution Powder quest item on Bloodmaul Dire Wolves:
03) Go in the Draenethyst Mine (entrance at 43.84) and do “Into the Draenethyst Mine“: loot the Draenethyst Mine Crystals. The ogres in the mine can drop the crystals as well.
04) Leave the mine and around Bloodmaul Outpost 43.83 do “The Bloodmaul Ogres” along with “Strange Brew“: kill 30 Bloodmaul ogres (any type). And loot Bloodmaul Brew Kegs (barrels), and the Bloodmaul Brewmasters (the ones carrying mugs in their hands) can drop the brew as well.
05) Make sure “A Dire Situation” is finished: use Rina’s Diminution Powder quest item on Bloodmaul Dire Wolves around the ravine (#2 on map).
06) Hearth (or go back) to Sylvanaar and at the entrance of the merchant building turn in “Strange Brew” 37.65. Accept “Getting the Bladespire Tanked“.
07) Next to you turn in “Into the Draenethyst Mine” 37.65.
08) At the entrance of the tree tower turn in “The Bloodmaul Ogres” 36.66 , accept “The Bladespire Ogres“.
09) SW in town turn in “A Dire Situation” 36.67.
10) Go north in Sylvanaar at 37.61, then carefully take a few drops down, if done right you should live. OR EASY ROUTE:  Or if you would rather try a more easier but longer route: go to the ramp down (entrance at 39.75).

Bladespire Hold

01) Go north to Bladespire Hold and from the caged Draenei accept “The Trappings of a Vindicator” 44.52.
02) Around Bladespire Hold around 43.53 start working on “The Bladespire Ogres” along with “Getting the Bladespire Tanked“: kill Bladespire Ogres (of any type). And use the Bloodmaul Brutebane Keg quest item near ogres (that are not in combat) to get them drunk. Continue on with the next quests while doing these along the way:
03) Do “The Trappings of a Vindicator“: kill/loot Droggam (in the hut, 38.52).  
TIP: In order to do this solo: First kill the 2 non-elites closest to the entrance by pulling/killing them individually. Then get as close as you can get without pulling the 2 elites and place a Bloodmaul Brutebane Keg on the floor. This will stun the elites allowing you to kill the named one. See the next step for Mugdorg:
04) Kill/loot Mugdorg (in the southern barracks 43.60).  Do this with the same strategy as previous step.
05) From the caged Draenei turn in “The Trappings of a Vindicator” (#1 on map 44.52), accept “Gorr’Dim, Your Time Has Come…“.
06) Do “Gorr’Dim, Your Time Has Come…“: kill Gorr’Dim (in the NW barracks 39.49) by using the same strategy as before.
07) From the caged Draenei turn in “Gorr’Dim, Your Time Has Come…” (#1 on map 44.52) , accept “Planting the Banner“.
08) Do part of “Planting the Banner“: kill/loot a Bladespire Champion. Some easy spawns are: (in a hut 40.58), or (in a hut 41.47 ) or (up the ramp in a hut 39.58).  We will do the other part to this quest in a bit..
09) Around Bladespire Hold (#2 on map around 43.53) finish “The Bladespire Ogres” along with “Getting the Bladespire Tanked“: kill 30 Bladespire Ogres (of any type). And use the Bloodmaul Brutebane Keg quest item near ogres (that are not in combat) to get them drunk.
10) Go south to Bloodmaul Outpost and do the last part of “Planting the Banner“: use the Bladespire Clan Banner quest item on top of the Northmaul Tower 47.75. You will have to kill 3 waves of ogres, then kill/loot Gurn Grubnosh.  
NOTE:  Don’t place your banner down if someone else is doing the quest or you will not be able to do the quest and lose your banner!
11) Hearth (or go back) to Sylvanaar and at the entrance of the merchant building turn in “Getting the Bladespire Tanked” 37.65.
12) At the entrance of the tree tower 36.66 turn in “The Bladespire Ogres” and “Planting the Banner“. Accept “Where Did Those Darn Gnomes Go?“.
13) Go east across the bridge, then SE to turn in “Where Did Those Darn Gnomes Go?” 55.73, accept “Follow the Breadcrumbs“.

Toshley’s Station

01) Go east to Toshley’s Station, make a right in the town, up to the Gryphon Master 61.70 and get the Flight Path. From him accept (if you are lvl 67) “Building a Better Gryphon“.
02) Go down and turn in “Follow the Breadcrumbs” 61.69. Accept “Picking Up Some Power Converters“.
03) West next to you accept “Crystal Clear” 60.69.
04) North next to you accept “Test Flight: The Zephyrium Capacitorium” 60.68.
05) East in the Inn/hut talk to the Innkeeper 61.68 to make Toshley’s Station your new home. Also from him accept “What Came First, the Drake or the Egg?“.
06) NOTE: You will also see (if you are lvl 67) “Parts for the Rocket-Chief” available in town. SKIP it.
07) In town do “Test Flight: The Zephyrium Capacitorium“: speak to Rally Zapnabber /target 60.69.
08) South around Singing Ridge around 59.73 do “Crystal Clear” along with “What Came First, the Drake or the Egg?“: kill 10 Crystal Flayers.  And click the Nether Drake Eggs then use your quest item Temporal Phase Modulator on the small Nether Whelp that comes out of the egg. Then, kill/loot the required mobs. 
NOTE: You can use the quest item multiple times on the same spawn to change it to something else.
09) Hearth (or go back) to Toshley’s Station and turn in “Crystal Clear” 60.69, accept “Gauging the Resonant Frequency“. 
NOTE:  Turn in next step’s quest first if you were able to hearth!
10) NE In the Inn turn in “What Came First, the Drake or the Egg?” 61.68.
11) Near you turn in “Test Flight: The Zephyrium Capacitorium” 60.68 , accept “Test Flight: The Singing Ridge“.
12) Do “Test Flight: The Singing Ridge“: use your Tally Waiver quest item here at the quest giver 60.68.  Then:
13) Near by, talk to Rally Zapnabber /target 60.69 to have him take you to Singing Ridge.
14) There at Singing Ridge (#8 on map around 60.74) do “Gauging the Resonant Frequency“: use your quest item Oscillating Frequency Scanners in a way that when you stand amongst them, you are hit by 5 overlapping Oscillation fields. It can’t be used within 25 yards of each other and can only extend within a 40 yard radius. You must be at Singing Ridge to do this.

01) Hearth (or go back) to Toshley’s Station and turn in “Test Flight: The Singing Ridge” 60.68.
02) Near you turn in “Gauging the Resonant Frequency” 60.69.
03) Go north to Bladespire Outpost around 58.61 and do “Picking Up Some Power Converters“: loot the Power Converters on the ground then immediately use your quest item Protovoltaic Magneto Collector on the Electromental that spawns, then kill it.
04) Hearth (or go back) to Toshley’s Station and turn in “Picking Up Some Power Converters” 61.69 , accept “Ride the Lightning“.
05) Next to you accept “Ridgespine Menace” 60.69.
06) Find Razak Ironsides /target (he patrols around the town) and from him accept “Cutting Your Teeth“.
07) In town, talk to Rally Zapnabber /target 60.69 to have him take you to Singing Ridge.
08) Go east to Scalewing Shelf around 68.72 then work your way north to do “Ridgespine Menace” along with “Ride the Lightning” and “Cutting Your Teeth“: kill 10 Ridgespine Stalkers (stealthy spiders).  Use your quest item Repolarized Magneto Sphere when your fighting the Scalewing Serpents to absorb the lightning strikes (loot these too). And kill/loot the Daggermaw Lashtails.
09) Hearth (or go back) to Toshley’s Station and turn in “Ride the Lightning” 61.69, accept “Trapping the Light Fantastic“.
10) Next to you turn in “Ridgespine Menace” 60.69. Accept “More than a Pound of Flesh“.
11) Find Razak Ironsides /target (he patrols around the town) and from him turn in “Cutting Your Teeth“.
12) In town accept “Test Flight: Razaan’s Landing” (#1 on map 60.68).

01) Do “Test Flight: Razaan’s Landing“: in town, talk to Rally Zapnabber /target 60.69 to have him take you to Razaan’s Landing.
02) At Razaan’s Landing around 67.44 do “Trapping the Light Fantastic” and “More than a Pound of Flesh“: use your quest item Multi-Spectrum Light Trap anywhere in Razaan’s Landing. It should attract the small orbs floating around, repeat until your done. And kill/loot the Fiendling Flesh Beasts.
03) Hearth (or go back) to Toshley’s Station and turn in “Test Flight: Razaan’s Landing” (#1 on map 60.68).
04) Near you turn in “More than a Pound of Flesh” 60.69.
05) Next to you turn in “Trapping the Light Fantastic” 61.69, accept “Show Them Gnome Mercy!“.
06) In town, talk to Rally Zapnabber /target 60.69 to have him take you to Razaan’s Landing.
07) At Razaan’s Landing (#2 on map around 67.44) do “Show Them Gnome Mercy!“: keep killing the Razaani mobs until Nexus-Prince Razaan /target shows up, kill him and loot the cube.  
NOTE: When the Prince spawns he yells “Who dares to interrupt my operations?“, when you see that in your chat, look for him and kill him.
08) Hearth (or go back) to Toshley’s Station and turn in “Show Them Gnome Mercy!” 61.69.
09) In town accept “Test Flight: Ruuan Weald” 60.68.
10) Do “Test Flight: Ruuan Weald“: in town, talk to Rally Zapnabber /target 60.69 to have him take you to Ruuan. Use your quest item Nether-Weather Vane while your flying in the air.

Evergrove

01) When you land at Evergrove get the Flight Path from the Flight Master /target 62.40.
02) Accept ALL quests at Evergrove:  In front of you by the moonwell accept “A Time for Negotiation…” 62.39.
03) Next to you at the moonwell accept “Creating the Pendant” 62.39.
04) At the gnome SE in town turn in “Test Flight: Ruuan Weald” 63.40.
05) Go in the Inn next to you and talk to the Innkeeper /target 63.38 to make Evergrove your new home.
06) Make a right out of the Inn and next to the Mailbox accept “Culling the Wild” 63.38.
07) West a bit by the small wagon 62.38 accept “A Date with Dorgok” and “Crush the Bloodmaul Camp!“.
08) At the west part of town, accept (from the big Ancient /target, 61.38) “Little Embers” and “From the Ashes“.
09) Do “A Time for Negotiation…“: find and talk to Overseer Nuaar /target (male draenei), he patrols around the left side and the south side of Ruuan Weald.
10) Back at Evergrove by the moonwell turn in “A Time for Negotiation…” (62.39, #1 on map), accept “…and a Time for Action” and (next to you) “Poaching from Poachers“.
11) All around Evergrove (aka Ruuan Weald) do “…and a Time for Action” along with “Poaching from Poachers“: kill 10 Wyrmcult Hewer (they wield axes) and kill/loot the Wyrmcult Poachers (they wield bows). While doing these quests you should find an item which starts “Did You Get The Note?“, accept it.

01) Go to the ramp down (at 60.29).
02) Go up in the hut (ramp entrance at 55.25) and then do “A Date with Dorgok“: kill Dorgok. He will drop Gorgrom’s Favor, which starts “Favor of the Gronn“, accept it. Keep the next step in mind:
03) Within the immediate area around Bloodmaul Camp do “Crush the Bloodmaul Camp!“: kill 10 BloodmaulMaulers and 5 Warlocks.
04) Hearth (or go back) to Evergrove and by the moonwell 62.39 turn in “Poaching from Poachers” (accept “Whelps of the Wyrmcult“), “…and a Time for Action” and “Did You Get The Note?“. Accept “Wyrmskull Watcher“.
05) North a bit by the small wagon 62.38 turn in “A Date with Dorgok“, “Favor of the Gronn” and “Crush the Bloodmaul Camp!“. Accept “Pay the Baron a Visit“.
06) Go north to Veil Ruuan and do “Creating the Pendant“: kill/loot the Ruuan’ok mobs (arakkoa) for 6 claws, then use them at the green summoning circle 64.33, and kill/loot the bird mob /target that spawns.
07) Back south at Evergrove by the moonwell turn in “Creating the Pendant” (62.39, #4 on map), accept “Whispers of the Raven God“.

Baron Sablemane

01) Go to the ramp down (at 60.44).
02) Go west to the northern outside part of Circle of Blood and turn in “Pay the Baron a Visit” 53.41, accept “Into the Churning Gulch“.
03) Just to the west at Churning Gulch 49.42 do “Into the Churning Gulch“: kill/loot Young or Greater Crust Bursters.
04) Back at the northern outside part of Circle of Blood turn in “Into the Churning Gulch” (#2 on map 53.41), accept “Goodnight, Gronn“.
05) Go east to Cursed Hollow and do “Goodnight, Gronn“: use your quest item Sabkemane’s Sleeping Powder on Grulloc 61.48 then loot Grulloc’s Sack on the ground next to him.
06) Back at the northern outside part of Circle of Blood turn in “Goodnight, Gronn” (#2 on map 53.41), accept “It’s a Trap!“.
07) Go to the ramp up (at 59.46).
08) Go to Evergrove and NW in town next to the small wagon 62.38 turn in “It’s a Trap!“, accept “Gorgrom the Dragon-Eater“. And next to you accept “Slaughter at Boulder’mok“.

Grishnath

01) Go west across the bridge and turn in “Wyrmskull Watcher” 50.36 (he patrols a bit), accept “Longtail is the Lynchpin“.
02) Go in Wyrmskull Tunnel next to you and do “Longtail is the Lynchpin“: kill Draaca Longtail /target (draenei), she is wondering around near the end of the tunnel around 46.33.  
NOTE:  You can mount while in this tunnel.
03) Back at the tunnel entrance next to the bridge turn in “Longtail is the Lynchpin” (50.36, #1 on map), accept “Meeting at the Blackwing Coven“.
04) Go back through the tunnel to the other side, then north at Grishnath around 41.22 and do “Whispers of the Raven God“: kill a Grishna Falconwing /target to obtain a 2 min buff that will allow you to then view the Prophecies (listed below).  
NOTE: While doing this quest, you should find an item which starts “The Truth Unorbed“, accept it. Here are the locations of the 4 Prophecies to view:
05) View The First Prophecy (up in the tree house, 39.17).
06) View The Third Prophecy (on the ground by the swamp, 41.18).
07) View The Second Prophecy (up in the tree house, lower deck, 42.22).
08) View The Fourth Prophecy (on the ground between a hut and a red canopy, 40.23).
09) Go west to Boulder’mok and do “Slaughter at Boulder’mok” along with “Gorgrom the Dragon-Eater“: kill 5 Boulder’mokBrutes and 3 Shamans, then click on Gorgrom’s Altar 31.22. Gorgrom the Dragon-Eater will spawn and then drop dead at the altar, then use 3 Grisly Totems quest item (collected from the ogres) on his corpse.
10) Go SW to Blackwing Coven (cave entrance at 32.34) and do “Whelps of the Wyrmcult“: use the Blackwhelp Net quest item on the Wyrmcult Blackwhelps (dragon whelps) in the cave.
11) In Blackwing Coven (cave) do “Meeting at the Blackwing Coven“: first collect 5 Costume Scraps from the Wyrmcult mobs in the cave (you might already have enough). Then click on it in your backpack to make an Overseer Disguise, then use it to talk to Kolphis Darkscale /target (male orc 33.37) in the cave.
12) Hearth to Evergrove.

01) West in town by the small wagon 62.38 turn in “Gorgrom the Dragon-Eater“, accept “Baron Sablemane Has Requested Your Presence“. And turn in “Slaughter at Boulder’mok“.
02) At the moonwell turn in “Whispers of the Raven God” 62.39.
03) At the other side of the moonwell 62.39 turn in “Meeting at the Blackwing Coven” (accept “Maxnar Must Die!“), “The Truth Unorbed” and “Whelps of the Wyrmcult“. Accept “Treebole Must Know“.
04) Go NE to Bladed Gulch (starting around 69.37) and do “Culling the Wild“: kill 4 Felsworn Scalewings (serpents), 4 Felsworn Daggermaw (raptors) and 2 Fel Corrupters.  
NOTE: While doing this quest, the Fel Corrupters can drop an item which starts “Damaged Mask“, accept it.
05) Go north to Skald around 72.22 and do “Little Embers” along with “From the Ashes“: kill 8 Scorch Imps, and click on these 3 Volcanic Soil mounds:
06) Click on Southern Fertile Volcanic Soil mound 72.22.
07) Click on Central Fertile Volcanic Soil mound 72.20.
08) Click on Northern Fertile Volcanic Soil mound 72.18.
09) Hearth (or go back) to Evergrove and turn in all quests and accept new ones:
10) At the male gnome SE in town turn in “Damaged Mask” 63.40, accept “Mystery Mask“.
11) From Wildlord Antelarion (male dryad patrolling around the moonwell) turn in “Mystery Mask“, accept “Felsworn Gas Mask“.
12) At the west part of town, turn in (from the big Ancient, 61.38) “Little Embers” and “From the Ashes“.
13) Next to the mailbox/Inn turn in “Culling the Wild” 63.38.

Forge Camp Anger

01) Go east to Forge Camp: Anger and do “Felsworn Gas Mask“: first equip the Felsworn Gas Mask quest item, if you do not have the mask you can get another one from the dryad walking around in Evergrove. Once the mask is equipped go to the Legion Communicator 73.40 and turn this quest in and accept “Deceive thy Enemy“.  
NOTE: You may have to take the mask off and on to get the communicator to work right.
02) In the immediate area around Forge Camp: Anger do “Deceive thy Enemy“: kill 4 DoomforgeAttendants and 4 Engineers.
03) Back at the Legion Communicator (73.40, #1 on map) turn in “Deceive thy Enemy“, accept “You’re Fired!“.
04) In the immediate area around Forge Camp: Anger (#2 on map) do “You’re Fired!“: kill/loot the Anger Guards in the immediate area to obtain 5 Camp Anger Keys, then use the keys at the 5 Legion Obelisks in the area to summon and kill Doomcryer /target (lvl 68 Elite).  
NOTE: This quest recommends you have 2 players but with good skill this can be soloed. If you can’t do it, don’t worry about it and skip it.
05) Hearth (or go back) to Evergrove and turn in (if you did it) “You’re Fired!” (at the male dryad walking around the moonwell, 62.39), accept “Death’s Door“.

Death’s Door

01) NOTE: The steps in this section can only be done if you completed and turned in “You’re Fired!“. If you did not do it, then skip to the Raven’s Wood section below.
02) At the Flight Master in Evergrove 62.40 fly to Toshley’s Station. Then when landing at Toshley’s Station, from the Gryphon Master accept (if you haven’t yet, requires lvl 67) “Building a Better Gryphon“.
03) At the east side of Toshley’s Station drop down to Death’s Door. Be careful as you are dropping down as there are several long falls, but you should be able to make it alive if you are careful.
04) Once you get down to Death’s Door 62.60 use the Druid Signal quest item, wait a few seconds then at the Druid that spawns turn in “Death’s Door“, accept “Harvesting the Fel Ammunition“.
05) In the immediate area all around Death’s Door do “Harvesting the Fel Ammunition“: kill/loot any mobs (except the hounds) to obtain the 5 Fel cannonballs.
06) Any where at Death’s Door use the Druid Signal quest item, wait a few seconds then at the Druid that spawns turn in “Harvesting the Fel Ammunition“, accept “Fire At Will!“.
07) Do “Fire At Will!“.  First clear out the Death Mights around the south Death’s Door Fel Cannon 65.68, then use your Naturalized Ammunition quest item on it.  You will get a pet-bar to control the cannon, keep spamming the Artillery on the Warp-Gate ability (about 10 times to kill the Warp-Gate), while you kill the imps that come out with the Flame Thrower.  
NOTE:  DO NOT summon a pet/minion during this or it will remove of the cannon bar. And see next step for the north one:
08) Use the Naturalized Ammunition quest item at the north Death’s Door Fel Cannon 62.60. Then do the same thing you did in the previous step.
09) Anywhere at Death’s Door use the Druid Signal quest item, wait a few seconds then at the Druid that spawns turn in “Fire At Will!“, accept “The Hound-Master“.
10) North at Death’s Door by the big portal do “The Hound-Master“: get close to Baelmon the Hound-Master /target (lvl 68 Elite, 64.59) and use the Evergrove Wand quest item to summon Evergrove Ancients to help you kill him.
11) Hearth (or go back) to Evergrove and turn in (if you did it) “The Hound-Master” (at the male dryad walking around the moonwell, 62.39, #2 on map).

Raven’s Wood

01) Head west across the bridge/tunnel to Raven’s Wood and at Treebole /target (big ancient, 37.22) turn in “Treebole Must Know“, accept “Exorcising the Trees“.
02) All around Raven’s Wood in the immediate area do “Exorcising the Trees“: first obtain 5 Grishnath Orbs (purple orb objects NE at the arakkoa village Grishnath), then kill/loot Dire Ravens to obtain 5 Dire Pinfeathers, and then combine them by clicking on them in your backpack to make 5 Exorcism Feathers. Then use these Feathers on 5 Raven’s Wood Leafbeards /target (all around Raven’s Wood) to release their Koi-Koi Spirits, then finally kill those spirits.
03) Back at Treebole /target (big ancient, 37.22, #1 on map) turn in “Exorcising the Trees“.
04) Go SW and enter Blackwing Coven (cave entrance at 32.34).
05) At the end of the cave do “Maxnar Must Die!“: kill Maxnar the Ashmaw /target 34.35.  
NOTE: Watch out this guy does a fire attack that does about 4,000 fire damage!
06) Hearth to Evergrove, if hearthstone is still on a cooldown, just die on purpose and res at the spirit healer.
07) By the moonwell at Evergrove turn in “Maxnar Must Die!” 62.39.

OPTIONAL GROUP (or soloable?) – Gruul’s Lair

NOTE:  This section is optional and involves killing elite mobs (they can be soloed but could take awhile).  You can skip them all if you like (especially if you want a break from Blade’s Edge Mountains).  If you decide to skip them, then go to the Journey to Netherstorm section below:

01) Go to the ramp down (at 59.44).
02) Go west to the northern outside part of Circle of Blood and turn in “Baron Sablemane Has Requested Your Presence” 53.41, accept “Massacre at Gruul’s Lair“.
03) Go north to Gruul’s Lair and do “Massacre at Gruul’s Lair“: kill the required amount of Bladespire (elite) mobs. Fingrom is at the top of the hut (ramp entrance at 66.20).
04) Back at the northern outside part of Circle of Blood turn in “Massacre at Gruul’s Lair” (#2 on map 53.41), accept “Showdown“.
05) Back north down at Gruul’s Lair do “Showdown“: use Sablemane’s Signet quest item at the Altar of Goc 64.18, then kill Goc /target (lvl 70 Elite) when he comes. 
TIP: Let Baren Sablemane fight him for a little while first so he builds up aggro, so Goc does not come after you.
06) Back at the northern outside part of Circle of Blood turn in “Showdown” (#2 on map 53.41).

Journey to Netherstorm

01)Blades Edge Mountains is now FINISHED!  
NOTE: You can safely abandon any quests that are currently in your Quest Log (EXCEPT “Building a Better Gryphon“).
02) Follow the main path NE to Netherstorm.

WoW TBC Classic Horde 60-70 Leveling Guide: 67-68 Blade’s Edge Mountains

Thunderlord Stronghold

01) Right before entering the cave at Blade’s Run accept “Killing the Crawlers” 53.96.
02) Grind your way north through the cave while doing “Killing the Crawlers” by killing 6 Cavern Crawlers. Then continue to Thunderlord Stronghold and turn in “Killing the Crawlers” 52.58. Accept “The Bladespire Threat“.
03) Next to you at the Bonfire, accept “The Encroaching Wilderness” and (Wanted Poster, 52.58) “Felling an Ancient Tree“.
04) Get the Flight Path at the Wind Rider Master /target 52.54.
05) Go in the Inn (the biggest building at the Stronghold) and talk to the Innkeeper /target 53.55 to make Thunderlord Stronghold your new home.
06) NOTE: There is a First Aid Trainer /target 54.55 there in the Inn if you need to upgrade your First Aid.
07) To the south and west of Thunderlord Stronghold at Jagged Ridge do “The Encroaching Wilderness“: kill 12 Bladewing Bloodletters.
08) Follow the main path west across the bridge to The Living Grove (watch out for the Alliance town Sylvanaar) and do “Felling an Ancient Tree“: kill/loot Stronglimb Deeproot /target (this huge ancient patrols up and down the path).  His spawn is at 37.78.

Bloodmaul/Bladespire Ogres

01) Go down into Bloodmaul Ravine (ramp entrance at 40.76).
02) Go down and accept from the male troll “They Stole Me Hookah and Me Brews!” 45.72.
03) Go south into Bloodmaul Ravine and do “They Stole Me Hookah and Me Brews!“: kill/loot Bloodmaul Brewmasters for the 10 brews and loot T’chali’s Hookah (next to the Campfire at 42.81).  
NOTES: The Brewmasters are the ones carrying mugs in their hands. You can also loot the brews from the Bloodmaul Brew Kegs on the ground.
04) Back north at the male troll turn in “They Stole Me Hookah and Me Brews!” (45.72, #2 on map), accept “Bladespire Kegger“.
05) Go north to Bladespire Hold around 43.53 and do “The Bladespire Threat” along with “Bladespire Kegger“: kill 30 Bladespire Ogres (of any type), and 10 Bladespire Raptors. And use the Bloodmaul Brutebane Keg quest item near ogres (that are not in combat) to get them drunk.  
ALSO: An item should drop while doing this quest, which starts: “Thunderlord Clan Artifacts“, accept and do it by looting the following 3 artifacts around the hold:
06) Pick up Thunderlord Clan Drum (in the hut, 40.58).
07) Pick up Thunderlord Clan Arrow (up on the rock, 42.53).  
NOTE:  Ramp entrance at 41.52.
08) Pick up Thunderlord Clan Tablet (in the hut, 41.46).
09) Once they are done, go south and at the male troll turn in “Bladespire Kegger” (45.72, #2 on map), accept “Grimnok and Korgaah, I Am For You!“.
10) Go south to Bloodmaul Outpost and do part of “Grimnok and Korgaah, I Am For You!“: kill Grimnok Battleborn /target (up in the watch tower, 45.80).
11) Go north to Bladespire Hold and finish “Grimnok and Korgaah, I Am For You!“: kill Korgaah /target (up in the hut, 43.47).  
NOTE: This ogre is next to 2 Elite mobs.  Just quickly kill Korgaah and run out of there. Also if you have some Bloodmaul Brutebane Keg left, use them to distract the ogres to disable some of them.
12) Back south at the male troll turn in “Grimnok and Korgaah, I Am For You!” (45.72, #2 on map), accept “A Curse Upon Both of Your Clans!“.
13) Go south to Bloodmaul Outpost and do part of “A Curse Upon Both of Your Clans!“: use the Wicked Strong Fetish quest item at 2 buildings there around 47.79.  
NOTE:  You can use the quest item on the same building multiple times.
14) Go north to Bladespire Hold and finish “A Curse Upon Both of Your Clans!“: use the Wicked Strong Fetish quest item at 5 buildings there around 42.57.
15) Back south at the male troll turn in “A Curse Upon Both of Your Clans!” (45.72, #2 on map).

Bloodmaul Ravine

01) Hearth to Thunderlord Stronghold.
02) Just outside of the Inn, next to the Wind Rider Master accept (if you are lvl 67) “The Apprentice’s Request” 52.54.  
NOTE:  There is a quest nearby called “Out of This World Produce” (requires 67), do NOT accept this quest as we will do another similar one that will give more XP.
03) Down by the Bonfire 52.58 turn in “Felling an Ancient Tree“, “The Bladespire Threat” (accept “The Bloodmaul Ogres“), and “The Encroaching Wilderness” (accept “Dust from the Drakes“).
04) SE in town, turn in “Thunderlord Clan Artifacts” 53.59, accept “Vision Guide“.
05) Do “Vision Guide“. Simply click on the Fiery Soul Fragment quest item (right there at the quest giver, 53.59, #4 on map) and it will fly you around. Once the flight is over turn in “Vision Guide“, accept “The Thunderspike“.
06) Go SW across the bridge to The Living Grove (around 39.70, watch out for the Alliance town Sylvanaar) and do “Dust from the Drakes“: kill/loot Fey Drakes.
07) Go down and south to Draenethyst Mine (entrance at 42.85) and do “The Bloodmaul Ogres” along with “The Thunderspike“: go to the end of the linear cave and loot The Thunderspike. You then need to kill/loot the mob that spawns. Then leave the cave and finish up killing the 30 Bloodmaul Ogres (of any type).
08) Hearth (or go back) to Thunderlord Stronghold and down by the Bonfire (52.58, #3 on map) turn in “The Bloodmaul Ogres” and “Dust from the Drakes“, accept “Protecting Our Own“.
09) SE in town, turn in “The Thunderspike” (53.59, #4 on map). Then wait a moment and accept next to you “The Spirits Have Voices“.
10) Back by the Bonfire turn in “The Spirits Have Voices” (53.59, #3 on map), accept “Whispers on the Wind“.
11) Just south of Thunderlord Stronghold around 51.64 do “Protecting Our Own“: use the Gor’drek’s Ointment quest item on Thunderlord Dire Wolves.
12) Back at Thunderlord Stronghold at the Bonfire, turn in “Protecting Our Own” 52.58.

Mok’Nathal Village

01) Follow the main path all the way to Mok’Nathal Village (see path to take on map), then accept “The Stones of Vekh’nir” 75.62.
02) In the middle of the village turn in “Whispers on the Wind” 75.61, accept “Reunion“.
03) Just east of you at the Inn, talk to the Innkeeper /target 76.60 to make Mok’Nathal Village your new home, also accept “Mok’Nathal Treats“.
04) Just outside of the Inn on your left, accept “Silkwing Cocoons” and “The Softest Wings” 76.61.
05) SE in town, get the Flight Path from the Flight Master /target 76.66.
06) Just south of Mok’Nathal Village (around Vekhaar Stand, 75.75) do “Silkwing Cocoons” along with “The Softest Wings“: kill/loot the yellow Silkwing Larvas and Mature Silkwings (moths).
07) SE at Veil Vekh do “The Stones of Vekh’nir“: keep kill/looting the Vekh’nir mobs until the Vekh’nir Crystal drops, then use it at the purple spell circle 78.75.
08) Back north at Mok’Nathal Village turn in “The Stones of Vekh’nir” (75.62, #4 on map). Wait a few seconds then accept “Trial and Error“.
09) Across the path, turn in “The Softest Wings” and “Silkwing Cocoons” 76.61.
10) Near you at Leoroxx, accept “Understanding the Mok’Nathal” (75.61, #1 on map).
11) Go SE to Veil Vekh around 78.75 and do part of “Trial and Error“: kill/loot the Vekh’nir mobs until you get 4 Infused Vekh’nir Crystals. You can find some more Vekh’nir mobs west around 72.74.  These are #7 on map.
12) West at Trogma’s Claim around 72.74 finish “Trial and Error“: first open the Dertrok’s Wand Case (in your backpack), then use the 4 wands on the Ogres in the area.  Keep the next step in mind:
13) Enter the cave at Trogma’s Claim and do “Understanding the Mok’Nathal“: take the middle path in the cave then kill Vekh /target (green arakkoa mob, 70.72).

01) Hearth to Mok’Nathal Village.
02) Just outside of the Inn turn in “Understanding the Mok’Nathal” 75.61, accept “Since Time Forgotten…“.
03) Next to you by the fire accept “The Totems of My Enemy” 75.60.
04) Just south of you across the path turn in “Trial and Error” 75.62, accept “Ruuan Weald“.
05) Grind your way NW to Bladespire Outpost while start working on “Mok’Nathal Treats” (kill/loot serpents and raptors, #6 on map) and then do “The Totems of My Enemy” along with “Since Time Forgotten…“: kill/loot the Bladespire ogres and kill Gnosh Brognat /target (under the rock canopy, 57.54).
06) As you work your way SE back to Mok’Nathal Village continue working on “Mok’Nathal Treats“: kill/loot serpents and raptors around Razor Ridge (don’t need to finish this yet).
07) Hearth or go back to Mok’Nathal Village and in the Inn turn in (if it’s done) “Mok’Nathal Treats” 76.60.
08) Just outside of the Inn turn in “Since Time Forgotten…” (75.61, #2 on map), accept “Slay the Brood Mother“.
09) Next to you by the fire turn in “The Totems of My Enemy” (75.60), accept “Spirit Calling“.
10) Go to the ramp up (starting at 71.62).
11) Go SW to Singing Ridge and do “Slay the Brood Mother” along with “Spirit Calling“: kill Dreadwing /target (the largest netherdrake in the area, around 63.77).  And use the Spirit Calling Totems quest item near the Lesser Nether Drakes to loot their spirits when they die.  
NOTE: Use your 5 totems wisely, you can go get more but you should use the 5 totems to get all 8 spirits.
12) Hearth or go back to Mok’Nathal Village and just outside of the Inn turn in “Slay the Brood Mother” (75.61, #2 on map).
13) Next to you by the fire turn in “Spirit Calling” 75.61, accept “Gather the Orbs“.

01) Go NW to Razaan’s Landing around 67.42 and do “Gather the Orbs“: use the Orb Collecting Totem quest item anywhere in Razaan’s Landing to collect 15 Razaani Light Orbs (those small purple puff balls floating around).  
NOTE: Keep using the totem constantly when the cooldown is up to get all 15 (because the totem disappears after it collects an orb), and you generally don’t need to attack anything.
02) Hearth or go back to Mok’Nathal Village and by the fire turn in “Gather the Orbs” 75.61, accept “Inform Leoroxx!“.
03) Next to you turn in “Inform Leoroxx!” 75.61.  Accept “There Can Be Only One Response“.
04) Go back NW to Razaan’s Landing (around 67.42, #1 on map) and do “There Can Be Only One Response“: keep killing the Razaani mobs until Nexus-Prince Razaan /target shows up, kill him and loot the cube.  
NOTE: When the Prince spawns he yells “Who dares to interrupt my operations?“, when you see that in your chat, look for him and kill him.
05) Now make sure “Mok’Nathal Treats” is now finished (if you still need to): kill/loot serpents and raptors around Razor Ridge.  
NOTE:  There is a large concentration of serpents around 68.72.
06) Hearth or go back to Mok’Nathal Village and in the Inn turn in (if you still need to) “Mok’Nathal Treats” 76.60.
07) By the fire turn in “There Can Be Only One Response” (75.60, #2 on map).
08) Go SE to the Flight Master /target 76.66 and fly to Thunderlord Stronghold, Blade’s Edge Mountains.
09) At Thunderlord Stronghold, down by the Bonfire turn in “Reunion” 52.58, accept “On Spirit’s Wings“.

Evergrove

01) Head NE to Evergrove (see path on map to take) then get the Flight Path from the Flight Master /target 62.40.
02) Accept ALL quests at Evergrove:  In front of you by the moonwell accept “A Time for Negotiation…” 62.39.
03) Next to you at the moonwell turn in “Ruuan Weald” 62.39.  Accept “Creating the Pendant“.
04) Next to the mailbox/Inn accept “Culling the Wild” 63.38.
05) Go in the Inn next to you and talk to the Innkeeper /target 63.38to make Evergrove your new home.
06) At the west part of town, accept (from the big Ancient /target, 61.38) “Little Embers” and “From the Ashes“.
07) Do “A Time for Negotiation…“: find and talk to Overseer Nuaar /target (male draenei), he patrols around the left side and the south side of Ruuan Weald.
08) Back at Evergrove by the moonwell turn in “A Time for Negotiation…” (62.39, #1 on map), accept “…and a Time for Action” and (next to you) “Poaching from Poachers“.
09) All around Evergrove (aka Ruuan Weald) do “…and a Time for Action” along with “Poaching from Poachers“: kill 10 Wyrmcult Hewer (they wield axes) and kill/loot the Wyrmcult Poachers (they wield bows).  While doing these quests you should find an item which starts “Did You Get The Note?“, accept it.
10) Back at Evergrove by the moonwell (62.39, #1 on map) turn in “Poaching from Poachers” (accept “Whelps of the Wyrmcult“), “…and a Time for Action” and “Did You Get The Note?“. Accept “Wyrmskull Watcher“.
11) Go north to Veil Ruuan and do “Creating the Pendant“: kill/loot the Ruuan’ok mobs (arakkoa) for 6 claws, then use them at the green summoning circle 64.33, and kill/loot the bird mob /target that spawns.
12) Back south at Evergrove by the moonwell turn in “Creating the Pendant” (62.39, #1 on map), accept “Whispers of the Raven God“.

01) Go west across the bridge and turn in “Wyrmskull Watcher” 50.36 (he patrols a bit), accept “Longtail is the Lynchpin“.
02) Go in Wyrmskull Tunnel next to you and do “Longtail is the Lynchpin“: kill Draaca Longtail /target (draenei), she is wondering around near the end of the tunnel around 46.33.  
NOTE:  You can mount while in this tunnel.
03) Back at the tunnel entrance next to the bridge turn in “Longtail is the Lynchpin” (50.36, #1 on map), accept “Meeting at the Blackwing Coven“.
04) Go back through the tunnel to the other side, then north at Grishnath around 41.22 and do “Whispers of the Raven God“: kill a Grishna Falconwing /target to obtain a 2 min buff that will allow you to then view the Prophecies (listed below).  
NOTE: While doing this quest, you should find an item which starts “The Truth Unorbed“, accept it. Here are the locations of the 4 Prophecies to view:
05) View The First Prophecy (up in the tree house, 39.17).
06) View The Third Prophecy (on the ground by the swamp, 41.18).
07) View The Second Prophecy (up in the tree house, lower deck, 42.22).
08) View The Fourth Prophecy (on the ground between a hut and a red canopy, 40.23).
09) Go SW to Blackwing Coven (cave entrance at 32.34) and do “Whelps of the Wyrmcult“: use the Blackwhelp Net quest item on the Wyrmcult Blackwhelps (dragon whelps) in the cave.
10) In Blackwing Coven (cave) do “Meeting at the Blackwing Coven“: first collect 5 Costume Scraps from the Wyrmcult mobs in the cave (you might already have enough).  Then click on it in your backpack to make an Overseer Disguise, then use it to talk to Kolphis Darkscale /target (male orc, 33.37) in the cave.
11) Hearth to Evergrove.

01) At the moonwell 62.39 turn in “Whispers of the Raven God“, “Meeting at the Blackwing Coven” (accept “Maxnar Must Die!“), “The Truth Unorbed” and “Whelps of the Wyrmcult“. Accept “Treebole Must Know“.
02) Go NE to Bladed Gulch (starting around 69.37) and do “Culling the Wild“: kill 4 Felsworn Scalewings (serpents), 4 Felsworn Daggermaw (raptors) and 2 Fel Corrupters.  
NOTE: While doing this quest, the Fel Corrupters can drop an item which starts “Damaged Mask“, accept it.
03) Go north to Skald around 72.22 and do “Little Embers” along with “From the Ashes“: kill 8 Scorch Imps, and click on these 3 Volcanic Soil mounds:
04) Click on Southern Fertile Volcanic Soil mound 72.22.
05) Click on Central Fertile Volcanic Soil mound 72.20.
06) Click on Northern Fertile Volcanic Soil mound 72.18.
07) Hearth (or go back) to Evergrove and turn in all quests and accept new ones:
08) At the male gnome SE in town turn in “Damaged Mask” 63.40, accept “Mystery Mask“.
09) From Wildlord Antelarion (male dryad patrolling around the moonwell) turn in “Mystery Mask“, accept “Felsworn Gas Mask“.
10) At the west part of town, turn in (from the big Ancient, 61.38) “Little Embers” and “From the Ashes“.
11) Next to the mailbox/Inn turn in “Culling the Wild” 63.38.
12) Follow the path NW to Daggermaw Canyon and at the bottom of the ramp 58.31 do “On Spirit’s Wings“: use Rexxar’s Whistle quest item near a Bloodmaul Soothsayer talking to a Bloodmaul Taskmaster (Ogres talking to each other).
13) Go back SE to Evergrove and at the Flight Master (62.40, #1 on map) fly to Thunderlord Stronghold, Blade’s Edge Mountains.

01) Down by the Bonfire turn in “On Spirit’s Wings” 52.58, accept “Baron Sablemane“.
02) Head north down to the northern outside part of Circle of Blood and turn in “Baron Sablemane” 53.41, accept “Into the Churning Gulch“.
03) Just to the west at Churning Gulch around 49.42 do “Into the Churning Gulch“: kill/loot Young or GreaterCrust Bursters.
04) Back at the northern outside part of Circle of Blood turn in “Into the Churning Gulch” (53.41, #2 on map). Wait a few seconds then accept “Baron Sablemane’s Poison“.
05) Go back south to Thunderlord Stronghold and at the Bonfire turn in “Baron Sablemane’s Poison” (52.58, #1 on map), accept “The Smallest Creatures“. Next to you accept “Crush the Bloodmaul Camp“.
06) Hearth (or fly back, Wind Rider Master at 52.54) to Evergrove.
07) Go down NW to Bloodmaul Camp and do “The Smallest Creatures“: use the Kodohide Drum quest item down at the small Marmot Den (small critters at 56.29), then control the marmot to poison the 3 kegs (listed below). 
TIP: You should use stealth as soon as you get your marmot, and still try to stay away from the mobs to not get detected. The next 3 steps shows you where the kegs are, you can also use this image to help you find the kegs:
08) Poison the Ripe Moonshine Keg 55.28.
09) Poison the Green Spot Grog Keg 55.26.
10) Poison the Fermented Seed Beer Keg 56.23.
11) At the Bloodmaul Camp do “Crush the Bloodmaul Camp“: kill 10 Bloodmaul Maulers and 5 Bloodmaul Warlocks.
12) Go to the Flight Master 62.40 at Evergrove and fly to Thunderlord Stronghold, Blade’s Edge Mountains.

01) Down by the Bonfire 52.58 turn in “The Smallest Creatures” (accept “A Boaring Time for Grulloc“) and next to you “Crush the Bloodmaul Camp“.
02) Go NE down to Cursed Hollow and do “A Boaring Time for Grulloc“: use Huffer’s Whistle quest item to call Huffer out to distract Grulloc (lvl 70 Elite) so you can pick up Grulloc’s Sack (that’s right next to Grulloc, 61.48).
03) West at the northern outside part of Circle of Blood turn in “A Boaring Time for Grulloc” 53.41, accept “It’s a Trap!“.
04) Go south to Thunderlord Stronghold and down by the Bonfire turn in “It’s a Trap!” (52.58, #1 on map), accept “Gorgrom the Dragon-Eater” and (next to you) “Slaughter at Boulder’mok“.
05) Go north in town to the Wind Rider Master 52.54 and fly to Evergrove.
06) Go east to Forge Camp: Anger and do “Felsworn Gas Mask“: first equip the Felsworn Gas Mask quest item, if you do not have the mask you can get another one from the dryad walking around in Evergrove. Once the mask is equipped go to the Legion Communicator 73.40 and turn this quest in and accept “Deceive thy Enemy“.  
NOTE: You may have to take the mask off and on to get the communicator to work right.
07) In the immediate area around Forge Camp: Anger do “Deceive thy Enemy“: kill 4 Doomforge Attendants and 4 Engineers.
08) Back at the Legion Communicator (73.40, #6 on map) turn in “Deceive thy Enemy“, accept “You’re Fired!“.
09) In the immediate area around Forge Camp: Anger (#7 on map) do “You’re Fired!“: kill/loot the Anger Guards in the immediate area to obtain 5 Camp Anger Keys, then use the keys at the 5 Legion Obelisks in the area to summon and kill Doomcryer /target (lvl 68 Elite).  
NOTE: This quest recommends you have 2 players but with good skill this can be soloed.  If you can’t do it, don’t worry about it and skip it.
10) Hearth (or go back) to Evergrove and turn in (if you did it) “You’re Fired!” (at the male dryad walking around the moonwell, 62.39), accept “Death’s Door“.

Death’s Door

01) NOTE: The steps in this section can only be done if you completed and turned in “You’re Fired!“. If you did not do it, then skip to the Raven’s Wood section below.
02) At the Flight Master in Evergrove 62.40 fly to Thunderlord Stronghold, Blade’s Edge Mountains.
03) Go south a bit to the cave entrance at 54.63 to Death’s Door.
04) Do “Death’s Door“.  Grind your way through the cave to take you to Death’s Door. Once you get to the outside section of Death’s Door 62.60 use the Druid Signal quest item, wait a few seconds then at the Druid that spawns turn in “Death’s Door“, accept “Harvesting the Fel Ammunition“.
05) In the immediate area all around Death’s Door do “Harvesting the Fel Ammunition“: kill/loot any mobs (except the hounds) to obtain the 5 Fel cannonballs.
06) Any where at Death’s Door use the Druid Signal quest item, wait a few seconds then at the Druid that spawns turn in “Harvesting the Fel Ammunition“, accept “Fire At Will!“.
07) Do “Fire At Will!“.  First clear out the Death Mights around the south Death’s Door Fel Cannon 65.68, then use your Naturalized Ammunition quest item on it.  You will get a pet-bar to control the cannon, keep spamming the Artillery on the Warp-Gate ability (about 10 times to kill the Warp-Gate), while you kill the imps that come out with the Flame Thrower.  
NOTE: DO NOT summon a pet/minion during this or it will remove of the cannon bar. And see next step for the north one:
08) Use the Naturalized Ammunition quest item at the north Death’s Door Fel Cannon 62.60. Then do the same thing you did in the previous step.
09) Anywhere at Death’s Door use the Druid Signal quest item, wait a few seconds then at the Druid that spawns turn in “Fire At Will!“, accept “The Hound-Master“.
10) North at Death’s Door by the big portal do “The Hound-Master“: get close to Baelmon the Hound-Master /target (lvl 68 Elite, 64.59) and use the Evergrove Wand quest item to summon Evergrove Ancients to help you kill him.
11) Hearth (or go back) to Evergrove and turn in (if you did it) “The Hound-Master” (at the male dryad walking around the moonwell, 62.39, #2 on map).

Raven’s Wood

01) Head west across the bridge/tunnel to Raven’s Wood and at Treebole /target (big ancient, 37.22) turn in “Treebole Must Know“, accept “Exorcising the Trees“.
02) All around Raven’s Wood in the immediate area do “Exorcising the Trees“: first obtain 5 Grishnath Orbs (purple orb objects NE at the arakkoa village Grishnath), then kill/loot Dire Ravens to obtain 5 Dire Pinfeathers, and then combine them by clicking on them in your backpack to make 5 Exorcism Feathers. Then use these Feathers on 5 Raven’s Wood Leafbeards /target (all around Raven’s Wood) to release their Koi-Koi Spirits, then finally kill those spirits.
03) Back at Treebole /target (big ancient, 37.22, #1 on map) turn in “Exorcising the Trees“.
04) Go west to Boulder’mok and do “Slaughter at Boulder’mok” along with “Gorgrom the Dragon-Eater“: kill 5 Boulder’mokBrutes and 3 Shamans, then click on Gorgrom’s Altar 31.22. Gorgrom the Dragon-Eater will spawn and then drop dead at the altar, then use the 3 Grisly Totems quest item (collected from the ogres) on his corpse.
05) Go south and enter Blackwing Coven (cave entrance at 32.34).
06) At the end of the cave do “Maxnar Must Die!“: kill Maxnar the Ashmaw /target 34.35.  
NOTE: Watch out this guy does a fire attack that does about 4,000 fire damage!
07) Hearth to Evergrove, if hearthstone is still on a cooldown, just die on purpose and res at the spirit healer.
08) By the moonwell at Evergrove turn in “Maxnar Must Die!” 62.39.
09) At the Flight Master in Evergrove 62.40 fly to Thunderlord Stronghold, Blade’s Edge Mountains.
10) At Thunderlord Stronghold, down by the Bonfire turn in “Gorgrom the Dragon-Eater” 52.58, accept “Prisoner of the Bladespire“. Next to you turn in “Slaughter at Boulder’mok“.

OPTIONAL – GROUP (or soloable) – Gruul’s Lair

NOTE:  This section is optional and involves killing elite mobs (they can be soloed but could take awhile).  You can skip them all if you like (especially if you want a break from Blade’s Edge Mountains).  If you decide to skip them, then go to the Journey to Netherstorm section below:

01) Go in the Inn and talk to the Innkeeper 53.55 to make Thunderlord Stronghold your new home.
02) Go north in town to the Wind Rider Master 52.54 and fly to Evergrove.
03) Go down north to Gruul’s Lair and do “Prisoner of the Bladespire“: kill/loot the Elite Bladespire orgres in the area until one of them drops the Wyvern Cage Key. Once you get the key, go up the spike ramp starting at 66.19 and open the cage then use the Spirit’s Whistle quest item.
04) Hearth or go to the Flight Master in Evergrove 62.40 and fly to Thunderlord Stronghold, Blade’s Edge Mountains.
05) At Thunderlord Stronghold, down by the Bonfire turn in “Prisoner of the Bladespire” 52.58, accept “Showdown“.
06) Go north in town to the Wind Rider Master (52.54, #2 on map) and fly to Evergrove.
07) Back north down at Gruul’s Lair do “Showdown“: use Rexxar’s Battle Horn quest item at the Altar of Goc 64.18, then kill Goc /target (lvl 70 Elite) when he comes. 
TIP: Let Rexxar fight him for a little while first so he builds up aggro, so Goc does not come after you.
08) Hearth or go to the Flight Master in Evergrove (62.40, #4 on map) and fly to Thunderlord Stronghold, Blade’s Edge Mountains.
09) At Thunderlord Stronghold, down by the Bonfire turn in “Showdown” (52.58, #5 on map).
10) Go north in town to the Wind Rider Master (52.54, #2 on map) and fly to Evergrove.

Journey to Netherstorm

01)Blades Edge Mountains is now FINISHED!  NOTE: You can safely Abandon any quests that are currently in your Quest Log (EXCEPT “The Apprentice’s Request“), as you will not need them any more.
02) Follow the main path NE to Netherstorm.

WoW TBC Classic Alliance 60-70 Leveling Guide: 65-67 Nagrand

Telaar

01) Head SW to Wazat 62.67 and accept “I Must Have Them!“.
02) Follow the path west into Telaar, make a right after the bridge then accept “Do My Eyes Deceive Me” 55.71.  And next to you accept “The Nesingwary Safari“.
03) When you see Huntress Kima /target patrolling around the town, from her accept (if you are lvl 65) “The Ravaged Caravan“.
04) Go through the building next to you and at the balcony accept “The Throne of the Elements” 56.69.
05) Just outside of the building, from the Telaar Bulletin Board (wanted poster 55.71), accept “Wanted: Giselda the Crone“, “Wanted: Zorbo the Advisor” and (if you are lvl 65) “Fierce Enemies“.
06) At the purple crystal in the middle of town 54.72 accept “Stopping the Spread” and “Solving the Problem“.
07) SE in town accept “In Defense of Halaa” 56.74.  NOTE:  This is a PvP Daily quest that you can do at Halaa (center of Nagrand), however my guide will not cover this, but do this if you like or if you happen to go near it while questing.
08) Go in the Inn south in town and talk to the Innkeeper 54.76 to make Telaar your new home.
09) Go up the ramp (outside of the Inn) to go on top and get the Flight Path from the Hippogryph Master 54.75.

01) NOTE: While questing throughout Nagrand, keep an eye out for the Wild Elekks (they look like elephants), they are scattered all over Nagrand, they can drop Pair of Ivory Tucks, which will be used for a later quest. And do not sell them to a vendor!
02) Go east a bit around 62.73 and do “Do My Eyes Deceive Me“: kill/loot Boulderfist Hunters (ogres) until you get the Boulderfist Plans.  
NOTES:  There is only 6 of these ogre spawns.  25% drop rate. Save any Warbeads you find, and dont sell them to a vendor as you will use them for a later quest.
03) Head north to Nesingwary Safari and turn in “The Nesingwary Safari” 72.41. Accept “Clefthoof Mastery“.
04) Also at the camp accept “Windroc Mastery” and “Talbuk Mastery“.
05) NOTE: If you ever see a female gnome getting attacked here at Nesingwary Safari, kill those mobs, and then you get to accept “I’m Saved!“, which you can easily turn in for free XP. This only happens randomly a few times a day so just keep an eye out every time your here, but don’t stay there and wait for it:
06) Grind your way NW to Throne of the Elements (Killing Windrocs along the way) and turn in “The Throne of the Elements” 61.22.
07) Accept (right next to you) “A Rare Bean“, “Muck Diving” and “The Underneath“. Also turn in (if you have it already) “The Howling Wind“, accept (if available) “Murkblood Corrupters“.
08) At Throne of the Elements find the big giant named Gordawg /target (he wonders around here) and turn in “The Underneath“, accept “The Tortured Earth“.

Nesingwary Safari Grind

01) NOTE: Throughout the next few sections start working on “I Must Have Them!“: kill/loot (any) wind elementals.  
NOTE:  Any wind elemental (especially Dust Howlers /target) can drop an item which starts “The Howling Wind” (if you can find it, accept it, we will have more opportunities later to try and find it):
02) Go finish all of the following 4 quests, doesn’t matter what order:
03) “Clefthoof Mastery“: kill 30 Clefthoofs.
04) “Windroc Mastery“: kill 30 Windrocs.
05) “Talbuk Mastery“: kill 30 Talbuk Stags.
06) “The Tortured Earth“: kill 15 Tortured Earth Spirits.
07) Once all these quests are complete then go NE in Nagrand to Nesingwary Safari 72.41 and turn in all quests and accept new ones: Turn in (at the tauren) “Windroc Mastery“, accept “Windroc Mastery“. Turn in (at Mr Nesingwary) “Clefthoof Mastery“, accept “Clefthoof Mastery“. Turn in (from the human laying down) “Talbuk Mastery“, accept “Talbuk Mastery“.  
NOTE: Near the camp is a broken down airplane with an NPC /target 71.41 that you can sell items to and get repaired.

Nagrand

01) Go NW to Throne of the Elements and turn in (if you have it) “The Howling Wind” 60.22, accept (if available) “Murkblood Corrupters“.  
NOTE: You may have already got this.
02) At Throne of the Elements find the big giant named Gordawg /target (he wonders around here) and turn in “The Tortured Earth“, accept “Eating Damnation“.
03) Then go west and do all of the following in any order:
04) “A Rare Bean“: pick up 15 Dung piles on the ground.  
TIP:  This quest becomes way easier when turning down the Ground Clutter in the System -> Graphics settings.
05) “Clefthoof Mastery“: kill 30 Clefthoof Bulls.
06) “Talbuk Mastery“: kill 30 Talbuk Thorngrazers.
07) “Eating Damnation“: kill/loot Enraged Crushers. These are around the hills between Throne of the Elements and Laughing Skull Ruins around 52.21.
08) North at Laughing Skull Ruins around 46.23 do “Wanted: Zorbo the Advisor“: kill 10 WarmaulShamans, 10 Reavers and kill Zorbo the Advisor (up in the small cave 46.18 ). Also start working on looting the ogres for Warbeads (and you will have more opportunities later to collect more of these), this is for a later lvl 65 quest.

The Ring of Blood (Group Quests)

GROUP 3+ players:  If you can find a group then go to The Ring of Blood 43.21 and accept and do the following quests below. You can really rack up some quick XP doing these, however you are going to need a group to help you do them all as they are not soloable, if you cant find a group then they will have to be skipped. You can come back later if you find a group to do them. If you can’t do it now, then skip to the Nagrand section below:

01) “The Ring of Blood: Brokentoe
02) “The Ring of Blood: The Blue Brothers
03) “The Ring of Blood: Rokdar the Sundered Lord
04) “The Ring of Blood: Skra’gath
05) “The Ring of Blood: The Warmaul Champion
06) “The Ring of Blood: The Final Challenge” (Be warned after you kill him once, you have to fight him again)

Nagrand

01) Go east to Throne of the Elements and turn in “A Rare Bean” 61.22, accept “Agitated Spirits of Skysong“.
02) At Throne of the Elements find the big giant named Gordawg /target (he wonders around here) and turn in “Eating Damnation“, accept “Shattering the Veil“.
03) Next to you at Skysong Lake 59.27 do “Agitated Spirits of Skysong“: kill 12 Lake Spirits (in the water).
04) Back north at Throne of the Elements turn in “Agitated Spirits of Skysong” (61.22, #1 on map), accept “Blessing of Incineratus“.
05) NOTE: Do not sell any Obsidian Warbeads or Pair of Ivory Tucks you find to a vender, as you will need them for later quest turn ins.
06) Hearth to Telaar.
07) Down by the Telaar Bulletin Board turn in “Wanted: Zorbo the Advisor” 55.71. And if you are lvl 65 and have enough warbeads then accept and turn in “Fierce Enemies“.  
NOTE: “More Warbeads!” is a repeatable quest for Kurenai rep only.
08) Next to you turn in “Do My Eyes Deceive Me” 55.71, accept “Not On My Watch!“.
09) Just west at the outskirts of the town accept “The Consortium Needs You!” 51.70 .
10) Grind north to the Abandoned Armory and turn in (IF YOU HAVE IT) “The Master’s Grand Design?” (in the building 52.57), accept “Vision of the Dead“.
11) Around the immediate area 51.60 do “Windroc Mastery“: kill 30 Ravenous Windrocs.
12) Make sure “I Must Have Them!” is now finished: kill/loot (any) wind elementals.  
NOTE:  Any wind elemental (especially Dust Howlers /target) can drop an item which starts “The Howling Wind” (if you can find it, accept it, we will have more opportunities later to try and find it). If you have “Murkblood Corrupters” in your quest book means you already did this!
13) Go SE and up on a hill next to a bonfire do “Not On My Watch!“: first defeat then talk to Lump 63.71.
14) Go back west to Telaar, make a right after the bridge to turn in “Not On My Watch!” (#7 on map 55.71), accept “Mo’mor the Breaker“.
15) SW a bit in the middle of town by the purple crystal turn in “Mo’mor the Breaker” 55.72, accept “The Ruins of Burning Blade“.
16) Go east to Wazat 62.67 and turn in “I Must Have Them!“.
17) You could accept and try to do “Bring Me The Egg!“: use the Jump-a-tron 4000 62.67 next to Wazat and try to land in the nest in the tree to loot the Mysterious Egg (could take a LOT of tries). Then you will need to fight a Windroc Matriarch /target (lvl 66 elite bird) which can be very hard to solo. The graveyard is very close, so might not hurt to try if you want. Overall if you are in a hurry to 70 I would skip this quest. Doing this once you get a flying mount at 70 makes this much easier. Turn this in if you did it.

01) Go east to Burning Blade Ruins and from Corki in the cage accept “HELP!” 73.71.
02) Around the immediate area around Burning Blade Ruins do “The Ruins of Burning Blade” along with “HELP!“: kill 15 BoulderfistCrushers and 15 Mystics. And keep kill/looting any ogres until you get the Boulderfist Key (goes in keyring). Once you got the key, open Corki’s cage 73.71.
03) Go north to Windyreed Village and do “Blessing of Incineratus“: use the Living Fire quest item inside the 4 huts. Starting with burning the Eastern Hut 73.55. And these 3 others:
04) Burn the Southern Hut 71.53.
05) Burn the Western Hut 71.51.
06) Burn the Large Hut 72.50.
07) Go north to Nesingwary Safari 72.41 and turn in all quests and accept new ones: Turn in (at the tauren) “Windroc Mastery“, accept “Windroc Mastery“. Turn in (at Mr Nesingwary) “Clefthoof Mastery“, accept “Clefthoof Mastery“. Turn in (from the human laying down) “Talbuk Mastery“, accept “Talbuk Mastery“.
08) At this point make sure you have found the Howling Wind item (from any wind elemental, especially from Dust Howlers /target) that starts “The Howling Wind“, make sure this is now accepted.  
NOTE:  If you have “Murkblood Corrupters” in your quest book means you already did this!
09) Go NW to Throne of the Elements and turn in “Blessing of Incineratus” 61.22, accept “The Spirit Polluted“. Also next to you turn in (if you still need to) “The Howling Wind“, accept “Murkblood Corrupters“.

Telaar

01) Hearth (or go back) to Telaar and in the middle of town by the purple crystal turn in “The Ruins of Burning Blade” 55.72, accept “The Twin Clefts of Nagrand“.
02) Down by the Telaar Bulletin Board you should be able to accept and turn in (requires lvl 65) “Fierce Enemies” 55.71.  
NOTE: “More Warbeads!” is a repeatable quest for Kurenai rep only.
03) NE in town at the balcony turn in “HELP!” 55.69, accept “Corki’s Gone Missing Again!“.
04) Also, if you are lvl 65 and if you haven’t yet, from Huntress Kima /target patrolling around the town accept “The Ravaged Caravan“.
05) Go NW to Halaani Basin (the water down around Halaa 44.47) and do “Muck Diving“: kill/loot Muck Spawn (water elementals).
06) Go NW to Northwind Cleft and enter the cave (entrance at 41.31).
07) Work your way through the cave while kill/looting the ogres until you find the Northwind Cleft Key (goes in keyring), then north in the cave click on Corki’s cage 39.27 to free him for “Corki’s Gone Missing Again!“.
08) In the immediate area around Northwind Cleft finish “The Twin Clefts of Nagrand“: kill 25 BoulderfistWarriors and 25 Mages.  
NOTE:  There is more of these mobs SE at Southwind Cleft around 49.57.

01) NOTE: If you have “Vision of the Dead” you can start working on that throughout the west side of Nagrand by kill/looting the Mountain Gronn (elite) /target for the eyeballGreater Windroc /target for the beak and the Aged Clefthoof /target for the blubber. Please note that this quest is optional and you may need help killing the elite Mountain Gronn.
02) GROUP 2+ Players: Go NW and see if you can do “Windroc Mastery“: kill Gutripper /target (lvl 67 Elite, around 33.24). This bird flies up around his patrol path.  
NOTE: This bird is unkitable. If you can’t find help, then it can be skipped or tried again later.
03) Do “Talbuk Mastery“: kill Bach’lor /target (lvl 67 Elite goat).  
NOTE: See patrol path on map. This beast is kitable. If he is to hard to solo, and you can’t find help, then it can be skipped or tried later. You may come across him doing upcoming quests for Nagrand..
Sunspring Post
04) Just SE a bit down in the hut 33.42, first kill the two Brutes then see if you can accept and do the escort “The Totem of Kar’dash“: escort Kurenai Captive /target out of Sunspring Post. If he’s not there means someone else is currently doing the escort, if so consider coming back and trying this again. Keep the next step in mind:
05) All around Sunspring Post do “Solving the Problem” along with “Murkblood Corrupters” and “Stopping the Spread“: kill the required amount of Murkblood mobs and use your Torch of Liquid Fire quest item on Sunspring Villager corpses /target.
06) Go south to the middle of Lake Sunspring and do “The Spirit Polluted“: kill/loot Watoosun’s Polluted Essence /target at 33.51 along with 10 Lake Surgers in the lake.

Aeris Landing

01) Go south to Aeris Landing and at the SW part of the Landing accept “Gava’xi” and “Matters of Security” 31.58.
02) At the middle of the Landing turn in “The Consortium Needs You!” 31.58. Accept “Stealing from Thieves“.
03) At the NE part of the Landing accept “A Head Full of Ivory” 32.57. If you happen to already have 3 Pair of Ivory Tucks then turn this quest in. This becomes repeatable for rep only.
04) NOTE: You can get repaired/resupplied from Paulsta’ats /target west at the Landing 31.57.
05) REMINDER: Keep an eye out for the Wild Elekks /target (they look like elephants), they are scattered all over Nagrand, they can drop Pair of Ivory Tucks, which is used for “A Head Full of Ivory” (or the repeatable quest). And do not sell them to a vendor! Continue on questing:
06) Try to do “Clefthoof Mastery“: kill Banthar /target (lvl 67 Elite), he patrols all around the northern side of Oshu’gun. NOTE: This mob is kitable, but if he is to hard to solo and you can’t find help, then it can be skipped or tried later.
07) All around Oshu’gun do “Stealing from Thieves” along with “Matters of Security“: obtain 10 Oshu’gun Crystal Fragments by either kill/looting the Vir’aani Raiders or looting these as crystal objects on the ground. Also kill 12 Voidspawn. Keep the next step in mind:
08) Do “Gava’xi“: kill Gava’xi /target. This ethereal wonders around the eastern side of Oshu’Gun, and he will stop and stay at the top of the hill at 42.74 for awhile before patrolling again.
09) South of Oshu’gun (around the ledges, 35.82) do “Shattering the Veil“: use Gordawg’s Boulder quest item on Shattered Rumblers then kill the Minion of Guroks that spawn (use Explosive trap and Volley to kill multiple minions at once.
10) Go north to Aeris Landing and at the SW part of the Landing turn in “Gava’xi” and “Matters of Security” (31.58#1 on map).
11) At the middle of the Landing turn in “Stealing from Thieves” 31.58.  
NOTE:  “More Crystal Fragments” is a repeatable rep only quest.
12) At the NE part of the Landing turn in (if its done) “A Head Full of Ivory” (32.57, #3 on map). This becomes repeatable for rep only.
13) NOTE: If you happen to become friendly with The Consortium (you may need to turn in more Crystal Fragments or Pair of Ivory Tucks to make that happen) you can accept and complete “Membership Benefits” and “Obsidian Warbeads” for easy XP (This is optional right now though). You will definitely become friendly later doing future quests for The Consortium.

Telaar

01) Hearth to Telaar.
02) As you turn in quests here, keep an eye out for Huntress Kima /target patrolling around the town and accept (should be lvl 65 by now) “The Ravaged Caravan“.  Also accept (if you are lvl 66) “He Called Himself Altruis…“.
03) At the purple crystal in the middle of town 54.72 turn in “Solving the Problem” and next to you “Stopping the Spread” and “The Twin Clefts of Nagrand“, accept “Diplomatic Measures“.
04) NE in town on the balcony 55.69 turn in “The Totem of Kar’dash” and “Corki’s Gone Missing Again!“, accept “Corki’s Ransom“.
05) Head east to the northern part of Burning Blade Ruins and talk to Lantresor of the Blade /target 74.63, then turn in “Diplomatic Measures“. Accept “Armaments for Deception” and “Ruthless Cunning“.
06) Go south to Kil’Sorrow Fortress and do “Armaments for Deception” (pick up 20 Kil’sorrow Armaments from the ground) along with “Ruthless Cunning” (use the Warmaul Ogre Banner quest item on 20 corpses) and “Wanted: Giselda the Crone” (kill Giselda the Crone /target in the big building 71.82).
07) Go back north to Lantresor of the Blade (74.63, #5 on map) and turn in “Armaments for Deception” and “Ruthless Cunning” … accept “Returning the Favor” and “Body of Evidence“.
08) If you did any of the Elite Nesingwary Safari quests then go north at Nesingwary Safari 72.41 and turn them in: Turn in (at the tauren) “Windroc Mastery“.  Turn in (at Mr Nesingwary) “Clefthoof Mastery“. Turn in (from the human laying down) “Talbuk Mastery“. If you turned all three of them in, you get to accept (at Mr Nesingwary) “The Ultimate Bloodsport“, accept it if you can.
09) Go NW to Throne of the Elements 61.22 and turn in “Murkblood Corrupters“, “The Spirit Polluted” and “Muck Diving“.
10) At Throne of the Elements find the big giant named Gordawg /target (he wonders around here) and turn in “Shattering the Veil“, accept “Gurok the Usurper“.
11) Go west to Laughing Skull Ruins and do “Returning the Favor” along with “Body of Evidence“: use the Kil’sorrow Banner quest item on 10 ogre corpses, and use the Damp Woolen Blanket quest item at the Blazing Warmaul Pyre 47.24 , then protect the two Boulderfist Saboteurs that spawn.

Warmaul Hill

01) Go west up to Warmaul Hill (around 26.30) and do “The Ravaged Caravan“: loot 20 Telaar Supply Crates. If you can get a group, then continue on with the other quests here while doing this one:
02) GROUP 2+ Players (or soloable?): Go in the cave just up the ramp (entrance at 27.24).
03) GROUP 2+ Players (or soloable?): SE at the end of the cave turn in from Corki in the cage “Corki’s Ransom” 30.26 , accept “Cho’war the Pillager“.  
NOTE: His cage is heavily guarded, there is a 66 elite next to it.
04) GROUP 2+ Players: If you can find a group, then you can go up in Warmaul Hill and do “Gurok the Usurper“: first you need to obtain 7 skulls from the ogres in the area, then use them to summon and kill/loot Gurok the Usurper (lvl 67 Elite) at the purple circle on top of the mountain 29.25. If you can’t find a group, then skip it.
05) GROUP 3+ Players: If you have a group you can do part of “Cho’war the Pillager” by entering the cave up at Warmaul Hill (entrance up at 27.18) and kill/loot Cho’war the Pillager (lvl 67 Elite) at the end of the (mostly linear) cave for the Cho’war’s Key (goes in keyring).
06) Go back to the other cave (entrance at 27.24, #2 on map).
07) GROUP 2+ Players (or soloable?):  SE at the end of the cave, open Corki’s cage (#3 on map 30.26) to complete “Cho’war the Pillager“.
08) Make sure “The Ravaged Caravan” is now finished: loot 20 Telaar Supply Crates (#1 on map).

Altruis the Sufferer

01) Go south and between the two Forge Camps turn in “He Called Himself Altruis…” 27.43. Make sure you are unmounted then accept “Survey the Land“.
02) Do “Survey the Land“.  You will automatically fly around then land to complete the quest. 
NOTE: If you are unable to mount the dragon, abandon the quest and re-accept it (but make sure you are unmounted first). Once it is done, turn it in.
03) GROUP: The rest of this quest chain (“Buying Time” and 5 more quests after that) requires a group to do them. They can be worth it for quick XP. If so accept “Buying Time” (#1 on map).
04) GROUP 2+ Players: West at the Forge Camps do “Buying Time“: kill the required amount of mobs, they are spread out evenly throughout the two camps.
05) GROUP 2+ Players: Back at Altruis the Sufferer turn in “Buying Time” (27.43, #1 on map), accept “The Master Planner“.
06) GROUP 2+ Players: NW in Forge Camp: Hate do “The Master Planner“: kill/loot Mo’arg Master Planner /target (lvl 68 Elite next to a lake and a structure, 24.34).
07) GROUP 2+ Players: Back at Altruis the Sufferer turn in “The Master Planner” (27.43, #1 on map), accept “Patience and Understanding“.
08) NOTE:  This is the last time we will be in the western part of Nagrand, which could be the last chance to finish (if you have it) “Vision of the Dead“: kill/loot Mountain Gronn /target (elite) for the eyeballGreater Windroc /target for the beak and the Aged Clefthoof /target for the blubber. Please note that this quest is optional and you may need help killing the elite Mountain Gronn.
09) Just east of Oshu’gun do (if you have it) “The Ultimate Bloodsport“: kill/loot Tusker /target (lvl 68 Elite 44.65), he looks like an elephant.  
NOTE: If he is to hard to solo, and you can’t find help, then it can be skipped.

01) Turn in (IF YOU HAVE IT AND IF YOU DID IT) at the Abandoned Armory 52.57 “Vision of the Dead“, accept “Levixus the Soul Caller“.
02) Go east to the northern part of Burning Blade Ruins 74.63 and turn in “Returning the Favor” and “Body of Evidence“. Accept “Message to Telaar“.
03) Turn in (IF YOU DID IT) (or any other ones you may have done) “The Ultimate Bloodsport” north at the Nesingwary Safari 71.41.
04) Turn in (IF YOU DID IT) “Gurok the Usurper” at Gordawg /target, the giant that wonders around at Throne of the Elements around 60.24.
05) Hearth (or go back) to Telaar.
06) As you turn in quests here, keep an eye out for Huntress Kima /target patrolling around the town and turn in “The Ravaged Caravan“.
07) Down by the Telaar Bulletin Board turn in “Wanted: Giselda the Crone” 55.71. Also turn in any remaining warbeads for “More Warbeads!” (rep only).
08) NE in town at the balcony turn in “Message to Telaar” 55.69.
09)GROUP 5 Players: If you can find a full group you can accept and do “Wanted: Durn the Hungerer“: kill Durn the Hungerer /target. He continuously circles around Oshu’Gun clockwise.  
NOTE: This is non-soloable, you will need a decent full group. If you did it, turn it in. This is accepted and turned in at (#7 on map 55.71). If you can’t find a group then skip it.
10) The last thing to do in Nagrand is to turn in any Oshu’gun Crystal Powder Samples you have for the quest “Oshu’gun Crystal Powder” at Halaa. Turn these in at Chief Researcher Kartos /target (in the western hut at Halaa 41.44). This quest is repeatable for extra Halaa Research Tokens only, so turn in as many as you can. The NPC only appears if the Alliance has control over Halaa, so you can only turn these in when the Alliance has control of the base.
11)Nagrand is now FINISHED!  
NOTE: You can safely Abandon quests that are currently in your Quest Log for the Nagrand section only (EXCEPT if you have any of these: “Levixus the Soul Caller” or “Patience and Understanding“).
12) Hearth (or go back) to Telaar and then go up the ramp (outside of the Inn) to go on top and from the Hippogryph Master 54.75 fly to Shattrath, Terokkar Forest.

Shattrath City

01) While in Shattrath City you could do (if you have it) “Patience and Understanding“: talk to Sal’salabim /target (lvl 68 Elite east in Shattrath City,77.35), then kill him. Then turn this in at him. All follow up quests will not be covered in this guide!
02) (If you have it) NOTE: “Levixus the Soul Caller” can be done if you want to do it or if you ever happen to stop at Terokkar Forest for any reason. It involves going to Auchindoun in Terokkar Forest and kill/loot Levixus /target 40.71 (66 Elite, could be soloable with good skill). Then drop down and turn this in at the pile of bones 35.66.
03) Since you should be at least lvl 66 you could port to a Major City (portals are at 56.37 in Shattrath City) to get new spells/abilities, THEN/OR..
04) Fly to Orebor Harborage, Zangarmarsh. 
NOTE:  Flight Master /target is at (64.41 in Shattrath City).
05) Right when you land at Orebor Harborage, accept “No Time for Curiosity” 41.29.
06) Go NE into Blade’s Edge Mountains.  The entrance to Blade’s Edge Mountains is in Zangarmarsh (at 47.25)…

WoW TBC Classic Horde 60-70 Leveling Guide: 65-67 Nagrand

Garadar

01) Head to Garadar’s Inn (which is the highest and largest building in Garadar) and talk to the Innkeeper /target 57.34 to make Garadar your new home.
02) We will be accepting all available quests at Garadar, starting off from the NPC that patrols around in the Inn, accept (if you are lvl 65) “Missing Mag’hari Procession“.
03) Just outside of the Inn on the SE side get the Flight Path from the Wind Rider Master /target 57.35.
04) Go down SW in town to the Bonfire 55.37 and accept “The Impotent Leader“, “The Nesingwary Safari” and (from the male orc that patrols around the Bonfire) “The Throne of the Elements“.
05) Just SE at the Bonfire, from the Garadar Bulletin Board (wanted poster 56.38), accept “Wanted: Giselda the Crone” and “Wanted: Zorbo the Advisor“. And at the male orc next to it, accept (if you are level 65) “Proving Your Strength“.
06) SW in Garadar, down by the summoning circle 55.40, accept “Vile Idolatry“, “The Missing War Party” and “Murkblood Leaders…“.
07) West in town accept “Enemies, Old and New” 53.36.  
NOTE:  This is a PvP Daily quest that you can do at Halaa (center of Nagrand), however my guide will not cover this, but do this if you like or if you happen to go near it while questing.
08) Just west at the outskirts of the town accept “The Consortium Needs You!” 52.35.
09) NOTE: While questing throughout Nagrand, keep an eye out for the Wild Elekks (they look like elephants), they are scattered all over Nagrand, they can drop Pair of Ivory Tucks, which will be used for a later quest. And do not sell them to a vendor!
10) Head east to Nesingwary Safari and turn in “The Nesingwary Safari” 72.41. Accept “Windroc Mastery“.
11) Also at the camp accept “Clefthoof Mastery” and “Talbuk Mastery“.
12) NOTE: If you ever see a female gnome getting attacked here at Nesingwary Safari, kill those mobs, and then you get to accept “I’m Saved!“, which you can easily turn in for free XP. This only happens randomly a few times a day so just keep an eye out every time your here, but don’t stay there and wait for it:
13) Grind your way NW to Throne of the Elements (Killing Windrocs along the way) and turn in “The Throne of the Elements” 61.22.
14) Accept (right next to you) “A Rare Bean“, “Muck Diving” and “The Underneath“.
15) At Throne of the Elements find the big giant named Gordawg /target (he wonders around here) and turn in “The Underneath“, accept “The Tortured Earth“.
16) Grind way down south (killing all mobs along the way) to Wazat 62.67 and accept “I Must Have Them!“.

Nesingwary Safari Grind

01) NOTE: Throughout the next few sections start working on “I Must Have Them!“: kill/loot (any) wind elementals.  
NOTE:  Any wind elemental (especially Dust Howlers /target) can drop an item which starts “The Howling Wind” (if you can find it, accept it, we will have more opportunities later to try and find it):
02) Go finish all of the following 4 quests, doesn’t matter what order:
03) “Clefthoof Mastery“: kill 30 Clefthoofs.
04) “Windroc Mastery“: kill 30 Windrocs.
05) “Talbuk Mastery“: kill 30 Talbuk Stags.
06) “The Tortured Earth“: kill 15 Tortured Earth Spirits.
07) Once all these quests are complete then go NE in Nagrand to Nesingwary Safari 72.41 and turn in all quests and accept new ones: Turn in (at the tauren) “Windroc Mastery“, accept “Windroc Mastery“. Turn in (at Mr Nesingwary) “Clefthoof Mastery“, accept “Clefthoof Mastery“. Turn in (from the human laying down) “Talbuk Mastery“, accept “Talbuk Mastery“.   
NOTE: Near the camp is a broken down airplane with an NPC /target 71.41 that you can sell items to and get repaired.

Nagrand

01) Go NW to Throne of the Elements and turn in (if you have it) “The Howling Wind” 60.22, accept (if available) “Murkblood Corrupters“.
02) At Throne of the Elements find the big giant named Gordawg /target (he wonders around here) and turn in “The Tortured Earth“, accept “Eating Damnation“.
03) Then go west and do all of the following in any order:
04) “A Rare Bean“: pick up 15 Dung piles on the ground.  
TIP:  This quest becomes way easier when turning down the Ground Clutter in the System -> Graphics settings.
05) “Clefthoof Mastery“: kill 30 Clefthoof Bulls.
06) “Talbuk Mastery“: kill 30 Talbuk Thorngrazers.
07) “Eating Damnation“: kill/loot Enraged Crushers. These are around the hills between Throne of the Elements and Laughing Skull Ruins around 52.21.
08) North at Laughing Skull Ruins around 46.23 do “Wanted: Zorbo the Advisor“: kill 10 WarmaulShamans, 10 Reavers and kill Zorbo the Advisor (up in the small cave 46.18). Also start working on “Proving Your Strength” (lvl 65 quest) by looting the ogres for Warbeads (and you will have more opportunities later to collect more of these).

The Ring of Blood (Group Quests)

GROUP 3+ players: If you can find a group then go to The Ring of Blood 43.21 and accept and do the following quests below. You can really rack up some quick XP doing these, however you are going to need a group to help you do them all as they are not soloable, if you cant find a group then they will have to be skipped. You can come back later if you find a group to do them. If you can’t do it now, then skip to the Nagrand section below:

01) “The Ring of Blood: Brokentoe
02) “The Ring of Blood: The Blue Brothers
03) “The Ring of Blood: Rokdar the Sundered Lord
04) “The Ring of Blood: Skra’gath
05) “The Ring of Blood: The Warmaul Champion
06) “The Ring of Blood: The Final Challenge” (Be warned after you kill him once, you have to fight him again)

Nagrand

01) Go east to Throne of the Elements and turn in “A Rare Bean” 61.22, accept “Agitated Spirits of Skysong“.
02) At Throne of the Elements find the big giant named Gordawg /target (he wonders around here) and turn in “Eating Damnation“, accept “Shattering the Veil“.
03) Next to you at Skysong Lake 59.27 do “Agitated Spirits of Skysong“: kill 12 Lake Spirits (in the water).
04) Back north at Throne of the Elements turn in “Agitated Spirits of Skysong” (61.22, #1 on map), accept “Blessing of Incineratus“.
05) NOTE: Do not sell any Obsidian Warbeads or Pair of Ivory Tucks you find to a vender, as you will need them for later quest turn ins.
06) Hearth to Garadar.
07) Down by the Bonfire, next to the Garadar Bulletin Board (wanted poster, 56.38), turn in “Wanted: Zorbo the Advisor” and (if you did it) “Proving Your Strength“.  
NOTE: “More Warbeads!” is a repeatable quest for Mag’har rep only.
08) Grind south to the Abandoned Armory and turn in (if you have it) “The Master’s Grand Design?” (in the building 52.57), accept “Vision of the Dead“.
09) Around the immediate area 51.60 do “Windroc Mastery“: kill 30 Ravenous Windrocs.
10) Make sure “I Must Have Them!” is now finished: kill/loot (any) wind elementals.  
NOTE: Any wind elemental (especially Dust Howlers /target) can drop an item which starts “The Howling Wind” (if you can find it, accept it, we will have more opportunities later to try and find it).
11) Go SE and at Wazat 62.67 turn in “I Must Have Them!“.
12) OPTIONAL GROUP (or soloable?): You could accept and try to do “Bring Me The Egg!“: use the Jump-a-tron 4000 62.67 next to Wazat and try to land in the nest in the tree to loot the Mysterious Egg (could take a LOT of tries). Then you will need to fight a Windroc Matriarch /target (lvl 66 elite bird) which can be very hard to solo. The graveyard is very close, so might not hurt to try if you want. Overall if you are in a hurry to 70 I would skip this quest. Doing this once you get a flying mount at 70 makes this much easier. Turn this in if you did it.

Terokkar Forest

01) Head SE into Terokkar Forest and behind a hut turn in “The Impotent Leader” (20.61 in Terokkar Forest), accept “Don’t Kill the Fat One“.
02) Just SE a bit at Bleeding Hollow Ruins do “Don’t Kill the Fat One“: kill 10 Boulderfist Invaders, and once you get Unkor the Ruthless’s /target health down, turn in “Don’t Kill the Fat One” and accept “Success!“. 
NOTE:  Unkor the Ruthless looks just like the other ogres; he’s standing next to the campfire 21.63.
03) NW a bit behind the hut, turn in “Success!” (20.61, #1 on map), accept “Because Kilrath is a Coward“.

Nagrand

01) Go back NW into Nagrand, then north to Windyreed Village and do “Blessing of Incineratus“: use the Living Fire quest item inside the 4 huts. Starting with burning the Eastern Hut 73.55.  And these 3 others:
02) Burn the Southern Hut 71.53.
03) Burn the Western Hut 71.51.
04) Burn the Large Hut 72.50.
05) Go north to Nesingwary Safari 72.41 and turn in all quests and accept new ones: Turn in (at the tauren) “Windroc Mastery“, accept “Windroc Mastery“. Turn in (at Mr Nesingwary) “Clefthoof Mastery“, accept “Clefthoof Mastery“. Turn in (from the human laying down) “Talbuk Mastery“, accept “Talbuk Mastery“.
06) At this point make sure you have found the Howling Wind item (from any wind elemental, especially from Dust Howlers /target) that starts “The Howling Wind“, make sure this is now accepted.  
NOTE:  If you have “Murkblood Corrupters” in your quest book means you already did this!
07) Go NW to Throne of the Elements and turn in “Blessing of Incineratus” 61.22, accept “The Spirit Polluted“. Also next to you turn in (if you still need to) “The Howling Wind“, accept “Murkblood Corrupters“.
08) Hearth (or go back) to Garadar and down by the Bonfire turn in “Because Kilrath is a Coward” 55.38, accept “Message in a Battle“. Also accept “Standards and Practices“.

01) Go SE to Burning Blade Ruins and do “Message in a Battle” along with “Standards and Practices“: kill the required amount of Boulderfist ogres, and use the Mag’har Battle Standard quest item at the 3 Pyres. First Burning Blade Pyre is at 72.70, and the other two:
02) Second Burning Blade Pyre (up at 75.70).
03) Third Burning Blade Pyre (up further at 76.68).
04) Hearth (or go back) to Garadar and in the Inn accept (if you haven’t yet) “Missing Mag’hari Procession” around 57.35.
05) Go down by the Bonfire 55.37 and turn in “Message in a Battle“, accept “An Audacious Advance“. And turn in “Standards and Practices“, accept “Bleeding Hollow Supply Crates“.
06) Next to you by the Garadar Bulletin Board (wanted poster, 56.38), turn in (if you still need to) “Proving Your Strength” along with any additional warbeads for the repeatable rep quest “More Warbeads!“.
07) Go west to Halaani Basin (the water down around Halaa 44.47) and do “Muck Diving“: kill/loot Muck Spawn (water elementals).
08) Go north to Northwind Cleft around 41.34 [or south to Southwind Cleft, around 50.56] and do “An Audacious Advance” along with “Bleeding Hollow Supply Crates“: kill 25 Boulderfist Warriors and 25 Mages, also pick up 20 Bleeding Hollow Supply Crates from the ground.  
NOTE: You can also do these quests in the caves at these two locations as well.

Mag’hari Procession

01) Go west along the main path to the Mag’hari Procession 32.36 and turn in all quests and accept new ones: Turn in “The Missing War Party“, accept “Once Were Warriors“. Turn in “Missing Mag’hari Procession“, accept “War on the Warmaul“. And accept “Finding the Survivors“.
02) NOTE: If you have “Vision of the Dead” you can start working on that throughout the west side of Nagrand by kill/looting the Mountain Gronn (elite) /target for the eyeballGreater Windroc /target for the beak and the Aged Clefthoof /target for the blubber. Please note that this quest is optional and you may need help killing the elite Mountain Gronn.
03) Go west up to Warmaul Hill (starting around 26.31) and do “War on the Warmaul” along with “Finding the Survivors“: kill 15 WarmaulBrutes and 15 Warlocks. Also open the cages to free 15 prisoners (first obtain keys from the ogres).  
NOTE: There are more ogres and cages up the big ramp in that area.
04) GROUP 2+ Players: Go east and see if you can do “Windroc Mastery“: kill Gutripper /target (lvl 67 Elite, around 33.24).  This bird flies up around his patrol path.  
NOTE: This bird is unkitable. If you can’t find help, then it can be skipped or tried again later.
05) Back at Mag’hari Procession along the main path (32.36, #1 on map) turn in “War on the Warmaul“, accept “Cho’war the Pillager“. And turn in “Finding the Survivors“.
06) GROUP 3+ Players: If you have a group you can go back up to Warmaul Hill, enter the cave (entrance up at 27.18) and do “Cho’war the Pillager“: kill/loot Cho’war the Pillager /target (lvl 67 Elite) at the end of the (mostly linear) cave. Then go back to Mag’hari Procession 32.36 to turn this in (if you did it).
07) GROUP (or soloable?): Do “Talbuk Mastery“: kill Bach’lor /target (lvl 67 Elite goat).  
NOTES:  See patrol path on map. This beast is kitable. If he is to hard to solo, and you can’t find help, then it can be skipped or tried later. You may come across him doing upcoming quests for Nagrand..
08) Go south a bit to Sunspring Post and do “Murkblood Leaders…“: kill/loot Ortor of Murkblood /target (in the hut 31.42).
09) Just SE a bit down in the broken hut 31.44, first kill the two Brutes then see if you can accept and do the escort “The Totem of Kar’dash“: escort Mag’har Captive /target out of Sunspring Post. If he’s not there means someone else is currently doing the escort, if so consider coming back and trying this again.
10) All around Sunspring Post finish up “Once Were Warriors” along with “Murkblood Corrupters” and “Vile Idolatry“: kill the required amount of Murkblood mobs and loot them for the 20 idols.
11) Go south to the middle of Lake Sunspring and do “The Spirit Polluted“: kill/loot Watoosun’s Polluted Essence /target at 33.51 along with 10 Lake Surgers in the lake.
12) Back north at Mag’hari Procession along the main path (32.36, #1 on map) turn in “Once Were Warriors“, accept “He Will Walk The Earth…“.

Aeris Landing

01) Go south to Aeris Landing and at the SW part of the Landing accept “Gava’xi” and “Matters of Security” 31.58.
02) At the middle of the Landing turn in “The Consortium Needs You!” 31.58. Accept “Stealing from Thieves“.
03) At the NE part of the Landing accept “A Head Full of Ivory” 32.57. If you happen to already have 3 Pair of Ivory Tucks then turn this quest in. This becomes repeatable for rep only.
04) NOTE: You can get repaired/resupplied from Paulsta’ats /target west at the Landing 31.57.
05) REMINDER: Keep an eye out for the Wild Elekks /target (they look like elephants), they are scattered all over Nagrand, they can drop Pair of Ivory Tucks, which is used for “A Head Full of Ivory” (or the repeatable quest). And do not sell them to a vendor!  Continue on questing:
06) Try to do “Clefthoof Mastery“: kill Banthar /target (lvl 67 Elite), he patrols all around the northern side of Oshu’gun.  
NOTE: This mob is kitable, but if he is to hard to solo and you can’t find help, then it can be skipped or tried later.
07) All around Oshu’gun do “Stealing from Thieves” along with “Matters of Security“: obtain 10 Oshu’gun Crystal Fragments by either kill/looting the Vir’aani Raiders or looting these as crystal objects on the ground. Also kill 12 Voidspawn.  Keep the next step in mind:
08) Do “Gava’xi“: kill Gava’xi /target. This ethereal wonders around the eastern side of Oshu’Gun, and he will stop and stay at the top of the hill at 42.74 for awhile before patrolling again.
09) South of Oshu’gun (around the ledges, 35.82) do “Shattering the Veil“: use Gordawg’s Boulder quest item on Shattered Rumblers then kill the Minion of Guroks that spawn (use Explosive trap and Volley to kill multiple minions at once.
10) Go north to Aeris Landing and at the SW part of the Landing turn in “Gava’xi” and “Matters of Security” (31.58#1 on map).
11) At the middle of the Landing turn in “Stealing from Thieves” 31.58.  
NOTE:  “More Crystal Fragments” is a repeatable rep only quest.
12) At the NE part of the Landing turn in (if its done) “A Head Full of Ivory” (32.57, #3 on map). This becomes repeatable for rep only.
13) NOTE: If you happen to become friendly with The Consortium (you may need to turn in more Crystal Fragments or Pair of Ivory Tucks to make that happen) you can accept and complete “Membership Benefits” and “Obsidian Warbeads” for easy XP (This is optional right now though).  You will definitely become friendly later doing future quests for The Consortium.

Garadar

01) Hearth to Garadar.
02) Down by the Bonfire 55.37 turn in “Bleeding Hollow Supply Crates“, “An Audacious Advance” (accept “Diplomatic Measures“) and “The Totem of Kar’dash“.
03) Up the hill accept (if you are lvl 66) “He Called Himself Altruis…” 55.36.
04) SW in Garadar, down by the summoning circle 55.40, turn in “Vile Idolatry“, “He Will Walk The Earth…” and “Murkblood Leaders…“.
05) Head SE to the northern part of Burning Blade Ruins and talk to Lantresor of the Blade /target 74.63, then turn in “Diplomatic Measures“. Accept “Armaments for Deception” and “Ruthless Cunning“.
06) Go south to Kil’Sorrow Fortress and do “Armaments for Deception” (pick up 20 Kil’sorrow Armaments from the ground) along with “Ruthless Cunning” (use the Warmaul Ogre Banner quest item on 20 corpses) and “Wanted: Giselda the Crone” (kill Giselda the Crone /target in the big building, 71.82).
07) Go back north to Lantresor of the Blade (74.63, #5 on map) and turn in “Armaments for Deception” and “Ruthless Cunning” … accept “Returning the Favor” and “Body of Evidence“.
08) If you did any of the Elite Nesingwary Safari quests then go north at Nesingwary Safari 72.41 and turn them in: Turn in (at the tauren) “Windroc Mastery“. Turn in (at Mr Nesingwary) “Clefthoof Mastery“. Turn in (from the human laying down) “Talbuk Mastery“. If you turned all three of them in, you get to accept (at Mr Nesingwary) “The Ultimate Bloodsport“, accept it if you can.
09) Go NW to Throne of the Elements 61.22 and turn in “Murkblood Corrupters“, “The Spirit Polluted” and “Muck Diving“.
10) At Throne of the Elements find the big giant named Gordawg /target (he wonders around here) and turn in “Shattering the Veil“, accept “Gurok the Usurper“.
11) Go west to Laughing Skull Ruins and do “Returning the Favor” along with “Body of Evidence“: use the Kil’sorrow Banner quest item on 20 ogre corpses, and use the Damp Woolen Blanket quest item at the Blazing Warmaul Pyre 47.24, then protect the two Boulderfist Saboteurs that spawn.
12) GROUP 2+ Players: If you can find a group, then you can go west to Warmaul Hill and do “Gurok the Usurper“: first you need to obtain 7 skulls from the ogres in the area, then use them to summon and kill/loot Gurok the Usurper (lvl 67 Elite) at the purple circle on top of the mountain 29.25.  If you can’t find a group, or can’t do it, then skip it.
13) GROUP 3+ Players: If you still need to do “Cho’war the Pillager” and have a group you can do this quest now by entering the cave here at Warmaul Hill (entrance up at 27.18) and kill/loot Cho’war the Pillager (lvl 67 Elite) at the end of the (mostly linear) cave. Then go back to Mag’hari Procession 32.36 to turn this in (if you did it).

Altruis the Sufferer

01) Go south and between the two Forge Camps turn in “He Called Himself Altruis…” 27.43. Make sure you are unmounted then accept “Survey the Land“.
02) Do “Survey the Land“. You will automatically fly around then land to complete the quest. 
NOTE: If you are unable to mount the dragon, abandon the quest and re-accept it (but make sure you are unmounted first). Once it is done, turn it in.
03) GROUP: The rest of this quest chain (“Buying Time” and 5 more quests after that) requires a group to do them. They can be worth it for quick XP.  If so accept “Buying Time” (#1 on map).
04) GROUP 2+ Players: West at the Forge Camps do “Buying Time“: kill the required amount of mobs, they are spread out evenly throughout the two camps.
05) GROUP 2+ Players: Back at Altruis the Sufferer turn in “Buying Time” (27.43, #1 on map), accept “The Master Planner“.
06) GROUP 2+ Players: NW in Forge Camp: Hate do “The Master Planner“: kill/loot Mo’arg Master Planner /target (lvl 68 Elite next to a lake and a structure, 24.34).
07) GROUP 2+ Players: Back at Altruis the Sufferer turn in “The Master Planner” (27.43, #1 on map), accept “Patience and Understanding“.
08) NOTE:  This is the last time we will be in the western part of Nagrand, which could be the last chance to finish (if you have it) “Vision of the Dead“: kill/loot Mountain Gronn /target (elite) for the eyeballGreater Windroc /target for the beak and the Aged Clefthoof /target for the blubber. Please note that this quest is optional and you may need help killing the elite Mountain Gronn.
09) Just east of Oshu’gun do (if you have it) “The Ultimate Bloodsport“: kill/loot Tusker /target (lvl 68 Elite 44.65), he looks like an elephant.  
NOTE: If he is to hard to solo, and you can’t find help, then it can be skipped.

01) Hearth to Garadar.
02) Down by the Bonfire, next to the Garadar Bulletin Board (wanted poster, 56.38), turn in “Wanted: Giselda the Crone“. You can also turn in any additional warbeads for “More Warbeads!“.
03) GROUP 5 Players: If you can find a full group you can accept and do “Wanted: Durn the Hungerer“: kill Durn the Hungerer /target. He continuously circles around Oshu’Gun clockwise.  
NOTE: This is non-soloable, you will need a decent full group. If you did it, turn it in.  If you can’t find a group then skip it.
04) Turn in (IF YOU DID IT) “Gurok the Usurper” at Gordawg /target the giant that wonders around at Throne of the Elements around 60.24.
05) Turn in (IF YOU DID IT) (or any other ones you may have done) “The Ultimate Bloodsport” at the Nesingwary Safari 71.41.
06) Go SE to the northern part of Burning Blade Ruins 74.63 and turn in “Returning the Favor” and “Body of Evidence“. Accept “Message to Garadar“.
07) Hearth (or go back) to Garadar and down by the Bonfire turn in “Message to Garadar” (55.38, #2 on map).
08) Turn in (IF YOU HAVE IT AND IF YOU DID IT) at the Abandoned Armory 52.57 “Vision of the Dead“, accept “Levixus the Soul Caller“.
09) The last thing to do in Nagrand is to turn in any Oshu’gun Crystal Powder Samples you have for the quest “Oshu’gun Crystal Powder” at Halaa. Turn these in at Chief Researcher Amereldine /target (in the northern hut at Halaa 42.43). This quest is repeatable for extra Halaa Research Tokens only, so turn in as many as you can. The NPC only appears if the Horde has control over Halaa, so you can only turn these in when the Horde has control of the base.
10) Nagrand is now FINISHED!  
NOTE: You can safely Abandon quests that are currently in your Quest Log for the Nagrand section only (EXCEPT if you have any of these: “Levixus the Soul Caller” or “Patience and Understanding“).
11) Go back to Garadar to the Wind Rider Master /target 57.35 and fly to Shattrath, Terokkar Forest.

Shattrath City

01) While in Shattrath City you could do (if you have it) “Patience and Understanding“: talk to Sal’salabim /target (lvl 68 Elite east in Shattrath City,77.35), then kill him.  Then turn this in at him.  All follow up quests will not be covered in this guide!
02) NOTE:  “Levixus the Soul Caller” can be done if you want to do it or if you ever happen to stop at Terokkar Forest for any reason. It involves going to Auchindoun in Terokkar Forest and kill/loot Levixus /target 40.71 (66 Elite, could be soloable with good skill). Then drop down and turn this in at the pile of bones 35.66.
03) Since you should be at least lvl 66 you could port to a Major City (portals are at 52.53 in Shattrath City) to get new spells/abilities, THEN/OR..
04) Fly to Swamprat Post, Zangarmarsh.  NOTE:  Flight Master /target is at (64.41 in Shattrath City).
05) Go north into Blade’s Edge Mountains.  The entrance to Blade’s Edge Mountains is in Zangarmarsh (at 70.34)…

WoW TBC Classic Alliance 60-70 Leveling Guide: 63-65 Terokkar Forest

Cenarion Thicket

01) Go SE to the Cenarion Thicket and on the main path turn in “What’s Wrong at Cenarion Thicket?” 44.26. Accept “Strange Energy” and “Clues in the Thicket“.
02) Find Warden Treelos /target wondering around the paths at the Cenarion Thicket next to you around 44.22 and accept “It’s Watching You!“.  
TIP: Look for the exclamation mark on minimap if you can’t find him!
03) Do “Strange Energy“: kill/loot Vicious Teromoths (hostile mobs) in the immediate area around the Cenarion Thicket and Teromoths (neutral mobs), just south of the main path around 45.28.
04) Up in the tower at Cenarion Thicket do “It’s Watching You!“: kill Naphthal’ar (up at 44.22).
05) Find Warden Treelos (#2 on map /target) wondering around the paths at the Cenarion Thicket and turn in “It’s Watching You!“.
06) In the middle of the Inn building at Cenarion Thicket do “Clues in the Thicket“: click on the Strange Object 45.22.
07) On the main path south at Cenarion Thicket turn in “Strange Energy” (44.26, #1 on map) and “Clues in the Thicket“. Accept “By Any Means Necessary“.
08) On the main path running between Shattrath City and Tuurem find Empoor /target (he’s with a bodyguard) and do “By Any Means Necessary“: simply talk to him and then kill him. Then at him turn this in and accept “Wind Trader Lathrai“.

Allerian Stronghold

01) Go SE to Allerian Stronghold and in the wizard building turn in “Concerns About Tuurem” 59.54. Accept “Magical Disturbances“.
02) East in town get the Flight Path from the Gryphon Master /target 59.55.
03) Just west a bit by the wagon and white boxes 58.55 accept “Unruly Neighbors” and “Timber Worg Tails“.
04) West a bit by the ballista, accept “Stymying the Arakkoa” 58.54.
05) At the town hall entrance, from the Wanted Poster accept “Wanted: Bonelashers Dead!” 58.55.
06) Just inside the town hall’s entrance accept “Olemba Seeds” 57.55.
07) Go inside the town hall further and accept “Secrets of the Arakkoa” 58.56.
08) Next to you accept “Speak with Private Weeks” and “Thin the Flock” 57.56.
09) Exit the town hall and go NW in town to the Inn and talk to the Innkeeper /target 57.53 to make Allerian Stronghold your new home.
10) NOTE:  NE in town at the tower, Exorcist Sullivan (male human, /target 56.54) offers a PvP daily quest (“Spirits of Auchindoun“) that you can optionally do if you want, but my guide will not cover it.

Allerian Post

01) As you go out questing start working on “Olemba Seeds” (loot white Olemba Cones off the ground) along with “Timber Worg Tails” (kill/loot the Timber Worg Alphas) and “Magical Disturbances” (kill Warp Stalkers). Work on these along the way as you do the next few sections:
02) Go east to Bonechewer Ruins 66.51 and do “Unruly Neighbors“: kill 12 Warped Peons (workers hammering things around the entrances to the ruins).
03) Go NE to Allerian Post (small Alliance camp) and turn in “Unruly Neighbors” 70.44. Accept “The Firewing Liaison” and “Thinning the Ranks“.
04) Back SW at Bonechewer Ruins enter the barracks and do “The Firewing Liaison“: kill Lisaile Fireweaver 68.53.
05) Next to you in the barracks on the ground, click on the Fel Orc Plans scroll 68.54 and accept “Fel Orc Plans“.
06) Finish “Thinning the Ranks“: kill 10 BonechewerDevastators and 6 Backbreakers.
07) Back NE to Allerian Post (#3 on map 70.44) turn in “The Firewing Liaison” and “Thinning the Ranks“.

Grangol’var Village

01) Go west to Grangol’var Village and at Private Weeks 40.36 turn in “Speak with Private Weeks“, accept “Who Are They?“.
02) Go south into Grangol’var Village and do “Who Are They?“. First make sure you got a disguise by talking to the quest giver (40.36 , #1 on map). You can’t use any abilities or you will lose the disguise. If you lose your disguise then go back to him to get a new one. While doing this quest stay away from the hostile Shadowy Hunters /target, they will see through your disguise and attack you (consider going into the village and killing these first before doing the quest). Then to do the quest, go talk to these 3 NPCs (they can respawn as different races/genders): Make sure your pet is dismissed and you have Aspect of the Cheetah on first before getting your disguise.
03) Talk to Shadowy Initiate /target (on the wood plank, 39.40).
04) Talk to Shadowy Laborer /target, the Laborer walks around and sometimes stops to hammer something around 38.40.
05) Talk to Shadowy Advisor /target (in the barracks, 40.39).
06) Back north in Grangol’var Village, at Private Weeks and turn in “Who Are They?” (40.36, #1 on map), accept “Kill the Shadow Council!“.
07) Back south at Grangol’var Village do “Kill the Shadow Council!“: kill 10 Shadowy Executioners, 10 Summoners, and kill Shadowmaster Grieve (male orc in the barracks at 40.39, which is actually #5 on map).

Shattrath City

01) Head NW into Shattrath City, take the bridge entrance 35.26 and from Haggard War Veteran /target who patrols around on the bridge, accept “A’dal“.
02) Make a right at the end of the bridge then stop at the Flight Master /target 64.41 to get the Flight Path.
03) Directly in the middle of the city, from A’dal (brightly glowing), turn in “A’dal” 54.45.
04) Next to you accept and do the escort “City of Light“: simply follow Khadgar’s Servant /target around the city. NOTES:  This escort literally takes 9 minutes to do.  If you are in an absolute hurry to 70 then I would skip this quest as it wastes too much time. However if you are just playing casually, then I would do it.  This has to be done if you want to further advance with the Scryers or Aldors, and to receive further quests from those factions. If you skip this quest, then some of the future quests listed in this guide will not be available. If you did it then turn it in at 55.44 , accept/complete (for the sake of this guide) “Allegiance to the Scryers“. Accept “Voren’thal the Seer“.  
NOTE:  You can choose which ever faction you want to part with, but my guide will focus on Scryers.
05) North in the city, turn in “Secrets of the Arakkoa” 52.21, accept “The Eyes of Skettis“.
06) NE a bit in the city, accept “Rather Be Fishin’” 64.15.
07) East a bit turn in “Wind Trader Lathrai” 72.31, accept “A Personal Favor“.
08) Leave the city, take the NE exit 76.11..

Veil

01) NE at Silmyr Lake (around 39.12 in Terokkar Forest) do “Rather Be Fishin’“: kill/loot Shimmerscale Eels in the water.
02) Go south to Veil Skith and do part of “Stymying the Arakkoa“: kill Urdak /target, he wonders up around on the tree platforms, (ramp entrance at 30.43).
03) Before leaving Veil Skith make sure “A Personal Favor” is finished by kill/looting the Skithian mobs.
04) NOTE: Make sure you save your Arakkoa feathers, 30 of them will be used for a later quest, and you do NOT need to grind here till you get 30, since you will most likely get the rest from the other quests later dealing with these mobs as well.  Also make sure you do not accidentally sell them to a vendor!
05) Go back north into Shattrath City (entrance at 36.31 in Terokkar Forest).
06) On the NE side in the city turn in “A Personal Favor” 72.31, accept “Investigate Tuurem“.
07) North in the city turn in “Rather Be Fishin’” 64.15.
08) Leave the city and go east to Veil Reskk (Terokkar Forest) and take the ramp up to get to the tree platforms (ramp starts at 50.16)..
09) Up at the tree platforms do part of “Stymying the Arakkoa“: kill Ashkaz /target around 49.17.
10) Do part of “The Eyes of Skettis“: loot the Eye of Veil Reskk (at the top of the tree platform, 50.19).
11) Go east to Veil Shienor and enter the tree ramp (inside the big tree 60.25)..
12) Up on the tree platform finish “The Eyes of Skettis“: loot the Eye of Veil Shienor 58.23 .
13) Go back down and finish “Stymying the Arakkoa“: kill Ayit /target (in the hut, 59.23).
14) Around the immediate area finish “Thin the Flock“: kill 14 ShienorTalonites & 6 Sorcerers.
15) Go SW a bit to Tuurem and do “Investigate Tuurem“: loot the Sealed Box 54.30.  There is a greenish glow coming from it.
16) Make sure “Olemba Seeds” and “Timber Worg Tails” are now finished: loot white Olemba Cones off the ground and kill/loot the Timber Worg Alphas.
17) Go west and on the main path south at Cenarion Thicket turn in “Investigate Tuurem” 44.26.  Accept “What Are These Things“.
18) Go west into the northern part of Shattrath City and turn in “The Eyes of Skettis” (53.21 in Shattrath City), accept “Seek Out Kirrik“.

Allerian Stronghold

01) Hearth to Allerian Stronghold.
02) Right outside of the Inn on your left turn in “What Are These Things” 57.53, accept “Report to the Allerian Post“.
03) Turn in (if you finished it) “Magical Disturbances” (in the wizard building 59.54).
04) Just south a bit by the wagon and white boxes 58.55 turn in “Fel Orc Plans” and “Timber Worg Tails, accept “The Elusive Ironjaw“.
05) West a bit by the ballista, turn in “Stymying the Arakkoa” 58.54.
06) Just inside the town hall’s entrance turn in “Olemba Seeds” 57.55, accept “Vessels of Power“.
07) Further inside the town hall  57.56 turn in “Kill the Shadow Council!” and “Thin the Flock“.
08) Head east to Allerian Post and turn in “Report to the Allerian Post” 70.44 , accept “Attack on Firewing Point“.
09) Work your way NE to Firewing Point and accept and do the escort from the caged female night elf /target (in the lower part of a building, 74.35) “Escape from Firewing Point!“: escort her west out of Firewing Point.  
TIP: Before accepting this escort it’s wise to clear the main path just outside of the building first to make this easier, as the escortee is very squishie.
10) Finish up “Attack on Firewing Point“: kill the required amount of Firewing mobs within Firewing Point.
11) West of Firewing Point see if you can do “The Elusive Ironjaw“: kill/loot Ironjaw /target (this brown colored worg patrols around 68.34). If you cant find him, don’t worry we will be back here later to try again.
12) Back SW at Allerian Post turn in “Attack on Firewing Point” (#8 on map 70.44) , accept “The Final Code“.
13) Go back east to Firewing Point and do “The Final Code“: enter the eastern most building (entrance at 74.36, #9 on map). Then work your way up the ramp and click on the Orb of Translocation.  Once teleported, go to the top of the building and kill/loot Sharth Voldoun.
14) Go to the middle of Firewing Point and click on the Mana Bomb (actual #10 on map 71.37).  
NOTE: You will most likely have to kill some mobs around it first, but if you can, try to click on the bomb ASAP, it will kill all the mobs in the area.
15) Last chance for “The Elusive Ironjaw“: west of Firewing Point kill/loot Ironjaw /target (this brown colored worg patrols around 68.34, #11 on map).
16) West at Tuurem 56.30 do “Vessels of Power“: loot 8 Draenei Vessels off the ground.
17) NOTE: If you find any Arcane Tomes, save them, you can use them later for quest turn ins. These drop from certain humanoid mobs throughout Outland.
18) Make sure “Magical Disturbances” is now finished (if you still need to): kill 10 Warp Stalkers as you work your way to the next step:
19) Hearth (or go back) to Allerian Stronghold and right outside of the Inn on your left turn in “The Final Code” (#2 on map 57.53) . Accept “Letting Earthbinder Tavgren Know“.
20) In the wizard building turn in (if you still need to) “Magical Disturbances” (#3 on map 59.54).
21) Just west a bit by the wagon and white boxes turn in “The Elusive Ironjaw” (#4 on map 58.55).
22) Just inside the town hall’s entrance turn in “Vessels of Power” (#6 on map 57.55).
23) Inside the town hall turn in “Escape from Firewing Point!” 57.56.

For Hunters
23a) if you are using a pet that uses Bite (such as Ravagers or Cats) and if you are lvl 64 (or if you are close to it you can grind to it first) then we will work on upgrading to Bite Rank 9 (or you can do this step once you return to Allerian Stronghold later at lvl 64).  First go to the Stable Master 56.54 /target and stable your pet.
23b) Go just SW to The Bone Wastes and tame a lvl 64 Dreadfang Widow around 54.58 to obtain Bite Rank 9.
23c) Once you got Bite Rank 9 abandon the spider and then go to the Stable Master 56.54 /target at Allerian Stronghold and get your main pet back out and teach him the new ability.

Refugee Caravan

01) Head west in The Bone Wastes to Refugee Caravan and turn in “Seek Out Kirrik” 37.51, accept “Veil Skith: Darkstone of Terokk“.
02) Accept all other quests at Refugee Caravan: “Missing Friends“, “The Infested Protectors” and “Before Darkness Falls“.
03) Go NW to Veil Skith and do “Missing Friends” along with “Veil Skith: Darkstone of Terokk“: kill/loot the Skithian arakkoa mobs to obtain keys, then use the keys to open the cages.  And use the Rod of Purification quest item at the Darkstone of Terokk 31.42.  
NOTE: There is 4 cages total: (2 down below 31.41 30.43) and (2 up in the tree houses with more kids in them 31.44 31.42).
04) Around the north and east in The bone Wastes starting around 33.51 do “The Infested Protectors” along with “Wanted: Bonelashers Dead!“: kill the Infested Root-Walkers (tree mobs), then kill the Wood Mites that spawn.  And kill 20 Bonelashers.
05) Just south of Refugee Caravan around 40.56 do “Before Darkness Falls“: kill the required amount of Cabal mobs.  While doing this quest you will find an item which starts “Cabal Orders“, accept it.
06) Back north at Refugee Caravan (around 38.51, #1 on map) turn in all quests and accept all new ones:  Turn in “Veil Skith: Darkstone of Terokk“, “Missing Friends“, “The Infested Protectors“, “Before Darkness Falls” and “Cabal Orders” … Accept “The Shadow Tomb“, “Veil Rhaze: Unliving Evil“, “The Tomb of Lights” and “The Vengeful Harbinger“.

The Bone Wastes – Tombs

01) Go west then enter the Shadow Tomb (entrance at 31.53).
02) As you enter, keep going straight north in the tomb all the way to the very last room. Once you enter the last room make a left and see if Akuno /target 31.49 is there and accept and do the escort “Escaping the Tomb“: escort him out of the tomb.  
NOTE: We try this first because he may not be there as others could be doing the quest. If he’s not there we can try again later.
03) Inside the tomb do “The Shadow Tomb“: loot the 3 chests at the end of each room. In the western room, loot the chest for the Gavel of K’alen 30.52.
04) In the eastern room, loot the chest for the Drape of Arunen 32.51.
05) In the northern room, loot the chest for the Scroll of Atalor 31.47.
06) If you haven’t yet, you can see if Akuno /target (31.49, #2 on map) is at the northern tunnel to do the escort quest “Escaping the Tomb“, which leads out of the tunnel.
07) Outside of the tomb at the NW side of The Bone Wastes around 28.55 do “Veil Rhaze: Unliving Evil“: kill the required amount of undead arakkoa mobs.
08) Back east at Refugee Caravan 37.51 turn in all quests and accept new ones, Turn in “Veil Rhaze: Unliving Evil” , “The Shadow Tomb” and (if you did it) “Escaping the Tomb” … Accept “Veil Lithic: Preemptive Strike“.
09) Go east to the Tomb of Lights (around the outside of it around 47.56) and do “The Tomb of Lights“: kill the required amount of Ethereal mobs.
10) GROUP 2+ Players: Inside the tomb (entrance at 47.55) do “The Vengeful Harbinger“: use the Draenei Tomb Relic quest item at the altar (east in the tomb 51.55), then kill several waves of mobs that come. Once done turn it in right there in the tomb.
11) West back at Refugee Caravan turn in “The Tomb of Lights” (37.51, #8 on map).
12) North in Refugee Caravan accept “Recover the Bones” 37.50.

Sha’Tari Base Camp

01) NOTE: While continuing on with the next few sections, start working on “Recover the Bones” by looting the Restless Bones you see on the ground throughout The Bone Wastes:
02) Head SW in The Bone Wastes to Sha’Tari Base Camp and “Taken in the Night” 31.76.
03) Also accept “An Improper Burial“, “The Dread Relic” and “Digging Through Bones“. NOTE:  Accepting “Digging Through Bones” starts an escort quest immediately:
04) Do the easy escort “Digging Through Bones“: just follow the dwarves.
05) Turn in “Digging Through Bones” 31.76, accept “Fumping“.
06) Just east at The Bone Wastes (very close to the camp 32.77) do “Fumping“: keep using the Fumper quest item to kill/loot under ground worms.  Do this close to the camp so the guards at the camp will help you kill the spawned mobs.
07) Back at the camp turn in “Fumping” 31.76, SKIP “The Big Bone Worm“.
08) Work your way east (starting around 32.75) and do “An Improper Burial“: use the Sha’tari Torch quest item on 8 Slain Auchenai Warriors /target and on 8 Slain Sha’tar Vindicators /target.
09) Go further east and do “The Dread Relic“: loot the Massive Treasure Chest 44.76. 
TIP:  After looting it, I would run away quick.
10) Go east a bit more and accept “For the Fallen” 50.76.
11) Just to the east of you at Netherweb Ridge around 52.78 do “For the Fallen” along with “Taken in the Night” Kill 20 Dreadfang Widows (spiders), and free the warriors by attacking the Netherweb Victims.

01) Back SE in The Bone Wastes, turn in “For the Fallen” 50.76, accept “Terokkarantula“.
02) SE in Netherweb Ridge try to do “Terokkarantula“: kill Terokkarantula /target (level 65 Elite spider, 54.82). I think with good skill most classes should be able to solo this? If you can’t solo it, or find help, then it can be skipped.
03) Back SE in The Bone Wastes, turn in (if you did it) “Terokkarantula” (50.76, #1 on map), accept “Return to Sha’tari Base Camp“.
04) Go back west to Sha’tari Base Camp 31.76 and turn in “Taken in the Night” and (if you have it) “Return to Sha’tari Base Camp“.
05) Also turn in “An Improper Burial“, “The Dread Relic” … Accept “A Hero Is Needed” and “Evil Draws Near“.
06) Go east to Auchenai Grounds around 33.74 and do “A Hero Is Needed“: kill 12 Auchenai Initiates and 5 Doomsayers.
07) Back west at Sha’tari Base Camp turn in “A Hero Is Needed” (31.76, #4 on map), accept “The Fallen Exarch“.
08) Now make sure “Recover the Bones” is finished, by picking up the Restless Bones all around The Bone Wastes.
09) Go east into Auchindoun and do “The Fallen Exarch“: click on the Auchenai Coffin 36.66, then kill Reanimated Exarch that spawns.
10) Go down into Auchindoun and take the entrance with the two red fires at it at 37.66..
11) Go straight in a bit and then on your right from the child, accept “I See Dead Draenei” 35.65.
12) Across the room on the pile of bones, turn in “Recover the Bones” 35.66, accept “Helping the Lost Find Their Way“.  And turn in “I See Dead Draenei“, accept “Ezekiel“.
13) Leave Auchindoun, then go SW to Sha’tari Base Camp and turn in “The Fallen Exarch” (31.76, #4 on map).

The Bone Wastes

01) Go west to Veil Lithic around 24.73 and do “Veil Lithic: Preemptive Strike“: click on the Cursed Eggs in the nests around the huts, if a mob comes out, kill it.  Keep doing this until the quest is complete.
02) Go east at The Bone Wastes around 32.71 and do part of “Helping the Lost Find Their Way“: kill 10 Lost Spirits (for now). We will finish the Broken Skeletons later at a higher concentration of these mobs.
03) Go north to Refugee Caravan and turn in “Veil Lithic: Preemptive Strike” 37.51, accept “Veil Shalas: Signal Fires“.
04) Go east in The Bone Wastes around 49.62 and finish “Helping the Lost Find Their Way“: finishing killing all 10 of the Broken Skeletons you need.
05) GROUP (2+ players): East in The Bone Wastes at Writhing Mound do “Evil Draws Near“: kill/loot the Auchenai mobs there to collect 20 Doom Skulls, then use the Dread Relic quest item at the purple summoning circle 49.67, then kill Teribus the Cursed (huge lvl 65 Elite skeleton dragon) when he spawns in. Try to save your group for the next step (if you can):
06) East at Veil Shalas see if you can accept and do “Skywing” (Escort quest, starts at 54.72 from Skywing /target). It leads you up and around the tree houses, and you have to fight an elite mob at the end, which can be challenging solo, if you can’t kill the elite guy, then the quest can be skipped or tried again later at a higher level. While doing this escort, you can do the following quest at the same time:
07) East at Veil Shalas do (along with the previous quest “Skywing” [if you can]) “Veil Shalas: Signal Fires“: click on the 4 Signal Fires up in the tree houses, here are the locations:
08) Click on Bloodstone Signal Fire 56.72.
09) Click on Violet Signal Fire 57.69.
10) Click on Emerald Signal Fire 55.70.
11) Click on Sapphire Signal Fire 55.67.
12) NOTE: Before you leave here, make sure you have at least 30 Arakkoa feathers (by killing the arakkoa mobs), so you will have enough for a later quest.
13) Turn in (if you did it) “Evil Draws Near” west at Sha’tari Base Camp 31.77.
14) North in The Bone Wastes at Refugee Caravan turn in “Veil Shalas: Signal Fires” (37.51, #3 on map), accept “Return to Shattrath“.
15) North in Refugee Caravan turn in “Helping the Lost Find Their Way” 37.50.
16) Hearth to Allerian Stronghold.
17) In front of the wizard building turn in “Wanted: Bonelashers Dead!” 58.53, accept “Torgos!“.
18) Go SW a bit to Carrion Hill at The Bone Wastes and do part of “Torgos!“: kill/loot Trachela /target (the big white bird on top of the hill, 43.52), he drops Trachela’s Carcass, which will be used later.  Then:
19) CONTINUED: Go west to Veil Rhaze and do “Torgos!“: at Torgo’s Bane (a bluish glowing scarecrow on a cross, 27.56), first clear all the mobs around it, then use the Trachela’s Carcass item at it, then kill Torgos /target (level 65 Elite bird in the air) when he lands.  NOTE: You may need help if you can’t solo it. If you can’t solo it or find help, then skip it, or consider trying again later at a higher level.
20) Turn in (if you did it) “Torgos!” 58.53 (Hearth [or run back] to Allerian Stronghold).
21) Go NW and on the main path south at Cenarion Thicket turn in “Letting Earthbinder Tavgren Know” 44.26.
22) Head west into Shattrath City 38.24..

Shattrath City

01) Find Ezekiel /target. He patrols clockwise around the outer perimeter of Terrace of Light, look for the moving question mark on minimap. At him, turn in “Ezekiel“, accept “What Book? I Don’t See Any Book.“.
02) North in the city, go up to the bird houses (ramp entrance at 56.16) and turn in 30 Arakkoa feathers in for the quest “The Outcast’s Plight“.  
NOTE:  This becomes a repeatable quest, but no additional XP.
03) Drop down and turn in “Return to Shattrath” and (if you did it) “Skywing” 53.21.
04) GROUP (2+ players): Next to you accept and do in the immediate area “The Skettis Offensive“: kill the 4 waves of birds that spawn in, the last wave is a tough one. 
NOTES:  Don’t move to far from the quest giver or the quest will fail. Then turn this in next to you if you did it.
05) West a bit at the Campfire 43.30 do “What Book? I Don’t See Any Book.“: first talk to “Dirty” Larry (the shirtless male standing), then kill him and his friends.  These guys are kitable, so some classes may be able to solo this. You can always try again later if you cannot do this now. If someone else taps the mob, you can still jump in, do damage and complete the quest. If you did this, turn it in at him and accept “The Master’s Grand Design?“.
06) NOTE: If you happen to have any Arcane Tomes with you, you can turn one in for some good XP (south in the city at 43.92) for the quest “Synthesis of Power“. After turning in one tome, it then becomes repeatable for Scryer rep only. I will remind you a few more times in the future if you have not done this yet.  From this same NPC turn in “Voren’thal the Seer“. 

Scryer Quests References

01) NOTES: For the sake of this guide, I will focus on Scryers and getting their reputation up rather than Aldor, it really doesn’t matter a whole lot which faction you go with, they each have their ups and downs for items etc. Please note that you must have done the “City of Light” (started at #1 on map) escort quest in order to accept these optional quests below (my guide will not cover these in a step-by-step fashion), although some future Scryer quests will be covered step-by-step in upcoming zones:
02) SCRYERS ONLY:  You can accept and do the following quests obtained in Shattrath City (mainly for Scryer rep):
03) “A Cure for Zahlia” (obtained at 64.15). Doing this quest will cause your Scryer rep to decrease, but I would consider doing this for XP. Kill/loot Stonegazer /target. He is a lvl 64 Elite basilisk NE in Terokkar Forest, (patrols around 65.30).
04) “Firewing Signets” (obtained at 45.81). Done at Firewing Point (around 71.37 in Terokkar Forest) by kill/looting the mobs there.
05) “Sunfury Signets” (obtained at 45.81, and attainable at lvl 68)
06) “Synthesis of Power” (obtained at 42.91) (you can turn in more for Scryer rep).

Journey to Nagrand

01)Terokkar Forest is now FINISHED!
NOTE: You can safely abandon any quests that are currently in your Quest Log for Terokkar Forest, as you will not need them going forward. Although keep note of the quests you did not do and consider coming back to do them later if you like.
02) To get to Nagrand, try leaving west out of Shattrath City: If your rep is to low with the Aldor, then you may not be able to go this way as they could be hostile towards you. If so you will have to go around through Zangarmarsh. First take the elevator at 42.39, then:
03) Go through the tunnel 17.54 to get to Nagrand..

WoW TBC Classic Horde 60-70 Leveling Guide: 63-65 Terokkar Forest

Cenarion Thicket

01) Go SE to the Cenarion Thicket and on the main path turn in “What’s Wrong at Cenarion Thicket?” 44.26.  Accept “Strange Energy” and “Clues in the Thicket“.
02) Find Warden Treelos /target wondering around the paths at the Cenarion Thicket next to you around 44.22 and accept “It’s Watching You!“.  
TIP: Look for the exclamation mark on minimap if you can’t find him!
03) Do “Strange Energy“: kill/loot Vicious Teromoths (hostile mobs) in the immediate area around the Cenarion Thicket and Teromoths (neutral mobs), just south of the main path around 45.28.  Keep the next few steps in mind:
04) Up in the tower at Cenarion Thicket do “It’s Watching You!“: kill Naphthal’ar (up at 44.22).
05) Find Warden Treelos (#2 on map /target) wondering around the paths at the Cenarion Thicket and turn in “It’s Watching You!“.
06) In the middle of the Inn building at Cenarion Thicket do “Clues in the Thicket“: click on the Strange Object 45.22.
07) On the main path south at Cenarion Thicket turn in “Strange Energy” (44.26, #1 on map) and “Clues in the Thicket“.  Accept “By Any Means Necessary“.
08) On the main path running between Shattrath City and Tuurem find Empoor /target (he’s with a bodyguard) and do “By Any Means Necessary“: simply talk to him and then kill him.  Then at him turn this in and accept “Wind Trader Lathrai“.

Stonebreaker Hold

01) Go SE to Stonebreaker Hold and as you enter make a right and turn in “News from Zangarmarsh” 50.43.
02) Near you get the Flight Path from the Wind Rider Master /target 49.43.
03) Go in the Inn (the biggest building in the town) and talk to the Innkeeper 49.45 to make Stonebreaker Hold your new home.
04) Accept all quests at Stonebreaker Hold: In the Inn accept from Rokag (male orc, 49.45) “Stymying the Arakkoa” and “Surrender to the Horde“. And next to him from Advisor Faila (female blood elf) accept “Speak with Scout Neftis” and “Arakkoa War Path“. 
05) Inside the Inn on the other side, from Kurgatok (male orc, 49.46) accept “An Unwelcome Presence” and “Magical Disturbances“.
06) Straight outside of the Inn, accept from Rakoria (female orc, 50.45) “Olemba Seed Oil“.
07) Just behind you from the Wanted Poster, accept “Wanted: Bonelashers Dead!” 50.45.
08) Go in the SE hut in the town and accept “Vestments of the Wolf Spirit” 50.46.
09) NOTE:  Just outside of the hut, Exorcist Vaisha (female troll, 50.46) offers a PvP daily quest (“Spirits of Auchindoun“) that you can optionally do if you want, but my guide will not cover it.

Stonebreaker Camp

10) As you work your way east to Stonebreaker Camp (along with the rest of this section) start working on “Vestments of the Wolf Spirit” (kill/loot the Timber Worg Alphas), “Olemba Seed Oil” (pick up the white Olemba Cones) and “Magical Disturbances” (kill Warp Stalkers) /target.  All those are #16 on map.  At Stonebreaker Camp accept (under a tent) “What Happens in Terokkar Stays in Terokkar” 63.43.
11) Go south to Bonechewer Ruins around 66.51 and do “What Happens in Terokkar Stays in Terokkar” along with “An Unwelcome Presence“: kill 10 Bonechewer Devastators, 6 Backbreakers and 12 Warped Peons.
12) Back north at Stonebreaker Camp (under a tent, 63.43, #10 on map) turn in “An Unwelcome Presence” and “What Happens in Terokkar Stays in Terokkar“.  Accept “The Firewing Liaison“.
13) Back south at Bonechewer Ruins enter the barracks and do “The Firewing Liaison“: kill Lisaile Fireweaver 68.53.
14) Next to you in the barracks on the ground, click on the Fel Orc Plans scroll 68.54 and accept “An Unseen Hand“.
15) Back north at Stonebreaker Camp (under a tent, 63.43, #10 on map) turn in “The Firewing Liaison
16) All around the eastern side of Terokkar Forest finish “Vestments of the Wolf Spirit” (kill/loot the Timber Worg Alphas), “Olemba Seed Oil” (pick up 30 white Olemba Cones) and “Magical Disturbances” (kill 10 Warp Stalkers) /target.
17) Hearth to Stonebreaker Hold.
18) In the Inn, from Rokag (male orc, 49.45, #3 on map) turn in “An Unseen Hand
19) Inside the Inn on the other side, from Kurgatok (male orc, 49.46) turn in “Magical Disturbances“.
20) Straight outside of the Inn, from Rakoria (female orc, 50.45) turn in “Olemba Seed Oil“, accept “And Now, the Moment of Truth“.
21) Right behind you, in front of the Wanted Poster do “And Now, the Moment of Truth“: talk to Grek.
22) Back at Rakoria (female orc, 50.45) turn in “And Now, the Moment of Truth“.
23) Go in the SE hut in the town and turn in “Vestments of the Wolf Spirit” (50.46, #8 on map), accept “Patriarch Ironjaw“.

Grangol’var Village

01) Go west to Grangol’var Village and at Scout Neftis turn in “Speak with Scout Neftis” 39.44, accept “Who Are They?“.
02) Go north into Grangol’var Village and do “Who Are They?“. First make sure you got a disguise by talking to the quest giver (39.44 , #1 on map). You can’t use any abilities or you will lose the disguise. If you lose your disguise then go back to her to get a new one. While doing this quest stay away from the hostile Shadowy Hunters /target, they will see through your disguise and attack you (consider going into the village and killing these first before doing the quest). Then to do the quest, go talk to these 3 NPCs (they can respawn as different races/genders): Make sure your pet is dismissed and you have Aspect of the Cheetah on first before getting your disguise.
03) Talk to Shadowy Initiate /target (on the wood plank, 39.40).
04) Talk to Shadowy Laborer /target, the Laborer walks around and sometimes stops to hammer something around 38.40.
05) Talk to Shadowy Advisor /target (in the barracks, 40.39).
06) Back south in Grangol’var Village, at Scout Neftis and turn in “Who Are They?” (39.44, #1 on map), accept “Kill the Shadow Council!“.
07) Back north at Grangol’var Village do “Kill the Shadow Council!“: kill 10 Shadowy Executioners, 10 Summoners, and kill Shadowmaster Grieve (male orc in the barracks at 40.39, which is actually #5 on map).

Shattrath City

01) Head NW into Shattrath City, take the bridge entrance 35.26 and from Haggard War Veteran /target who patrols around on the bridge, accept “A’dal“.
02) Make a right at the end of the bridge then stop at the Flight Master /target 64.41 to get the Flight Path.
03) Directly in the middle of the city, from A’dal (brightly glowing), turn in “A’dal” 54.45.
04) Next to you accept and do the escort “City of Light“: simply follow Khadgar’s Servant /target around the city.  NOTES:  This escort literally takes 9 minutes to do.  If you are in an absolute hurry to 70 then I would skip this quest as it wastes too much time.  However if you are just playing casually, then I would do it.  This has to be done if you want to further advance with the Scryers or Aldors, and to receive further quests from those factions.  If you skip this quest, then some of the future quests listed in this guide will not be available.  If you did it then turn it in at 55.44 , accept/complete (for the sake of this guide) “Allegiance to the Scryers“.  Accept “Voren’thal the Seer“.  
NOTE:  You can choose which ever faction you want to part with, but my guide will focus on Scryers.
05) North in the city, turn in “Surrender to the Horde” 52.21, accept “The Eyes of Skettis“.
06) NE a bit in the city, accept “Rather Be Fishin’” 64.15.
07) East a bit turn in “Wind Trader Lathrai” 72.31, accept “A Personal Favor“.
08) Leave the city, take the NE exit 76.11..

Veil

01) NE at Silmyr Lake (around 39.12 in Terokkar Forest) do “Rather Be Fishin’“: kill/loot Shimmerscale Eels in the water.
02) Go south to Veil Skith and do part of “Stymying the Arakkoa“: kill Urdak /target, he wonders up around on the tree platforms, (ramp entrance at 30.43).  Keep the next step in mind:
03) Before leaving Veil Skith make sure “A Personal Favor” is finished by kill/looting the Skithian mobs.
04) NOTE: Make sure you save your Arakkoa feathers, 30 of them will be used for a later quest, and you do NOT need to grind here till you get 30, since you will most likely get the rest from the other quests later dealing with these mobs as well. Also make sure you do not accidentally sell them to a vendor!
05) Go back north into Shattrath City (entrance at 36.31 in Terokkar Forest).
06) On the NE side in the city turn in “A Personal Favor” 72.31, accept “Investigate Tuurem“.
07) North in the city turn in “Rather Be Fishin’” 64.15.
08) Leave the city and go east to Veil Reskk (Terokkar Forest) and take the ramp up to get to the tree platforms (ramp starts at 50.16)..
09) Up at the tree platforms do part of “Stymying the Arakkoa“: kill Ashkaz /target around 49.17.
10) Do part of “The Eyes of Skettis“: loot the Eye of Veil Reskk (at the top of the tree platform, 50.19).
11) Go east to Veil Shienor and enter the tree ramp (inside the big tree, 60.25)..
12) Up on the tree platform finish “The Eyes of Skettis“: loot the Eye of Veil Shienor 58.23 .
13) Go back down and finish “Stymying the Arakkoa“: kill Ayit /target (in the hut, 59.23).
14) Make sure “Arakkoa War Path” is finished by killing the required amount of Shienor mobs around the immediate area.
15) Go SW a bit to Tuurem and do “Investigate Tuurem“: loot the Sealed Box 54.30.  There is a greenish glow coming from it.
16) Go west and on the main path south at Cenarion Thicket turn in “Investigate Tuurem” 44.26.  Accept “What Are These Things“.
17) Go west into the northern part of Shattrath City and turn in “The Eyes of Skettis” (53.21 in Shattrath City), accept “Seek Out Kirrik“.

01) Hearth to Stonebreaker Hold.
02) In the Inn, from Rokag (male orc, 49.45) turn in “Stymying the Arakkoa“.
03) Next to you from Advisor Faila (female blood elf) turn in “Kill the Shadow Council!” and “Arakkoa War Path“.
04) Outside of the Inn, in front of a hut, turn in “What Are These Things” 50.46, accept “Report to Stonebreaker Camp“.
05) Head east to Stonebreaker Camp and turn in “Report to Stonebreaker Camp” 63.43, accept “Attack on Firewing Point“.
06) NE of Stonebreaker Camp do “Patriarch Ironjaw“: kill/loot Ironjaw /target (this brown colored worg patrols around 68.34).
07) Work your way east to Firewing Point and accept and do the escort from the caged female night elf /target (in the lower part of a building, 74.35) “Escape from Firewing Point!“: escort her west out of Firewing Point.  
TIP:  Before accepting this escort it’s wise to clear the main path just outside of the building first to make this easier, as the escortee is very squishie.
08) Finish up “Attack on Firewing Point“: kill the required amount of Firewing mobs within Firewing Point.
09) SW at Stonebreaker Camp turn in “Attack on Firewing Point” (63.43, #5 on map), accept “The Final Code“.
10) Go back east to Firewing Point and do “The Final Code“: enter the eastern most building (entrance at 74.36, #7 on map). Then work your way up the ramp and click on the Orb of Translocation.  Once teleported, go to the top of the building and kill/loot Sharth Voldoun.
11) Go to the middle of Firewing Point and click on the Mana Bomb 71.37.  
NOTE: You will most likely have to kill some mobs around it first, but if you can, try to click on the bomb ASAP, it will kill all the mobs in the area.
12) NOTE:  If you find any Arcane Tomes, save them, you can use them later for quest turn ins. These drop from certain humanoid mobs throughout Outland.
13) Hearth (or run back) to Stonebreaker Hold.
14) In the Inn turn in “Escape from Firewing Point!” (49.45, #2 on map).
15) Outside of the Inn, in front of a hut, turn in “The Final Code” (50.46, #4 on map), accept “Letting Earthbinder Tavgren Know“.
16) In the hut next to you, turn in “Patriarch Ironjaw” 50.46, accept “Welcoming the Wolf Spirit“.
17) In the hut do “Welcoming the Wolf Spirit“: use the Ceremonial Incense quest item at the candles next to you. Once done, turn in “Welcoming the Wolf Spirit“.

For Hunters
17a) if you are using a pet that uses Bite (such as Ravagers or Cats) and if you are lvl 64 (or if you are close to it you can grind to it first) then we will work on upgrading to Bite Rank 9 (or you can do this step once you return to Stonebreaker Hold later at lvl 64). First go to the Stable Master 49.45 /target and stable your pet.
17b) Go just SW to The Bone Wastes and tame a lvl 64 Dreadfang Widow around 49.50 to obtain Bite Rank 9.
17c) Once you got Bite Rank 9 abandon the spider and then go to the Stable Master 49.45 /target at Stonebreaker Hold and get your main pet back out and teach him the new ability.

Refugee Caravan

01) Head west in The Bone Wastes to Refugee Caravan and turn in “Seek Out Kirrik” 37.51, accept “Veil Skith: Darkstone of Terokk“.
02) Accept all other quests at Refugee Caravan: “Missing Friends“, “The Infested Protectors” and “Before Darkness Falls“.
03) Go NW to Veil Skith and do “Missing Friends” along with “Veil Skith: Darkstone of Terokk“: kill/loot the Skithian arakkoa mobs to obtain keys, then use the keys to open the cages.  And use the Rod of Purification quest item at the Darkstone of Terokk 31.42.  
NOTE: There is 4 cages total: (2 down below 31.41 30.43) and (2 up in the tree houses with more kids in them 31.44 31.42).
04) Around the north and east in The bone Wastes do “The Infested Protectors” along with “Wanted: Bonelashers Dead!“: kill the Infested Root-Walkers (tree mobs), then kill the Wood Mites that spawn. And kill 20 Bonelashers.
05) Just south of Refugee Caravan around 40.56 do “Before Darkness Falls“: kill the required amount of Cabal mobs. While doing this quest you will find an item which starts “Cabal Orders“, accept it.
06) Back north at Refugee Caravan (around 38.51, #1 on map) turn in all quests and accept all new ones: Turn in “Veil Skith: Darkstone of Terokk“, “Missing Friends“, “The Infested Protectors“, “Before Darkness Falls” and “Cabal Orders” … Accept “The Shadow Tomb“, “Veil Rhaze: Unliving Evil“, “The Tomb of Lights” and “The Vengeful Harbinger“.

The Bone Wastes – Tombs

01) Go west then enter the Shadow Tomb (entrance at 31.53).
02) As you enter, keep going straight north in the tomb all the way to the very last room. Once you enter the last room make a left and see if Akuno /target 31.49 is there and accept and do the escort “Escaping the Tomb“: escort him out of the tomb.  
NOTE:  We try this first because he may not be there as others could be doing the quest.  If he’s not there we can try again later.
03) Inside the tomb do “The Shadow Tomb“: loot the 3 chests at the end of each room. In the western room, loot the chest for the Gavel of K’alen 30.52.
04) In the eastern room, loot the chest for the Drape of Arunen 32.51.
05) In the northern room, loot the chest for the Scroll of Atalor 31.47.
06) If you haven’t yet, you can see if Akuno /target (31.49, #2 on map) is at the northern tunnel to do the escort quest “Escaping the Tomb“, which leads out of the tunnel.
07) Outside of the tomb at the NW side of The Bone Wastes around 28.55 do “Veil Rhaze: Unliving Evil“: kill the required amount of undead arakkoa mobs.
08) Back east at Refugee Caravan 37.51 turn in all quests and accept new ones, Turn in “Veil Rhaze: Unliving Evil” , “The Shadow Tomb” and (if you did it) “Escaping the Tomb” … Accept “Veil Lithic: Preemptive Strike“.
09) Go east to the Tomb of Lights (around the outside of it around 47.56) and do “The Tomb of Lights“: kill the required amount of Ethereal mobs.  Keep the next step in mind:
10) GROUP 2+ Players: Inside the tomb (entrance at 47.55) do “The Vengeful Harbinger“: use the Draenei Tomb Relic quest item at the altar (east in the tomb 51.55), then kill several waves of mobs that come. Once done turn it in right there in the tomb.
11) West back at Refugee Caravan turn in “The Tomb of Lights” (37.51 , #8 on map).
12) North in Refugee Caravan accept “Recover the Bones” 37.50.

Sha’Tari Base Camp

01) NOTE: While continuing on with the next few sections, start working on “Recover the Bones” by looting the Restless Bones you see on the ground throughout The Bone Wastes:
02) Head SW in The Bone Wastes to Sha’Tari Base Camp and “Taken in the Night” 31.76.
03) Also accept “An Improper Burial“, “The Dread Relic” and “Digging Through Bones“.  
NOTE:  Accepting “Digging Through Bones” starts an escort quest immediately:
04) Do the easy escort “Digging Through Bones“: just follow the dwarves.
05) Turn in “Digging Through Bones” 31.76, accept “Fumping“.
06) Just east at The Bone Wastes (very close to the camp 32.77) do “Fumping“: keep using the Fumper quest item to kill/loot under ground worms. Do this close to the camp so the guards at the camp will help you kill the spawned mobs.
07) Back at the camp turn in “Fumping” 31.76, SKIP “The Big Bone Worm“.
08) Work your way east (starting around 32.75) and do “An Improper Burial“: use the Sha’tari Torch quest item on 8 Slain Auchenai Warriors /target and on 8 Slain Sha’tar Vindicators /target.
09) Go further east and do “The Dread Relic“: loot the Massive Treasure Chest 44.76. 
TIP:  After looting it, I would run away quick.
10) Go east a bit more and accept “For the Fallen” 50.76.
11) Just to the east of you at Netherweb Ridge around 52.78 do “For the Fallen” along with “Taken in the Night” Kill 20 Dreadfang Widows (spiders), and free the warriors by attacking the Netherweb Victims.

01) Back SE in The Bone Wastes, turn in “For the Fallen” 50.76, accept “Terokkarantula“.
02) SE in Netherweb Ridge try to do “Terokkarantula“: kill Terokkarantula /target (level 65 Elite spider, 54.82). I think with good skill most classes should be able to solo this?  If you can’t solo it, or find help, then it can be skipped.
03) Back SE in The Bone Wastes, turn in (if you did it) “Terokkarantula” (50.76, #1 on map), accept “Return to Sha’tari Base Camp“.
04) Go back west to Sha’tari Base Camp 31.76 and turn in “Taken in the Night” and (if you have it) “Return to Sha’tari Base Camp“.
05) Also turn in “An Improper Burial“, “The Dread Relic” … Accept “A Hero Is Needed” and “Evil Draws Near“.
06) Go east to Auchenai Grounds around 33.74 and do “A Hero Is Needed“: kill 12 Auchenai Initiates and 5 Doomsayers.
07) Back west at Sha’tari Base Camp turn in “A Hero Is Needed” (31.76, #4 on map), accept “The Fallen Exarch“.
08) Now make sure “Recover the Bones” is finished, by picking up the Restless Bones all around The Bone Wastes.
09) Go east into Auchindoun and do “The Fallen Exarch“: click on the Auchenai Coffin 36.66, then kill Reanimated Exarch that spawns.
10) Go down into Auchindoun and take the entrance with the two red fires at it at 37.66..
11) Go straight in a bit and then on your right from the child, accept “I See Dead Draenei” 35.65.
12) Across the room on the pile of bones, turn in “Recover the Bones” 35.66, accept “Helping the Lost Find Their Way“. And turn in “I See Dead Draenei“, accept “Ezekiel“.
13) Leave Auchindoun, then go SW to Sha’tari Base Camp and turn in “The Fallen Exarch” (31.76, #4 on map).

The Bone Wastes

01) Go west to Veil Lithic around 24.73 and do “Veil Lithic: Preemptive Strike“: click on the Cursed Eggs in the nests around the huts, if a mob comes out, kill it.  Keep doing this until the quest is complete.
02) Go east at The Bone Wastes around 32.71 and do part of “Helping the Lost Find Their Way“: kill 10 Lost Spirits (for now).  We will finish the Broken Skeletons later at a higher concentration of these mobs.
03) Go north to Refugee Caravan and turn in “Veil Lithic: Preemptive Strike” 37.51, accept “Veil Shalas: Signal Fires“.
04) Go east in The Bone Wastes around 49.62 and finish “Helping the Lost Find Their Way“: finishing killing all 10 of the Broken Skeletons you need.
05) GROUP (2+ players):  East in The Bone Wastes at Writhing Mound do “Evil Draws Near“: kill/loot the Auchenai mobs there to collect 20 Doom Skulls, then use the Dread Relic quest item at the purple summoning circle 49.67, then kill Teribus the Cursed (huge lvl 65 Elite skeleton dragon) when he spawns in. Try to save your group for the next step (if you can):
06) GROUP (or soloable?):  East at Veil Shalas see if you can accept and do “Skywing” (Escort quest, starts at 54.72 from Skywing /target). It leads you up and around the tree houses, and you have to fight an elite mob at the end, which can be challenging solo, if you can’t kill the elite guy, then the quest can be skipped or tried again later at a higher level. While doing this escort, you can do the following quest at the same time:
07) East at Veil Shalas do (along with the previous quest “Skywing” [if you can]) “Veil Shalas: Signal Fires“: click on the 4 Signal Fires up in the tree houses, here are the locations:
08) Click on Bloodstone Signal Fire 56.72.
09) Click on Violet Signal Fire 57.69.
10) Click on Emerald Signal Fire 55.70.
11) Click on Sapphire Signal Fire 55.67.
12) NOTE: Before you leave here, make sure you have at least 30 Arakkoa feathers (by killing the arakkoa mobs), so you will have enough for a later quest.
13) Turn in (if you did it) “Evil Draws Near” west at Sha’tari Base Camp 31.77.
14) North in The Bone Wastes at Refugee Caravan turn in “Veil Shalas: Signal Fires” (37.51, #3 on map), accept “Return to Shattrath“.
15) North in Refugee Caravan turn in “Helping the Lost Find Their Way” 37.50.
16) Hearth to Stonebreaker Hold.
17) Just outside of the Inn on your right, turn in “Wanted: Bonelashers Dead!” 49.46, accept “Torgos!“.
18) Go SW a bit to Carrion Hill at The Bone Wastes and do part of “Torgos!“: kill/loot Trachela /target (the big white bird on top of the hill, 43.52), he drops Trachela’s Carcass, which will be used later.  Then:
19) Go west to Veil Rhaze and do “Torgos!“: at Torgo’s Bane (a bluish glowing scarecrow on a cross, 27.56), first clear all the mobs around it, then use the Trachela’s Carcass item at it, then kill Torgos /target (level 65 Elite bird in the air) when he lands.  
NOTE: You may need help if you can’t solo it. If you can’t solo it or find help, then skip it, or consider trying again later at a higher level.
20) Turn in (if you did it) “Torgos!” (#17 on map 49.46), (Hearth [or run back] to Stonebreaker Hold.
21) Go NW and on the main path south at Cenarion Thicket turn in “Letting Earthbinder Tavgren Know” 44.26.
22) Head west into Shattrath City 38.24..

Shattrath City

01) Find Ezekiel /target. He patrols clockwise around the outer perimeter of Terrace of Light, look for the moving question mark on minimap. At him, turn in “Ezekiel“, accept “What Book? I Don’t See Any Book.“.
02) North in the city, go up to the bird houses (ramp entrance at 56.16) and turn in 30 Arakkoa feathers in for the quest “The Outcast’s Plight“.  
NOTE:  This becomes a repeatable quest, but no additional XP.
03) Drop down and turn in “Return to Shattrath” and (if you did it) “Skywing” 53.21.
04) GROUP (2+ players): Next to you accept and do in the immediate area “The Skettis Offensive“: kill the 4 waves of birds that spawn in, the last wave is a tough one.  
NOTES: Don’t move to far from the quest giver or the quest will fail. Then turn this in next to you if you did it.
05) West a bit at the Campfire 43.30 do “What Book? I Don’t See Any Book.“: first talk to “Dirty” Larry (the shirtless male standing), then kill him and his friends.  These guys are kitable, so some classes may be able to solo this. You can always try again later if you cannot do this now. If someone else taps the mob, you can still jump in, do damage and complete the quest. If you did this, turn it in at him and accept “The Master’s Grand Design?“.
06) NOTE: If you happen to have any Arcane Tomes with you, you can turn one in for some good XP (south in the city at 43.92) for the quest “Synthesis of Power“. After turning in one tome, it then becomes repeatable for Scryer rep only. I will remind you a few more times in the future if you have not done this yet.

Scryer Quests References

01) NOTES: For the sake of this guide, I will focus on Scryers and getting their reputation up rather than Aldor, it really doesn’t matter a whole lot which faction you go with, they each have their ups and downs for items etc. Please note that you must have done the “City of Light” (started at #1 on map) escort quest in order to accept these optional quests below (my guide will not cover these in a step-by-step fashion), although some future Scryer quests will be covered step-by-step in upcoming zones:
02) SCRYERS ONLY: You can accept and do the following quests obtained in Shattrath City (mainly for Scryer rep):
03) “A Cure for Zahlia” (obtained at 64.15). Doing this quest will cause your Scryer rep to decrease, but I would consider doing this for XP. Kill/loot Stonegazer /target.  He is a lvl 64 Elite basilisk NE in Terokkar Forest, (patrols around 65.30).
04) “Firewing Signets” (obtained at 45.81). Done at Firewing Point (around 71.37 in Terokkar Forest) by kill/looting the mobs there.
05) “Sunfury Signets” (obtained at 45.81, and attainable at lvl 68)
06) “Synthesis of Power” (obtained at 42.91) (you can turn in more for Scryer rep).

Journey to Nagrand

01) Terokkar Forest is now FINISHED!  
NOTE: You can safely abandon any quests that are currently in your Quest Log for Terokkar Forest, as you will not need them going forward. Although keep note of the quests you did not do and consider coming back to do them later if you like.
02) To get to Nagrand, try leaving west out of Shattrath City: If your rep is to low with the Aldor, then you may not be able to go this way as they could be hostile towards you. If so you will have to go around through Zangarmarsh. First take the elevator at 42.39, then:
03) Go through the tunnel 17.54 to get to Nagrand..

WoW TBC Classic Alliance 60-70 Leveling Guide: 61-63 Zangarmash

Cenarion Refuge

01) As you enter Zangarmarsh, from the right side accept “The Umbrafen Tribe” and “Plants of Zangarmarsh” 80.64.
02) NW in town, in the Inn and on your left inside take “The Dying Balance” 78.63.
03) Make Cenarion Refuge your new home for your Hearthstone.
04) At the Inn’s balcony turn in “The Cenarion Expedition“. Accept “Disturbance at Umbrafen Lake” and “Warden Hamoot” 78.62.
05) From the Wanted Poster at the tower entrance at 79.65 take “Leader of the Darkcrest” and “Leader of the Bloodscale“.
06) At the top of the tower turn in “Warden Hamoot” (79.65, #2 on map is tower entrance), accept “A Warm Welcome“.

Telredor

07) Go NW to the Alliance town Telredor (elevator entrance at 71.49).
08) Go into the town, make a right down the steps and accept “Fulgor Spores” 69.49.
09) By the water fountain accept “The Boha’mu Ruins” 68.49.  And if you are level 62 accept “The Orebor Harborage“.
10) Next to you between the steps accept “Unfinished Business” 69.49.
11) Next to you accept “The Dead Mire” 68.50.  If available (at lvl 62), do NOT accept “The Fate of Tuurem“.
12) Up the steps next to you get the Flight Path from the Hippogryph Master /target 68.51.
13) Up the steps north in town accept “Menacing Marshfangs” and “Too Many Mouths to Feed” 68.48.

NOTE: Start working on the next 3 steps/quests while doing the next few sections:
01) Start Working On: “Plants of Zangarmarsh” by kill/looting almost any mob in Zangarmarsh for the plant parts (and remember not to sell your plant parts to a vendor!):
02) Start Working On:  “Fulgor Spores” right around under Telredor, loot the green Fulgor Spores:
03) Start Working On:  “Menacing Marshfangs” around the NE side of Zangarmarsh (except The Dead Mire area) kill any Marshfang Rippers you see along the way:
04) NE at The Dead Mire do “Unfinished Business“: kill Sporewing /target (patrols around 77.45).
05) Around The Dead Mire do “The Dead Mire“: loot a Dead Mire Soil off the ground.  Here are a few of the locations it could be at: 81.44, 81.37, 79.36, 84.43. 
NOTE: Do not sell the Bog Lord Tendrils to a vender you will need them later!
06) Just south of Cenarion Refuge around 82.75 do “The Dying Balance“: kill Boglash /target (lvl 61 Elite tall strider mob).  
NOTE: He patrols up and down the swamp, easy to solo but be prepared.
07) Go south to Umbrafen Village and do “The Umbrafen Tribe“: kill the required amount of Umbrafen mobs and Kataru is very south of the village up in the hut 85.91.  
NOTE:  There is only a few Umbrafen Witchdoctor /target spawns.
08) In the middle of the village, in a hut 83.85, accept and do the escort “Escape from Umbrafen“: escort Kayra Longmane /target to the north near Cenarion Refuge. A few waves of mobs will spawn, but not difficult.
09) Around the shoreline of Umbrafen Lake start working on “Too Many Mouths to Feed” by killing any Mire Hydra you see along the way to the next step:
10) Go SW of Umbrafen Lake at the steam pump and do “Disturbance at Umbrafen Lake“: simply go to 71.80 to get the lake investigated.
11) Hearth to Cenarion Refuge.

Cenarion Refuge

01) At the Inn’s balcony turn in “Disturbance at Umbrafen Lake” (accept “As the Crow Flies“) and “Escape from Umbrafen” 78.62.
02) There on the balcony do “As the Crow Flies“: use the Stormcrow Amulet quest item right there to complete the quest (a crow will fly you around for a few minutes). Once you land, turn this in and accept “Balance Must Be Preserved“.
03) In the Inn turn in “The Dying Balance” 78.63.
04) East in town turn in (if you did it) “Plants of Zangarmarsh” 80.64. Next to you turn in “The Umbrafen Tribe“, accept “A Damp, Dark Place“. Next to you again accept “Saving the Sporeloks“.  
NOTE:  “Identify Plant Parts” is a repeatable quest for rep only, no XP.
05) Across the path by the moonwell, accept “Safeguarding the Watchers” 80.65.
06) If you are friendly with Cenarion Expedition then also accept “Blessings of the Ancients” (if not we will do this later).
07) If you have it do “Blessings of the Ancients“: talk to the 2 big Ancients at Cenarion Refuge, they patrol the paths around the town, but generally they stay in their spots. Talk to Ashyen /target, his usual spot is at 81.64, and:
08) Talk to Keleth /target, his usual spot is at 79.67.
09) Turn in at the moonwell (if you did it) “Blessings of the Ancients” (80.65, #5 on map).
10) In the Inn accept (if you are friendly with Cenarion Expedition) “Watcher Leesa’oh” and (if you are lvl 62) “What’s Wrong at Cenarion Thicket?” 79.63.

01) Go south to Funggor Cavern (cave entrance at 74.92) [continue working on “Too Many Mouths to Feed” along the way] and do “Saving the Sporeloks” along with “Safeguarding the Watchers” and “A Damp, Dark Place“: kill 10 Marsh Dredgers and 10 Lurkers. Kill Lord Klaq /target (He is the big reddish mob down in the middle of the cave), and see next step for the location of the Belongings:
02) Pick up Ikeyen’s Belongings (looks like a small chest on a rocky ledge, 71.98.
03) Exit the cave and go NW to the steam pump SW of Umbrafen Lake 71.80 and do part of “Balance Must Be Preserved“: use the Ironvine Seeds quest item on the Umbrafen Lake Controls to Disable it. Also while you are there kill/loot any Steam Pump Overseers /target you see, you may get an item which starts “Drain Schematics“, accept it, and you will have more chances later to obtain it.
04) GROUP 2+ Players: NW a bit to Darkcrest Enclave do “Leader of the Darkcrest“: kill Rajah Haghazed /target (a lvl 63 Elite naga in the small temple, 65.69).  
NOTE: This is very hard to solo, if you cannot find help right now, you can try soloing this later near the end of this guide when you are stronger.
05) North in Darkcrest Enclave at the Lagoon Steam Pump 63.64 do part of “Balance Must Be Preserved“: use the Ironvine Seeds quest item on the Lagoon Lake Controls to Disable it.
AGAIN:  Also while you are there kill/loot any Steam Pump Overseers /target you see, you may get an item which starts “Drain Schematics“, accept it, and you will have more chances later to obtain it.
06) Around the shoreline of The Lagoon lake or Umbrafen Lake finish “Too Many Mouths to Feed“: kill 10 Mire Hydras.
07) Hearth (if you can) to Cenarion Refuge.
08) East in town 80.64 turn in (if you haven’t yet) “Plants of Zangarmarsh“. And turn in “Saving the Sporeloks“, “A Damp, Dark Place“.
09) At the moonwell next to you turn in “Safeguarding the Watchers” 80.65.
10) By now you should for sure be friendly with Cenarion Expedition and should be able to accept and do (if you haven’t yet) “Blessings of the Ancients“:  talk to the 2 big Ancients at Cenarion Refuge, they patrol the paths around the town, but generally they stay in their spots. Talk to Ashyen /target, his usual spot is at 81.64, and:
11) Talk to Keleth /target, his usual spot is at 79.67.
12) Turn in at the moonwell (if you did it) “Blessings of the Ancients” (80.65, #8 on map).
13) In the Inn accept (if you haven’t yet) “Watcher Leesa’oh” 79.63.

01) Around the NE side of Zangarmarsh (except The Dead Mire area) finish “Menacing Marshfangs“: kill 10 Marshfang Rippers /target. Also finish the following at the same time:
02) Right around under Telredor finish “Fulgor Spores“: loot 6 Fulgor Spores (green mushrooms).
03) Go NW to the Alliance town Telredor (elevator entrance at 71.49).
04) Go into the town, make a right down the steps and turn in “Fulgor Spores” 69.49.
05) By the water fountain accept (if you haven’t yet and also are lvl 62) “The Orebor Harborage” 68.49.
06) Next to you between the steps turn in “Unfinished Business” 69.49, accept “Blacksting’s Bane“.
07) Next to you turn in “The Dead Mire” 68.50 , accept An Unnatural Drought“. If available (at lvl 62), SKIP “The Fate of Tuurem“.
08) West in town talk to the Innkeeper /target 67.49 to make Telredor your new home.
09) Up the steps north in town turn in “Menacing Marshfangs” 68.48, accept “Umbrafen Eel Filets“. And turn in “Too Many Mouths to Feed“, accept “Diaphanous Wings“.
10) NOTE: As we continue on with the rest of the Zangarmarsh guide start working on “Diaphanous Wings” by kill/looting any stinger bugs you may come across along the way for the 8 Diaphanous Wings. These mobs are spread all over the open fields of Zangarmarsh. We have until the end of this guide to get this finished and turned in so only kill/loot the ones along the way and don’t intentionally go around to find them:
11) Exit Telredor drop shortcut at 69.47, then go NE to The Dead Mire around 80.41 and do “An Unnatural Drought“: kill 12 Withered Giants. While doing this quest you should get an item (low drop rate) that starts “Withered Basidium“, accept it.
12) Go SW around Umbrafen Lake 74.58and do “Umbrafen Eel Filets“: kill/loot the Umbrafen Eels under the water. NOTES: Remember to use your Potion of Water Breathing quest item so you can breath underwater and try to save the other charges for future quests in Zangarmarsh. And there are a lot of Umbraglow Stingers around the shoreline for continuing with “Diaphanous Wings“.
13) GROUP 2+ Players: (IF YOU STILL NEED TO): west a bit to Darkcrest Enclave do “Leader of the Darkcrest“: kill Rajah Haghazed /target (a lvl 63 Elite naga in the small temple, 65.69).  
NOTE: This is very hard to solo, if you cannot find help right now, you can try soloing this later near the end of this guide when you are stronger.

01) North at the small temple in Bloodscale Grounds do “Leader of the Bloodscale“: kill/loot Rajis Fyashe /target (lvl 63 elite naga 65.41).  
NOTES: With good skill and preparation I think most classes should be able to solo this. We will turn this in near the end of the Zangarmarsh guide, so if you cant solo it consider coming back later if you find a small group to help you kill it.
02) Just west a bit do part of “Balance Must Be Preserved“: use the Ironvine Seeds quest item on the Serpent Lake Controls 62.41 to disable it. 
AGAIN:  Also while you are there kill/loot any Steam Pump Overseers /target you see, you may get an item which starts “Drain Schematics“, accept it, and you will have one more chance later to obtain it.
03) Hearth (if you can) to Telredor. If Hearthstone is still on a cooldown consider grinding on naga for a short while until you can hearth. Or you can just go to the elevator entrance at 71.49.
04) East in town turn in “Withered Basidium” 69.49 , accept “Withered Flesh“.
05) By the water fountain accept if you haven’t yet (you should be lvl 62 by now) “The Orebor Harborage” 68.49.
06) Next to you turn in “An Unnatural Drought” 68.50 .  SKIP “The Fate of Tuurem“.
07) Up the steps north in town turn in “Umbrafen Eel Filets” 68.48 and (if its finished) “Diaphanous Wings“.
08) Exit Telredor drop shortcut at 69.47, then go NE to The Dead Mire around 80.41 and do “Withered Flesh“: kill/loot Withered Bog Lords and Parched Hydra. Remember: Do not sell the Bog Lord Tendrils to a vender you will need them later!
09) Hearth (if you can) then turn in “Withered Flesh” 69.49 .  NOTE:  If Hearthstone is still on a cooldown, skip this step and we will turn this in later!:
10) Head SW to Feralfen Village and do “Nothin’ Says Lovin’ Like a Big Stinger“: kill/loot Blacksting /target 50.60.
11) Go SW to Boha’mu Ruins and do “The Boha’mu Ruins“: simply go in the small building 44.69 to get it Explored.
12) Go west and see if you can kill “Count” Ungula 33.59, he drops an item which starts “The Count of the Marshes“, accept it.  
NOTE:  He spawns every 5 minutes, but if he’s dead you don’t need to wait around as we will swing by around here later.

Cenarion Watchpost

NOTE: Starting here, loot any Glowcaps (orange mushrooms) you see along the way (and remember not to sell them to a vendor):
01) Head west to Cenarion Watchpost and turn in “Watcher Leesa’oh” 23.66, accept “Observing the Sporelings“.  Also turn in (if you have it) “The Count of the Marshes“.
02) West a bit accept “The Sporelings’ Plight” and “Natural Enemies” (NPC patrols around 19.64).
03) Just to the west at The Spawning Glen do “The Sporelings’ Plight” along with “Natural Enemies” and “Observing the Sporelings“: pick up 10 Mature Spore Sacs from the ground, kill/loot the Bog Lord Giants (of any type) for the Bog Lord Tendrils (you may already have enough saved up), and go to the middle of The Spawning Glen 15.61 to get it investigated.
04) East of The Spawning Glen turn in (NPC patrols around 19.64, #2 on map) “The Sporelings’ Plight” and “Natural Enemies“, accept “Sporeggar“.  
NOTE: To obtain this quest, you need to be Neutral with Sporeggar. If you can’t accept it, don’t worry about it right now then.  And remember you can turn in more Bog Lord Tendrils for the repeatable rep only quest “More Tendrils!“.
05) East at the Cenarion Watchpost turn in “Observing the Sporelings” 23.66 , accept “A Question of Gluttony“.
06) Go east to Quagg Ridge around 28.64 and do “A Question of Gluttony“: pick up 10 Discarded Nutriments from the ground (green glowing objects).
07) Back west at Cenarion Watchpost turn in “A Question of Gluttony” 23.66, accept “Familiar Fungi“.
08) Make sure you are now Neutral with Sporeggar so you can accept (if you haven’t yet) “Sporeggar” (NPC patrols around 19.64, #2 on map).  If not, then keep grinding on Bog Giants (of any type) in The Spawning Glen (to the west of you, #3 on map), until you are either neutral with Sporeggar, or you have 6 more Bog Lord Tendrils to turn in (at this NPC).  Once you do become neutral, accept “Sporeggar“.

Sporeggar

01) Go north to Sporeggar and in the SE hut turn in “Sporeggar” 20.52.  Accept “Glowcap Mushrooms“.
02) Accept (in the northern hut) “Fertile Spores” 19.49.  
NOTE: The currency the Sporeggar uses is Glowcaps, so watch out you don’t lose all your Glowcaps to them.
03) While working on the next few sections start working on these 2 quests together:
04) “Fertile Spores“:  kill/loot the Spore Bats and Strider mobs (of any type) all around the open fields of Zangarmarsh.
05) “Glowcap Mushrooms“:  loot any Glowcaps (orange mushrooms) you see along the way.  
NOTE:  Remember not to sell your Fertile Spores or Glowcaps to a vendor!  While working on those continue on:
06) Go NE to the east side of Marshlight Lake and at the steam pump finish “Balance Must Be Preserved“: use the Ironvine Seeds quest item on the Marshlight Lake Controls 25.43 to Disable it. 
LAST CHANCE: While doing this quest an item should have dropped by now which starts “Drain Schematics“, accept it.  
NOTE:  The Steam Pump Overseers /target have a much higher drop chance for that item, but any Bloodscale naga could drop it.
07) Go north to the Alliance town Orebor Harborage and accept “Secrets of the Daggerfen” 41.29.
08) Next to you get the Flight Path from the Hippogryph Master /target 41.29.
09) North in town accept from the Wanted Poster “Wanted: Chieftain Mummaki” 42.27.
10) Next to you turn in “The Orebor Harborage” 42.27.  Accept “Ango’rosh Encroachment“, “Daggerfen Deviance” and “Concerns About Tuurem“.
11) Go south around 39.28 and do “Familiar Fungi” along with “Ango’rosh Encroachment“: kill/loot the Ango’rosh Ogres. Remember continue working on “Glowcap Mushrooms” by looting any Glowcap (orange mushrooms, #5 on map) from the ground you may see.
12) Go west to Daggerfen Village around 25.25 and start working on “Daggerfen Deviance“: kill DaggerfenAssassins and Muckdwellers. Do the next 2 quests while working on this one:
13) Do part of “Secrets of the Daggerfen“: search the village for a Daggerfen Poison Vial (has random spawns). Try some here: on table 25.25 next to flametorch 26.23 2 right here 24.23 on a crate 27.22.
14) Go to the top of the building and do “Wanted: Chieftain Mummaki“: kill/loot Chieftain Mummaki /target (actual #12 on map 24.27).
15) Next to you at the top of the tower (opposite side the Chieftain is at) do the last part of “Secrets of the Daggerfen“: loot the Daggerfen Poison Manual on the floor 24.27.
16) Finish “Daggerfen Deviance“: kill 3 Daggerfen Assassins and 15 Muckdwellers (#12 on map).
17) Back east at Orebor Harborage and turn in “Secrets of the Daggerfen” (#7 on map 41.29).
18) North in town 42.27 turn in “Ango’rosh Encroachment” (accept “Overlord Gorefist“), “Daggerfen Deviance” and “Wanted: Chieftain Mummaki“.
19) Now that you are Neutral with Kurenai, go in the Inn next to you and talk to the Innkeeper /target 42.26 make Orebor Harborage your new home 42.26.
20) Outside of the Inn, make a right and accept “Natural Armor” 42.27.
21) South a bit in the hut 41.29 accept “Stinger Venom“, “Lines of Communication” and “The Terror of Marshlight Lake“.

01) Go SE to the middle of Serpent Lake around 49.39 and do “Natural Armor“: kill/loot Fenclaw Thrashers (down in the water).  
NOTE: Remember to use your Potion of Water Breathing quest item so you can breath underwater.  Do the next quest in the same area also:
02) Directly in the middle of the lake do “Drain Schematics“: simply go to 50.41 to get the Drain Discovered to complete the quest. 
NOTE: You have to go up a little bit in the water then down in order to trigger this.
03) Go SW and start working on “Lines of Communication“: kill Marshfang Slicers starting around 38.47. 
Work your way to the next 2 steps while working on this one:
04) Go SW and kill (if you haven’t yet) “Count” Ungula 33.59, he drops an item which starts “The Count of the Marshes“, accept it.  
NOTE:  He spawns every 5 minutes, you may have already did this sooner, but this is the last time we stop here so do this if you haven’t yet. You can grind on Marshfang Slicers in the meantime until he respawns.
05) At Cenarion Watchpost turn in “Familiar Fungi” 23.66 (accept “Stealing Back the Mushrooms“) and (if you have it) “The Count of the Marshes“.
06) Make sure “Lines of Communication“, “Glowcap Mushrooms” and “Fertile Spores” are now finished. Kill 12 Marshfang Slicers (#3 on map). Pick up 10 Glowcap mushrooms from the ground (#6 on map). And kill/loot the Spore Bats and Strider mobs (of any type) all around the open fields of Zangarmarsh.  
REMINDER:  Remember not to sell your Fertile Spores or Glowcaps to a vendor!
07) Go NW to Sporeggar and in the southern hut turn in “Glowcap Mushrooms” 20.52.  
NOTE:  (if available) “More Glowcaps” is a repeatable quest for rep only, no XP.
08) In the northern hut turn in “Fertile Spores” 19.49.
09) Make sure you are now friendly with Sporeggar. If you’re not then grind on mobs at The Spawning Glen (SW in Zangarmarsh) until you are. Remember you can turn in more glowcaps or tendrils 19.64 for more rep.
10) Once you are friendly with Sporeggar, at Sporeggar accept “Now That We’re Friends…” (#8 on map 20.50).

01) As you do this section start working on “Stinger Venom“: kill/loot Fenglow Stingers and Marshlight Bleeders.  These are mostly found on the western side of Zangarmarsh:
02) Go NE to the small island in Marshlight Lake and do “Pursuing Terrorclaw“: kill Terrorclaw /target 22.46.
03) To the east side of Marshlight Lake, at Bloodscale Enclave around 25.42 do “Now That We’re Friends…“: kill 12 Bloodscale Slavedrivers and 12 Enchantresses.
04) Finish “A Warm Welcome“: obtain 30 Naga Claws from the Nagas around Zangarmarsh (try to finish them around #3 on map)..
05) Go to the island NW in Zangarmarsh (Ango’rosh Stronghold) and do “Overlord Gorefist” along with “Stealing Back the Mushrooms“: kill 10 Ango’rosh Maulers and kill Overlord Gorefist (in the hut up at 18.8). Also pick up the Box of Mushrooms on the ground. The ogres can drop the mushrooms as well and you should get most from them.
06) Go south to Sporeggar and turn in “Now That We’re Friends…” 20.50.  
NOTES:  This quest becomes a repeatable rep only quest, no XP. And most other quests here are optional Coilfang Reservoir dungeon quests that my guide does not cover.
07) Go SE to Cenarion Watchpost and turn in “Stealing Back the Mushrooms” 23.66.  
NOTE: You do not need to follow her as she does not give any more quests.
08) Finish “Stinger Venom“: kill/loot Fenglow Stingers and Marshlight Bleeders. These are mostly found on the western side of Zangarmarsh (#1 on map).
09) Hearth to Orebor Harborage.
10) Make a right out of the Inn and turn in “Overlord Gorefist” 42.27.
11) Next to you turn in “Natural Armor” 42.27, accept “Maktu’s Revenge“.
12) South in the hut 41.29 turn in “Stinger Venom“, “Lines of Communication” and “The Terror of Marshlight Lake“.

01) Go south to the small island at Serpent Lake and do “Maktu’s Revenge“: kill Mragesh /target.  He is under the water on the NE side of the island 42.41.
02) Back north at Orebor Harborage turn in “Maktu’s Revenge” 42.27 .
03) Go to the Hippogryph Master /target 41.29 and fly to Telredor, Zangarmarsh.
04) At Telredor go down by the water fountain and turn in “The Boha’mu Ruins” 68.49, accept “Idols of the Feralfen“.
05) Next to you between the steps turn in “Blacksting’s Bane” 69.49.
06) At the NE side of town turn in (if you haven’t yet) “Withered Flesh” 69.49.
07) West in town talk to the Innkeeper /target 67.49 to make Telredor your new home.
08) Up the steps north in town turn in (if its finished and if you still need to) “Diaphanous Wings” 68.48.
09) Exit Telredor and go SE to Cenarion Refuge and in the Inn accept (if you haven’t yet) “What’s Wrong at Cenarion Thicket?” 79.63.
10) On the Inn’s balcony turn in “Balance Must Be Preserved” and “Drain Schematics“. Accept “Warning the Cenarion Circle” 78.62.
12) East in town turn in (it should be done by now) “Plants of Zangarmarsh” 80.64.  
NOTE: You can turn additional in for more rep, but no XP.
13) Head east to Hellfire Peninsula and at the Cenarion Post (16.52 in Hellfire Peninsula) turn in “Warning the Cenarion Circle“, accept “Return to the Marsh“.
14) Go back west to Cenarion Refuge in Zangarmarsh and at the Inn’s balcony turn in “Return to the Marsh” (#9 on map 78.62).  
NOTE: “Failed Incursion” is a dungeon quest at Coilfang Reservoir that my guide does not cover.

01) Head west to Feralfen Village around 49.61 and do “Idols of the Feralfen“: loot the Feralfen Idols off the ground.
02) Hearth (or go back) to Telredor (elevator entrance at 71.49).
03) At Telredor go down by the water fountain and turn in “Idols of the Feralfen” 68.49, accept “Gathering the Reagents“.
04) Exit Telredor drop shortcut at 69.47 and all over the open fields of Zangarmarsh do “Gathering the Reagents“: kill/loot the Sporebats (or Young Sporebats) and Fen Striders.  There is a good concentration of these mobs just NE of Telredor around 72.45.
05) Hearth (or go back) to Telredor (elevator entrance at 71.49, #2 on map).
06) At Telredor go down by the water fountain and turn in “Gathering the Reagents” 68.49 , accept “Messenger to the Feralfen“.
07) Exit Telredor and go SW to Boha’mu Ruins and do “Messenger to the Feralfen“: use your quest item Ahuurn’s Elixer then talk to Elder Kuruti (in the small building 44.69).
08) Finish (if you still need to) “Diaphanous Wings“: kill/loot stinger bugs for the 8 Diaphanous Wings. These mobs are spread all over the open fields of Zangarmarsh.  
NOTE:  You may have already completed and turned this in by now.
09) Hearth (or go back) to Telredor (elevator entrance at 71.49, #2 on map).
10) At Telredor go down by the water fountain and turn in “Messenger to the Feralfen” 68.49.
11) Up the steps north in town turn in (if you still need to) “Diaphanous Wings” 68.48.

For Hunters:
11a)  Now is the time to start considering if you want to get the highest tier Ravager pet (that comes with Gore Rank 9 and Dash Rank 3) if that is what you are using or want to use.  As said previously, ravagers do the most DPS out of all the pets in TBC (even more than cats), which can help you level faster.  If you choose to go this route then first understand that this new ravager we would be getting is in Blades Edge Mountains and getting there means we have to work our way through some level 65 mobs.  It’s usually best to use your current pet then abandon it once you get to your new ravager to tame, or you can go to the Stable Master 68.50 at Telredor and get the pet out you don’t mind abandoning for your new one.  You also need to be level 63 to proceed with this.
11b) New Ravager pet?: Go north to enter Blades Edge Mountains (entrance at 23.66). Work your way to the other side of the cave, you may need to kill some lvl 65 spiders.
11c) New Ravager pet?: Go NE on the main path, and right around Toshley’s Station (Alliance town around 59.69) tame a lvl 63 Rip-Blade Ravager for your new pet. Please note that there are multiple colors to choose from. The main reason to get this ravager is for Gore Rank 9, but also comes with Dash Rank 3 as well.
11d )New Ravager pet?: Go to the Gryphon Master 61.70 /target at Toshley’s Station and fly to Telredor, Zangarmarsh.

12) GROUP 2+ Players (or soloable?): (IF YOU HAVEN’T YET): south at Darkcrest Enclave do “Leader of the Darkcrest“: kill Rajah Haghazed /target (a lvl 63 Elite naga in the small temple, 65.69).  
NOTE: You will most likely be level 63 now just enough to possibly solo this.
13) At the top of the tower turn in “A Warm Welcome” and (if you did any of them) “Leader of the Darkcrest” and “Leader of the Bloodscale” 79.65.
14) East in town turn in any remaining plant parts you have at Lauranna Thar’well 80.64 /target.
15) Zangarmarsh is now FINISHED!  
NOTE: You can safely abandon any quests in Zangarmarsh if you didn’t do them (EXCEPT: “What’s Wrong at Cenarion Thicket?” and “Concerns About Tuurem“).
16) Head directly south on the path into Terokkar Forest… 83.94