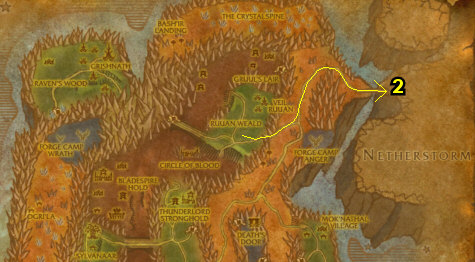
Thunderlord Stronghold
01) Right before entering the cave at Blade’s Run accept “Killing the Crawlers” 53.96.
02) Grind your way north through the cave while doing “Killing the Crawlers” by killing 6 Cavern Crawlers. Then continue to Thunderlord Stronghold and turn in “Killing the Crawlers” 52.58. Accept “The Bladespire Threat“.
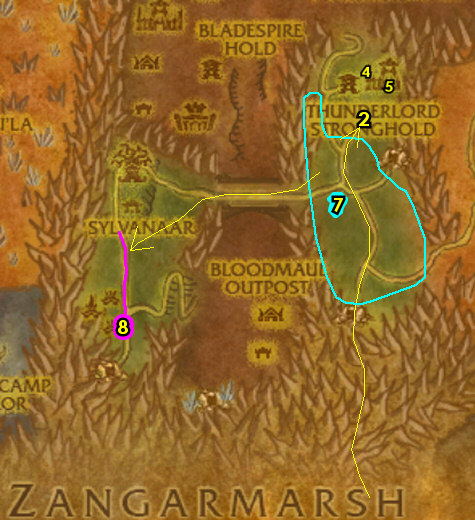
03) Next to you at the Bonfire, accept “The Encroaching Wilderness” and (Wanted Poster, 52.58) “Felling an Ancient Tree“.
04) Get the Flight Path at the Wind Rider Master /target 52.54.
05) Go in the Inn (the biggest building at the Stronghold) and talk to the Innkeeper /target 53.55 to make Thunderlord Stronghold your new home.
06) NOTE: There is a First Aid Trainer /target 54.55 there in the Inn if you need to upgrade your First Aid.
07) To the south and west of Thunderlord Stronghold at Jagged Ridge do “The Encroaching Wilderness“: kill 12 Bladewing Bloodletters.
08) Follow the main path west across the bridge to The Living Grove (watch out for the Alliance town Sylvanaar) and do “Felling an Ancient Tree“: kill/loot Stronglimb Deeproot /target (this huge ancient patrols up and down the path). His spawn is at 37.78.
Bloodmaul/Bladespire Ogres
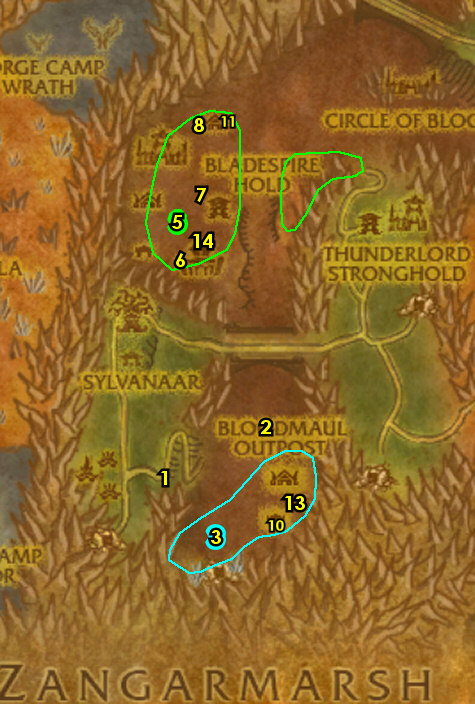
01) Go down into Bloodmaul Ravine (ramp entrance at 40.76).
02) Go down and accept from the male troll “They Stole Me Hookah and Me Brews!” 45.72.
03) Go south into Bloodmaul Ravine and do “They Stole Me Hookah and Me Brews!“: kill/loot Bloodmaul Brewmasters for the 10 brews and loot T’chali’s Hookah (next to the Campfire at 42.81).
NOTES: The Brewmasters are the ones carrying mugs in their hands. You can also loot the brews from the Bloodmaul Brew Kegs on the ground.
04) Back north at the male troll turn in “They Stole Me Hookah and Me Brews!” (45.72, #2 on map), accept “Bladespire Kegger“.
05) Go north to Bladespire Hold around 43.53 and do “The Bladespire Threat” along with “Bladespire Kegger“: kill 30 Bladespire Ogres (of any type), and 10 Bladespire Raptors. And use the Bloodmaul Brutebane Keg quest item near ogres (that are not in combat) to get them drunk.
ALSO: An item should drop while doing this quest, which starts: “Thunderlord Clan Artifacts“, accept and do it by looting the following 3 artifacts around the hold:
06) Pick up Thunderlord Clan Drum (in the hut, 40.58).
07) Pick up Thunderlord Clan Arrow (up on the rock, 42.53).
NOTE: Ramp entrance at 41.52.
08) Pick up Thunderlord Clan Tablet (in the hut, 41.46).
09) Once they are done, go south and at the male troll turn in “Bladespire Kegger” (45.72, #2 on map), accept “Grimnok and Korgaah, I Am For You!“.
10) Go south to Bloodmaul Outpost and do part of “Grimnok and Korgaah, I Am For You!“: kill Grimnok Battleborn /target (up in the watch tower, 45.80).
11) Go north to Bladespire Hold and finish “Grimnok and Korgaah, I Am For You!“: kill Korgaah /target (up in the hut, 43.47).
NOTE: This ogre is next to 2 Elite mobs. Just quickly kill Korgaah and run out of there. Also if you have some Bloodmaul Brutebane Keg left, use them to distract the ogres to disable some of them.
12) Back south at the male troll turn in “Grimnok and Korgaah, I Am For You!” (45.72, #2 on map), accept “A Curse Upon Both of Your Clans!“.
13) Go south to Bloodmaul Outpost and do part of “A Curse Upon Both of Your Clans!“: use the Wicked Strong Fetish quest item at 2 buildings there around 47.79.
NOTE: You can use the quest item on the same building multiple times.
14) Go north to Bladespire Hold and finish “A Curse Upon Both of Your Clans!“: use the Wicked Strong Fetish quest item at 5 buildings there around 42.57.
15) Back south at the male troll turn in “A Curse Upon Both of Your Clans!” (45.72, #2 on map).
Bloodmaul Ravine
01) Hearth to Thunderlord Stronghold.
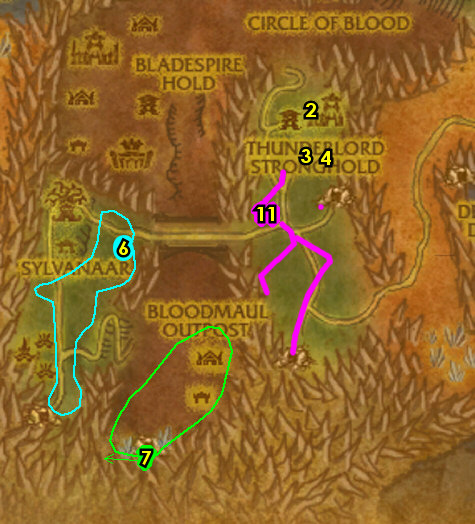
02) Just outside of the Inn, next to the Wind Rider Master accept (if you are lvl 67) “The Apprentice’s Request” 52.54.
NOTE: There is a quest nearby called “Out of This World Produce” (requires 67), do NOT accept this quest as we will do another similar one that will give more XP.
03) Down by the Bonfire 52.58 turn in “Felling an Ancient Tree“, “The Bladespire Threat” (accept “The Bloodmaul Ogres“), and “The Encroaching Wilderness” (accept “Dust from the Drakes“).
04) SE in town, turn in “Thunderlord Clan Artifacts” 53.59, accept “Vision Guide“.
05) Do “Vision Guide“. Simply click on the Fiery Soul Fragment quest item (right there at the quest giver, 53.59, #4 on map) and it will fly you around. Once the flight is over turn in “Vision Guide“, accept “The Thunderspike“.
06) Go SW across the bridge to The Living Grove (around 39.70, watch out for the Alliance town Sylvanaar) and do “Dust from the Drakes“: kill/loot Fey Drakes.
07) Go down and south to Draenethyst Mine (entrance at 42.85) and do “The Bloodmaul Ogres” along with “The Thunderspike“: go to the end of the linear cave and loot The Thunderspike. You then need to kill/loot the mob that spawns. Then leave the cave and finish up killing the 30 Bloodmaul Ogres (of any type).
08) Hearth (or go back) to Thunderlord Stronghold and down by the Bonfire (52.58, #3 on map) turn in “The Bloodmaul Ogres” and “Dust from the Drakes“, accept “Protecting Our Own“.
09) SE in town, turn in “The Thunderspike” (53.59, #4 on map). Then wait a moment and accept next to you “The Spirits Have Voices“.
10) Back by the Bonfire turn in “The Spirits Have Voices” (53.59, #3 on map), accept “Whispers on the Wind“.
11) Just south of Thunderlord Stronghold around 51.64 do “Protecting Our Own“: use the Gor’drek’s Ointment quest item on Thunderlord Dire Wolves.
12) Back at Thunderlord Stronghold at the Bonfire, turn in “Protecting Our Own” 52.58.
Mok’Nathal Village
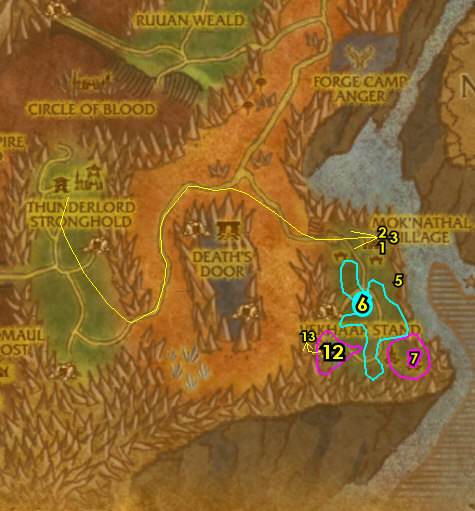
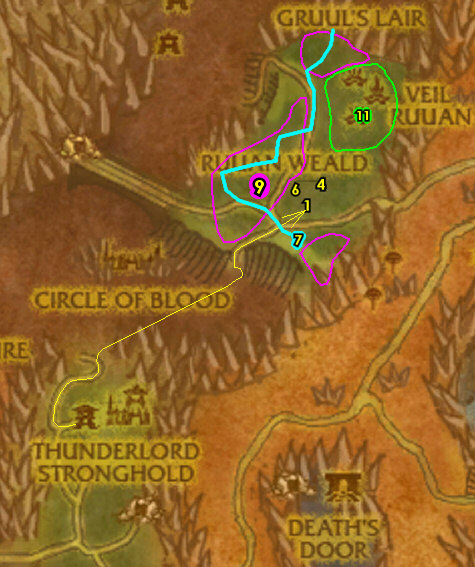
01) Follow the main path all the way to Mok’Nathal Village (see path to take on map), then accept “The Stones of Vekh’nir” 75.62.
02) In the middle of the village turn in “Whispers on the Wind” 75.61, accept “Reunion“.
03) Just east of you at the Inn, talk to the Innkeeper /target 76.60 to make Mok’Nathal Village your new home, also accept “Mok’Nathal Treats“.
04) Just outside of the Inn on your left, accept “Silkwing Cocoons” and “The Softest Wings” 76.61.
05) SE in town, get the Flight Path from the Flight Master /target 76.66.
06) Just south of Mok’Nathal Village (around Vekhaar Stand, 75.75) do “Silkwing Cocoons” along with “The Softest Wings“: kill/loot the yellow Silkwing Larvas and Mature Silkwings (moths).
07) SE at Veil Vekh do “The Stones of Vekh’nir“: keep kill/looting the Vekh’nir mobs until the Vekh’nir Crystal drops, then use it at the purple spell circle 78.75.
08) Back north at Mok’Nathal Village turn in “The Stones of Vekh’nir” (75.62, #4 on map). Wait a few seconds then accept “Trial and Error“.
09) Across the path, turn in “The Softest Wings” and “Silkwing Cocoons” 76.61.
10) Near you at Leoroxx, accept “Understanding the Mok’Nathal” (75.61, #1 on map).
11) Go SE to Veil Vekh around 78.75 and do part of “Trial and Error“: kill/loot the Vekh’nir mobs until you get 4 Infused Vekh’nir Crystals. You can find some more Vekh’nir mobs west around 72.74. These are #7 on map.
12) West at Trogma’s Claim around 72.74 finish “Trial and Error“: first open the Dertrok’s Wand Case (in your backpack), then use the 4 wands on the Ogres in the area. Keep the next step in mind:
13) Enter the cave at Trogma’s Claim and do “Understanding the Mok’Nathal“: take the middle path in the cave then kill Vekh /target (green arakkoa mob, 70.72).
01) Hearth to Mok’Nathal Village.
02) Just outside of the Inn turn in “Understanding the Mok’Nathal” 75.61, accept “Since Time Forgotten…“.
03) Next to you by the fire accept “The Totems of My Enemy” 75.60.
04) Just south of you across the path turn in “Trial and Error” 75.62, accept “Ruuan Weald“.
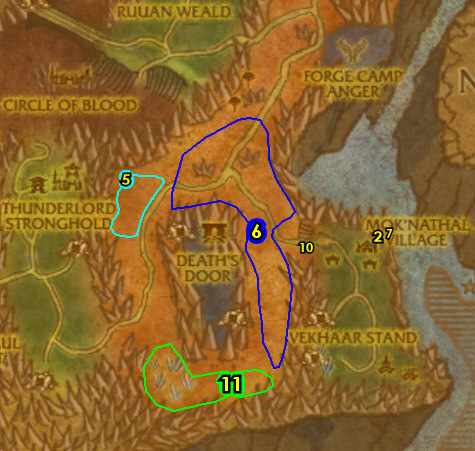
05) Grind your way NW to Bladespire Outpost while start working on “Mok’Nathal Treats” (kill/loot serpents and raptors, #6 on map) and then do “The Totems of My Enemy” along with “Since Time Forgotten…“: kill/loot the Bladespire ogres and kill Gnosh Brognat /target (under the rock canopy, 57.54).
06) As you work your way SE back to Mok’Nathal Village continue working on “Mok’Nathal Treats“: kill/loot serpents and raptors around Razor Ridge (don’t need to finish this yet).
07) Hearth or go back to Mok’Nathal Village and in the Inn turn in (if it’s done) “Mok’Nathal Treats” 76.60.
08) Just outside of the Inn turn in “Since Time Forgotten…” (75.61, #2 on map), accept “Slay the Brood Mother“.
09) Next to you by the fire turn in “The Totems of My Enemy” (75.60), accept “Spirit Calling“.
10) Go to the ramp up (starting at 71.62).
11) Go SW to Singing Ridge and do “Slay the Brood Mother” along with “Spirit Calling“: kill Dreadwing /target (the largest netherdrake in the area, around 63.77). And use the Spirit Calling Totems quest item near the Lesser Nether Drakes to loot their spirits when they die.
NOTE: Use your 5 totems wisely, you can go get more but you should use the 5 totems to get all 8 spirits.
12) Hearth or go back to Mok’Nathal Village and just outside of the Inn turn in “Slay the Brood Mother” (75.61, #2 on map).
13) Next to you by the fire turn in “Spirit Calling” 75.61, accept “Gather the Orbs“.
01) Go NW to Razaan’s Landing around 67.42 and do “Gather the Orbs“: use the Orb Collecting Totem quest item anywhere in Razaan’s Landing to collect 15 Razaani Light Orbs (those small purple puff balls floating around).
NOTE: Keep using the totem constantly when the cooldown is up to get all 15 (because the totem disappears after it collects an orb), and you generally don’t need to attack anything.
02) Hearth or go back to Mok’Nathal Village and by the fire turn in “Gather the Orbs” 75.61, accept “Inform Leoroxx!“.
03) Next to you turn in “Inform Leoroxx!” 75.61. Accept “There Can Be Only One Response“.
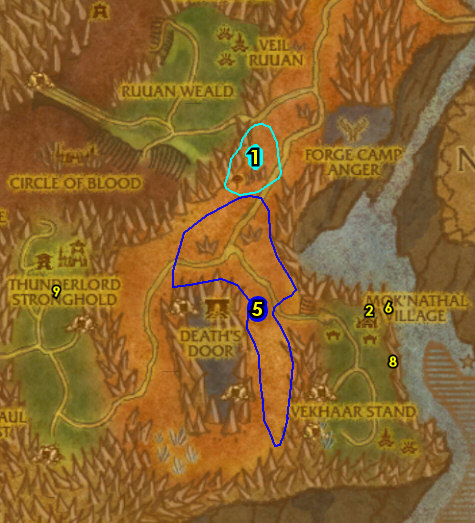
04) Go back NW to Razaan’s Landing (around 67.42, #1 on map) and do “There Can Be Only One Response“: keep killing the Razaani mobs until Nexus-Prince Razaan /target shows up, kill him and loot the cube.
NOTE: When the Prince spawns he yells “Who dares to interrupt my operations?“, when you see that in your chat, look for him and kill him.
05) Now make sure “Mok’Nathal Treats” is now finished (if you still need to): kill/loot serpents and raptors around Razor Ridge.
NOTE: There is a large concentration of serpents around 68.72.
06) Hearth or go back to Mok’Nathal Village and in the Inn turn in (if you still need to) “Mok’Nathal Treats” 76.60.
07) By the fire turn in “There Can Be Only One Response” (75.60, #2 on map).
08) Go SE to the Flight Master /target 76.66 and fly to Thunderlord Stronghold, Blade’s Edge Mountains.
09) At Thunderlord Stronghold, down by the Bonfire turn in “Reunion” 52.58, accept “On Spirit’s Wings“.
Evergrove
01) Head NE to Evergrove (see path on map to take) then get the Flight Path from the Flight Master /target 62.40.
02) Accept ALL quests at Evergrove: In front of you by the moonwell accept “A Time for Negotiation…” 62.39.
03) Next to you at the moonwell turn in “Ruuan Weald” 62.39. Accept “Creating the Pendant“.
04) Next to the mailbox/Inn accept “Culling the Wild” 63.38.
05) Go in the Inn next to you and talk to the Innkeeper /target 63.38to make Evergrove your new home.
06) At the west part of town, accept (from the big Ancient /target, 61.38) “Little Embers” and “From the Ashes“.
07) Do “A Time for Negotiation…“: find and talk to Overseer Nuaar /target (male draenei), he patrols around the left side and the south side of Ruuan Weald.
08) Back at Evergrove by the moonwell turn in “A Time for Negotiation…” (62.39, #1 on map), accept “…and a Time for Action” and (next to you) “Poaching from Poachers“.
09) All around Evergrove (aka Ruuan Weald) do “…and a Time for Action” along with “Poaching from Poachers“: kill 10 Wyrmcult Hewer (they wield axes) and kill/loot the Wyrmcult Poachers (they wield bows). While doing these quests you should find an item which starts “Did You Get The Note?“, accept it.
10) Back at Evergrove by the moonwell (62.39, #1 on map) turn in “Poaching from Poachers” (accept “Whelps of the Wyrmcult“), “…and a Time for Action” and “Did You Get The Note?“. Accept “Wyrmskull Watcher“.
11) Go north to Veil Ruuan and do “Creating the Pendant“: kill/loot the Ruuan’ok mobs (arakkoa) for 6 claws, then use them at the green summoning circle 64.33, and kill/loot the bird mob /target that spawns.
12) Back south at Evergrove by the moonwell turn in “Creating the Pendant” (62.39, #1 on map), accept “Whispers of the Raven God“.
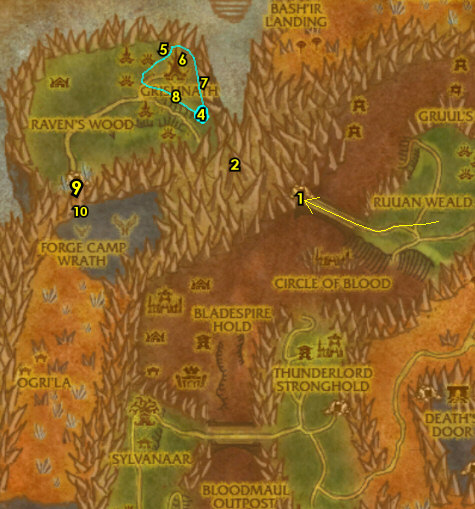
01) Go west across the bridge and turn in “Wyrmskull Watcher” 50.36 (he patrols a bit), accept “Longtail is the Lynchpin“.
02) Go in Wyrmskull Tunnel next to you and do “Longtail is the Lynchpin“: kill Draaca Longtail /target (draenei), she is wondering around near the end of the tunnel around 46.33.
NOTE: You can mount while in this tunnel.
03) Back at the tunnel entrance next to the bridge turn in “Longtail is the Lynchpin” (50.36, #1 on map), accept “Meeting at the Blackwing Coven“.
04) Go back through the tunnel to the other side, then north at Grishnath around 41.22 and do “Whispers of the Raven God“: kill a Grishna Falconwing /target to obtain a 2 min buff that will allow you to then view the Prophecies (listed below).
NOTE: While doing this quest, you should find an item which starts “The Truth Unorbed“, accept it. Here are the locations of the 4 Prophecies to view:
05) View The First Prophecy (up in the tree house, 39.17).
06) View The Third Prophecy (on the ground by the swamp, 41.18).
07) View The Second Prophecy (up in the tree house, lower deck, 42.22).
08) View The Fourth Prophecy (on the ground between a hut and a red canopy, 40.23).
09) Go SW to Blackwing Coven (cave entrance at 32.34) and do “Whelps of the Wyrmcult“: use the Blackwhelp Net quest item on the Wyrmcult Blackwhelps (dragon whelps) in the cave.
10) In Blackwing Coven (cave) do “Meeting at the Blackwing Coven“: first collect 5 Costume Scraps from the Wyrmcult mobs in the cave (you might already have enough). Then click on it in your backpack to make an Overseer Disguise, then use it to talk to Kolphis Darkscale /target (male orc, 33.37) in the cave.
11) Hearth to Evergrove.
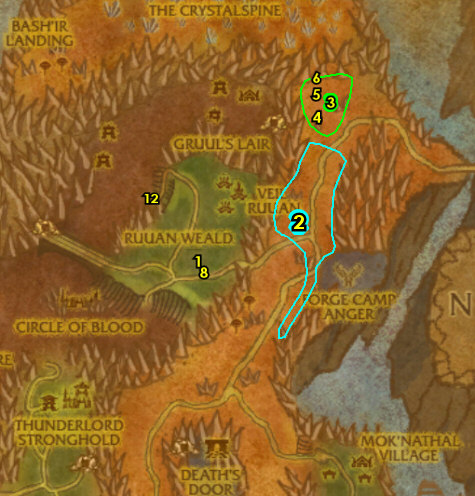
01) At the moonwell 62.39 turn in “Whispers of the Raven God“, “Meeting at the Blackwing Coven” (accept “Maxnar Must Die!“), “The Truth Unorbed” and “Whelps of the Wyrmcult“. Accept “Treebole Must Know“.
02) Go NE to Bladed Gulch (starting around 69.37) and do “Culling the Wild“: kill 4 Felsworn Scalewings (serpents), 4 Felsworn Daggermaw (raptors) and 2 Fel Corrupters.
NOTE: While doing this quest, the Fel Corrupters can drop an item which starts “Damaged Mask“, accept it.
03) Go north to Skald around 72.22 and do “Little Embers” along with “From the Ashes“: kill 8 Scorch Imps, and click on these 3 Volcanic Soil mounds:
04) Click on Southern Fertile Volcanic Soil mound 72.22.
05) Click on Central Fertile Volcanic Soil mound 72.20.
06) Click on Northern Fertile Volcanic Soil mound 72.18.
07) Hearth (or go back) to Evergrove and turn in all quests and accept new ones:
08) At the male gnome SE in town turn in “Damaged Mask” 63.40, accept “Mystery Mask“.
09) From Wildlord Antelarion (male dryad patrolling around the moonwell) turn in “Mystery Mask“, accept “Felsworn Gas Mask“.
10) At the west part of town, turn in (from the big Ancient, 61.38) “Little Embers” and “From the Ashes“.
11) Next to the mailbox/Inn turn in “Culling the Wild” 63.38.
12) Follow the path NW to Daggermaw Canyon and at the bottom of the ramp 58.31 do “On Spirit’s Wings“: use Rexxar’s Whistle quest item near a Bloodmaul Soothsayer talking to a Bloodmaul Taskmaster (Ogres talking to each other).
13) Go back SE to Evergrove and at the Flight Master (62.40, #1 on map) fly to Thunderlord Stronghold, Blade’s Edge Mountains.
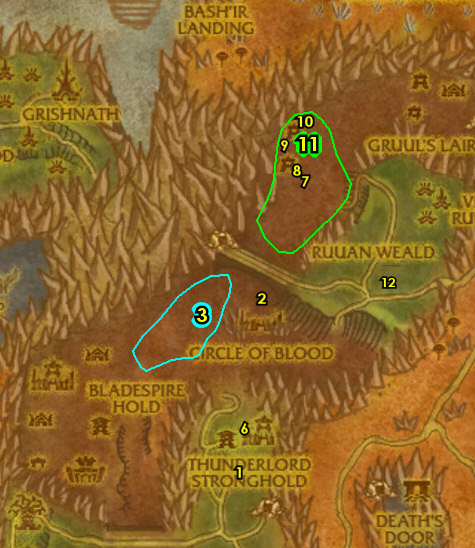
01) Down by the Bonfire turn in “On Spirit’s Wings” 52.58, accept “Baron Sablemane“.
02) Head north down to the northern outside part of Circle of Blood and turn in “Baron Sablemane” 53.41, accept “Into the Churning Gulch“.
03) Just to the west at Churning Gulch around 49.42 do “Into the Churning Gulch“: kill/loot Young or GreaterCrust Bursters.
04) Back at the northern outside part of Circle of Blood turn in “Into the Churning Gulch” (53.41, #2 on map). Wait a few seconds then accept “Baron Sablemane’s Poison“.
05) Go back south to Thunderlord Stronghold and at the Bonfire turn in “Baron Sablemane’s Poison” (52.58, #1 on map), accept “The Smallest Creatures“. Next to you accept “Crush the Bloodmaul Camp“.
06) Hearth (or fly back, Wind Rider Master at 52.54) to Evergrove.
07) Go down NW to Bloodmaul Camp and do “The Smallest Creatures“: use the Kodohide Drum quest item down at the small Marmot Den (small critters at 56.29), then control the marmot to poison the 3 kegs (listed below).
TIP: You should use stealth as soon as you get your marmot, and still try to stay away from the mobs to not get detected. The next 3 steps shows you where the kegs are, you can also use this image to help you find the kegs:
08) Poison the Ripe Moonshine Keg 55.28.
09) Poison the Green Spot Grog Keg 55.26.
10) Poison the Fermented Seed Beer Keg 56.23.
11) At the Bloodmaul Camp do “Crush the Bloodmaul Camp“: kill 10 Bloodmaul Maulers and 5 Bloodmaul Warlocks.
12) Go to the Flight Master 62.40 at Evergrove and fly to Thunderlord Stronghold, Blade’s Edge Mountains.
01) Down by the Bonfire 52.58 turn in “The Smallest Creatures” (accept “A Boaring Time for Grulloc“) and next to you “Crush the Bloodmaul Camp“.
02) Go NE down to Cursed Hollow and do “A Boaring Time for Grulloc“: use Huffer’s Whistle quest item to call Huffer out to distract Grulloc (lvl 70 Elite) so you can pick up Grulloc’s Sack (that’s right next to Grulloc, 61.48).
03) West at the northern outside part of Circle of Blood turn in “A Boaring Time for Grulloc” 53.41, accept “It’s a Trap!“.
04) Go south to Thunderlord Stronghold and down by the Bonfire turn in “It’s a Trap!” (52.58, #1 on map), accept “Gorgrom the Dragon-Eater” and (next to you) “Slaughter at Boulder’mok“.
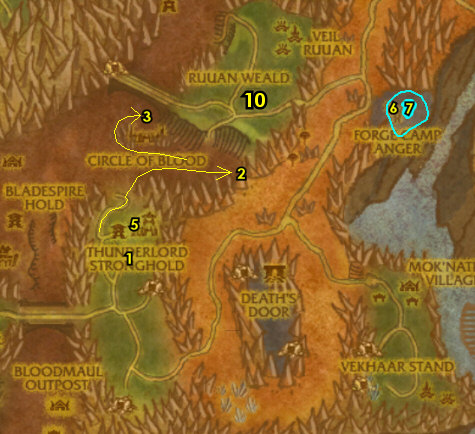
05) Go north in town to the Wind Rider Master 52.54 and fly to Evergrove.
06) Go east to Forge Camp: Anger and do “Felsworn Gas Mask“: first equip the Felsworn Gas Mask quest item, if you do not have the mask you can get another one from the dryad walking around in Evergrove. Once the mask is equipped go to the Legion Communicator 73.40 and turn this quest in and accept “Deceive thy Enemy“.
NOTE: You may have to take the mask off and on to get the communicator to work right.
07) In the immediate area around Forge Camp: Anger do “Deceive thy Enemy“: kill 4 Doomforge Attendants and 4 Engineers.
08) Back at the Legion Communicator (73.40, #6 on map) turn in “Deceive thy Enemy“, accept “You’re Fired!“.
09) In the immediate area around Forge Camp: Anger (#7 on map) do “You’re Fired!“: kill/loot the Anger Guards in the immediate area to obtain 5 Camp Anger Keys, then use the keys at the 5 Legion Obelisks in the area to summon and kill Doomcryer /target (lvl 68 Elite).
NOTE: This quest recommends you have 2 players but with good skill this can be soloed. If you can’t do it, don’t worry about it and skip it.
10) Hearth (or go back) to Evergrove and turn in (if you did it) “You’re Fired!” (at the male dryad walking around the moonwell, 62.39), accept “Death’s Door“.
Death’s Door
01) NOTE: The steps in this section can only be done if you completed and turned in “You’re Fired!“. If you did not do it, then skip to the Raven’s Wood section below.
02) At the Flight Master in Evergrove 62.40 fly to Thunderlord Stronghold, Blade’s Edge Mountains.
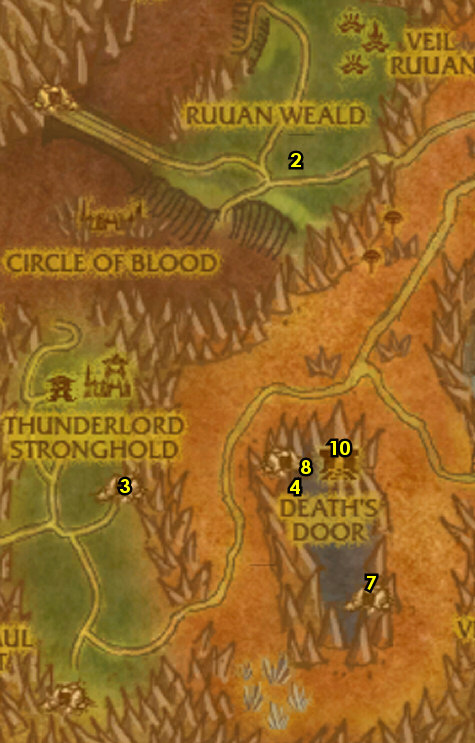
03) Go south a bit to the cave entrance at 54.63 to Death’s Door.
04) Do “Death’s Door“. Grind your way through the cave to take you to Death’s Door. Once you get to the outside section of Death’s Door 62.60 use the Druid Signal quest item, wait a few seconds then at the Druid that spawns turn in “Death’s Door“, accept “Harvesting the Fel Ammunition“.
05) In the immediate area all around Death’s Door do “Harvesting the Fel Ammunition“: kill/loot any mobs (except the hounds) to obtain the 5 Fel cannonballs.
06) Any where at Death’s Door use the Druid Signal quest item, wait a few seconds then at the Druid that spawns turn in “Harvesting the Fel Ammunition“, accept “Fire At Will!“.
07) Do “Fire At Will!“. First clear out the Death Mights around the south Death’s Door Fel Cannon 65.68, then use your Naturalized Ammunition quest item on it. You will get a pet-bar to control the cannon, keep spamming the Artillery on the Warp-Gate ability (about 10 times to kill the Warp-Gate), while you kill the imps that come out with the Flame Thrower.
NOTE: DO NOT summon a pet/minion during this or it will remove of the cannon bar. And see next step for the north one:
08) Use the Naturalized Ammunition quest item at the north Death’s Door Fel Cannon 62.60. Then do the same thing you did in the previous step.
09) Anywhere at Death’s Door use the Druid Signal quest item, wait a few seconds then at the Druid that spawns turn in “Fire At Will!“, accept “The Hound-Master“.
10) North at Death’s Door by the big portal do “The Hound-Master“: get close to Baelmon the Hound-Master /target (lvl 68 Elite, 64.59) and use the Evergrove Wand quest item to summon Evergrove Ancients to help you kill him.
11) Hearth (or go back) to Evergrove and turn in (if you did it) “The Hound-Master” (at the male dryad walking around the moonwell, 62.39, #2 on map).
Raven’s Wood
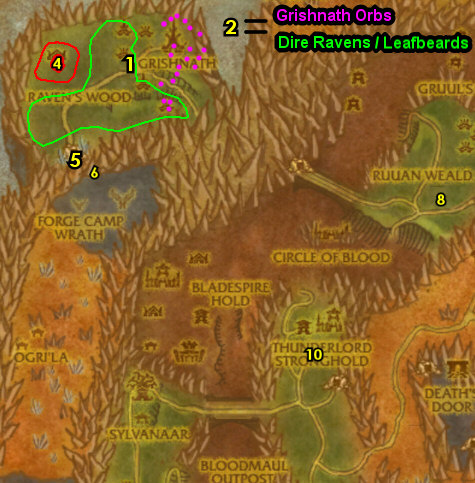
01) Head west across the bridge/tunnel to Raven’s Wood and at Treebole /target (big ancient, 37.22) turn in “Treebole Must Know“, accept “Exorcising the Trees“.
02) All around Raven’s Wood in the immediate area do “Exorcising the Trees“: first obtain 5 Grishnath Orbs (purple orb objects NE at the arakkoa village Grishnath), then kill/loot Dire Ravens to obtain 5 Dire Pinfeathers, and then combine them by clicking on them in your backpack to make 5 Exorcism Feathers. Then use these Feathers on 5 Raven’s Wood Leafbeards /target (all around Raven’s Wood) to release their Koi-Koi Spirits, then finally kill those spirits.
03) Back at Treebole /target (big ancient, 37.22, #1 on map) turn in “Exorcising the Trees“.
04) Go west to Boulder’mok and do “Slaughter at Boulder’mok” along with “Gorgrom the Dragon-Eater“: kill 5 Boulder’mokBrutes and 3 Shamans, then click on Gorgrom’s Altar 31.22. Gorgrom the Dragon-Eater will spawn and then drop dead at the altar, then use the 3 Grisly Totems quest item (collected from the ogres) on his corpse.
05) Go south and enter Blackwing Coven (cave entrance at 32.34).
06) At the end of the cave do “Maxnar Must Die!“: kill Maxnar the Ashmaw /target 34.35.
NOTE: Watch out this guy does a fire attack that does about 4,000 fire damage!
07) Hearth to Evergrove, if hearthstone is still on a cooldown, just die on purpose and res at the spirit healer.
08) By the moonwell at Evergrove turn in “Maxnar Must Die!” 62.39.
09) At the Flight Master in Evergrove 62.40 fly to Thunderlord Stronghold, Blade’s Edge Mountains.
10) At Thunderlord Stronghold, down by the Bonfire turn in “Gorgrom the Dragon-Eater” 52.58, accept “Prisoner of the Bladespire“. Next to you turn in “Slaughter at Boulder’mok“.
OPTIONAL – GROUP (or soloable) – Gruul’s Lair
NOTE: This section is optional and involves killing elite mobs (they can be soloed but could take awhile). You can skip them all if you like (especially if you want a break from Blade’s Edge Mountains). If you decide to skip them, then go to the Journey to Netherstorm section below:
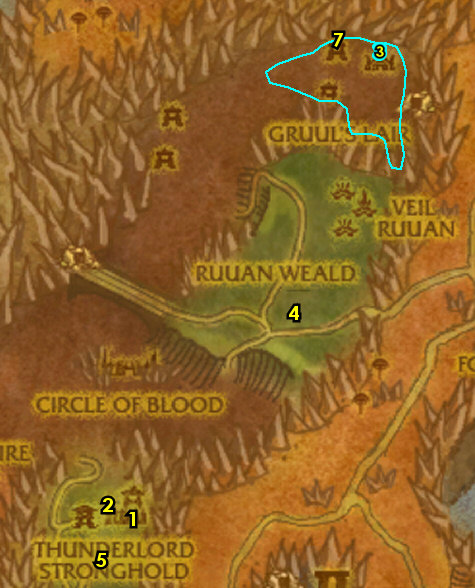
01) Go in the Inn and talk to the Innkeeper 53.55 to make Thunderlord Stronghold your new home.
02) Go north in town to the Wind Rider Master 52.54 and fly to Evergrove.
03) Go down north to Gruul’s Lair and do “Prisoner of the Bladespire“: kill/loot the Elite Bladespire orgres in the area until one of them drops the Wyvern Cage Key. Once you get the key, go up the spike ramp starting at 66.19 and open the cage then use the Spirit’s Whistle quest item.
04) Hearth or go to the Flight Master in Evergrove 62.40 and fly to Thunderlord Stronghold, Blade’s Edge Mountains.
05) At Thunderlord Stronghold, down by the Bonfire turn in “Prisoner of the Bladespire” 52.58, accept “Showdown“.
06) Go north in town to the Wind Rider Master (52.54, #2 on map) and fly to Evergrove.
07) Back north down at Gruul’s Lair do “Showdown“: use Rexxar’s Battle Horn quest item at the Altar of Goc 64.18, then kill Goc /target (lvl 70 Elite) when he comes.
TIP: Let Rexxar fight him for a little while first so he builds up aggro, so Goc does not come after you.
08) Hearth or go to the Flight Master in Evergrove (62.40, #4 on map) and fly to Thunderlord Stronghold, Blade’s Edge Mountains.
09) At Thunderlord Stronghold, down by the Bonfire turn in “Showdown” (52.58, #5 on map).
10) Go north in town to the Wind Rider Master (52.54, #2 on map) and fly to Evergrove.
Journey to Netherstorm
01)Blades Edge Mountains is now FINISHED! NOTE: You can safely Abandon any quests that are currently in your Quest Log (EXCEPT “The Apprentice’s Request“), as you will not need them any more.
02) Follow the main path NE to Netherstorm.
