Cataclysm Classic Alliance 80-85 Leveling Guide: 84-85 Uldum

At Stormwind, turn in That’s No Pyramid! Get Meetup with the Caravan.
Fly to Adarrah in Tanaris. Turn in your quest. Get Easy Money. Hop on Lady Humps to start the escort.

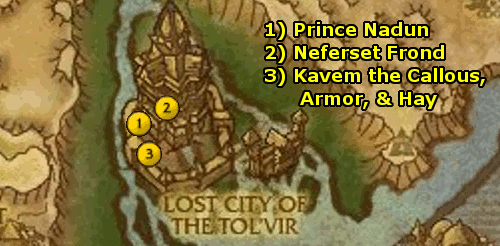
  1. At Adarrah, turn in your quest. Get Traitors! From Prince Nadun.
  2. Fly up and hide behind the Neferset Frond.
    • Then, return to Prince Nadun and turn in your quest. Get Smoke in Their Eyes, Kavem the Callous, and Budd’s Plan.
  3. Kill Kavem the Callous for the Neferset Key, Collect 6 Neferset Armor, and Burn 5 Bales of Hay with the Brazier Torch.
    • Then, return to Prince Nadun and turn in your quests. Get Escape from the Lost City.
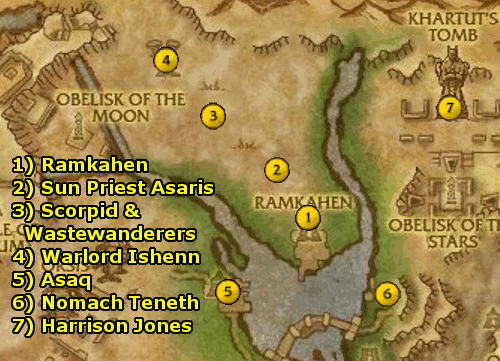
  1. You’ll escape to Ramkahen. Turn in your quest. Get Impending Retribution.
  2. Fly to Sun Priest Asaris. Speak with him through the dialogue option. Also, get Relics of the Sun King and Venomblood Antidote.
  3. Kill 8 Venomblood Scorpid and use the Antidote Vial on their corpses. Also, kill Wastewander Outriders for 4 Relic of the Sun King.
    • Return to Sun Priest Asaris and turn in your quests. Get The Bandit Warlord.
  4. Kill Warlord Ihsenn.
    • Return to Sun Priest Asaris and turn in your quest.
  5. Speak with Asaq. Also, get Take it to ‘Em!
  6. Speak with Nomarch Teneth. Also, get Thieving Little Pluckers.
    • Use the Tahret Dynasty Mallet on 30 Thieving pluckers in the nearby date field.
    • Then, return to Nomarch Teneth and turn in your quest.
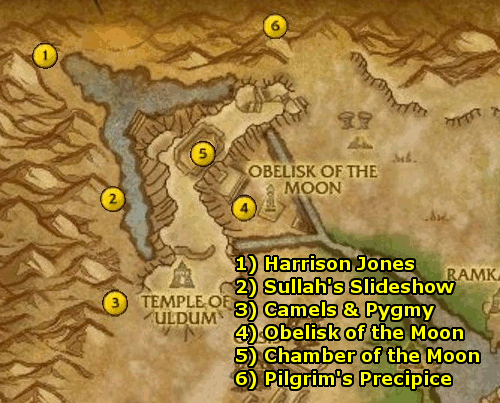
  7. Fly to Harrison Jones. Turn in your quest and get Premature Explosionation.
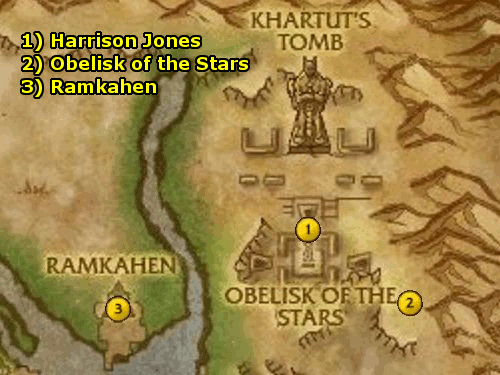
  1. After the cut-scene, turn in your quest to Harrison Jones. Get Field Work. Also, get Just the Tip from the Elaborate Disc nearby.
  2. Kill Sultan Oogah for the Sultan’s Staff. Form the Staff of the Stars with it. Also, kill Skarf which will start the quest Do the World a Favor. In the area, kill 12 Mangy Hyena, and kill Sand Pygmy for 10 Ornate Tablet Fragment.
    • Then, return to Harrison Jones and turn in your quests. Get On to Something. Follow Harrison Jones, then mount up and fly down to him. Turn in your quest. Get The Thrill of Discovery.
    • Explore the northern hieroglyphics, the middle mechanism, and the southern hieroglyphics. On the south side, get Be Prepared and Lessons from the Past. Get the goggles from the Schnottz Scout.
    • Return to Harirson Jones. Turn in your quests. Get By the Light of the Stars.
    • Gather 7 Suspended Starlight – be sure to kill all nearby Indentured Protectors before grabbing them. Also, kill Tormented Tomb Raiders – spawn them by walking over the skeletons on the ground – for 6 Piece of Rope.
    • Return to Harrison Jones. Turn in your quests. Get Tipping the Balance. Talk to Harrison Jones and let him do the work. Then, turn in your quest. Get After the Fall.
    • Go to the four corners of the chamber and pick up the four orbs from the fallen Statue Watcher Heads.
    • Return to Harrison Jones. Turn in your quest. Get Do the Honors.
    • Place the Orbs of the Stars at the corner pillar of the center mechanism.
    • Turn in your quest to Harrison Jones.
  3. Go to Ramkahen.
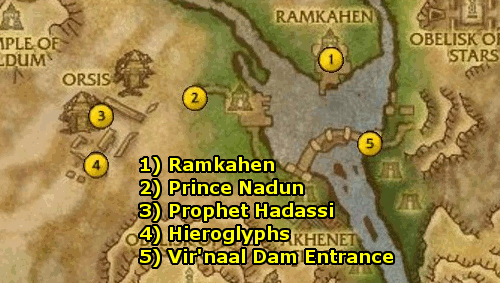
  1. At Ramkahen, turn in your quest. Get Al’akir’s Vengeance as wella s That Gleam in his Eye from Adarrah.
  2. Go to Prince Nadun. Turn in your quest. Get The Prophet Hadassi, Minions of Al’akir, and Under the Choking Sands.
  3. Go to Prophet Hadassi. Turn in your quest and get The Prophet’s Dying Words.
  4. Go to the Sand-Covered Hieroglyphs. Turn in your quest and get Colossal Guardians.
    • In Orsis, kill the 2 Colossus for their Stones. Also, kill 6 Scions of Al’kir and rescue 8 Orsis Survivors.
    • Return to the Sand-Covered Hieroglyphs and turn in your quest. Get The Scepter of Orsis. Loot the scepter for the chest.
    • Return to Prince Nadun. Turn in your quests.
    • Return to Ramkahen. Turn in your quest. Get The High Priest’s Vote, The Vizier’s Vote, and The High Commander’s Vote.
  5. Go into the Vir’naal Dam from one of the entrances.
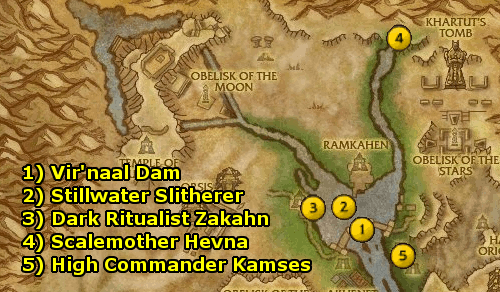
  1. At the Vir’naal Dam, turn in your quest. Get Stopping the Spread and Trespassers in the Water.
  2. Kill 8 Stillwater Sltiherer and Destroy 6 Slitherer Egg.
    • Return to the Vir’naal Dam and turn in your quests. Get The Defilers’ Ritual.
  3. Go into the underwater cavern and kill Dark Ritualist Zakahn. Get ready to AoE those snakes!
    • Return to the Vir’naal Dam and turn in your quest. Get The Root of the Corruption.
  4. Kill Scalemother Hevna.
    • Return to the Vir’naal Dam and turn in your quest.
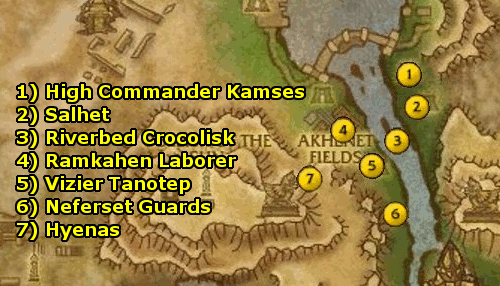
  5. Go to High Commander Kamses.
  1. At High Commander Kamses, turn in your quest. Get The Weakest Link, Ploughshares to Swords, and The Element of Supplies.
  2. Go to Salhet. Turn in your quest and get Shaping Up.
  3. Kill Riverbed Crocolisk for 20 Hardened Crocolisk Hide.
  4. Recruit 8 Ramkahen Laborer by talking with them.
  5. Go to Vizier Tanotep. Turn in your quest. Get Tanotep’s Son.
  6. Kill Neferset Guards to get the Vir’Naal Delta Map. Complete your quest and get Neferset Prison.
  7. Fly to the Hyenas and wait for Salhet to come.
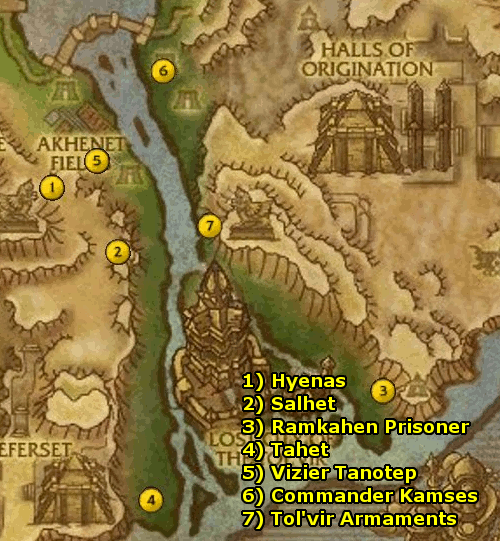
  1. Kill 8 Bloodsnarl Hyena alongside Salhet.
  2. Go to Salhet. Turn in your quest and get Salhet the Tactician. Talk to Salhet and control the Lions to defeat 30 Hyenas. Use Roar and/or Claw Flurry when there are many Hyenas.
  3. Go to the Ramkahen Prisoner. Talk to him. Fight near him and defeat the Enforcers. Make sure to let him tank the Overlord and focus it to kill it before the Prisoner dies.
  4. Go to Tahet and talk to him. Kill the waves of crocodiles. When Caimas comes, lure him over the Croc Eggs (without stepping on them yourself) and use his reduced movement speed to do ranged damage to him.
  5. Go to Vizier Tanotep and turn in your quest.
  6. Go to High Commander Kamses and turn in your quests. Get Ancient Weapons and The High Council’s Decision.
  7. At the Ancient Tol’vir Armaments, use the Horn of Ramkahen to get the Laborers to help you distract the Smugglers. Loot the Armaments.
    • Return to High Commander Kamses and turn in your quest.
    • Return to Ramkahen.
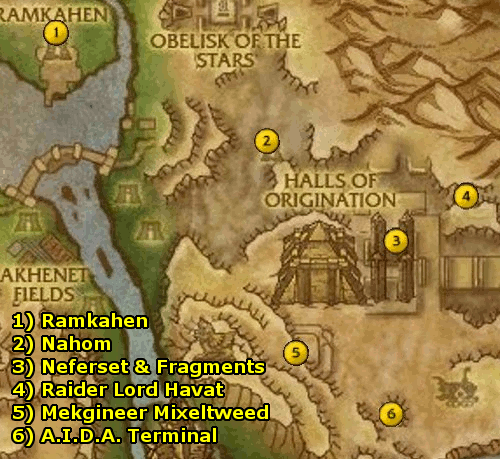
  1. At Ramkahen, turn in your quest. Get Nahom Must Hold.
  2. Go to Nahom. Turn in your quest. Get The Secret of Nahom and Punish the Trespassers.
  3. Kill 10 Neferset and Gather 8 Atulhet’s Record Fragment.
    • Return to Nahom. Turn in your quests. Get The Cypher of Keset.
  4. Kill Raider Lord Havat for The Cypher of Keset.
    • Return to Nahom. Turn in your quest. Get The Defense of Nahom.
    • Talk to a Sergeant to begin the Defense. Move your infantry to intercept the enemy, continuously fire arrows, and use Sun’s Radiance when there’s a big battle.
    • Turn in your quests. Get The Push Westward and The Curse of the Tombs.
  5. Kill Mekgineer Mixeltweed and 6 Crazed Diggers. You’ll also get the A.I.D.A Communicator, which starts Artificial Intelligence.
    • Return to Nabom and turn in your quest.
  6. Go to the A.I.D.A. Terminal.
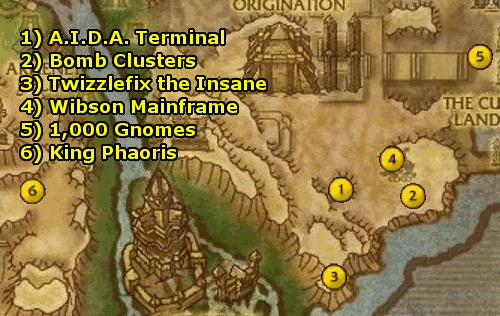
  1. At the A.I.D.A. Terminal, turn in your quest. Get A Disarming Distraction and Core Access Codes.
  2. Disarm the Bomb Clusters and Bots. Use your Holographic Projector to distract the goblins.
  3. Kill Twizzlefix the Insane. Use the Mech Control Scrambler on cooldown on his vehicle to disable it. Pick off the adds and keep disabling the vehicle, ultimately killing Twizzlefix for the Core Access Codes.
    • Return to the A.I.D.A. Terminal and turn in your quests. Get Hacking the Wibson.
  4. Fly to the Wibson Mainframe on top of the M.A.C. Diver. Get the Maintenance Tools and ‘hack’ the Wibson Mainframe. Complete your quest and get Gnomebliteration at the Fusion Core.
  5. Roll down the hill and through 1,000 gnomes.
    • Return to the Fusion Core and turn in your quest.
  6. Go to King Phaoris.
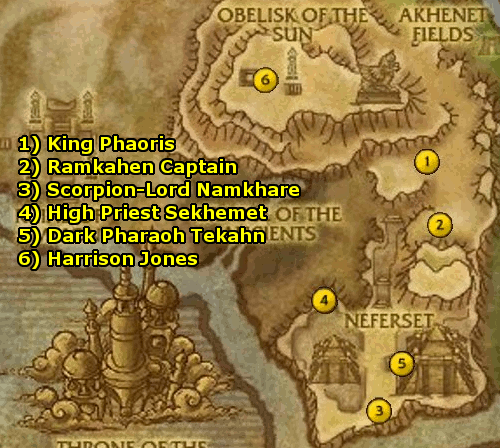
  1. At King Phaoris, turn in your quest. Get Lieutenants of Darkness, Bleeding the Enemy, and Salhet’s Gambit.
  2. Go to Ramkahen Ranger Captain and talk to him. Fight with them and secure the high ground.
  3. Kill Scorpion-Lord Namkhare.
  4. Kill High Priest Sekhemet. Finish killing Neferset for 10 Neferset Insignia as well.
    • Return to King Phaoris and turn in your quests. Get The Fall of Neferset City.
  5. Kill Dark Pharaoh Tekahn.
  6. Go to Harrison Jones.
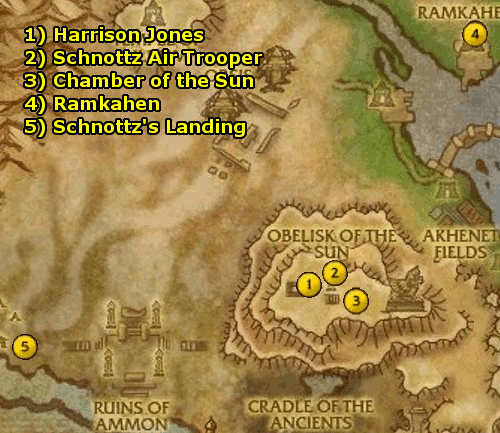
  1. At Harrison Jones, turn in your quest. Get I’ve Got This Guy and They Don’t Know What They’ve Got Here.
  2. Kill 10 Schnottz Air Trooper and a Schnottz Air Officer for Uldum Chest Key Codes, as well as Efficient Excavations which starts the quest Efficient Excavations. Open the coffers for 6 Titan Device Components and assemble it into the Titan Activation Device.
    • Return to Harrison Jones and turn in your quests. Get Ignition.
  3. Go down into the Chamber of the Sun. Stand next to the obelisk and use your Titan Activation Device. Kill the Titantic Guardian – use the meteors whenever they spawn. Loot the Lens of the Sun. Go to the Titan Dais inside the room and turn in your quest.
    • At Harrison Jones, get Tailgunner. Line up the chasing flying machines and shoot them down with the machine gun, while spamming the rockets as well. Turn in your quest once landed.
  4. Go to Ramkahen and turn in your quest. Get Return to the Lost City (Dungeon).
  5. Go to Schnottz’s Landing.
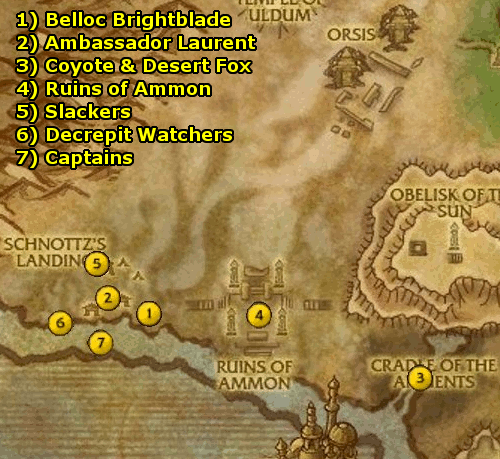
  1. At Belloc Brightblade, turn in your quest. Get Eastern Hospitality.
  2. Go to Ambassador Laurent and speak with him and other guests..
    • Return to Belloc Brightblade. Turn in your quest. Get A Favor for the Furrier and The Desert Fox.
  3. Kill Desert Coyotes for 5 Desert Coyote Pelt. Keep an eye out for The Desert Fox – it wanders around the area. Pick it up when you see it.
    • Return to Belloc Brightblade. Turn in your quests. Get Fashionism, dolatry, and Angered Spirits.
  4. Go to the Ruins of Ammon. Collect 10 Trooper Uniform and 8 Well-preserved Idol, and use the Licensed Proton Accelerator Cannon on 5 Furious Specters with less than 50% health.
    • Return to Commander Schnottz. Turn in your quests. Get Gobbles. Speak with Schnottz to begin the ritual. Complete the quest and get Make Yourself Useful.
  5. Put on the Refurbished Trooper Uniform and motivate 6 Slackers.
    • Return to Commander Schnottz. Turn in your quest. Get Crisis Management.
    • Go once again to Ambassador Laurent and speak with the guests around him.
    • Return to Belloc Brightblade. Turn in your quest and get Battlezone.
  6. Hop into a siege tank. Use the cannons to kill 7 Decrepit Watchers.
    • Return to Commander Schnottz. Turn in your quest. Get Missed Me By Zhat Much. Talk to Schnottz and begin your escort.
    • Go to the adjacent building and speak with all the guests there. Also, get The Great Escape.
    • Return to Commander Schnottz. Turn in your quest. Get Sending a Message.
  7. Go onto the three ships and kill the three captains – all will be on the top deck of the ships. Kill enough troopers for 6 Fresh Sailor Uniform as well.
    • Return to the Prolific Writer and turn in your quest.
    • Return to Commander Schnottz and turn in your quest. Get Firing Squad. Talk to him to begin your death march. At the end of it, complete your quest and get Meet Me in Vir’sar.
  1. Go to Harrison Jones at the Oasis of Vir’sar. Turn in your quest. Get Friend of a Friend. Talk to Sullah and turn in your quest to get Two Tents.
  2. At Sullah’s Sideshow, turn in your quest. Get Master Trapper, Camel Tow, and Unlimited Potential.
  3. Kill Wild Camels for 5 Meat Scraps. Also, capture 3 of the Camels and 5 of the Pygmy after beating them to low life.
    • Return to Sullah and turn in your quests. Get Jonesy Sent For You.
    • Return to Harrison Jones. Turn in your quest. Get Reduced Productivity and Missing Pieces.
  4. Go to the Obelisk of the Moon. Kill 15 Schnottz Employees and Gather 7 Ancient Copper Scroll.
    • Return to Harrison Jones. Turn in your quests. Get Stirred the Hornet’s Nest.
    • Go to Sullah. Turn in your quest and get Shroud of the Makers.
    • Return to the Obelisk of the Moon. Use the Shroud of the Makers. Sabotage 7 Powder Kegs. Watch out for that dragon!
    • Return to Harrison Jones. Turn in your quest. Get Schnottz So Fast.
  5. Fly down into the Chamber of the Moon. Kill 10 Schnottz Elite Troopers. Turn in your quest. Get Bad Datas.
    • Talk to Harrison Jones and follow him. Turn in your quest and get I’ll Do It By Hand.
    • Kill the Lunar Crystals. Turn in your quest and get Sullah’s Gift.
  6. Fly to Pilgrim’s Precipice. At Pilgrim’s Precipice, turn in your quest. Get Fire From the Sky. Jump in the Artillery and paint the targets to kill 100 Schnottz Troopers. Turn in your quest and get See You On The Other Side.
    • You’ll be teleported to the Maker’s Ascent, where you can turn in your quest. Get Fortune and Glory. Follow Harrison Jones, then defeat the Obsidian Colossus. Avoid the runes, and stand behind it when it does it’s Frontal Strike. Turn in your quest. Get Harrison Jones and the Temple of Uldum. After your final cutscene, you’ll complete the quest. Get Put That Baby in the Cradle. Turn that in and get Three if by Air. Place the three flares, then turn in your quest. Get The Coffer of Promise. Open the coffer for the Titan Discs, then turn in your quest. Get The Heart of the Matter (Dungeon).
Cataclysm Classic Horde 80-85 Leveling Guide: 84-85 Uldum

At Orgrimmar, turn in That’s No Pyramid! Get Meetup with the Caravan.
Fly to Adarrah in Tanaris. Turn in your quest. Get Easy Money. Hop on Lady Humps to start the escort.

  1. At Adarrah, turn in your quest. Get Traitors! From Prince Nadun.
  2. Fly up and hide behind the Neferset Frond.
    • Then, return to Prince Nadun and turn in your quest. Get Smoke in Their Eyes, Kavem the Callous, and Budd’s Plan.
  3. Kill Kavem the Callous for the Neferset Key, Collect 6 Neferset Armor, and Burn 5 Bales of Hay with the Brazier Torch.
    • Then, return to Prince Nadun and turn in your quests. Get Escape from the Lost City.
  1. You’ll escape to Ramkahen. Turn in your quest. Get Impending Retribution.
  2. Fly to Sun Priest Asaris. Speak with him through the dialogue option. Also, get Relics of the Sun King and Venomblood Antidote.
  3. Kill 8 Venomblood Scorpid and use the Antidote Vial on their corpses. Also, kill Wastewander Outriders for 4 Relic of the Sun King.
    • Return to Sun Priest Asaris and turn in your quests. Get The Bandit Warlord.
  4. Kill Warlord Ihsenn.
    • Return to Sun Priest Asaris and turn in your quest.
  5. Speak with Asaq. Also, get Take it to ‘Em!
  6. Speak with Nomarch Teneth. Also, get Thieving Little Pluckers.
    • Use the Tahret Dynasty Mallet on 30 Thieving pluckers in the nearby date field.
    • Then, return to Nomarch Teneth and turn in your quest.
  7. Fly to Harrison Jones. Turn in your quest and get Premature Explosionation.
  1. After the cut-scene, turn in your quest to Harrison Jones. Get Field Work. Also, get Just the Tip from the Elaborate Disc nearby.
  2. Kill Sultan Oogah for the Sultan’s Staff. Form the Staff of the Stars with it. Also, kill Skarf which will start the quest Do the World a Favor. In the area, kill 12 Mangy Hyena, and kill Sand Pygmy for 10 Ornate Tablet Fragment.
    • Then, return to Harrison Jones and turn in your quests. Get On to Something. Follow Harrison Jones, then mount up and fly down to him. Turn in your quest. Get The Thrill of Discovery.
    • Explore the northern hieroglyphics, the middle mechanism, and the southern hieroglyphics. On the south side, get Be Prepared and Lessons from the Past. Get the goggles from the Schnottz Scout.
    • Return to Harirson Jones. Turn in your quests. Get By the Light of the Stars.
    • Gather 7 Suspended Starlight – be sure to kill all nearby Indentured Protectors before grabbing them. Also, kill Tormented Tomb Raiders – spawn them by walking over the skeletons on the ground – for 6 Piece of Rope.
    • Return to Harrison Jones. Turn in your quests. Get Tipping the Balance. Talk to Harrison Jones and let him do the work. Then, turn in your quest. Get After the Fall.
    • Go to the four corners of the chamber and pick up the four orbs from the fallen Statue Watcher Heads.
    • Return to Harrison Jones. Turn in your quest. Get Do the Honors.
    • Place the Orbs of the Stars at the corner pillar of the center mechanism.
    • Turn in your quest to Harrison Jones.
  3. Go to Ramkahen.
  1. At Ramkahen, turn in your quest. Get Al’akir’s Vengeance as wella s That Gleam in his Eye from Adarrah.
  2. Go to Prince Nadun. Turn in your quest. Get The Prophet Hadassi, Minions of Al’akir, and Under the Choking Sands.
  3. Go to Prophet Hadassi. Turn in your quest and get The Prophet’s Dying Words.
  4. Go to the Sand-Covered Hieroglyphs. Turn in your quest and get Colossal Guardians.
    • In Orsis, kill the 2 Colossus for their Stones. Also, kill 6 Scions of Al’kir and rescue 8 Orsis Survivors.
    • Return to the Sand-Covered Hieroglyphs and turn in your quest. Get The Scepter of Orsis. Loot the scepter for the chest.
    • Return to Prince Nadun. Turn in your quests.
    • Return to Ramkahen. Turn in your quest. Get The High Priest’s Vote, The Vizier’s Vote, and The High Commander’s Vote.
  5. Go into the Vir’naal Dam from one of the entrances.
  1. At the Vir’naal Dam, turn in your quest. Get Stopping the Spread and Trespassers in the Water.
  2. Kill 8 Stillwater Sltiherer and Destroy 6 Slitherer Egg.
    • Return to the Vir’naal Dam and turn in your quests. Get The Defilers’ Ritual.
  3. Go into the underwater cavern and kill Dark Ritualist Zakahn. Get ready to AoE those snakes!
    • Return to the Vir’naal Dam and turn in your quest. Get The Root of the Corruption.
  4. Kill Scalemother Hevna.
    • Return to the Vir’naal Dam and turn in your quest.
  5. Go to High Commander Kamses.
  1. At High Commander Kamses, turn in your quest. Get The Weakest Link, Ploughshares to Swords, and The Element of Supplies.
  2. Go to Salhet. Turn in your quest and get Shaping Up.
  3. Kill Riverbed Crocolisk for 20 Hardened Crocolisk Hide.
  4. Recruit 8 Ramkahen Laborer by talking with them.
  5. Go to Vizier Tanotep. Turn in your quest. Get Tanotep’s Son.
  6. Kill Neferset Guards to get the Vir’Naal Delta Map. Complete your quest and get Neferset Prison.
  7. Fly to the Hyenas and wait for Salhet to come.
  1. Kill 8 Bloodsnarl Hyena alongside Salhet.
  2. Go to Salhet. Turn in your quest and get Salhet the Tactician. Talk to Salhet and control the Lions to defeat 30 Hyenas. Use Roar and/or Claw Flurry when there are many Hyenas.
  3. Go to the Ramkahen Prisoner. Talk to him. Fight near him and defeat the Enforcers. Make sure to let him tank the Overlord and focus it to kill it before the Prisoner dies.
  4. Go to Tahet and talk to him. Kill the waves of crocodiles. When Caimas comes, lure him over the Croc Eggs (without stepping on them yourself) and use his reduced movement speed to do ranged damage to him.
  5. Go to Vizier Tanotep and turn in your quest.
  6. Go to High Commander Kamses and turn in your quests. Get Ancient Weapons and The High Council’s Decision.
  7. At the Ancient Tol’vir Armaments, use the Horn of Ramkahen to get the Laborers to help you distract the Smugglers. Loot the Armaments.
    • Return to High Commander Kamses and turn in your quest.
    • Return to Ramkahen.
  1. At Ramkahen, turn in your quest. Get Nahom Must Hold.
  2. Go to Nahom. Turn in your quest. Get The Secret of Nahom and Punish the Trespassers.
  3. Kill 10 Neferset and Gather 8 Atulhet’s Record Fragment.
    • Return to Nahom. Turn in your quests. Get The Cypher of Keset.
  4. Kill Raider Lord Havat for The Cypher of Keset.
    • Return to Nahom. Turn in your quest. Get The Defense of Nahom.
    • Talk to a Sergeant to begin the Defense. Move your infantry to intercept the enemy, continuously fire arrows, and use Sun’s Radiance when there’s a big battle.
    • Turn in your quests. Get The Push Westward and The Curse of the Tombs.
  5. Kill Mekgineer Mixeltweed and 6 Crazed Diggers. You’ll also get the A.I.D.A Communicator, which starts Artificial Intelligence.
    • Return to Nabom and turn in your quest.
  6. Go to the A.I.D.A. Terminal.
  1. At the A.I.D.A. Terminal, turn in your quest. Get A Disarming Distraction and Core Access Codes.
  2. Disarm the Bomb Clusters and Bots. Use your Holographic Projector to distract the goblins.
  3. Kill Twizzlefix the Insane. Use the Mech Control Scrambler on cooldown on his vehicle to disable it. Pick off the adds and keep disabling the vehicle, ultimately killing Twizzlefix for the Core Access Codes.
    • Return to the A.I.D.A. Terminal and turn in your quests. Get Hacking the Wibson.
  4. Fly to the Wibson Mainframe on top of the M.A.C. Diver. Get the Maintenance Tools and ‘hack’ the Wibson Mainframe. Complete your quest and get Gnomebliteration at the Fusion Core.
  5. Roll down the hill and through 1,000 gnomes.
    • Return to the Fusion Core and turn in your quest.
  6. Go to King Phaoris.
  1. At King Phaoris, turn in your quest. Get Lieutenants of Darkness, Bleeding the Enemy, and Salhet’s Gambit.
  2. Go to Ramkahen Ranger Captain and talk to him. Fight with them and secure the high ground.
  3. Kill Scorpion-Lord Namkhare.
  4. Kill High Priest Sekhemet. Finish killing Neferset for 10 Neferset Insignia as well.
    • Return to King Phaoris and turn in your quests. Get The Fall of Neferset City.
  5. Kill Dark Pharaoh Tekahn.
  6. Go to Harrison Jones.
  1. At Harrison Jones, turn in your quest. Get I’ve Got This Guy and They Don’t Know What They’ve Got Here.
  2. Kill 10 Schnottz Air Trooper and a Schnottz Air Officer for Uldum Chest Key Codes, as well as Efficient Excavations which starts the quest Efficient Excavations. Open the coffers for 6 Titan Device Components and assemble it into the Titan Activation Device.
    • Return to Harrison Jones and turn in your quests. Get Ignition.
  3. Go down into the Chamber of the Sun. Stand next to the obelisk and use your Titan Activation Device. Kill the Titantic Guardian – use the meteors whenever they spawn. Loot the Lens of the Sun. Go to the Titan Dais inside the room and turn in your quest.
    • At Harrison Jones, get Tailgunner. Line up the chasing flying machines and shoot them down with the machine gun, while spamming the rockets as well. Turn in your quest once landed.
  4. Go to Ramkahen and turn in your quest. Get Return to the Lost City (Dungeon).
  5. Go to Schnottz’s Landing.
  1. At Belloc Brightblade, turn in your quest. Get Eastern Hospitality.
  2. Go to Ambassador Laurent and speak with him and other guests..
    • Return to Belloc Brightblade. Turn in your quest. Get A Favor for the Furrier and The Desert Fox.
  3. Kill Desert Coyotes for 5 Desert Coyote Pelt. Keep an eye out for The Desert Fox – it wanders around the area. Pick it up when you see it.
    • Return to Belloc Brightblade. Turn in your quests. Get Fashionism, dolatry, and Angered Spirits.
  4. Go to the Ruins of Ammon. Collect 10 Trooper Uniform and 8 Well-preserved Idol, and use the Licensed Proton Accelerator Cannon on 5 Furious Specters with less than 50% health.
    • Return to Commander Schnottz. Turn in your quests. Get Gobbles. Speak with Schnottz to begin the ritual. Complete the quest and get Make Yourself Useful.
  5. Put on the Refurbished Trooper Uniform and motivate 6 Slackers.
    • Return to Commander Schnottz. Turn in your quest. Get Crisis Management.
    • Go once again to Ambassador Laurent and speak with the guests around him.
    • Return to Belloc Brightblade. Turn in your quest and get Battlezone.
  6. Hop into a siege tank. Use the cannons to kill 7 Decrepit Watchers.
    • Return to Commander Schnottz. Turn in your quest. Get Missed Me By Zhat Much. Talk to Schnottz and begin your escort.
    • Go to the adjacent building and speak with all the guests there. Also, get The Great Escape.
    • Return to Commander Schnottz. Turn in your quest. Get Sending a Message.
  7. Go onto the three ships and kill the three captains – all will be on the top deck of the ships. Kill enough troopers for 6 Fresh Sailor Uniform as well.
    • Return to the Prolific Writer and turn in your quest.
    • Return to Commander Schnottz and turn in your quest. Get Firing Squad. Talk to him to begin your death march. At the end of it, complete your quest and get Meet Me in Vir’sar.
  1. Go to Harrison Jones at the Oasis of Vir’sar. Turn in your quest. Get Friend of a Friend. Talk to Sullah and turn in your quest to get Two Tents.
  2. At Sullah’s Sideshow, turn in your quest. Get Master Trapper, Camel Tow, and Unlimited Potential.
  3. Kill Wild Camels for 5 Meat Scraps. Also, capture 3 of the Camels and 5 of the Pygmy after beating them to low life.
    • Return to Sullah and turn in your quests. Get Jonesy Sent For You.
    • Return to Harrison Jones. Turn in your quest. Get Reduced Productivity and Missing Pieces.
  4. Go to the Obelisk of the Moon. Kill 15 Schnottz Employees and Gather 7 Ancient Copper Scroll.
    • Return to Harrison Jones. Turn in your quests. Get Stirred the Hornet’s Nest.
    • Go to Sullah. Turn in your quest and get Shroud of the Makers.
    • Return to the Obelisk of the Moon. Use the Shroud of the Makers. Sabotage 7 Powder Kegs. Watch out for that dragon!
    • Return to Harrison Jones. Turn in your quest. Get Schnottz So Fast.
  5. Fly down into the Chamber of the Moon. Kill 10 Schnottz Elite Troopers. Turn in your quest. Get Bad Datas.
    • Talk to Harrison Jones and follow him. Turn in your quest and get I’ll Do It By Hand.
    • Kill the Lunar Crystals. Turn in your quest and get Sullah’s Gift.
  6. Fly to Pilgrim’s Precipice. At Pilgrim’s Precipice, turn in your quest. Get Fire From the Sky. Jump in the Artillery and paint the targets to kill 100 Schnottz Troopers. Turn in your quest and get See You On The Other Side.
    • You’ll be teleported to the Maker’s Ascent, where you can turn in your quest. Get Fortune and Glory. Follow Harrison Jones, then defeat the Obsidian Colossus. Avoid the runes, and stand behind it when it does it’s Frontal Strike. Turn in your quest. Get Harrison Jones and the Temple of Uldum. After your final cutscene, you’ll complete the quest. Get Put That Baby in the Cradle. Turn that in and get Three if by Air. Place the three flares, then turn in your quest. Get The Coffer of Promise. Open the coffer for the Titan Discs, then turn in your quest. Get The Heart of the Matter (Dungeon).

Cataclysm Classic Alliance 80-85 Leveling Guide: 83-84 Deepholm

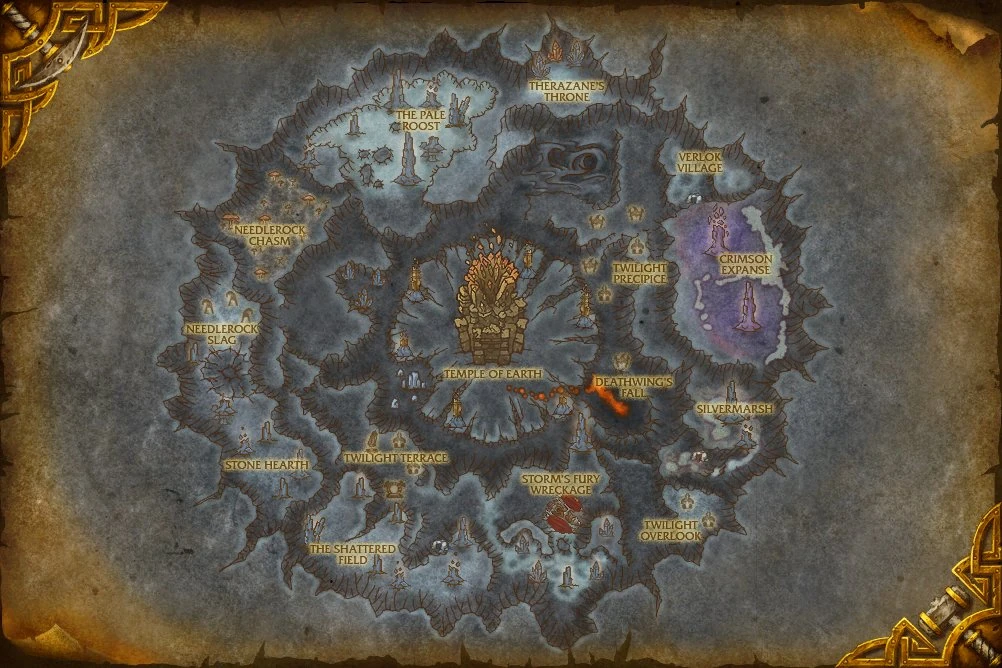
Turn in The Battle is Won, The War Goes On. Get The Maelstrom and Eye of the Storm. Use the Waters of Farseeing, then turn in your quest. Go through the portal. Talk to Thrall and complete your quest. Hop on Aggra’s Wyvern and travel into the Maelstrom.
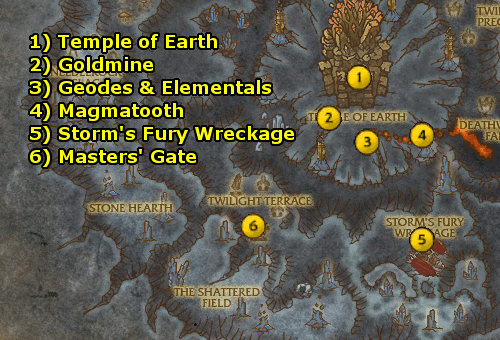
  1. Turn in your quest at the Temple of Earth. Get the five quests: Gunship Down, Elemental Energy, The Earth Claims All, The Explorers, and Where’s Goldmine?
    • To the west area of the Temple of Earth, turn in The Explorers. Get The Twilight Plot and Fly Over.
  2. Go to Goldmine and turn in your quest. Get Explosive Bonding Compound and Something that Burns.
    • Kill Rockslice Rippers nearby and gather 5 Quartzite Resin. Then, complete your quest.
  3. Use your Depleted Totem and kill Energized Geodes and Lodestone Elementals to Energize 8 Totems.
  4. Use Goldmine’s Fire Totem to summon Magmatooth. Kill him for The Burning Heart.
  5. Kill 5 Deepstone Elementals and gather the Three Clues at the Storm’s Fury Wreckage. Get Captain’s Log.
  6. Fly over the Masters’ Gate to get credit for investigating it. Also, kill the Twilight members for the Masters’ Gate Plans.
    • Return to Goldmine and turn in your quest. Get Apply and Flash Drive.
    • Use your Explosive Bonding Compound on Flint Oremantle. Get Take Him to the Earthcaller.
    • Return to the Temple of Earth.
  1. At the Temple of Earth, turn in your quests. Get To Stonehearth’s Aid, Diplomacy First, Decryption Made Easy, and Fight Fire and Water and Air with…
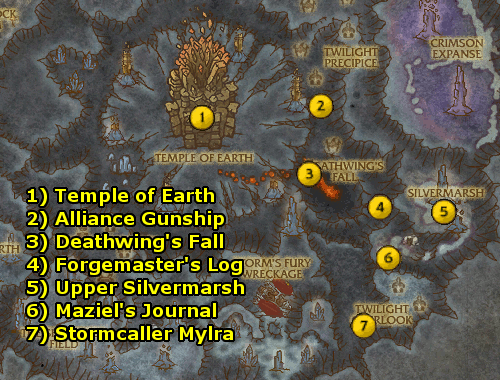
  2. Fly onto the alliance gunship. Turn in your quest. Get All Our Friends Are Dead and The Admiral’s Cabin.
    • Go into The Admiral’s Cabin and turn in yoru quest. Get Without a Captain or Crew.
    • Go outside and grab a Spool of Rope and Bottle of Whiskey. Also, use the Spirit Totem on 6 Slain Crew Members.
    • Return to First Mate Moody and turn in your quest, then return to Stormcaller Mylra and turn in your quest. Get Take No Prisoners and On Second Thought, Take One Prisoner.
    • Go below deck and kill 6 Twilight Saboteurs and Subdue Mor’norokk the Hateful.
    • Return to Stonecaller Mylra and turn in your quest. Then, hop on Stormbeak and listen to the interrogation. Then, turn in your quest. Get Return to the Temple of Earth.
    • Return to the Temple of Earth and turn in your quest. Get Deathwing’s Fall and Blood of the Earthwarder.
  3. Fly to Deathwing’s Fall. Complete your quest and get Bleed the Bloodshaper. Kill a Twilight Bloodshaper for the Twilight Orders. Get Question the Slaves.
    • In the camp, get the Twilight Slaver’s Key. Kill Living Blood for 5 Blood of Neltharion.
  4. Go to the Forgemaster’s Log and complete your quest. Get Silvermarsh Rendevous.
  5. Fly to Upper Silvermarsh. Complete your quest and get Quicksilver Submersion. Kill Troggs to get Maziel’s Research, which starts the quest Twilight Research. Also, pick up the Trogg Crate. Kill Mercurial Oozes for 4 Twilight Research Notes. Complete your quest and get Maziel’s Revelation.
    • Use the Trogg Crate and SWIM up (remain submerged inside the water) to Milhouse Manastorm. Complete your quest and get The Twilight Overlook.
  6. Go to Maziel’s Journal and turn in your quest. Get Maziel’s Ascendancy.
    • Then, go into the cave to the northeast and kill Maziel.
  7. Fly to Stormcaller Mylra.
  1. At Stormcaller Mylra, turn in your quest. Get Big Game, Big Bait, To Catch a Dragon, and Into the Stonecore (Dungeon).
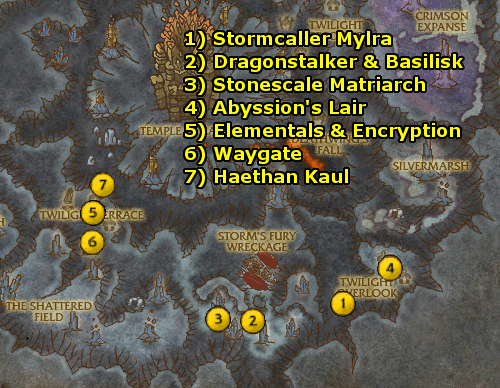
  2. Kill a Twilight Dragonstalker for a Twilight Snare, and kill 5 Jadescale Basilisk and use Mylra’s Knife on their corpses for 5 Side of Basilisk Meat.
    • Return to Stormcaller Mylra and turn in your quests. Get Testing the Trap.
  3. Use the Trapped Basilisk Meat at the bones. Kill the Stonescale Matriarch.
    • Return to Stormcaller Mylra and turn in your quest. Get Abyssion’s Minions and Block the Gates.
  4. Fly to Abyssion’s Lair. Kill 8 of Abyssion’s Underlings. Use the Stormstone at the two gates.
    • Return to Stormcaller Mylra and turn in your quests. Get The World Pillar Fragment.
    • Place the Earthen Ring Banner at the center of Abyssion’s Lair. Take cover behind a pillar when the Shadow Nova is cast. Defeat Abyssion and collect The Upper World Pillar Fragment.
  5. Kill the Bound Fire, Water, and Air Elemental – you can find them in the huge pillars. Also, Use 6 One-Time Decryption Engines to decrypt 6 plans to complete your quest. Get The Wrong Sequence.
  6. Use the Waygate Controller at the Waygate.
  7. Fly up and kill Haethan Kaul.
  1. Fly to Crag Rockcrusher and turn in To Stonehearth’s Aid. Get The Quaking Fields.
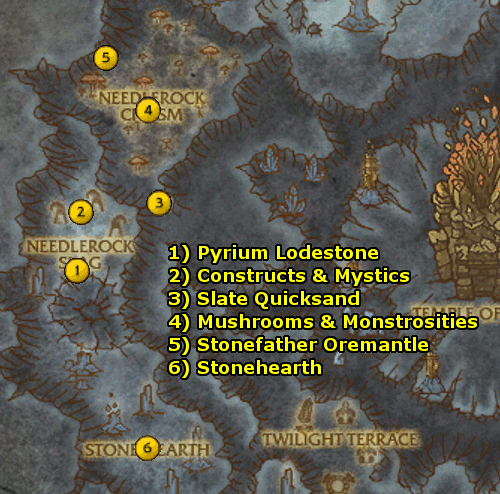
  2. Fly to Slate Quicksand and turn in your quest. Get The Axe of Earthly Sundering and Elemental Ore.
  3. Kill Jade Ragers for 6 Elemental Ore. Use the Axe of Earthly Sundering on 5 Emerald Colossus and kill them.
    • Then, return to Slate Quicksand and turn in your quests. Get One With the Ground. Talk to him again to begin the ritual. Upon arrival, complete the quest. Get Bring Down the Avalanche. Kill Avalanchion. Exit the cave to the north.
    • Then, return to Crag Rockcrusher and turn in your quest. Get Stonefather’s Boon.
  4. Get We’re Surrounded from Earthbreaker Dolomite. Use the Stonefather’s Banner near 12 Stonehearth Defenders and Kill 12 Stone Trogg Ambusher.
    • Then, return and turn in your quests. Get Sealing the Way and Thunder Stones.
    • Collect 12 Thunder Stone. Use your Rockside Reagents on the 4 Earthen Geomancers.
  5. Fly to the Fractured Front. Turn in your quests. Get Shatter Them!, Fixer Upper, and Battlefront Triage.
    • Use Deepvein’s Patch Kit on 10 Injured Earthen, Gather 6 Catapult Parts, and Kill 12 Fractured Front Stone Troggs.
    • Return to turn in your quests and get Troggzor the Earthinator.
  6. Kill Troggzor the Earthinator and loot The Earthinator’s Cudgel.
    • Return to Gravel Longslab and turn in your quest. Get Rush Delivery.
    • Fly to the catapult and turn in your quest. Get Close Escort.
  7. Escort the catapult to Needlerock Slag.
  1. At Pyrium Lodestone, turn in your quest. Get Keep Them Off the Front.
    • Get in an Earthen Catapult and Bombard 30 Reinforcements. Turn in your quest and get Reactivate the Constructs and Mystic Masters.
  2. Fly north and Activate 5 Deactivated War Constructs. Kill 5 Needlerock Mystics.
    • Return to Pyrium Lodestone and turn in your quest. Get Down Into the Chasm.
  3. Fly to Slate Quicksand. Turn in your quest. Get Sprout No More and Fungal Monstrosities. Make sure to grab a war guardian before heading out.
  4. Destroy 5 Giant Mushroom. Kill 5 Fungal Monstrosity.
    • Return to Slate Quicksand. Turn in your quest and get A Slight Problem.
    • Return to Pyrium Lodestone and turn in your quest. Get Rescue the Stonefeather… and Flint.
  5. Fly up to Stonefather Oremantle. Kill Bouldergut.
    • Return to Pyrium Lodestone and turn in your quest. Get The Hero Returns.
  6. Fly to Stonehearth and turn in your quest. Get The Middle Fragment. Open the vault behind Stonefather Oremantle to get The Middle Fragment of the World Pillar.
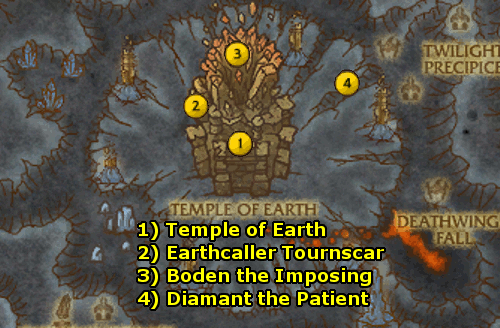
  1. At the Temple of Earth, turn in all your quests. Get That’s No Pyramid! and The Very Earth Beneath Our Feet.
  2. Fly to Earthcaller Torunscar. Turn in your quest. Get Crumbling Defenses, On Even Ground, and Core of Our Troubles.
    • Relieve the three shaman by killing the mobs attacking them. Also kill Irestone Rumblers for 6 Irestone Core and use the Elementium Grapple Line on 3 Servant of Therazane (and then run away from them).
    • Return to Earthcaller Tournscar and turn in your quests. Get Imposing Confrontation.
  3. Read the Earthen Ring Proclamation to Boden the Imposing.
    • Return to Earthcaller Tournscar and turn in your quest. Get Rocky Relations.
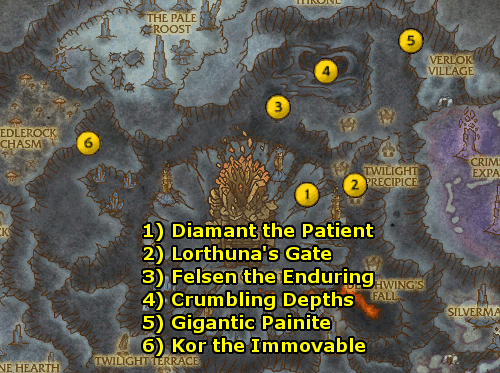
  4. Fly to Diamant the Patient.
  1. At Diamant the Patient, turn in your quest. Get Hatred Runs Deep, Unsolid Ground, and Loose Stones.
  2. At Lorthuna’s Gate, use the Delicate Chain Smasher to free 6 Quartz Rocklings, gather 6 Jade Crystal Cluster then combine them and use it to lure an Agitated Tunneler, and kill 12 Lorthuna’s Gate Cultists and Dragul Giantbutcher.
    • Return to Diamant and turn in your quests. Get Violent Gale.
  3. Fly to Felsen the Enduring.
  4. Fly to the Crumbling Depths entrance. Complete your quest and get Depth of the Depths.
  5. Travel deep into the depths to the Gigantic Painite Cluster.
    • Return to Diamant the Patient and turn in your quest. Get Entrenched.
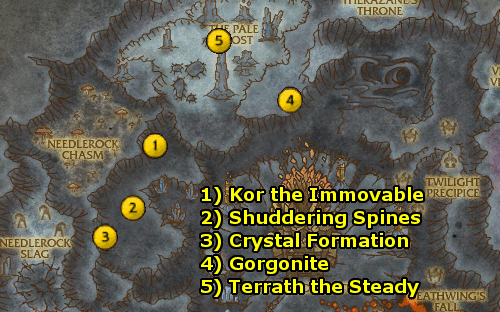
  6. Fly to Kor the Immovable.
  1. At Kor the Immovable, turn in your quest. Get Intervention, Making Things Crystal Clear, and Putting the Pieces Together.
  2. At the Shuddering Spines, Kill 12 Jaspertip Flayers, Gather 8 Chalky Crystal Formation, and Reform 6 Stonebound Elemental.
    • Return to Kor the Immovable. Turn in your quests. Get Pebble. Talk to Pebble and complete your quest, and get Clingy.
  3. Fly to the Crystal Formation. Fend off the Jaspertip Crystal-gorgers. Complete your quest and get So Big, So Round…
    • Return to Kor the Immovable. Turn in your quest. Get Petrified Delicacies and Rock Bottom.
  4. Kill Gorgonite. Pick up 12 Petrified Stone Bat nearby.
    • Return to Kor the Immovable. Turn in your quest. Get Steady Hand and Rocky Upheaval.
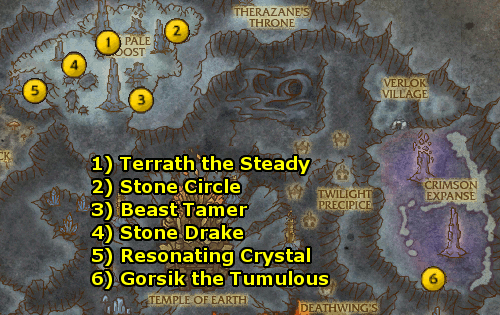
  5. Fly to Terrath the Steady.
  1. At Terrath the Steady, turn in your quest. Get Don’t. Stop. Moving. Talk to Terrath again to start the quest.
  2. Fly near the ground to the Stone Circle to quickly escort the Opalescent Guardians.
    • Return to Terrath the Steady. Turn in your quest. Get Hard Falls and Fragile Values.
  3. Kill the Stone Trogg Beast Tamer for a Stonework Mallet.
  4. Kill 6 Stone Drake.
    • Return to Terrath the Steady. Turn in your quests. Get Resonating Blow.
  5. At the Resonating Crystal, use the Stonework Mallet. Hop up the rocks. Jump from rock to rock to avoid Aeosera’s attacks and attack her until you defeat her.
    • Return to Terrath the Steady. Turn in your quest.
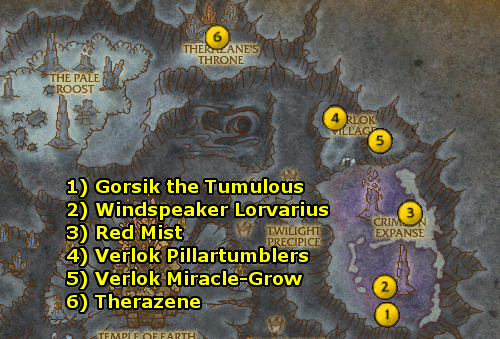
  6. Fly to Gorsik the Tumulous.
  1. Fly to Gorsik the Tumulous. Turn in your quest. Get Doomshrooms, Gone Soft, and Familiar Intruders.
  2. At Windspeaker Lorvarius, turn in your quest. Get A Head Full of Wind.
  3. Enter the red mist. Nearby, kill 10 Doomshrooms and 8 Fungal Behemoths.
    • Return to Windspeaker Lorvarius and turn in your quest. Get Unnatural Causes.
    • Return to Gorsik the Tumulous and turn in your quests. Get Shaken and Stirred and Corruption Destruction.
  4. In the canyon below, kill 8 Verlok Pillartumblers.
  5. Gather 8 Verlok Miracle-Grow.
    • Return to Gorsik the Tumultuous and turn in your quests. Get At the Stonemother’s Call.
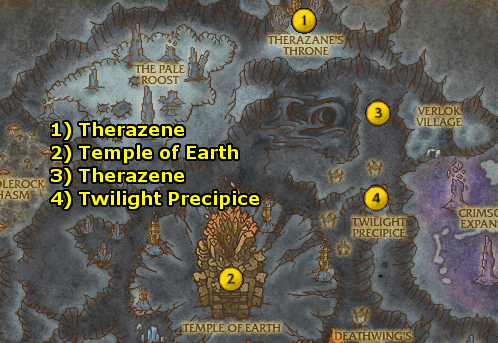
  6. Fly to Therazene.
  1. At Therazene, turn in your quest. Get Audience with the Stonemother and listen to the speech. Then, turn in the quest and get Rallying the Earthen Ring.
  2. Go to the Temple of Earth. In the back rooms, talk to the members of the Earthen Ring and rally the 5 members. Turn in your quest and get Our Part of the Bargain.
  3. Fly to Therazene’s new location and turn in your quest. Get The Stone March, Therazane’s Mercy, and The Twilight Flight.
  4. In the Twilight Precipice, kill Boldrich Stonerender, High Priestess Lorthuna, Zoltrik Drakebane, and 15 Twilight members.
    • Then, turn in your quests. Get Word in Stone.
    • Fly back to the Temple of Earth. Turn in your quest. Get Undying Twilight.
    • Defend the west side of the Temple of Earth. Kill 12 Twilight Invaders and a Desecrated Earthrager.
    • Complete the quest and get The Binding. Kill High Priestess Lorthuna. Complete your quest.
    • Return to Stormwind.

Cataclysm Classic Horde 80-85 Leveling Guide: 83-84 Deepholm

Turn in The Battle is Won, The War Goes On. Get The Maelstrom and Eye of the Storm. Use the Waters of Farseeing, then turn in your quest. Go through the portal. Talk to Thrall and complete your quest. Hop on Aggra’s Wyvern and travel into the Maelstrom.
  1. Turn in your quest at the Temple of Earth. Get the five quests: Gunship Down, Elemental Energy, The Earth Claims All, The Explorers, and Where’s Goldmine?
    • To the west area of the Temple of Earth, turn in The Explorers. Get The Twilight Plot and Fly Over.
  2. Go to Goldmine and turn in your quest. Get Explosive Bonding Compound and Something that Burns.
    • Kill Rockslice Rippers nearby and gather 5 Quartzite Resin. Then, complete your quest.
  3. Use your Depleted Totem and kill Energized Geodes and Lodestone Elementals to Energize 8 Totems.
  4. Use Goldmine’s Fire Totem to summon Magmatooth. Kill him for The Burning Heart.
  5. Kill 5 Deepstone Elementals and gather the Three Clues at the Storm’s Fury Wreckage. Get Captain’s Log.
  6. Fly over the Masters’ Gate to get credit for investigating it. Also, kill the Twilight members for the Masters’ Gate Plans.
    • Return to Goldmine and turn in your quest. Get Apply and Flash Drive.
    • Use your Explosive Bonding Compound on Flint Oremantle. Get Take Him to the Earthcaller.
    • Return to the Temple of Earth.
  1. At the Temple of Earth, turn in your quests. Get To Stonehearth’s Aid, Diplomacy First, Decryption Made Easy, and Fight Fire and Water and Air with…
  2. Fly onto the alliance gunship. Turn in your quest. Get All Our Friends Are Dead and The Admiral’s Cabin.
    • Go into The Admiral’s Cabin and turn in yoru quest. Get Without a Captain or Crew.
    • Go outside and grab a Spool of Rope and Bottle of Whiskey. Also, use the Spirit Totem on 6 Slain Crew Members.
    • Return to First Mate Moody and turn in your quest, then return to Stormcaller Mylra and turn in your quest. Get Take No Prisoners and On Second Thought, Take One Prisoner.
    • Go below deck and kill 6 Twilight Saboteurs and Subdue Mor’norokk the Hateful.
    • Return to Stonecaller Mylra and turn in your quest. Then, hop on Stormbeak and listen to the interrogation. Then, turn in your quest. Get Return to the Temple of Earth.
    • Return to the Temple of Earth and turn in your quest. Get Deathwing’s Fall and Blood of the Earthwarder.
  3. Fly to Deathwing’s Fall. Complete your quest and get Bleed the Bloodshaper. Kill a Twilight Bloodshaper for the Twilight Orders. Get Question the Slaves.
    • In the camp, get the Twilight Slaver’s Key. Kill Living Blood for 5 Blood of Neltharion.
  4. Go to the Forgemaster’s Log and complete your quest. Get Silvermarsh Rendevous.
  5. Fly to Upper Silvermarsh. Complete your quest and get Quicksilver Submersion. Kill Troggs to get Maziel’s Research, which starts the quest Twilight Research. Also, pick up the Trogg Crate. Kill Mercurial Oozes for 4 Twilight Research Notes. Complete your quest and get Maziel’s Revelation.
    • Use the Trogg Crate and SWIM up (remain submerged inside the water) to Milhouse Manastorm. Complete your quest and get The Twilight Overlook.
  6. Go to Maziel’s Journal and turn in your quest. Get Maziel’s Ascendancy.
    • Then, go into the cave to the northeast and kill Maziel.
  7. Fly to Stormcaller Mylra.
  1. At Stormcaller Mylra, turn in your quest. Get Big Game, Big Bait, To Catch a Dragon, and Into the Stonecore (Dungeon).
  2. Kill a Twilight Dragonstalker for a Twilight Snare, and kill 5 Jadescale Basilisk and use Mylra’s Knife on their corpses for 5 Side of Basilisk Meat.
    • Return to Stormcaller Mylra and turn in your quests. Get Testing the Trap.
  3. Use the Trapped Basilisk Meat at the bones. Kill the Stonescale Matriarch.
    • Return to Stormcaller Mylra and turn in your quest. Get Abyssion’s Minions and Block the Gates.
  4. Fly to Abyssion’s Lair. Kill 8 of Abyssion’s Underlings. Use the Stormstone at the two gates.
    • Return to Stormcaller Mylra and turn in your quests. Get The World Pillar Fragment.
    • Place the Earthen Ring Banner at the center of Abyssion’s Lair. Take cover behind a pillar when the Shadow Nova is cast. Defeat Abyssion and collect The Upper World Pillar Fragment.
  5. Kill the Bound Fire, Water, and Air Elemental – you can find them in the huge pillars. Also, Use 6 One-Time Decryption Engines to decrypt 6 plans to complete your quest. Get The Wrong Sequence.
  6. Use the Waygate Controller at the Waygate.
  7. Fly up and kill Haethan Kaul.
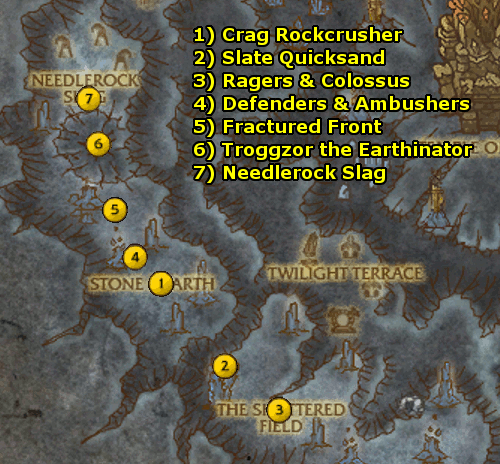
  1. Fly to Crag Rockcrusher and turn in To Stonehearth’s Aid. Get The Quaking Fields.
  2. Fly to Slate Quicksand and turn in your quest. Get The Axe of Earthly Sundering and Elemental Ore.
  3. Kill Jade Ragers for 6 Elemental Ore. Use the Axe of Earthly Sundering on 5 Emerald Colossus and kill them.
    • Then, return to Slate Quicksand and turn in your quests. Get One With the Ground. Talk to him again to begin the ritual. Upon arrival, complete the quest. Get Bring Down the Avalanche. Kill Avalanchion. Exit the cave to the north.
    • Then, return to Crag Rockcrusher and turn in your quest. Get Stonefather’s Boon.
  4. Get We’re Surrounded from Earthbreaker Dolomite. Use the Stonefather’s Banner near 12 Stonehearth Defenders and Kill 12 Stone Trogg Ambusher.
    • Then, return and turn in your quests. Get Sealing the Way and Thunder Stones.
    • Collect 12 Thunder Stone. Use your Rockside Reagents on the 4 Earthen Geomancers.
  5. Fly to the Fractured Front. Turn in your quests. Get Shatter Them!, Fixer Upper, and Battlefront Triage.
    • Use Deepvein’s Patch Kit on 10 Injured Earthen, Gather 6 Catapult Parts, and Kill 12 Fractured Front Stone Troggs.
    • Return to turn in your quests and get Troggzor the Earthinator.
  6. Kill Troggzor the Earthinator and loot The Earthinator’s Cudgel.
    • Return to Gravel Longslab and turn in your quest. Get Rush Delivery.
    • Fly to the catapult and turn in your quest. Get Close Escort.
  7. Escort the catapult to Needlerock Slag.
  1. At Pyrium Lodestone, turn in your quest. Get Keep Them Off the Front.
    • Get in an Earthen Catapult and Bombard 30 Reinforcements. Turn in your quest and get Reactivate the Constructs and Mystic Masters.
  2. Fly north and Activate 5 Deactivated War Constructs. Kill 5 Needlerock Mystics.
    • Return to Pyrium Lodestone and turn in your quest. Get Down Into the Chasm.
  3. Fly to Slate Quicksand. Turn in your quest. Get Sprout No More and Fungal Monstrosities. Make sure to grab a war guardian before heading out.
  4. Destroy 5 Giant Mushroom. Kill 5 Fungal Monstrosity.
    • Return to Slate Quicksand. Turn in your quest and get A Slight Problem.
    • Return to Pyrium Lodestone and turn in your quest. Get Rescue the Stonefeather… and Flint.
  5. Fly up to Stonefather Oremantle. Kill Bouldergut.
    • Return to Pyrium Lodestone and turn in your quest. Get The Hero Returns.
  6. Fly to Stonehearth and turn in your quest. Get The Middle Fragment. Open the vault behind Stonefather Oremantle to get The Middle Fragment of the World Pillar.
  1. At the Temple of Earth, turn in all your quests. Get That’s No Pyramid! and The Very Earth Beneath Our Feet.
  2. Fly to Earthcaller Torunscar. Turn in your quest. Get Crumbling Defenses, On Even Ground, and Core of Our Troubles.
    • Relieve the three shaman by killing the mobs attacking them. Also kill Irestone Rumblers for 6 Irestone Core and use the Elementium Grapple Line on 3 Servant of Therazane (and then run away from them).
    • Return to Earthcaller Tournscar and turn in your quests. Get Imposing Confrontation.
  3. Read the Earthen Ring Proclamation to Boden the Imposing.
    • Return to Earthcaller Tournscar and turn in your quest. Get Rocky Relations.
  4. Fly to Diamant the Patient.
  1. At Diamant the Patient, turn in your quest. Get Hatred Runs Deep, Unsolid Ground, and Loose Stones.
  2. At Lorthuna’s Gate, use the Delicate Chain Smasher to free 6 Quartz Rocklings, gather 6 Jade Crystal Cluster then combine them and use it to lure an Agitated Tunneler, and kill 12 Lorthuna’s Gate Cultists and Dragul Giantbutcher.
    • Return to Diamant and turn in your quests. Get Violent Gale.
  3. Fly to Felsen the Enduring.
  4. Fly to the Crumbling Depths entrance. Complete your quest and get Depth of the Depths.
  5. Travel deep into the depths to the Gigantic Painite Cluster.
    • Return to Diamant the Patient and turn in your quest. Get Entrenched.
  6. Fly to Kor the Immovable.
  1. At Kor the Immovable, turn in your quest. Get Intervention, Making Things Crystal Clear, and Putting the Pieces Together.
  2. At the Shuddering Spines, Kill 12 Jaspertip Flayers, Gather 8 Chalky Crystal Formation, and Reform 6 Stonebound Elemental.
    • Return to Kor the Immovable. Turn in your quests. Get Pebble. Talk to Pebble and complete your quest, and get Clingy.
  3. Fly to the Crystal Formation. Fend off the Jaspertip Crystal-gorgers. Complete your quest and get So Big, So Round…
    • Return to Kor the Immovable. Turn in your quest. Get Petrified Delicacies and Rock Bottom.
  4. Kill Gorgonite. Pick up 12 Petrified Stone Bat nearby.
    • Return to Kor the Immovable. Turn in your quest. Get Steady Hand and Rocky Upheaval.
  5. Fly to Terrath the Steady.
  1. At Terrath the Steady, turn in your quest. Get Don’t. Stop. Moving. Talk to Terrath again to start the quest.
  2. Fly near the ground to the Stone Circle to quickly escort the Opalescent Guardians.
    • Return to Terrath the Steady. Turn in your quest. Get Hard Falls and Fragile Values.
  3. Kill the Stone Trogg Beast Tamer for a Stonework Mallet.
  4. Kill 6 Stone Drake.
    • Return to Terrath the Steady. Turn in your quests. Get Resonating Blow.
  5. At the Resonating Crystal, use the Stonework Mallet. Hop up the rocks. Jump from rock to rock to avoid Aeosera’s attacks and attack her until you defeat her.
    • Return to Terrath the Steady. Turn in your quest.
  6. Fly to Gorsik the Tumulous.
  1. Fly to Gorsik the Tumulous. Turn in your quest. Get Doomshrooms, Gone Soft, and Familiar Intruders.
  2. At Windspeaker Lorvarius, turn in your quest. Get A Head Full of Wind.
  3. Enter the red mist. Nearby, kill 10 Doomshrooms and 8 Fungal Behemoths.
    • Return to Windspeaker Lorvarius and turn in your quest. Get Unnatural Causes.
    • Return to Gorsik the Tumulous and turn in your quests. Get Shaken and Stirred and Corruption Destruction.
  4. In the canyon below, kill 8 Verlok Pillartumblers.
  5. Gather 8 Verlok Miracle-Grow.
    • Return to Gorsik the Tumultuous and turn in your quests. Get At the Stonemother’s Call.
  6. Fly to Therazene.
  1. At Therazene, turn in your quest. Get Audience with the Stonemother and listen to the speech. Then, turn in the quest and get Rallying the Earthen Ring.
  2. Go to the Temple of Earth. In the back rooms, talk to the members of the Earthen Ring and rally the 5 members. Turn in your quest and get Our Part of the Bargain.
  3. Fly to Therazene’s new location and turn in your quest. Get The Stone March, Therazane’s Mercy, and The Twilight Flight.
  4. In the Twilight Precipice, kill Boldrich Stonerender, High Priestess Lorthuna, Zoltrik Drakebane, and 15 Twilight members.Then, turn in your quests. Get Word in Stone.
  5. Fly back to the Temple of Earth. Turn in your quest. Get Undying Twilight.
  6. Defend the west side of the Temple of Earth. Kill 12 Twilight Invaders and a Desecrated Earthrager.
  7. Complete the quest and get The Binding. Kill High Priestess Lorthuna. Complete your quest.
  8. Return to Orgrimmar.

Cataclysm Classic Alliance 80-85 Leveling Guide: 82-83 Vashj’ir

  • In Stormwind, Get To the Depths.
  • At Stormwind Harbor, turn in your quest and Get Call of Duty.
  • Wait for the ship on the northern dock, and board it.
  1. You’ll arrive at The Briny Cutter. Turn in your quest. Get Sea Legs. Set your Hearthstone to The Briny Cutter.
    • Just outside on the ocean floor, gather 3 Saltwater Starfish and 1 Conch Shell.
    • Return to The Briny Cutter and turn in your quest. Get Pay it Forward.
    • Rescue 6 Drowning Soldiers around the area with your Enchanted Conch Shell.
    • Return to The Briny Cutter and turn in your quest. Get Rest For the Weary. Complete the quest and get Buy Us Some Time and Traveling on Our Stomachs.
    • Kill 8 Zin’jatar Raiders and gather 8 Succulent Crab Meat from killing Crabs.
    • Return and turn in your quests. Get To Arms and Stormwind Elite Aquatic and Land Forces.
  2. Gather 6 Stormwind SEAL Equipment, 5 Stormwind Breastplate, 5 Stormwind Helm, 5 Stormwind Spear, and 5 Stormwind Shield off the ocean floor as well as from the Gilblin Scavengers.
    • Return to The Briny Cutter and turn in your quests. Get Finders, Keepers.
  3. Get Captain Taylor’s Flare Gun.
    Return and turn in your quest. Get All or Nothing. Defend the ship.
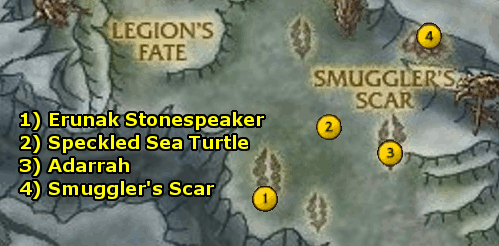
  1. You’ll arrive at Erunak Stonespeaker. Turn in All or Nothing. Get Better Late Than Dead.
  2. Use Moanah’s Meatstick on a Speckled Sea Turtle. It will get eaten, but that’s fine.
    • Return to Shallow’s End and turn in your quest. Get The Abyssal Ride.
    • Click on the Braided Rope nearby. Subdue the Abyssal Seahorse by following the directions and turn in your quest. Get Good Deed Left Undone.
  3. Go to Adarrah and Get Gimme Shelter!
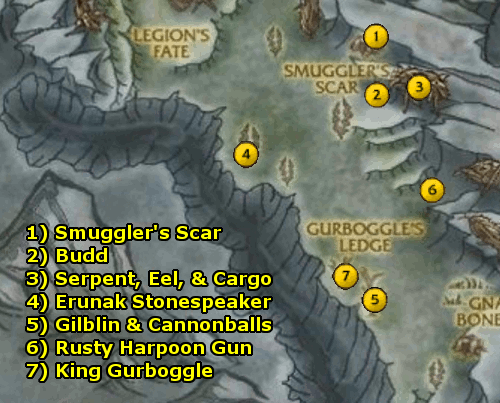
  4. Go to Smuggler’s Scar. Go into the cave, then back out. Then, back in again.
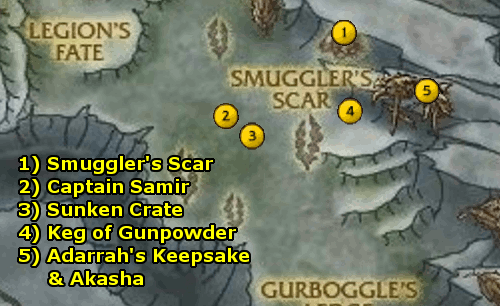
  1. At Smuggler’s Scar, turn in your quest and get Ain’t Too Proud to Beg.
  2. Go to the Captain Samir. Talk to him to rescue him. Also, kill Sabreclaw Skitterer for a Crumped Treasure Map which starts Kliklak’s Craw.
    • Return to Smuggler’s Scar and turn in your quests. Get A Girl’s Best Friend, A Taste for Tail, and Can’t Start a Fire Without a Spark.
  3. Kill Clacksnap Pincers for 4 Clacksnap Tail. One will drop a Tattered Treasure Map. Also, at the Sunken Crate, get the quest A Case of Crabs. As well, look for Kliklak (who wanders north/south a long distance). Kill him for the Corroded Key.
  4. Grab the Keg of Gunpowder.
  5. Gather 6 Adarrah’s Keepsake around the sunken boat. Kill Akasha for the Horde Chest Key. Behind the boat, go to the Sunken Horde Chest and turn in your quest.
    • Return to Smuggler’s Scar.
  1. At Smuggler’s Scar, turn in your quests. Get Ophidophobia and Nerve Tonic.
  2. At Budd, get Oh, the Insanity!
  3. Kill 4 Brinecale Serpent and Gather 5 Sunken Cargo. Also, kill a Slickskin Eel to start the quest Once More, With Eeling – then, kill 7 more Eels.
    • Return to Smuggler’s Scar. Get A Desperate Plea.
  4. Go to Erunak Stonespeaker and turn in your quests. Get Undersea Sanctuary. Use Erunak’s Scrying Orb. Complete your quest and get Spelunking.
  5. Kill a Gilblin Collector for Lady La-La’s Necklace, which starts Lady La-La’s Medallion. Kill Gilblin Hoarders for 5 Medallion Fragments and as well as just picking them off the ground for 50 Pilfered Cannonball. Use the Medallion Fragments to create Lady La-La’s Medallion and complete the quest.
    • Return to Budd. Complete your quest. Get Dah, Nunt… Dah, Nunt…
  6. At the Rusty Harpoon Gun, use the Booby-Trapped Bait. Complete your quest and get Shark Weak. Gather 5 of Gnaws’ Tooth nearby.
    • Return to Budd. Complete your quest. Get DUN-dun-DUN-dun-DUN-dun.
    • Go to the Rusty Harpoon Gun. Use Budd’s Chain. Fire the Harpoon Gun when allowed to.
    • Return to Budd. Complete your quest. Get A Bone to Pick.
  7. Kill King Gurboggle and loot the Pewter Pounder.
    • Return to Budd. Complete your quest. Get Decisions, Decisions.
    • Use The Pewter Pounder to destroy The Pewter Prophet. Then, complete your quest.
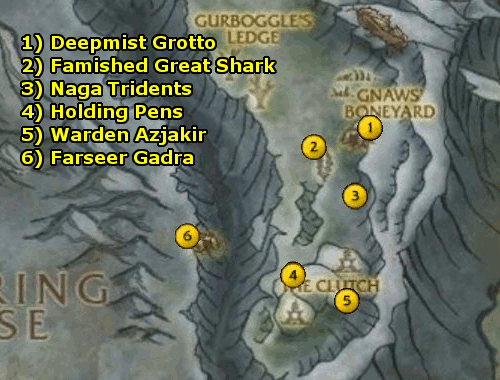
  1. Go to the Deepmist Grotto, Turn in Spelunking. Get Debriefing. Talk to Gurrok. Then, complete your quest. Get Wake of Destruction.
  2. Outside, use the Orb of Suggestion on a Famished Great Shark. Eat 25 Naga at the Holding Pens.
    • Then, use Ability 3 – Return to Safety. Turn in your quest. Get What? What? In My Gut…?, Decompression, and Come Hell or High Water.
  3. Go to the Naga Tridents and get How Disarming.
  4. Go to the Holding Pens and complete all your tasks here: Kill 12 Zin’jatar Naga. Rescue 10 Imprisoned Soldiers with the Breathstone, Destroy 6 Naga Weapons, and Gather 7 Wiggleweed Sprout. Complete Hell or High Water and get The Warden’s Time.
  5. Kill Warden Azjakir.
    • Return to the Deepmist Grotto. Turn in your quests. Get Across the Great Divide.
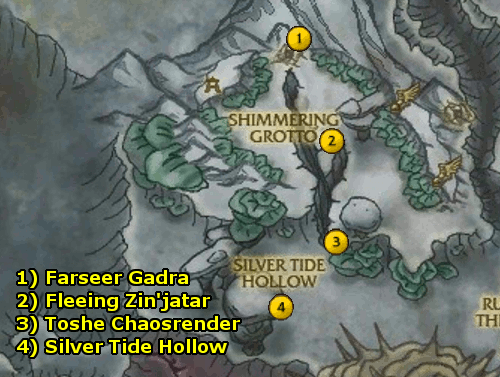
  6. Go through the cave to Farseer Gadra.
  1. At Farseer Gadra, turn in your quest. Get The Looming Threat. Talk to Gadra and complete the quet. Get Backed Into a Corner. Finish the fight, then turn in your quest. Get Rundown.
  2. Use Toshe’s Hunting Spears on 20 Fleeing Zin’jatar Fathom Stalkers.
  3. Go to Toshe Chaosrender and turn in your quest. Get Silver Tide Hollow.
  4. Go to Silver Tide Hollow and turn in your quest.
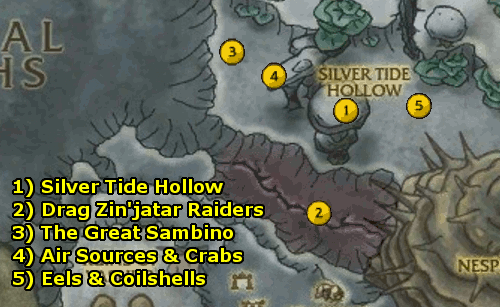
  1. At Silver Tide Hollow, Get A Distracting Scent, The Great Sambino, Slippery Threat, and Don’t be Shellfish.
  2. At the southern side of the cave, there are several Dead Zin’jatar Raiders. Drag three of them, one by one, to the Glimmerdeep Gorge.
  3. Go to The Great Sambino. Turn in your quest and get Undersea Inflation and Crabby Patrons.
  4. Use Sambino’s Air Balloon near 10 glowing air sources. Kill 10 Green Sand Crab and keep killing them until you get Sambino’s Air Valve.
    • Return to Sambino. Turn in your quests. Get Totem Modification.
    • Nearby in the sand, Use Sambino’s Modified Strength of Earth Totem and fend off the waves. Return to Sambino. Turn in the quest. Get Back in One Piece
  5. Kill 12 Spiketooth Eel and gather 10 Coilshell Sifter.
    • Return to Silver Tide Hollow.
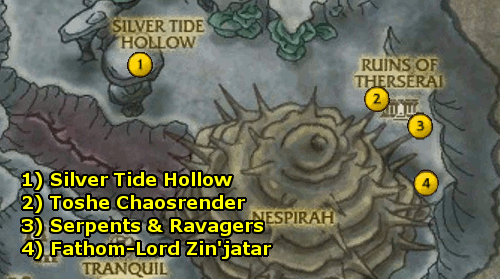
  1. At Silver Tide Hollow, turn in your quests. Get Toshe’s Vengeance.
  2. Go to Toshe Chaosrender. Turn in your quest. Get Vengeful Heart and Vortex.
  3. Use the Globes of Tumultuous Water near the Swarming Serpents and trap 30 of them. Also, kill 10 Zin’jatar Ravagers.
    • Return to Toshe and turn in your quests. Get Fathom-Lord Zin’jatar.
  4. Kill Fathom-Lord Zin’jatar. You’ll also get a Luminescent Pearl which starts A Pearl of Wisdom.
    • Return to Toshe and turn in your quest.
    • Return to Silver Tide Hollow.
  1. At Silver Tide Hollow, turn in your quest. Get Nespirah.
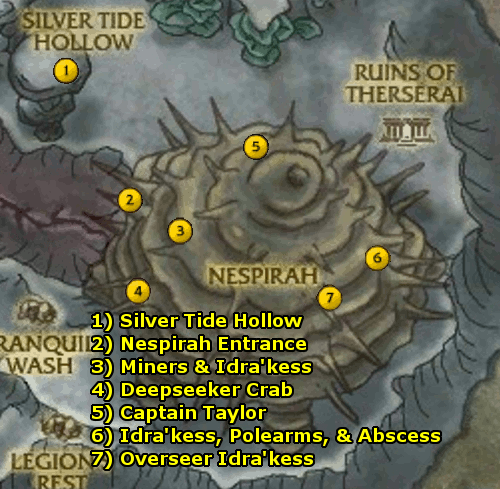
  2. Enter Nespirah from the location marked. Follow Earthmender Duarn and turn in your quest. Get Making Contact. Talk to Duarn to complete the quest. Get Slave Labor and Stick it to Them.
  3. Near the Giant Pearls, use Duarn’s Rope to rescue 8 Pearl Miners. Kill 7 Idra’kess Sentinel and 7 Idra’kess Enchantress.
    • Return to Earthmender Duarn and turn in your quests. Get Capture the Crab.
  4. Use Duarn’s Net on a Deepseeker Crab. Click the crab to capture it.
    • Return to Earthmender Duarn and turn in your quest. Get Breaking Through. Complete your quest by talking to Duarn and get We Are Not Alone.
  5. Go to Captain Taylor and turn in your quest. Get Body Blows, Still Valuable, and Hopelessly Gearless.
  6. Kill Idra’kess Warlords and Prophets for 5 Mysterious Pearl, loot 4 Purloined Polearm from the weapon racks, and Attack 7 Nespirah Abscess.
    • Return to Captain Taylor and turn in your quests. Get Overseer Idra’kess.
  7. Kill the Idra’kess Mistresses next to Overseer Idra’kess to make him vulnerable to attack. After some time, you can kite Idra’kess over the Nespirah Fluid to do massive damage to him.
    • Return to Earthmender Duarn and turn in your quest. Follow Erunak and board his seahorse.
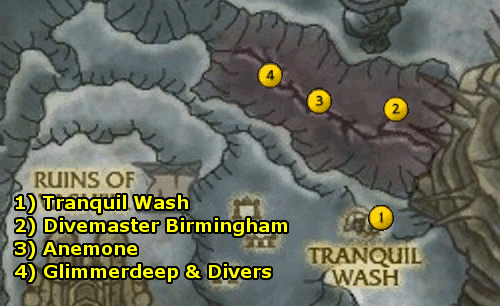
  1. You’ll arrive at Tranquil Wash. Turn in Waking the Beast. Get Cold Welcome and A Powerful Need to Eat
  2. Go to Divemaster Birmingham and turn in your quest. Get Clamming Up and Art of Attraction.
  3. Along the cliff walls, go up to the anemone and use the Anomne Chemical Extraction Device to gather 8 Chemicals.
    1. Return to Divemaster Birmingham and turn in your quest. Get Odor Coater.
  4. Use your Anemone Chemical Application Device on 8 Clam Divers, Kill 10 Glimmerdeep Tidehunter and gather 16 Glimmerdeep Clam.
    1. Return to Divemaster Birmingham and turn in your quests. Get Bellies Await.
    2. Return to Tranquil Wash.
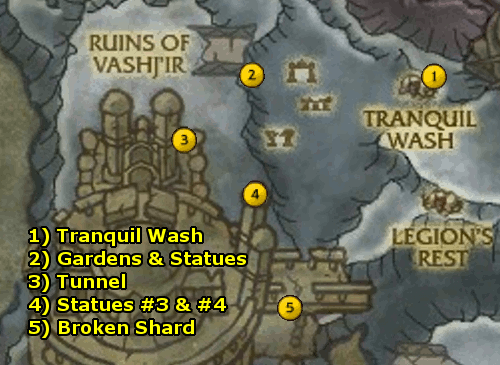
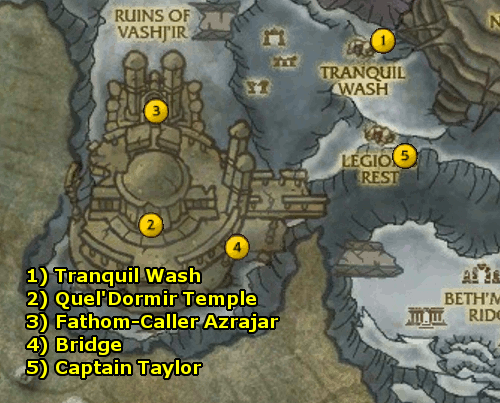
  1. At Tranquil Wash, turn in your quests. Get Swift Approach, A Better Vantage, Caught Off-Guard, and An Occupation of Time. During the next steps, kill 10 Azsh’ir Patroller and 8 Azsh’ir Monitor.
  2. Scout the Northern Quel’Domir Gardens & Examine the statues of Laestharia Vashj & Queen Azshara
  3. Scout the Tunnel.
  4. Examine the statues of High Priestess Siralen & Ranger Valarian.
  5. Go to the Broken Shard to get the quest Upon the Scene of Battle.
    • Return to Tranquil Wash.
  1. At Tranquil Wash, turn in all your quests. Get Visions of the Past: The Invasion of Vashj’ir.
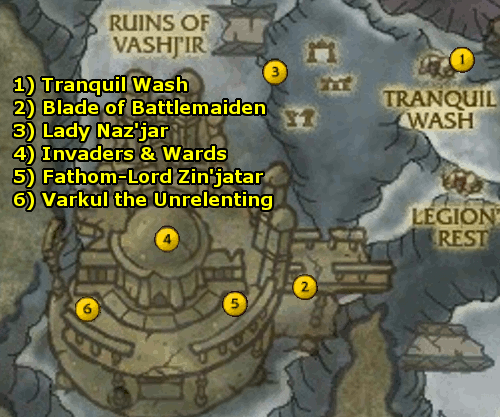
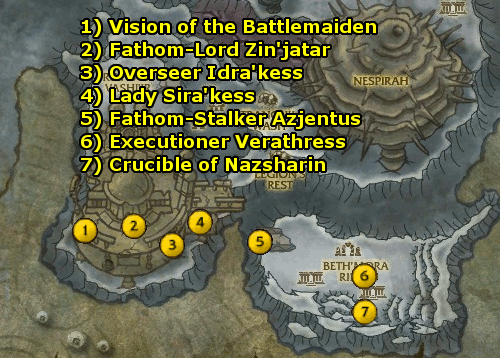
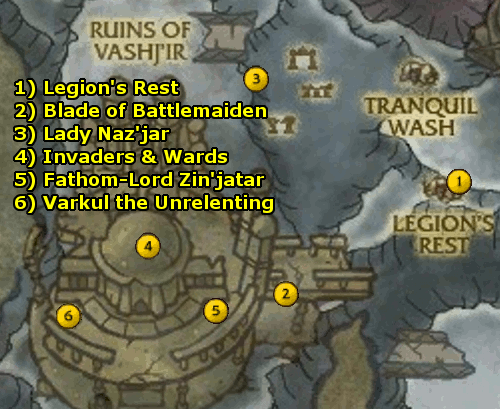
  2. Go to the Vision of the Battlemaiden and use the Blade of the Naz’jar Battlemaiden. Get Reoccupation at Fathom-Stalker Azjentus.
    • Kill 10 Kvaldir nearby. Return to Azjentus and turn in your quest. Get The Revered Lady.
  3. Go to Lady Naz’jar and turn in your quest. Get To the Fathom-Lord’s Call and Built to Last.
  4. Swim up to the top of the terrace. Kill 16 Kvaldir Invaders and activate 8 Nar’shola Wards.
  5. Go to Fathom-Lord Zin’jatar and turn in your quests. Get Not Soon Forgotten.
  6. Kill Varkul the Unrelenting. Make sure that those attacking the Sira’kess Sea Witches are killed. Complete your quest, then outside your vision complete Visions of the Past: The Invasion of Vash’jir. Get Looking Forward. Hop onto the Tamed Sea Horse.
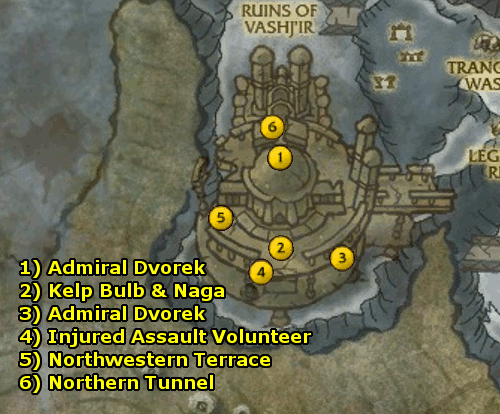
  1. At Admiral Dvorek, turn in your quest. Get Clear Goals, Not Entirely Unprepared, and Properly Inspired.
    • Around the area at the ledges, use the Box of Crossbow Bolts to restock 8 Alliance Lookouts.
  2. Kill 10 Naga and gather 8 Bloated Kelp Bulb hanging off the plants.
    • Return to Admiral Dvorek and turn in your quests. Get Swift Action. Talk to Engineer Hexascrub to begin the assault. Blow up 150 Naga.
  3. You’ll return to Admiral Dvorek’s new location. Then, turn in your quest. Get Gauging Success and Fallen But Not Forgotten.
  4. Rescue 6 Injured Assault Volunteer.
  5. Scout the northwestern terrace.
  6. Scout the tunnel to the north.
    • Return to Admiral Dvorek’s new location. At Admiral Dvorek, turn in your quests. Get Visions of the Past: The Slaughter of Biel’aran Ridge.
  1. Go to the Vision of the Battlemaiden and use the Blade of the Naz’jar Battlemaiden. As a naga, at Lady Naz’jar, get By Her Lady’s Word.
  2. Go to Fathom-Lord Zin’jatar and talk to him.
  3. Go to Overseer Idra’kess and talk to him.
  4. Go to Lady Sira’kess and talk to her.
  5. Go to Fathom-Stalker Azjentus and turn in your quest. Get No Trespass Forgiven and Stolen Property.
  6. Go to Executioner Verathress. Get Setting an Example.
    • Attack a Kvaldir High Shaman in a nearby building, then lure him back to Executioner Verathress. Turn in your quest.
  7. Go to the Crucible of Nazsharin and turn in your quest. Kill 20 Kvaldir on the way. Get Chosen Burden.
    • Return to Fathom-Stalker Azjentus and turn in your quests. Get The Culmination of Our Efforts. Then, complete the quest as well as Visions of the Past: The Slaughter of Biel’aran Ridge. Get Losing Ground. Mount the Tamed Sea Horse.
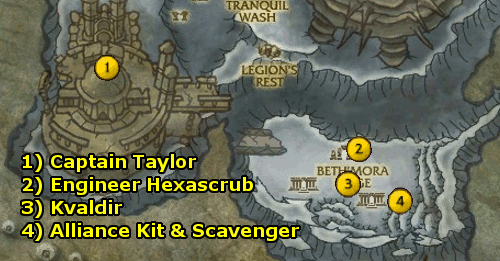
  1. Turn in Losing Ground to Captain Taylor. Get Desperate Plan.
  2. Go to Engineer Hexascrub and turn in your quest. Get Come Prepared, Unfurling Plan, and Hostile Waters.
  3. Kill Kvaldir for 8 Coils of Kvaldir Rope.
  4. Kill 10 Muckskin Scavenger and get the Alliance Survival Kit inside the boat.
    1. Return to Engineer Hexascrub and turn in your quests. Get Honor and Privilege. Swim up and use the Survival Kit Remnants. Use the Rescue Flare. Turn in your quest and get Welcome News.
    2. Return to Captain Taylor and turn in your quest.
  1. At Tranquil Wash, turn in your quest and get Visions of the Past: Rise from the Deep.
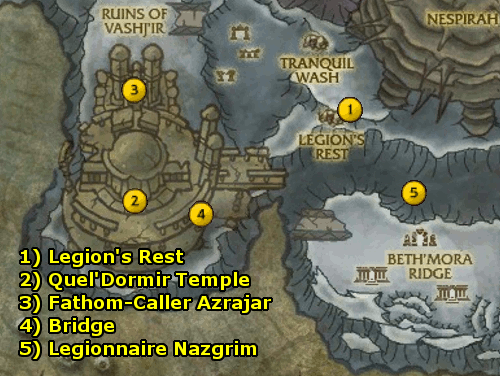
  2. Swim to the Quel’Dormir Temple. Use your Blade of the Naz’jar Battlemaiden on the top floor inside the temple. Get Devout Assembly. Right outside the temple, get Her Lady’s Hand.
  3. Look around the area. Speak to Fathom-Caller Azrajar. Kill the Kvaldir to Relieve 8 Naz’jar Honor Guard. Speak to 6 Sira’kess Tide Priestess.
    • Return to the Quel’Dormir Temple and turn in your quests. Get At All Costs.
    • Kill 20 Attacking Kvaldir outside, then return and turn in your quest. Get Final Judgement.
  4. Go to the bridge and defend it for 6 minutes to complete your quest.
    • Return to Tranquil Wash. Turn in your quest. Get A Breath of Fresh Air.
  5. Go to Captain Taylor, aboard the Voldrin’s Hold. Get to roughly that spot on the map and use your Boom Boots to be able to see the ships. Turn in your quest and get Full Circle and The War Has Many Fronts. Wait for The Verne to dock, then get aboard.
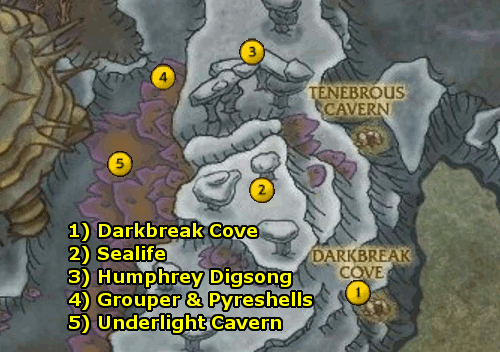
  1. You’ll arrive at Darkbreak Cove. Turn in your quests. Get Environmental Awareness.
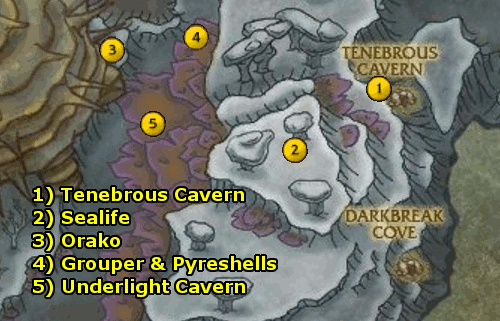
  2. Kill the various sealife and use the Oil Extraction Pump to gather 4 Terrapin Oil, 4 Remora Oil, and 4 Hammerhead Oil. The Terrapin and Hammerhead tend to be on the bottom of the ocean while the Remora tend to be right below cover.
    • Return to Darkbreak Cove and turn in your quests. Get The Perfect Fuel.
    • Go to the Fuel Sampling Station. Mix 2 Remora Oil Sample and 3 Hammerhead Oil Sample. Complete your quest. Get Orako.
  3. Swim to Orako and turn in your quest. Get “Glow-Juice”.
  4. Kill the Luxscale Grouper and Pyrehsell Scuttlers for 6 Glow-Juice.
    • Then, return to Orako and turn in your quest. Here Fishie Fishie and Die Fishman Die.
  5. Put on the Fish Hat. At the Underlight Cavern, Kill 4 Coldlight Oracle and 4 Coldlight Hunter. You’ll get an Enormous Eel Egg, which starts I Brought You This Egg. Attract 30 Underlight Nibblers by swimming near them.
    • Return to Orako and turn in your quests. Get Here Fishie Fishie 2: Eel-Egg-Trick Boogaloo and Orako’s Report.
    • Back at the Underlight Canyon, use the Eel-splosive Device on a Devious Great-eel, then kill it.
    • Return to Orako and turn in your quest.
    • Return (Hearth) to Darkbreak Cove. Turn in your quest.
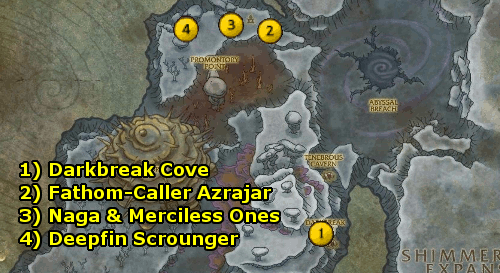
  1. At Darkbreak Cove, turn in your quest and get the four new quests: Treasure Reclamation, Those Aren’t Masks, Sira’kess Slaying, and A Standard Day for Azrajar.
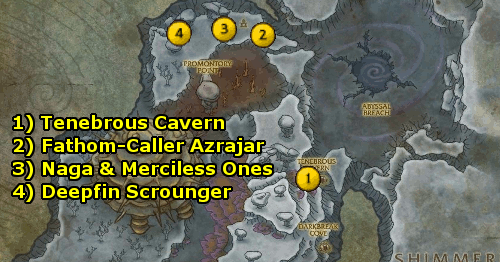
  2. Kill Fathom-Caller Azrajar and place the Alliance Standard on his corpse.
  3. Kill 10 Sira’kess Naga and Merciless Ones for 6 Merciless Heads.
  4. Kill Deepfin Scrounger and open the chests for 6 Deepfin Plunder.
    • Return to Darkbreak Cove.
  1. At Darkbreak Cove, turn in your quests. Get Promontory Point.
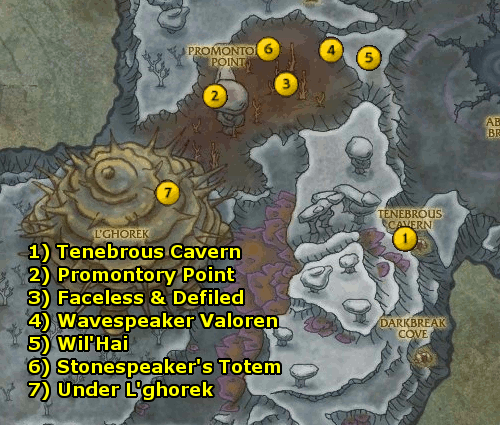
  2. Go to Promontory Point and turn in your quest. Get the four quests: The Wavespeaker, Clearing the Defiled, Scalding Shrooms, and Into the Totem.
  3. When facing the Faceless Defilers, first make sure to use Erunak’s Confinement Totem. Kill 5 Faceless Defilers, 8 Defiled Sealife, and Gather 5 Scalding Shrooms.
  4. Go to Wavespeaker Valoren and turn in your quest. Get Free Wil’Hai.
  5. Use Valoren’s Shrinkage Totem at the tentacles, then kill them to Free Wil’Hai.
    • Return to Wavespeaker Valoren and turn in your quest.
    • Return to Promonotory Point and turn in your quests. Get … It Will Come.
  6. Use Stonespeaker’s Luring Totem. Kill Ick’thys the Unfathomable. Make sure to get out of the Void Zones.
    • Return to Promonotory Point and turn in your quest. Get Unplug L’ghorek and Fiends From the Netherworld.
  7. Swim under L’ghorek. Kill the three ogres and 8 Nether Fiends.
    • Return to Promonotory Point.
  1. At Promonotory Point, turn in your quests. Get Communing with the Ancient.
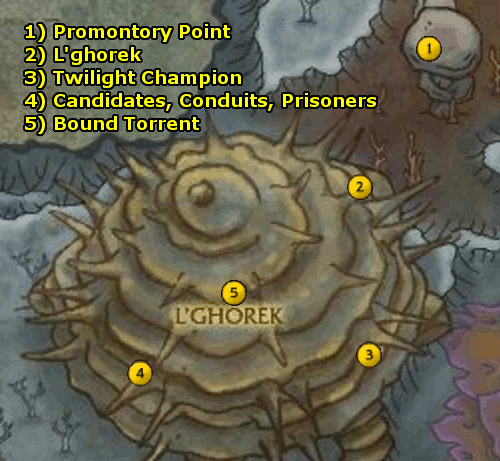
  2. Go into L’ghorek by entering in the tube to the left of his face. Turn in Communing with the Ancient. Get Runestones of Binding and Ascend No More!
  3. Kill a Twilight Champion to get a Twilight Cage Key. It starts the quest Prisoners.
  4. Kill Twilight Candidates for 7 Runestones of Binding, Destroy 5 Ancient Conduits, and Free 5 Horde Prisoners. Complete Prisoners.
    • Return to L’gohrek and turn in your quests. Get Twilight Extermination.
  5. Walk through the monsters and use the Attuned Runestone of Binding on a Bound Torrent.
    • Use Ability 3 to shield yourself with Aquatic Shield, then Ability 2 to Vortex to suck in all nearby units, then spam Watery doom Ability 1. Use Consume Essence Ability 4 to heal.
    • Enter the center temple and fight Hallazeal the Ascended. Use Consume Essence to heal, Concussive Splash to interrupt the massive attack, and spam Aquatic Blast.
    • Return to L’ghorek and turn in your quest. Get Back to Darkbreak Cove.
    • To complete the area, Hearth to Darkbreak Cove. Turn in your quest. Get Defending the Rift. Talk to Erunak again and go through the epic Battle for the Rift. Once complete, turn in Defending the Rift.
    • Return to Stormwind.

Cataclysm Classic Horde 80-85 Leveling Guide: 82-83 Vashj’ir

  • In Orgrimmar, Get Warchief’s Command: Vashj’ir!
  • At Commander Thorak, turn in your quest. Get Call of Duty.
  • Go to the harbor on the eastern side of Durotar, wait for the ship, and board it.
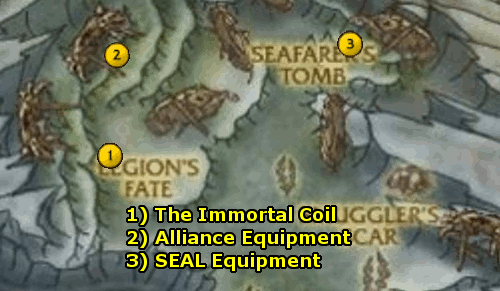
  1. You’ll arrive at The Immortal Coil. Turn in your quest. Get Sea Legs. Set your Hearthstone to The Immortal Coil.
    • Just outside on the ocean floor, gather 3 Saltwater Starfish and 1 Conch Shell.
    • Return to The Immortal Coil and turn in your quest. Get Pay it Forward.
    • Rescue 6 Drowning Soldiers around the area with your Enchanted Conch Shell.
    • Return to The Immortal Coil and turn in your quest. Get Rest For the Weary. Complete the quest and get Buy Us Some Time and Traveling on Our Stomachs.
    • Kill 8 Zin’jatar Raiders and gather 8 Succulent Crab Meat from killing Crabs.
    • Return and turn in your quests. Get Girding Our Loins.
  2. At the Alliance SEAL Equipment, get the quest Helm’s Deep. In the area, gather 5 Orgrimmar Axe, 5 Orgrimmar Helm, and 5 Orgrimmar Breastplate from the ocean floor and the Gilblin Scavengers.
    • Return to The Immortal Coil and turn in your quests. Get Finders, Keepers.
  3. Get 5 Stormwind SEAL Equipment.
    • Return and turn in your quest. Get Blood and Thunder! Defend the ship.
  1. You’ll arrive at Erunak Stonespeaker. Turn in All or Nothing. Get Better Late Than Dead.
  2. Use Moanah’s Meatstick on a Speckled Sea Turtle. It will get eaten, but that’s fine.
    • Return to Shallow’s End and turn in your quest. Get The Abyssal Ride.
    • Click on the Braided Rope nearby. Subdue the Abyssal Seahorse by following the directions and turn in your quest. Get Good Deed Left Undone.
  3. Go to Adarrah and Get Gimme Shelter!
  4. Go to Smuggler’s Scar. Go into the cave, then back out. Then, back in again.
  1. At Smuggler’s Scar, turn in your quest and get Ain’t Too Proud to Beg.
  2. Go to the Captain Samir. Talk to him to rescue him. Also, kill Sabreclaw Skitterer for a Crumped Treasure Map which starts Kliklak’s Craw.
    • Return to Smuggler’s Scar and turn in your quests. Get A Girl’s Best Friend, A Taste for Tail, and Can’t Start a Fire Without a Spark.
  3. Kill Clacksnap Pincers for 4 Clacksnap Tail. One will drop a Tattered Treasure Map. Also, at the Sunken Crate, get the quest A Case of Crabs. As well, look for Kliklak (who wanders north/south a long distance). Kill him for the Corroded Key.
  4. Grab the Keg of Gunpowder.
  5. Gather 6 Adarrah’s Keepsake around the sunken boat. Kill Akasha for the Horde Chest Key. Behind the boat, go to the Sunken Horde Chest and turn in your quest.
    • Return to Smuggler’s Scar.
  1. At Smuggler’s Scar, turn in your quests. Get Ophidophobia and Nerve Tonic.
  2. At Budd, get Oh, the Insanity!
  3. Kill 4 Brinecale Serpent and Gather 5 Sunken Cargo. Also, kill a Slickskin Eel to start the quest Once More, With Eeling – then, kill 7 more Eels.
    • Return to Smuggler’s Scar. Get A Desperate Plea.
  4. Go to Erunak Stonespeaker and turn in your quests. Get Undersea Sanctuary. Use Erunak’s Scrying Orb. Complete your quest and get Spelunking.
  5. Kill a Gilblin Collector for Lady La-La’s Necklace, which starts Lady La-La’s Medallion. Kill Gilblin Hoarders for 5 Medallion Fragments and as well as just picking them off the ground for 50 Pilfered Cannonball. Use the Medallion Fragments to create Lady La-La’s Medallion and complete the quest.
    • Return to Budd. Complete your quest. Get Dah, Nunt… Dah, Nunt…
  6. At the Rusty Harpoon Gun, use the Booby-Trapped Bait. Complete your quest and get Shark Weak. Gather 5 of Gnaws’ Tooth nearby.
    • Return to Budd. Complete your quest. Get DUN-dun-DUN-dun-DUN-dun.
    • Go to the Rusty Harpoon Gun. Use Budd’s Chain. Fire the Harpoon Gun when allowed to.
    • Return to Budd. Complete your quest. Get A Bone to Pick.
  7. Kill King Gurboggle and loot the Pewter Pounder.
    • Return to Budd. Complete your quest. Get Decisions, Decisions.
    • Use The Pewter Pounder to destroy The Pewter Prophet. Then, complete your quest.
  1. Go to the Deepmist Grotto, Turn in Spelunking. Get Debriefing. Talk to Gurrok. Then, complete your quest. Get Wake of Destruction.
  2. Outside, use the Orb of Suggestion on a Famished Great Shark. Eat 25 Naga at the Holding Pens.
    • Then, use Ability 3 – Return to Safety. Turn in your quest. Get What? What? In My Gut…?, Decompression, and Come Hell or High Water.
  3. Go to the Naga Tridents and get How Disarming.
  4. Go to the Holding Pens and complete all your tasks here: Kill 12 Zin’jatar Naga. Rescue 10 Imprisoned Soldiers with the Breathstone, Destroy 6 Naga Weapons, and Gather 7 Wiggleweed Sprout. Complete Hell or High Water and get The Warden’s Time.
  5. Kill Warden Azjakir.
    • Return to the Deepmist Grotto. Turn in your quests. Get Across the Great Divide.
  6. Go through the cave to Farseer Gadra.
  1. At Farseer Gadra, turn in your quest. Get The Looming Threat. Talk to Gadra and complete the quet. Get Backed Into a Corner. Finish the fight, then turn in your quest. Get Rundown.
  2. Use Toshe’s Hunting Spears on 20 Fleeing Zin’jatar Fathom Stalkers.
  3. Go to Toshe Chaosrender and turn in your quest. Get Silver Tide Hollow.
  4. Go to Silver Tide Hollow and turn in your quest.
  1. At Silver Tide Hollow, Get A Distracting Scent, The Great Sambino, Slippery Threat, and Don’t be Shellfish.
  2. At the southern side of the cave, there are several Dead Zin’jatar Raiders. Drag three of them, one by one, to the Glimmerdeep Gorge.
  3. Go to The Great Sambino. Turn in your quest and get Undersea Inflation and Crabby Patrons.
  4. Use Sambino’s Air Balloon near 10 glowing air sources. Kill 10 Green Sand Crab and keep killing them until you get Sambino’s Air Valve.
    • Return to Sambino. Turn in your quests. Get Totem Modification.
    • Nearby in the sand, Use Sambino’s Modified Strength of Earth Totem and fend off the waves. Return to Sambino. Turn in the quest. Get Back in One Piece
  5. Kill 12 Spiketooth Eel and gather 10 Coilshell Sifter.
    • Return to Silver Tide Hollow.
  1. At Silver Tide Hollow, turn in your quests. Get Toshe’s Vengeance.
  2. Go to Toshe Chaosrender. Turn in your quest. Get Vengeful Heart and Vortex.
  3. Use the Globes of Tumultuous Water near the Swarming Serpents and trap 30 of them. Also, kill 10 Zin’jatar Ravagers.
    • Return to Toshe and turn in your quests. Get Fathom-Lord Zin’jatar.
  4. Kill Fathom-Lord Zin’jatar. You’ll also get a Luminescent Pearl which starts A Pearl of Wisdom.
    • Return to Toshe and turn in your quest.
    • Return to Silver Tide Hollow.
  1. At Silver Tide Hollow, turn in your quest. Get Nespirah.
  2. Enter Nespirah from the location marked. Follow Earthmender Duarn and turn in your quest. Get Making Contact. Talk to Duarn to complete the quest. Get Slave Labor and Stick it to Them.
  3. Near the Giant Pearls, use Duarn’s Rope to rescue 8 Pearl Miners. Kill 7 Idra’kess Sentinel and 7 Idra’kess Enchantress.
    • Return to Earthmender Duarn and turn in your quests. Get Capture the Crab.
  4. Use Duarn’s Net on a Deepseeker Crab. Click the crab to capture it.
    • Return to Earthmender Duarn and turn in your quest. Get Breaking Through. Complete your quest by talking to Duarn and get We Are Not Alone.
  5. Go to Legionnaire Nazgrim and turn in your quest. Get Body Blows, Still Valuable, and Hopelessly Gearless.
  6. Kill Idra’kess Warlords and Prophets for 5 Mysterious Pearl, loot 4 Purloined Polearm from the weapon racks, and Attack 7 Nespirah Abscess.
    • Return to Legionnaire Nazgrim and turn in your quests. Get Overseer Idra’kess.
  7. Kill the Idra’kess Mistresses next to Overseer Idra’kess to make him vulnerable to attack. After some time, you can kite Idra’kess over the Nespirah Fluid to do massive damage to him.
    • Return to Earthmender Duarn and turn in your quest. Follow Erunak and board his seahorse.
  1. You’ll arrive at Legion’s Rest. Turn in Waking the Beast. Get Deep Attraction, Shelled Salvation, and Something Edible.
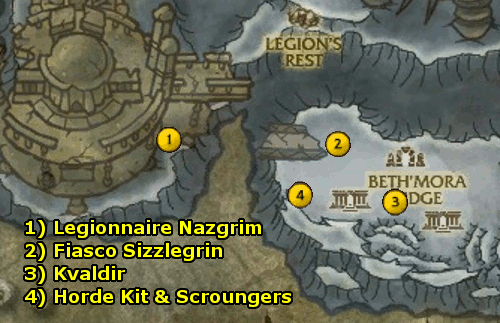
  2. Swim to the higher ledge. Go to Fiasco Sizzlegrin. Get Crafty Crabs.
  3. Kill 10 Redgill Scavenger, Kill Snapjaw Groupers for 8 Meat, Collect 8 Spiralung and save 8 Survivors, and Collect 12 Fiasco’s Stray Parts.
    • Return to Legion’s Rest.
  1. At Legion’s Rest, turn in your quests. Get Swift Approach, A Better Vantage, Caught Off-Guard, and An Occupation of Time. During the next steps, kill 10 Azsh’ir Patroller and 8 Azsh’ir Monitor.
  2. Scout the Northern Quel’Domir Gardens & Examine the statues of Laestharia Vashj & Queen Azshara
  3. Scout the Tunnel.
  4. Examine the statues of High Priestess Siralen & Ranger Valarian.
  5. Go to the Broken Shard to get the quest Upon the Scene of Battle.
    • Return to Legion’s Rest.
  1. At Legion’s Rest, turn in all your quests. Get Visions of the Past: The Invasion of Vashj’ir.
  2. Go to the Vision of the Battlemaiden and use the Blade of the Naz’jar Battlemaiden. Get Reoccupation at Fathom-Stalker Azjentus.
    • Kill 10 Kvaldir nearby. Return to Azjentus and turn in your quest. Get The Revered Lady.
  3. Go to Lady Naz’jar and turn in your quest. Get To the Fathom-Lord’s Call and Built to Last.
  4. Swim up to the top of the terrace. Kill 16 Kvaldir Invaders and activate 8 Nar’shola Wards.
  5. Go to Fathom-Lord Zin’jatar and turn in your quests. Get Not Soon Forgotten.
  6. Kill Varkul the Unrelenting. Make sure that those attacking the Sira’kess Sea Witches are killed. Complete your quest, then outside your vision complete Visions of the Past: The Invasion of Vash’jir. Get Looking Forward. Hop onto the Tamed Sea Horse.
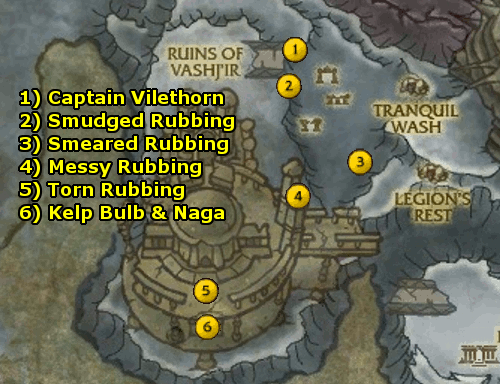
  1. At Captain Vilethorn, turn in your quest. Get Clear Goals, Not Entirely Unprepared, Properly Inspired, and Curious Distraction.
    • Around the area at the ledges, use the Box of Crossbow Bolts to restock 8 Horde Lookouts.
  2. Take the Smudged Rubbing.
  3. Take the Smeared Rubbing.
  4. Take the Messy Rubbing.
  5. Take the Torn Rubbing.
  6. Kill 10 Naga and gather 8 Bloated Kelp Bulb hanging off the plants.
    • Return to Captain Vilethorn and turn in your quests. Get Swift Action. Talk to Fiasco Sizzlegrin to begin the assault. Blow up the 100+ Naga.
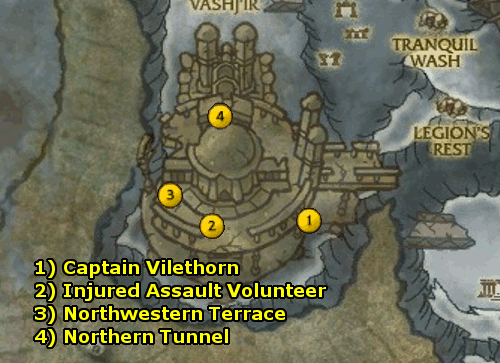
  1. You’ll return to Captain Vilethorn’s new location. Then, turn in your quest. Get Gauging Success and Fallen But Not Forgotten.
  2. Rescue 6 Injured Assault Volunteer.
  3. Scout the northwestern terrace.
  4. Scout the tunnel to the north.
    • Return to Captain Vilethorn’s new location. At Captain Vilethorn, turn in your quests. Get Visions of the Past: The Slaughter of Biel’aran Ridge.
  1. Go to the Vision of the Battlemaiden and use the Blade of the Naz’jar Battlemaiden. As a naga, at Lady Naz’jar, get By Her Lady’s Word.
  2. Go to Fathom-Lord Zin’jatar and talk to him.
  3. Go to Overseer Idra’kess and talk to him.
  4. Go to Lady Sira’kess and talk to her.
  5. Go to Fathom-Stalker Azjentus and turn in your quest. Get No Trespass Forgiven and Stolen Property.
  6. Go to Executioner Verathress. Get Setting an Example.
    • Attack a Kvaldir High Shaman in a nearby building, then lure him back to Executioner Verathress. Turn in your quest.
  7. Go to the Crucible of Nazsharin and turn in your quest. Kill 20 Kvaldir on the way. Get Chosen Burden.
    • Return to Fathom-Stalker Azjentus and turn in your quests. Get The Culmination of Our Efforts. Then, complete the quest as well as Visions of the Past: The Slaughter of Biel’aran Ridge. Get Losing Ground. Mount the Tamed Sea Horse.
  1. Turn in Losing Ground to Legionnaire Nazgrim. Get Desperate Plan.
  2. Go to Fiasco Sizzlegrin and turn in your quest. Get Come Prepared, Unfurling Plan, and Hostile Waters.
  3. Kill Kvaldir for 8 Coils of Kvaldir Rope.
  4. Kill 10 Muckskin Scrounger and get the Horde Survival Kit inside the boat.
    • Return to Fiasco Sizzlegrin and turn in your quests. Get Honor and Privilege. Swim up and use the Survival Kit Remnants. Use the Rescue Flare. Turn in your quest and get Welcome News.
    • Return to Legionnaire Nazgrim and turn in your quest.
  1. At Legion’s Rest, turn in your quest and get Visions of the Past: Rise from the Deep.
  2. Swim to the Quel’Dormir Temple. Use your Blade of the Naz’jar Battlemaiden on the top floor inside the temple. Get Devout Assembly. Right outside the temple, get Her Lady’s Hand.
  3. Look around the area. Speak to Fathom-Caller Azrajar. Kill the Kvaldir to Relieve 8 Naz’jar Honor Guard. Speak to 6 Sira’kess Tide Priestess.
    • Return to the Quel’Dormir Temple and turn in your quests. Get At All Costs.
    • Kill 20 Attacking Kvaldir outside, then return and turn in your quest. Get Final Judgement.
  4. Go to the bridge and defend it for 6 minutes to complete your quest.
    • Return to Legion’s Rest. Turn in your quest. Get A Breath of Fresh Air.
  5. Go to Legionnaire Nazgrim, aboard the Voldrin’s Hold. Get to roughly that spot on the map and use your Boom Boots to be able to see the ships. Turn in your quest and get Full Circle and The War Has Many Fronts. Wait for The Verne to dock, then get aboard.
  1. You’ll arrive at Tenebrous Cavern. Turn in your quests. Get Environmental Awareness.
  2. Kill the various sealife and use the Oil Extraction Pump to gather 4 Terrapin Oil, 4 Remora Oil, and 4 Hammerhead Oil. The Terrapin and Hammerhead tend to be on the bottom of the ocean while the Remora tend to be right below cover.
    • Return to Tenebrous Cavern and turn in your quests. Get The Perfect Fuel.
    • Go to the Fuel Sampling Station. Mix 2 Remora Oil Sample and 3 Hammerhead Oil Sample. Complete your quest. Get Orako.
  3. Swim to Orako and turn in your quest. Get “Glow-Juice”.
  4. Kill the Luxscale Grouper and Pyrehsell Scuttlers for 6 Glow-Juice.
    • Then, return to Orako and turn in your quest. Here Fishie Fishie and Die Fishman Die.
  5. Put on the Fish Hat. At the Underlight Cavern, Kill 4 Coldlight Oracle and 4 Coldlight Hunter. You’ll get an Enormous Eel Egg, which starts I Brought You This Egg. Attract 30 Underlight Nibblers by swimming near them.
    • Return to Orako and turn in your quests. Get Here Fishie Fishie 2: Eel-Egg-Trick Boogaloo and Orako’s Report.
    • Back at the Underlight Canyon, use the Eel-splosive Device on a Devious Great-eel, then kill it.
    • Return to Orako and turn in your quest.
    • Return (Hearth) to Tenebrous Cavern. Turn in your quest.
  1. At Tenebrous Cavern, turn in your quest and get the four new quests: Treasure Reclamation, Those Aren’t Masks, Sira’kess Slaying, and A Standard Day for Azrajar.
  2. Kill Fathom-Caller Azrajar and place the Alliance Standard on his corpse.
  3. Kill 10 Sira’kess Naga and Merciless Ones for 6 Merciless Heads.
  4. Kill Deepfin Scrounger and open the chests for 6 Deepfin Plunder.
    • Return to Tenebrous Cavern.
  1. At Tenebrous Cavern, turn in your quests. Get Promontory Point.
  2. Go to Promontory Point and turn in your quest. Get the four quests: The Wavespeaker, Clearing the Defiled, Scalding Shrooms, and Into the Totem.
  3. When facing the Faceless Defilers, first make sure to use Erunak’s Confinement Totem. Kill 5 Faceless Defilers, 8 Defiled Sealife, and Gather 5 Scalding Shrooms.
  4. Go to Wavespeaker Valoren and turn in your quest. Get Free Wil’Hai.
  5. Use Valoren’s Shrinkage Totem at the tentacles, then kill them to Free Wil’Hai.
    • Return to Wavespeaker Valoren and turn in your quest.
    • Return to Promonotory Point and turn in your quests. Get … It Will Come.
  6. Use Stonespeaker’s Luring Totem. Kill Ick’thys the Unfathomable. Make sure to get out of the Void Zones.
    • Return to Promonotory Point and turn in your quest. Get Unplug L’ghorek and Fiends From the Netherworld.
  7. Swim under L’ghorek. Kill the three ogres and 8 Nether Fiends.
    • Return to Promonotory Point.
  1. At Promonotory Point, turn in your quests. Get Communing with the Ancient.
  2. Go into L’ghorek by entering in the tube to the left of his face. Turn in Communing with the Ancient. Get Runestones of Binding and Ascend No More!
  3. Kill a Twilight Champion to get a Twilight Cage Key. It starts the quest Prisoners.
  4. Kill Twilight Candidates for 7 Runestones of Binding, Destroy 5 Ancient Conduits, and Free 5 Horde Prisoners. Complete Prisoners.
    • Return to L’gohrek and turn in your quests. Get Twilight Extermination.
  5. Walk through the monsters and use the Attuned Runestone of Binding on a Bound Torrent.
    • Use Ability 3 to shield yourself with Aquatic Shield, then Ability 2 to Vortex to suck in all nearby units, then spam Watery doom Ability 1. Use Consume Essence Ability 4 to heal.
    • Enter the center temple and fight Hallazeal the Ascended. Use Consume Essence to heal, Concussive Splash to interrupt the massive attack, and spam Aquatic Blast.
    • Return to L’ghorek and turn in your quest. Get Back to Tenebrous Cavern.
    • To complete the area, Hearth to Tenebrous Cavern. Turn in your quest. Get Defending the Rift. Talk to Erunak again and go through the epic Battle for the Rift. Once complete, turn in Defending the Rift.
    • Return to Orgrimmar.

Cataclysm Classic Alliance 80-85 Leveling Guide: 80-82 Mount Hyjal

  • Go to Stormwind. Get Hero’s Call: Mount Hyjal!
  • Go to Cenarion Emissary Jademoon in Stormwind Keep and take the portal to Moonglade.
  • Go to Nighthaven in Moonglade. Turn in your quest and get As Hyjal Burns.
  • Mount the dragon Aronus to fly to Hyjal. Turn in your quest. Get As Hyjal Burns.
  1. Turn in As Hyjal Burns. Get the three quests around Tholo Whitehoof and from Ysera inside the building: Inciting the Elements, Protect the World Tree, and The Earth Rises
  2. Gather 4 Juniper Berries and feed them to Faerie Dragons. Kill 4 Twilight Inciters. Kill 6 Scalding Rock Elemental.
    • Return to Tholo Whitehoof and turn in your three quests. Get Flames from Above.
  3. Use Tholo’s Horn at the Twilight Encampment.
    • Return to Tholo Whitehoof and turn in your quest.
  4. Fly to Malfurion Stormrage.
  1. At Malfurion Stormrage, turn in your quest. Get War on the Twilight’s Hammer and The Flameseer’s Staff.
  2. Gather 8 Charred Staff Fragment, kill 4 Twilight Flamecaller, and kill 10 Twilight Vanquisher.
    • Return to Malfurion and turn in your two quests. Get Flamebreaker.
  3. Use your Flameseer’s Staff on Blazehound Revenants around the center area and kill 30 of the Unbound Flame Spirits.
    • Return to Malfurion and turn in your quest. Get The Return of Baron Geddon.
    • Use the Flameseer’s Staff on Baron Geddon at the center of the crater. Make sure to back off when Baron Geddon is casting inferno, then go back in and use it again.
    • Return to Malfurion and turn in your quest. Get Emerald Allies.
  4. Fly to Alysra. Turn in your quest and get The Captured Scout.
  5. Fly to Scout Larandia. Turn in your quest and get Twilight Captivity.
    • Kill a Twilight Overseer at the camp for his key.
    • Return to Scout Larandis and turn in your quest. Get Return to Alysra.
    • Return to Alysra and turn in your quest. Get A Prisoner of Interest.
  6. Go into the Barrow Dens. Turn in your quest. Get Through the Dream.
    • Escort the druid outside and turn in your quest. Get Return to Nordrassil.
  7. Fly to Ysera at Nordrassil. Turn in Return to Nordrassil. Get The Return of the Ancients.
  1. Fly to Oomla Whitehorn. Turn in your quest. Get Harrying the Hunters, End of the Supply Line, and In The Rear With the Gear.
  2. Below, kill 4 Twilight Proveditor. Gather 36 Twilight Supplies when the slaves drop them. Kill 6 Twilight Hunter.
    • Return to Oomla Whitehorn. Turn in your three quests. Get The Voice of Goldrinn.
  3. Fly to Ian Duran. Turn in your quest. Get Goldrinn’s Ferocity.
  4. Kill Lycanthoth Vandal for 6 Polluted Essence.
    • Return to Ian Duran. Turn in your quest and get Lycantoth the Corruptor.
  5. Enter the Maw of Lycanthoth and use Lycanthoth’s Incense. Kill Lycanthoth. Turn in your quest and get The Shrine Reclaimed.
    • Return to Ian Duran. Turn in your quest and get Cleaning House, From the Mouth of Madness, and The Eye of Twilight.
    • Pick up a Bitterblossom at the lake nearby.
  6. Outside the cave.
    • Complete The Eye of Twilight at the Eye of Twilight. Get Mastering Puppets.
    • Collect a Stonebloom outside the cave entrance.
    • Collect a Darkflame Ember inside the Brazier. Go to the Twilight Cauldron and turn in From the Mouth of Madness and get Free Your Mind, the Rest Follows.
  7. Inside the cave.
    • Get Gar’gol’s Gotta Go from Kristoff Manheim.
    • Go to The Twilight Apocrypha and complete Mastering Puppets. Get Elementary! Activate the crucibles in this order: Fire, Earth, Air, Water. Complete the quest and get Return to Duskwhisper.
    • Get the Rusted Skull Key from Gar’gol’s Personal Treasure Chest.
    • Turn in Gar’Gol’s Gotta Go to Kristoff Manheim. Get Get Me Outta Here! Escort Kristoff out, finish killing 8 Minions of Gar’gol, and Free 8 Twilight Servitors.
    • Return to Ian Duran.
  1. At Ian Duran, turn in your quests. Get Sweeping the Shelf and Lightning in a Bottle.
  2. Use a Lightning Channel. Then, use the Totem of Lo’Gosh. Turn in your quest and get Into the Maw! Outside, kill 8 Twilight Stormcaller and 5 Howling Riftdweller. Then, enter the gate.
    • You’ll enter the Firelands Forgeworks. Turn in Into the Maw! and get Forged of Shadow and Flame, Crushing the Cores, and Rage of the Wolf Ancient.
    • Kill 12 Dark Iron Laborer, kill Searing Guardians for 8 Smoldering Cores, go to an anvil and use the Smoldering Cores to destroy them, and gather 10 Twilight Arms Crates.
    • Return to the entrance and turn in your quests. Get Cindermaul: the Portal Master.
    • Kill Cindemaul (he’s off a small sidepath to the left deeper in the cave) and get the Tome of Openings.
    • Return to the entrance and turn in your quest. Get Forgemaster Pyrendius.
    • Kill Forgemaster Pyrendius at the furthest end of the Forgeworks. Lure him over to Portal Runes and activate them to make him take heavy damage.
    • Return to the entrance and turn in your quest. Get Return from the Firelands.
    • Finally, exit the gate and return to Ian Duran. Turn in your two quests. Get Aviana’s Legacy and The Fires of Mount Hyjal.
  3. Fly to the Grove of Aessina.
  1. At the Grove of Aessina, turn in your quest and get Disrupting the Rituals, Fighting Fire With … Anything, Save the Wee Animals, and If You’re Not Against Us.
  2. Speak to Blackhorn. Turn in your quest and get Seeds of Their Demise.
    • Nearby, kill Wailing Weeds for 8 Bileberry.
    • Return to Blackhorn and turn in your quest. Get A New Master.
  3. At the Inferno:
    • Kill a Twilight Inferno Lord. Use the Bottled Bileberry Brew on the corpse of one of them and turn in your quest. Get The Name Never Spoken.
    • Examine the Southern, Central, and Northern Firestone
    • Kill 6 Twilight Inferno Lord and 10 Raging Firestorm
    • Rescue 10 Frightened Animal
    • Return to Blackhorn and turn in your quest. Get Black Heart of Flame.
    • Return to Grove Aessina.
  1. Go to Grove Aessina. Turn in your quests. Get Oh, Deer!
  2. Go to The Inferno. Use the Charged Branch and loot the Black Heart of Thol’embaar.
    • Rescue 3 Injured Fawn and escort them to the Grove of Aessina to Mylune. Note that you’ll have to clear a path for them since the mobs will attack the deer. Turn in your quest.
  3. Go to Blackhorn and turn in your quest.
    • Go to Laina Nightsky at the Grove of Aessina and get Last Stand at Whistling Grove.
  4. Go to Keeper Taldros and turn in your quest. Get The Bears Up There.
    • Use a Climbing Tree at the bottom of a tree. Climb up and pick up a Hyjal Bear Cub.
    • At the top of the tree, aim at the trampoline and Chuck-a-Bear. Repeat these steps 6 times – climb down, pick up a bear, climb up, chuck-a-bear.
    • Turn in your quest. Get Smashing Through Ashes.
  5. Kill 8 Charbringer.
  6. Go to Arch Druid Hamuul Runetotem.
  1. At Arch Druid Hamuul Runetotem, turn in your quest. Get Durable Seeds, Fresh Bait, and Firebreak.
  2. Kill 10 Twilight Earthscorcher, Kill Core Hounds for 6 Core Hound Entrails, Gather 10 Hyjal Seedlings from the Scorched Soil.
    • Return to the Arch Druid and turn in your quests. Get Hell’s Shells and Preparing the Soil.
  3. Go to a Flameward. Activate and defend it.
    • Look around the area for Nemesis, the giant turtle. Use the Heap of Core Hound Innards near it, then click him to gather a Nemesis Shell Fragment.
    • Run away! Back to the Arch Druid and turn in your quests. Get Tortolla Speaks.
  4. Turn in your quest to Tortolla. Get Breaking the Bonds and Children of Tortolla.
    • Deactivate the two Rods of Subjugation next to Tortolla.
    • Jump into the lake and kill the Deep Corruptors to Save 6 of Tortolla’s Eggs.
    • Return to Tortolla and turn in your quests. Get An Ancient Awakens.
    • Return to the Arch Druid and turn in your quest.
  5. Fly to the Shrine of Aviana.
  1. At the Shrine of Aviana, turn in your quest. Get An Offering for Aviana, The Wormwing Problem, and Scrambling for Eggs.
  2. At Aviana’s Burial Circle, use the Sacred Nectar. Complete your quest and get A Plea From Beyond.
    • Return to Choluna and turn in your quest. Get A Prayer and a Wing.
  3. Fly up to Blaithe’s Roost. Use the Enormous Bird Call. Kill Blaithe and loot its Ancient Feather.
  4. Kill 10 Wormwing Harpy and gather 8 Hyjal Egg.
    • Return to the Shrine of Aviana and turn in your quests. Get A Bird in Hand.
  5. Fly down and use a Harpy Signal Fire to summon Marion Wormwing. Go through the dialogue.
    • Return to the Shrine of Aviana and turn in your quest. Upstairs, get the new quest Fact-Finding Mission.
  6. Fly to Thisalee.
  1. At Thisalee, turn in your quest. Get Sethria’s Brood and A Chink in Their Armor.
  2. Get The Codex of Shadows from the Codex of Shadows. Kill 12 Twilight Dragonkin and gather 8 Twilight Armor Plate.
    • Return to Thisalee and turn in your quests. Get Disassembly and Egg Hunt.
  3. Use Thisalee’s Shiv on Twilight Juggernauts to make them vulnerable. You can keep using it on them to make them weaker. Kill 3 of them. Also, use the various Shadow Cloak Generators until you find the one which unveils Aviana’s Egg. Then, defend the egg.
    • Return to Thisalee and turn in your quests. Get Sethria’s Demise.
  4. Attack Sethria until she reveals her dragon form. Then, use Thisalee’s Signal Rocket. Kill Sethria.
    • Return to Thisalee and turn in your quest. Get Return to the Shrine.
    • Return to the Shrine of Aviana.
  1. At the Shrine of Aviana, turn in your quest. Get An Ancient Reborn.
    • Take the stairs to the next room over and use Herald’s Incense. Turn in your quest. Get The Hatchery Must Burn and The Last Living Lorekeeper.
  2. Enter the Flamegate into Firelands Hatchery. Turn in your quest. Get Flight in the Firelands.
    • Get a Twilight Firelance from the Twilight Weapon Rack and equip it. Mount one of Aviana’s Guardians.
    • Use Flap repeatedly to fly to the Guardian Flag.
    • Then, fly back and turn in your quest. Get Wave One.
    • Flap and ram your way into 10 Twilight Knight Rider to kill them.
    • Then, fly back and turn in your quest. Get Wave Two.
    • Once again, flap out and kill 10 Twilight Lancer.
    • Fly back and turn in your quest. Get Egg Wave.
    • Flap out and, on the ground, run over 40 Firelands Eggs.
    • Fly back and turn in your quest. Get Return to Aviana.
    • Dismount, don’t forget to equip your normal weapon, and exit the portal.
    • Return to Aviana. Turn in your quest.
  3. Fly to Nordu. Turn in your quest. Get Firefight.
    • Kill 5 Fiery Tormenter nearby, then return to Nordu and turn in your quest. Get Aessina’s Miracle.
  4. Fly to the Grove of Aessina. Turn in your quest. Get Tortolla’s Revenge.
  5. Fly to Tortolla.
  1. At Tortolla, turn in your quest. Get The Hammer and the Key, Lost Wardens, and Breakthrough.
  2. Fly to Logram. Get Hyjal Recycling Program.
  3. Kill 10 Twilight Scorchlords, Kill a Twilight Field Captain for a Glyph of Opening, Rescue 8 Lost Wardens, and Gather 15 Warden’s Arrows.
    • Return to Tortolla. Turn in your quest. Get The Third Flamegate.
    • Return to Logram. Turn in your quests. Get Pressing the Advantage.
  4. Kill 4 Twilight Field Captain. Enter the Flamegate.
    • Inside The Crucible of Flame, turn in your quest. Get The Time for Mercy Has Passed and The Strength of Tortolla.
    • Fight your way to the end of the cave and make sure your Child of Tortolla is with you. Examine the Nemesis Crystal.
    • Return to the entrance. On the way, make sure to kill 4 Shadowflame Master and 10 Molten Tormenter. Turn in your quests and get Finish Nemesis.
    • Once again, go to the back of the cave. Kill Nemesis. Make sure to use your Totem of Tortolla when Nemesis is about to erupt.
    • Return to the entrance and turn in your quest. Get Tortolla’s Triumph.
    • Return to Captain Irontree outside and turn in your quest
    • Return to Tortolla and turn in your quest. Get The Ancients are With Us.
  5. Fly to Ysera. Turn in your quest. Get Commander Jarod Shadowsong.
  1. Fly to Elementalist Ortell.
  2. Talk to a Twilight Recruit. Bring him back to Elementalist Ortell, then use the Blackjack on him.
  3. Fly to Condenna the Pitiless and turn in your quest. Get Trial By Fire, In Bloom, and Waste of Flesh.
  4. At the Twilight Gauntlet, Kill 8 Fiery Instructor, Gather 5 Flame Blossom, and use your Frostgale Crystal on an Immolated Supplicant.
    • Return to Condenna the Pitless and turn in your quests. Get Twilight Training.
  5. Fly to The Forge of Supplication and turn in your quest. Get all the quests in the area – Physical Training: Forced Labor, Walking the Dog, and Gather the Intelligence.
    • The Twilight Communique is in this camp. Pick it up.
  6. Pick up the Hyjal Battleplans.
  7. Use your Fiery Leash to summon the Spawn of Smolderos. Break 5 Darkwhisper Lodestone. Kill 5 Spinescale Basilisk for 5 Charred Basilisk Meat. Feed your Spawn of Smolderos the meat.
    • Return to The Forge of Supplication.
  1. At the Forge of Supplication, turn in your three quests and get the new three: A Champion’s Collar, Seeds of Discord, and Agility Training: Run Like Hell.
    • Run away from the Blazing Trainer for a minute, then turn in Agility Training. Get Mental Training: Speaking the Truth to Power.
    • Use the Orb of Ascension. Answer Yes (Ability 1) and No (Ability 2) to the questions. When done, dismiss the orb using Ability 4. Then, turn in your quest. Get Spiritual Training: Mercy is For the Weak.
  2. Kill 5 Failed Supplicant, and get The Defector from Maurice.
  3. Kill the Spinescale Matriarch for the Spiked Basilisk Hide.
    • Return to The Forge of Supplication and turn in your quests. Get Grudge Match.
  4. Fly to the Seat of the Chosen.
    • In the west hut, talk to Gromm’ko and challenge his raptor. Kill Gromm’ko.
    • Go to the Ogre Outhouse, to the east of the main building. Put on the Ogre Disguise.
    • Go into the main building and talk to Karr’gonn. Then, kill the High Cultist Azennios.
    • Return to The Forge of Supplication and turn in your quests. Get The Greater of Two Evils and Twilight Territory.
  5. Use the Talisman of Flame Ascendancy on Garnoth, Fist of the Legion. Spam your abilities on him – Flame Shield (Ability 2) one time, then Ascendant Strike (Ability 1) three times, repeat, is a good pattern. Also, kill 10 Horrorguard in the area.
    • Return to the Forge of Supplication.
  1. At the Forge of Supplication, turn in your quests. Get Speech Writing for Dummies.
  2. Kill Okrog as he walks outside the Seat of the Chosen.
    • Return to the Forge of Supplication. Turn in your quest and get Head of the Class. Turn that quest in and get Graduation Speech.
  3. Use the Initiation Podium. After 10 successes, turn in your quest and get Twilight Riot.
    • Inspire! (Ability 1) when the crowd seems bored.
    • Incite! (Ability 2) when the crowd seems angry.
    • Pander! (Ability 3) when the crowd seems crazy.
  4. Fly to Jarod Shadowsong.
  1. At Jarod Shadowsong, turn in your quest. Get Slash and Burn. Hop on an Emerald Drake.
  2. Fly to Darkwhisper Gorge. Use Aerial Swipe (Ability 2) to kill 5 Twilight Stormwalker and Acid Blast (Ability 1) to kill 40 Twilight’s Hammer Units.
    • Return to Jarod Shadowsong and turn in your quest. Get Might of the Firelord and Secrets of the Flame.
  3. Fly to the Ascendant’s Circle. In the camp, gather the Ascendant’s Codex, Tome of Flame, and The Burning Litanies – all of them are on tables or inside tents. Kill 5 Twilight Subjugator and 4 Flame Ascendant. Make sure to pick up the quest The Twilight Egg from the Pure Twilight Egg.
    • Return to Jarod Shadowsong and turn in your quests. Get The Gatekeeper, Brood of Evil, and The Sanctum of the Prophets.
  4. Kill a Young Twilight Drake for a Young Twilight Drake Skull.
  5. Use the Horn of Cenarius on Azralon the Gatekeeper, then kill him. Also kill 4 Twilight Augur, 4 Twilight Retainer, and 1 Emissary of Flame.
    • Return to Jarod Shadowsong.
  1. At Jarod Shadowsong, turn in your quests. Get The Firelord, Magma Monarch, and Death to the Broodmother
  2. Use the Twilight Drake Skull to summon Desperiona. Kill her.
  3. Use the Drums of the Turtle God to summon Tortolla aagainst King Moltron. Kill him.
  4. Enter and talk to Cenarius to begin the battle against Ragnaros. If you do physical damage, make sure to help Runetotem on the left side – if magical, help out Malfurion on the right side. Exit the portal and turn in your quests. Get The Battle is Won, The War Goes On.
    • Return to Stormwind.

Cataclysm Classic Horde 80-85 Leveling Guide: 80-82 Mount Hyjal

  • Go to Orgrimmar. Get Warchief’s Command: Mount Hyjal.
  • Go to Cenarion Emissary Blackhoof in the Valley of Wisdom and take the portal to Moonglade.
  • Go to Nighthaven in Moonglade. Turn in your quest and get As Hyjal Burns.
  • Mount the dragon Aronus to fly to Hyjal. Turn in your quest. Get As Hyjal Burns.
  1. Turn in As Hyjal Burns. Get the three quests around Tholo Whitehoof and from Ysera inside the building: Inciting the Elements, Protect the World Tree, and The Earth Rises
  2. Gather 4 Juniper Berries and feed them to Faerie Dragons. Kill 4 Twilight Inciters. Kill 6 Scalding Rock Elemental.
    • Return to Tholo Whitehoof and turn in your three quests. Get Flames from Above.
  3. Use Tholo’s Horn at the Twilight Encampment.
    • Return to Tholo Whitehoof and turn in your quest.
  4. Fly to Malfurion Stormrage.
  1. At Malfurion Stormrage, turn in your quest. Get War on the Twilight’s Hammer and The Flameseer’s Staff.
  2. Gather 8 Charred Staff Fragment, kill 4 Twilight Flamecaller, and kill 10 Twilight Vanquisher.
    • Return to Malfurion and turn in your two quests. Get Flamebreaker.
  3. Use your Flameseer’s Staff on Blazehound Revenants around the center area and kill 30 of the Unbound Flame Spirits.
    • Return to Malfurion and turn in your quest. Get The Return of Baron Geddon.
    • Use the Flameseer’s Staff on Baron Geddon at the center of the crater. Make sure to back off when Baron Geddon is casting inferno, then go back in and use it again.
    • Return to Malfurion and turn in your quest. Get Emerald Allies.
  4. Fly to Alysra. Turn in your quest and get The Captured Scout.
  5. Fly to Scout Larandia. Turn in your quest and get Twilight Captivity.
    • Kill a Twilight Overseer at the camp for his key.
    • Return to Scout Larandis and turn in your quest. Get Return to Alysra.
    • Return to Alysra and turn in your quest. Get A Prisoner of Interest.
  6. Go into the Barrow Dens. Turn in your quest. Get Through the Dream.
    • Escort the druid outside and turn in your quest. Get Return to Nordrassil.
  7. Fly to Ysera at Nordrassil. Turn in Return to Nordrassil. Get The Return of the Ancients.
  1. Fly to Oomla Whitehorn. Turn in your quest. Get Harrying the Hunters, End of the Supply Line, and In The Rear With the Gear.
  2. Below, kill 4 Twilight Proveditor. Gather 36 Twilight Supplies when the slaves drop them. Kill 6 Twilight Hunter.
    • Return to Oomla Whitehorn. Turn in your three quests. Get The Voice of Lo’Gosh.
  3. Fly to Takrik Ragehowl. Turn in your quest. Get Howling Mad.
  4. Kill 0 Lycanthoth Vandal for 6 Polluted Essence.
    • Return to Takrik Ragehowl. Turn in your quest and get Lycantoth the Corruptor.
  5. Enter the Maw of Lycanthoth and use Lycanthoth’s Incense. Kill Lycanthoth. Turn in your quest and get The Shrine Reclaimed.
    • Return to Takrik Ragehowl. Turn in your quest and get Cleaning House, From the Mouth of Madness, and The Eye of Twilight.
    • Pick up a Bitterblossom at the lake nearby.
  6. Outside the cave.
    • Complete The Eye of Twilight at the Eye of Twilight. Get Mastering Puppets.
    • Collect a Stonebloom outside the cave entrance.
    • Collect a Darkflame Ember inside the Brazier. Go to the Twilight Cauldron and turn in From the Mouth of Madness and get Free Your Mind, the Rest Follows.
  7. Inside the cave.
    • Get Gar’gol’s Gotta Go from Kristoff Manheim.
    • Go to The Twilight Apocrypha and complete Mastering Puppets. Get Elementary! Activate the crucibles in this order: Fire, Earth, Air, Water. Complete the quest and get Return to Duskwhisper.
    • Get the Rusted Skull Key from Gar’gol’s Personal Treasure Chest.
    • Turn in Gar’Gol’s Gotta Go to Kristoff Manheim. Get Get Me Outta Here! Escort Kristoff out, finish killing 8 Minions of Gar’gol, and Free 8 Twilight Servitors.
    • Return to Takrik Ragehowl.
  1. At Takrik Ragehowl, turn in your quests. Get Sweeping the Shelf and Lightning in a Bottle.
  2. Use a Lightning Channel. Then, use the Totem of Lo’Gosh. Turn in your quest and get Into the Maw! Outside, kill 8 Twilight Stormcaller and 5 Howling Riftdweller. Then, enter the gate.
    • You’ll enter the Firelands Forgeworks. Turn in Into the Maw! and get Forged of Shadow and Flame, Crushing the Cores, and Rage of the Wolf Ancient.
    • Kill 12 Dark Iron Laborer, kill Searing Guardians for 8 Smoldering Cores, go to an anvil and use the Smoldering Cores to destroy them, and gather 10 Twilight Arms Crates.
    • Return to the entrance and turn in your quests. Get Cindermaul: the Portal Master.
    • Kill Cindemaul (he’s off a small sidepath to the left deeper in the cave) and get the Tome of Openings.
    • Return to the entrance and turn in your quest. Get Forgemaster Pyrendius.
    • Kill Forgemaster Pyrendius at the furthest end of the Forgeworks. Lure him over to Portal Runes and activate them to make him take heavy damage.
    • Return to the entrance and turn in your quest. Get Return from the Firelands.
    • Finally, exit the gate and return to Takrik Ragehowl. Turn in your two quests. Get Aviana’s Legacy and The Fires of Mount Hyjal.
  3. Fly to the Grove of Aessina.
  1. At the Grove of Aessina, turn in your quest and get Disrupting the Rituals, Fighting Fire With … Anything, Save the Wee Animals, and If You’re Not Against Us.
  2. Speak to Blackhorn. Turn in your quest and get Seeds of Their Demise.
    • Nearby, kill Wailing Weeds for 8 Bileberry.
    • Return to Blackhorn and turn in your quest. Get A New Master.
  3. At the Inferno:
    • Kill a Twilight Inferno Lord. Use the Bottled Bileberry Brew on the corpse of one of them and turn in your quest. Get The Name Never Spoken.
    • Examine the Southern, Central, and Northern Firestone
    • Kill 6 Twilight Inferno Lord and 10 Raging Firestorm
    • Rescue 10 Frightened Animal
    • Return to Blackhorn and turn in your quest. Get Black Heart of Flame.
    • Return to Grove Aessina.
  1. Go to Grove Aessina. Turn in your quests. Get Oh, Deer!
  2. Go to The Inferno. Use the Charged Branch and loot the Black Heart of Thol’embaar.
    • Rescue 3 Injured Fawn and escort them to the Grove of Aessina to Mylune. Note that you’ll have to clear a path for them since the mobs will attack the deer. Turn in your quest.
  3. Go to Blackhorn and turn in your quest.
    • Go to Laina Nightsky at the Grove of Aessina and get Last Stand at Whistling Grove.
  4. Go to Keeper Taldros and turn in your quest. Get The Bears Up There.
    • Use a Climbing Tree at the bottom of a tree. Climb up and pick up a Hyjal Bear Cub.
    • At the top of the tree, aim at the trampoline and Chuck-a-Bear. Repeat these steps 6 times – climb down, pick up a bear, climb up, chuck-a-bear.
    • Turn in your quest. Get Smashing Through Ashes.
  5. Kill 8 Charbringer.
  6. Go to Arch Druid Hamuul Runetotem.
  1. At Arch Druid Hamuul Runetotem, turn in your quest. Get Durable Seeds, Fresh Bait, and Firebreak.
  2. Kill 10 Twilight Earthscorcher, Kill Core Hounds for 6 Core Hound Entrails, Gather 10 Hyjal Seedlings from the Scorched Soil.
    • Return to the Arch Druid and turn in your quests. Get Hell’s Shells and Preparing the Soil.
  3. Go to a Flameward. Activate and defend it.
    • Look around the area for Nemesis, the giant turtle. Use the Heap of Core Hound Innards near it, then click him to gather a Nemesis Shell Fragment.
    • Run away! Back to the Arch Druid and turn in your quests. Get Tortolla Speaks.
  4. Turn in your quest to Tortolla. Get Breaking the Bonds and Children of Tortolla.
    • Deactivate the two Rods of Subjugation next to Tortolla.
    • Jump into the lake and kill the Deep Corruptors to Save 6 of Tortolla’s Eggs.
    • Return to Tortolla and turn in your quests. Get An Ancient Awakens.
    • Return to the Arch Druid and turn in your quest.
  5. Fly to the Shrine of Aviana.
  1. At the Shrine of Aviana, turn in your quest. Get An Offering for Aviana, The Wormwing Problem, and Scrambling for Eggs.
  2. At Aviana’s Burial Circle, use the Sacred Nectar. Complete your quest and get A Plea From Beyond.
    • Return to Choluna and turn in your quest. Get A Prayer and a Wing.
  3. Fly up to Blaithe’s Roost. Use the Enormous Bird Call. Kill Blaithe and loot its Ancient Feather.
  4. Kill 10 Wormwing Harpy and gather 8 Hyjal Egg.
    • Return to the Shrine of Aviana and turn in your quests. Get A Bird in Hand.
  5. Fly down and use a Harpy Signal Fire to summon Marion Wormwing. Go through the dialogue.
    • Return to the Shrine of Aviana and turn in your quest. Upstairs, get the new quest Fact-Finding Mission.
  6. Fly to Thisalee.
  1. At Thisalee, turn in your quest. Get Sethria’s Brood and A Chink in Their Armor.
  2. Get The Codex of Shadows from the Codex of Shadows. Kill 12 Twilight Dragonkin and gather 8 Twilight Armor Plate.
    • Return to Thisalee and turn in your quests. Get Disassembly and Egg Hunt.
  3. Use Thisalee’s Shiv on Twilight Juggernauts to make them vulnerable. You can keep using it on them to make them weaker. Kill 3 of them. Also, use the various Shadow Cloak Generators until you find the one which unveils Aviana’s Egg. Then, defend the egg.
    • Return to Thisalee and turn in your quests. Get Sethria’s Demise.
  4. Attack Sethria until she reveals her dragon form. Then, use Thisalee’s Signal Rocket. Kill Sethria.
    • Return to Thisalee and turn in your quest. Get Return to the Shrine.
    • Return to the Shrine of Aviana.
  1. At the Shrine of Aviana, turn in your quest. Get An Ancient Reborn.
    • Take the stairs to the next room over and use Herald’s Incense. Turn in your quest. Get The Hatchery Must Burn and The Last Living Lorekeeper.
  2. Enter the Flamegate into Firelands Hatchery. Turn in your quest. Get Flight in the Firelands.
    • Get a Twilight Firelance from the Twilight Weapon Rack and equip it. Mount one of Aviana’s Guardians.
    • Use Flap repeatedly to fly to the Guardian Flag.
    • Then, fly back and turn in your quest. Get Wave One.
    • Flap and ram your way into 10 Twilight Knight Rider to kill them.
    • Then, fly back and turn in your quest. Get Wave Two.
    • Once again, flap out and kill 10 Twilight Lancer.
    • Fly back and turn in your quest. Get Egg Wave.
    • Flap out and, on the ground, run over 40 Firelands Eggs.
    • Fly back and turn in your quest. Get Return to Aviana.
    • Dismount, don’t forget to equip your normal weapon, and exit the portal.
    • Return to Aviana. Turn in your quest.
  3. Fly to Nordu. Turn in your quest. Get Firefight.
    • Kill 5 Fiery Tormenter nearby, then return to Nordu and turn in your quest. Get Aessina’s Miracle.
  4. Fly to the Grove of Aessina. Turn in your quest. Get Tortolla’s Revenge.
  5. Fly to Tortolla.
  1. At Tortolla, turn in your quest. Get The Hammer and the Key, Lost Wardens, and Breakthrough.
  2. Fly to Logram. Get Hyjal Recycling Program.
  3. Kill 10 Twilight Scorchlords, Kill a Twilight Field Captain for a Glyph of Opening, Rescue 8 Lost Wardens, and Gather 15 Warden’s Arrows.
    • Return to Tortolla. Turn in your quest. Get The Third Flamegate.
    • Return to Logram. Turn in your quests. Get Pressing the Advantage.
  4. Kill 4 Twilight Field Captain. Enter the Flamegate.
    • Inside The Crucible of Flame, turn in your quest. Get The Time for Mercy Has Passed and The Strength of Tortolla.
    • Fight your way to the end of the cave and make sure your Child of Tortolla is with you. Examine the Nemesis Crystal.
    • Return to the entrance. On the way, make sure to kill 4 Shadowflame Master and 10 Molten Tormenter. Turn in your quests and get Finish Nemesis.
    • Once again, go to the back of the cave. Kill Nemesis. Make sure to use your Totem of Tortolla when Nemesis is about to erupt.
    • Return to the entrance and turn in your quest. Get Tortolla’s Triumph.
    • Return to Captain Irontree outside and turn in your quest
    • Return to Tortolla and turn in your quest. Get The Ancients are With Us.
  5. Fly to Ysera. Turn in your quest. Get Commander Jarod Shadowsong.
  1. Fly to Elementalist Ortell.
  2. Talk to a Twilight Recruit. Bring him back to Elementalist Ortell, then use the Blackjack on him.
  3. Fly to Condenna the Pitiless and turn in your quest. Get Trial By Fire, In Bloom, and Waste of Flesh.
  4. At the Twilight Gauntlet, Kill 8 Fiery Instructor, Gather 5 Flame Blossom, and use your Frostgale Crystal on an Immolated Supplicant.
    • Return to Condenna the Pitless and turn in your quests. Get Twilight Training.
  5. Fly to The Forge of Supplication and turn in your quest. Get all the quests in the area – Physical Training: Forced Labor, Walking the Dog, and Gather the Intelligence.
    • The Twilight Communique is in this camp. Pick it up.
  6. Pick up the Hyjal Battleplans.
  7. Use your Fiery Leash to summon the Spawn of Smolderos. Break 5 Darkwhisper Lodestone. Kill 5 Spinescale Basilisk for 5 Charred Basilisk Meat. Feed your Spawn of Smolderos the meat.
    • Return to The Forge of Supplication.
  1. At the Forge of Supplication, turn in your three quests and get the new three: A Champion’s Collar, Seeds of Discord, and Agility Training: Run Like Hell.
    • Run away from the Blazing Trainer for a minute, then turn in Agility Training. Get Mental Training: Speaking the Truth to Power.
    • Use the Orb of Ascension. Answer Yes (Ability 1) and No (Ability 2) to the questions. When done, dismiss the orb using Ability 4. Then, turn in your quest. Get Spiritual Training: Mercy is For the Weak.
  2. Kill 5 Failed Supplicant, and get The Defector from Maurice.
  3. Kill the Spinescale Matriarch for the Spiked Basilisk Hide.
    • Return to The Forge of Supplication and turn in your quests. Get Grudge Match.
  4. Fly to the Seat of the Chosen.
    • In the west hut, talk to Gromm’ko and challenge his raptor. Kill Gromm’ko.
    • Go to the Ogre Outhouse, to the east of the main building. Put on the Ogre Disguise.
    • Go into the main building and talk to Karr’gonn. Then, kill the High Cultist Azennios.
    • Return to The Forge of Supplication and turn in your quests. Get The Greater of Two Evils and Twilight Territory.
  5. Use the Talisman of Flame Ascendancy on Garnoth, Fist of the Legion. Spam your abilities on him – Flame Shield (Ability 2) one time, then Ascendant Strike (Ability 1) three times, repeat, is a good pattern. Also, kill 10 Horrorguard in the area.
    • Return to the Forge of Supplication.
  1. At the Forge of Supplication, turn in your quests. Get Speech Writing for Dummies.
  2. Kill Okrog as he walks outside the Seat of the Chosen.
    • Return to the Forge of Supplication. Turn in your quest and get Head of the Class. Turn that quest in and get Graduation Speech.
  3. Use the Initiation Podium. After 10 successes, turn in your quest and get Twilight Riot.
    • Inspire! (Ability 1) when the crowd seems bored.
    • Incite! (Ability 2) when the crowd seems angry.
    • Pander! (Ability 3) when the crowd seems crazy.
  4. Fly to Jarod Shadowsong.
  1. At Jarod Shadowsong, turn in your quest. Get Slash and Burn. Hop on an Emerald Drake.
  2. Fly to Darkwhisper Gorge. Use Aerial Swipe (Ability 2) to kill 5 Twilight Stormwalker and Acid Blast (Ability 1) to kill 40 Twilight’s Hammer Units.
    • Return to Jarod Shadowsong and turn in your quest. Get Might of the Firelord and Secrets of the Flame.
  3. Fly to the Ascendant’s Circle. In the camp, gather the Ascendant’s Codex, Tome of Flame, and The Burning Litanies – all of them are on tables or inside tents. Kill 5 Twilight Subjugator and 4 Flame Ascendant. Make sure to pick up the quest The Twilight Egg from the Pure Twilight Egg.
    • Return to Jarod Shadowsong and turn in your quests. Get The Gatekeeper, Brood of Evil, and The Sanctum of the Prophets.
  4. Kill a Young Twilight Drake for a Young Twilight Drake Skull.
  5. Use the Horn of Cenarius on Azralon the Gatekeeper, then kill him. Also kill 4 Twilight Augur, 4 Twilight Retainer, and 1 Emissary of Flame.
    • Return to Jarod Shadowsong.
  1. At Jarod Shadowsong, turn in your quests. Get The Firelord, Magma Monarch, and Death to the Broodmother
  2. Use the Twilight Drake Skull to summon Desperiona. Kill her.
  3. Use the Drums of the Turtle God to summon Tortolla aagainst King Moltron. Kill him.
  4. Enter and talk to Cenarius to begin the battle against Ragnaros. If you do physical damage, make sure to help Runetotem on the left side – if magical, help out Malfurion on the right side. Exit the portal and turn in your quests. Get The Battle is Won, The War Goes On.
    • Return to Orgrimmar.

Cataclysm Classic: 1-12 Alliance Worgen Leveling Guide (Gilneas)

  1. First, get Lockdown! from Prince Liam Greymane in front of you.
  2. Go to Lieutenant Walden. Turn in Lockdown! and get Something’s Amiss.
    • Return to Prince Liam Greymane. Turn in your quest and get All Hell Breaks Loose, Evacuate the Merchant Square, and Salvage the Supplies
    • Kill 6 Rampaging Worgen, Evacuate 4 Market Homes by opening doors, and open 4 Supply Crates. Then, return to Prince Liam Greymane and turn in your quests. Get Royal Orders.
  3. Go to Gwen Armstead and turn in your quest. Get your class quest.
    • Do your class quest, then turn in your quest and get Safety in Numbers.
  4. Go to King Genn Greymane and complete the quest. Get Old Divisions and While You’re At It.
  5. At Stoneward Prison, turn in your quest to Captain Broderick. Get The Prison Rooftop. As you kill 5 Bloodfang Worgen on your way upstairs, go to Lord Darius Crowley and turn in your quest. Get By the Skin of His Teeth. Hold off the worgen for 2 minutes, then complete the quest. Get Brothers in Arms.
    • Then, return to King Genn Greymane. Turn in your quests. Get The Rebel Lord’s Arsenal.
  6. Open the cellar door, go downstairs, and turn in your quest. Get From the Shadows.
  7. Use the ability “Attack Lurker” around any open space. Kill 6 Bloodfang Lurker.
    • Then, turn in your quest. Get Message to Greymane. Turn the quest in to King Genn Greymane and get Save Krennan Aranas.
    • Use “Rescue Krennan” when you’re at Krennan. Turn in your quest. Get Time to Regroup.
  1. At Lord Godfrey, turn in your quests. Get Time to Regroup.
  2. Go to King Genn Greymane. Turn in your quest. Get Sacrifices. Throw Torches at 30 Worgen.
    • Complete your quest and get Blood and Ash. Blow up 80 Bloodfang Stalkers with a cannon.
    • Complete your quest and get Never Surrender, Sometimes Retreat.
  3. Inside the Light’s Dawn Cathdral, turn in your quest. Get Last Stand.
    • Kill 8 Frenzied Stalkers, then turn in your quest.
  1. After the cutscene, at Lord Godfrey, complete Last Chance at Humanity. Get Among Humans Again. Turn that in and get Need of Ingredients.
  2. Go to the Crate of Mandrake Essence and complete the quest. Get Invasion.
    • Return to Duskhaven. Turn in your quest. Get Kill or Be Killed.
  3. Go to Prince Liam Greymane and turn in your quest. Get Hold the Line and You Can’t Take ‘Em Alone.
    • Just south, kill 10 Forsaken Invader. Pick up 4 Black Gunpowder Keg and throw them at Horrid Abominations.
    • Turn in the quests to Prince Greymane and Holding Steady.
    • Return to Duskhaven. Turn in your quest. Get The Allens’ Storm Cellar.
  4. Head west Go to the Allen Farmstead. Turn in the quest. Get Unleash the Beast, Two By Sea, and Save the Children!
  5. Save James directly to the south, Ashley inside the house, and Cynthia a bit off to the east of the house.
  6. Kill a Forsaken Machinist to get control of a catapult and throw yourself onto one of the ships. Kill both Captain Anson and Captain Morris as well as 8 Forsaken.
    • Return to the Allen Farmstead and turn in your quests. Get Leader of the Pack.
  7. Use the Mastiff Whistle on Dark Ranger Thyala. Kill her.
    • Return to the Allen Farmstead. Turn in your quest. Get As the Land Shatters. Turn that in and get Gasping for Breath.
    • Off shore, grab Drowning Watchman and bring him to Prince Liam. Repeat 4 times. Turn the quest in and get Evacuation.
  1. Go to Duskhaven. Turn in the quest and get Grandma Wahl, The Hayward Brothers, and The Crowley Orchard.
  2. Go to Lorna Crowley south. Turn in your quest and get The Hungry Ettin.
  3. Mount one horse and use your horse’s ability to rally another four. Bring them to Lorna Crowley and turn in your quest.
  4. Go to Grandma Wahl. Turn in your quest and get Grandma’s Lost it Alright.
    • Pick up the book to the southeast and return it to her. Turn in your quest and get Grandma’s Good Clothes.
    • Pick up the clothes right otuside the house and return it to her. Turn in your quest and get Grandma’s Cat.
    • Pick up the cat to the east. Kill Lucius for Chance the Cat and return it to her.
  5. Go to Sebastian Hayward. Turn in The Hayward Brothers. Get Not Quite Shipshape and Washed Up.
    • Pick up the Coal Tar, Shipwright’s Tools, and Planks of Wood in the immediate area. Kill 6 Forsaken Castaways. Turn in the two quests and get Escape By Sea.
    • Hearth back to Duskhaven. Turn in Escape by Sea and get To Greymane Manor. Head up to the Manor. Turn in the quest and get The King’s Observatory. Go upstairs to find the King. Turn in the quest and get Alas, Gilneas! and after the cutscene get Exodus.
    • Exit the manor, head down the ramp, and board a stagecoach.
  1. After the ride finishes, turn in the quest to Prince Liam Greymane and get Stranded at the Marsh.
  2. Kill the crocodiles attacking the survivors and Save 5 Survivors.
    • Return to Prince Liam Greymane. Turn in the quest and get Introductions Are in Order.
  3. Head up the hill. Kill 4 Ogre Minions on the way and grab Koroth’s Banner.
    • Return to Liam Greymane. Turn in the quest and get Stormglen.
  4. Go to Stormglen Village.
  1. At Stormglen Village, turn in your quest. Get Pest Control and Pieces of the Past.
  2. Kill 6 Vilebrood Skitterer and gather 6 Pages.
    • Return to Stormglen. Turn in your quests and get Queen-Sized Troubles.
  3. Kill Rygna.
    • Return to Stormglen. Turn in your quest and get The Blackwald.
  4. Go to The Bradshaw Mill. Turn in your quest and get Losing Your Tail.
  5. Walk into the ice trap. Use Belrysa’s Talisman to break out and kill the Dark Scout.
    • Return to The Bradshaw Mill. Turn in your quest and get Tal’doren, the Wild Home.
  6. Go to Tal’doren.
  1. At Tal’doren, turn in your quest. Get At Our Doorstep and Preparations.
  2. Gather 6 Moonleaf and kill 6 Howling Banshee.
    • Return to Tal’doren and turn in your quests. Get Take Back What’s Ours.
  3. At the Wood’s End Cabin, use your Horn of Tal’doren before you engage the mobs. Grab the Mysterious Artifact and run.
    • Return to Tal’doren and turn in your quest. Get Neither Human Nor Beast. Drink from the three wells. Complete your quest and get Return to Stormglen.
  4. Go to Stormglen Village.
  1. At Stormglen Village, turn in your quest. Get Onwards and Upwards.
  2. Go to Krennan Aranas and turn in your quest. Get Betrayal at Tempest’s Reach.
  3. Use Krennan’s Potion of Stealth to stesalth to Baron Ashbury and kill him.
  4. Stealth to Lord Walden and kill him.
  5. Go to Tempest’s Reach. Turn in your quest. Get Flank the Forsaken. Talk to Lord Hewell and get a ride.
  1. At the Livery Outpost, turn in your quest. Get Last Meal, Liberation Day, and Slaves to No One.
  2. Kill Brown Stag for 10 Side of Stag Meat.
  3. Kill the Forsaken Slavedrivers for 5 Slaver’s Key and Free 5 Enslave Gilneans. Kill Brothogg the Slavemaster at the end of the cave.
    • Return to Livery Outpost and turn in your quests. Get Push Them Out.
  4. Kill 4 Forsaken Infantry, Executor Cornell, and Valnov the Mad.
    • Return to Livery Outpost and turn in your quest. Get The Battle for Gilneas City.
    • Talk to Krennan Aranas to start the charge to take over the city.
  5. Follow the crowd around Gilneas City. When victory is had, complete your quest. Get The Hunt for Sylvanas.
    • Follow Tobias Mistmantle to complete the quest.
    • Then, return and turn the quest in. Get Vengeance or Survival. Talk to King Greymane and turn in your quest. Get Slowing the Inevitable.
    • Mount the bat and use your bombs to Kill 40 Forsaken and 6 Catapults. Use Fly Back when done.
    • Turn in your quest and get Knee-Deep. Go downstairs and walk through the tunnel. Keep using the Half-Burnt Torch to keep the rats off you.
  1. At Aderic’s Repose, turn in Knee-Deep and get Laid to Rest.
  2. Get 5 Unearthed Memento from the area, then turn in the quest. Get Patriarch’s Blessing. Go to the middle of the graveyard and place the Blessed Offerings at Aderic’s Tomb.
  3. Go to Keel Harbor. Get They Have Allies, But So Do We.
  4. Get on a Glaive Thrower and drive to The Headlands. Kill 40 Raider, 8 Wolfmaw Outrider, and 4 Orcish War Machine.
    • Return to Keel Harbor and turn in your quest. Get Endgame.
    • Wait for Tobias to give the signal, then jump on a Hippogryph. Follow Lorna Crowley and destroy the Gunship. Complete your quest. Set Sail.
    • You’ll arrive at Rut’theran Village. Don’t bother getting any of the quests here.
    • At the south end of Rut’theran Village, at the end of the pier, wait for the ship to arrive. Board it and ride to Stormwind Harbor.
    • At the Trade District in Stormwind, get Hero’s Call: Westfall! Also, get the Flight Path.

Cataclysm Classic: 1-12 Horde Goblin Leveling Guide (The Lost Isles)

  1. Get Taking Care of Business from Sassy Hardwrench wrench in front of you.
    • Right outside, turn in the quest. Get Trouble in the Mines and Good Help is Hard to Find
  2. Head southeast and into the mine. Right click 8 Defiant Trolls to “Adjust their Attitude”, and Kill 8 Tunnel Worms.
    • Then, return to Foreman Dampwick. Turn in Trouble in the Mines and Good Help is Hard to Find and get the follow-up Kaja’Cola.
    • Return to Sassy Hardwrench and turn in your quest. Get Megs from Marketing.
    • Right outside, talk to Megs and turn in your quest. Get Rolling with my Homies. Use your Keys to the Hot Rod to get in your car.
  3. Pick up Izzy
  4. Pick up Goober
  5. Pick up Ace
    • Then, return to Megs.
  1. At the KTC Headquarters, turn in your quest. Get Report for Tryouts, Off to the Bank, and Do It Yourself.
  2. Go to Coach Crosscheck and turn in your quest. Get The Replacements. Over the next couple of quests, drive around and gather 8 Replacement Parts
  3. In the Drudgetown Area, Beat down Bruno Flameretardant, Sudsy Magee, Jack the Hammer, and Frankie Gearslipper.
  4. Go to FBoK Bank and turn in your quest. Get The New You.
  5. In the Swindle Street Area, buy Shiny Bling from Gappy Silvertooth, a Hip New Outfit from Szabo, and Cool Shades from Missa Spekkies.
    • Return to Coach Crosscheck to turn in your quest. Get Necessary Roughness. Footbomb 8 Steamwheedle Sharks. Complete your quest and get Fourth and Goal. Kick the ball through the smokestacks and complete your quest. Get Give Sassy the Good News.
    • Then, return to the KTC Headquarters. Turn in your quests. Get Life of the Party. Also, get and do your class quest.
  6. Head south and entertain your guests, each guest wants something unique. Click on them and look under their name to see which skill you should use on the guest.
    • Then, Turn in your quest and get Pirate Party Crashers
    • Kill 12 Pirate Party Crashers back at the party area
    • Turn in your quest and get An Uninvited Guest
    • Go upstairs and talk to Trade Prince Gallywix. Turn in your quest and get A Bazillion Macaroons?
  1. At KTC Headquartes, turn in your quest. speak to Sassy Hardwrench. Get the follow-up quests which appear: Liberating the Kaja’mite, Robbing Hoods, The Great Bank Heist, and Waltz Right In
  2. At Kaja’mine, use the Kablooey Bombs on the nodes and gather 12 Kaja’mite Chunk
  3. Ride southwest to the bank and click on the First Bank of Kezan Vault. Then, follow the directions and use whatever item the vault tells you to at the appropriate time.
  4. At Gallywix’s Villa, gather The Ultimate bomb, The Goblin Lisa, and Maldy’s Falcon from the buildings in the area.
    • Then, hearth to KTC Headquarters and turn in all your quests. Get the follow-up “447”
    • Overload the Defective Generator, Activate the Leaky Stove, Drop a Cigar on the Flammable Bed (upstairs), then activate the Gasbot Control Panel outside
    • Turn in “447” and get the follow-up Life Savings
    • You’ll be driven to Trade Prince Gallywix and turn in Life Savings
  1. You’ll wake up on a raft. Get and turn in Don’t Go Into the Light! Get the follow-up Goblin Escape Pods.
    • Rescue 6 Goblin Survivors in the area.
  2. Head onto shore to Sassy Hardwrench. Turn in your quest. Get the follow-ups Get Our Stuff Back!, It’s Our Problem Now, and Monkey Business
  3. Gather 8 Crate of Tools, Kill 6 Teraptor Hatchling, and Throw 10 Nitro-Potassium Bananas at the monkeys.
    • Return and turn in those quests and get the follow-up Help Wanted
  4. Head east to Foreman Dampwick and turn in your quest. Get Capturing the Unknown and Miner Troubles. Escort the Frightened Miner into the Cavern. Use your KTC Snapflash to take pictures of the various cave paintings – keep a lookout as you’re doing the escort at all the walls for paintings. At the end of the escort, capture the last picture of the Pygmy Altar and get the quest from the Dead Orc Scout – Orcs Can Write?
    • Hop off the edge and exit the cave. Turn in your quest.
    • Return to Sassy Hardwrench and turn in your quests. Get the follow-up The Enemy of My Enemy.
  5. Head east to the Horde Base Camp.
  1. At the Horde Base Camp, turn in your quest. Get the follow-up The Vicious Vale.
  2. Go to Kilag Gorefang and turn in your quest. Get Weed Whacker.
    • Activate the Weed Whacker and go whack 100 Plants. Then return and turn in your quest. Get Back to Aggra.
    • Return to Aggra and turn in your quest. Get Forward Movement.
  3. Go to Kilag Gorefang’s new location. Turn in your quest and get Infrared = Infradead.
  4. Put on your Infrared Heat Focals. Head west and kill 10 SI: 7 Assassins.
    • Return to Kilag Gorefang and turn in your quest. Get the follow-up To the Cliffs.
  5. You will get a ride to Scout Brax. Turn in your quest and get Get to the Gyrochoppa!
  6. Clear your way to the Gyrochoppa, collecting a set of Gyrochoppa Keys in the meantime. Turn in your quest and get Precious Cargo.
    • Fight your way to the bottom of the ship, turn in your quest and get Meet Me Up Top. Turn in the quest and get the follow-up Warchief’s Revenge. Use your Lightning Strike to kill 50 Alliance Sailor kills. You’ll then get transported. Turn in Warchief’s Revenge and get the follow-up Farewell for Now.
    • Use the rocket to sling over to the other island.
  1. At the Town-In-The-Box Site, turn in your quest and get the follow-up It’s a Town-In-A-Box.
    • Head onto the pile of explosives and push the plunger to complete the quest. Turn it in and get the follow-up Hobart Needs You! Turn that quest in and get the follow-up Cluster Cluck.
    • Gather 10 Cluckers and return to turn in the quest. Get the follow-up Trading Up
  2. Head east and use the Wild Clucker Eggs on 5 traps to gather 5 Spiny Raptor Eggs.
    • Return to Town-In-A-Box and turn in Trading Up. Get the follow-up The Biggest Egg Ever.
  3. Head north and kill Mechachicken. Grab The Biggest Egg Ever.
    • Return to Town-In-A-Box and turn in The Biggest Egg Ever. Get the follow-up Who’s Top of the Food Chain Now?
  4. Head west and kill Ravenous Lurkers for 5 Shark Parts.
    • Then, return to Town-In-A-Box and turn in the quest. Get the follow-up A Goblin in Shark’s Clothing.
    • Use the shark control to take control of the mecha-shark. Spam the first two abilities as well as the third repair ability on cooldown to take down The Hammer.
    • Return to Town-In-A-Box.
  1. At Town-In-A-Box, turn in the quest. Get Invasion Imminent!
  2. Head southeast to Megs Dreadshredder and turn in your quest and get Bilgewater Cartel Represent and Naga Hide.
  3. Head south and kill nagas for 5 Intact Naga Hide and Replace 10 Banners
    • Return to Megs Dreadshredder and turn in the two quests. Get Irresistible Pool Pony.
  4. Head southeast to the Vashj’elan Spawning Pool and inflate the pool pony. Talk to the Naga Hatchlings and lure 12.
    • Return to Megs Dreadshredder, turn in the quest, and get the Surrender or Else!
  5. Follow Ace and kill the Faceless of the Deep.
    • Return to Megs Dreadshredder, turn in the quest, and get Get Back to Town.
    • Return to Town-In-A-Box and turn in the quest. Get Town-In-A-Box: Under Attack. Enter a B.C. Eliminator and use the cannon attack to kill 30 Oomlot Warriors.
    • Then, turn in the quest and get Oomlot Village.
  6. Head southeast to Izzy and turn in Oomlot Village. Get Free the Captives and Send a Message.
  7. Head northeast up the cliff path and cross the rope bridge and kill Yngwie. Free Goblin Captives along the way. Then, return to Izzy and turn in the two quests. Get Oomlot Dealt With.
    • Return to Town-In-A-Box.
  1. At Town-In-A-Box, turn in that quest. Get Up the Volcano.
  2. Head northeast to Coach Crosscheck. Turn in the quest and get the follow-ups Zombies vs Super Booster Rocket Boots, Rockin’ Powder, and Three Little Pygmies. Put on the Super Booster Rocket Boots. Over the next three steps, run over 50 zombies and gather 5 Rockin’ Powder.
  3. Kill Malmo.
  4. Kill Gaahl.
  5. Kill Teloch.
    • Return to Coach Crosscheck and turn in the quests. Get Rocket Boot Boost.
  6. Use the Rockin’ Powder Infused Rocket Boots to fly to Hobart Grapplehammer. Turn in your quest and get Children of a Turtle God.
    • Kill Child of Volcanoth for 5 Fire Gland, then turn in the quest. Get Volcanoth!
  7. Head into the cave to the southeast and repeatedly use the Bootzooka at Volcanoth. Make sure to get out of the way of the flame breath. When it is killed, head deeper into the cave to Sassy Hardwrench and turn in Volcanoth! and get Old Friends.
  1. Fly out of the volcano to the Warchief’s Lookout and turn in Old Friends. Get Repel the Paratroopers, The Heads of the SI: 7, Mine Disposal, the Goblin Way. Over the next three steps, kill 10 Alliance Paratrooper. Use the Satchel of Grenades to blow up 10 Land Mines .
  2. Kill Commander Arrington and loot his head.
  3. Kill Alexi Silenthowl and loot his head.
  4. Kill Darkblade Cyn and loot her head.
    • Return to Warchief’s Lookout and turn in the 3 quests and get The Pride of Kezan. Talk to Sassy to mount the plane.
  5. Shoot down 10 Gnomeregan Stealth Fighters. Use Ability 2 – Wild Weasel Rockets, then chase them down with Ability 1 – Machine Gun. Kill 10 Stealth Fighters. Turn in the quest and get the The Warchief Wants You. Turn that in and get Borrow Bastia.
  6. Go to Kilag Gorefang and turn in your quest and get Let’s Ride.
  1. You’ll end up at the Gallywix Labor Mine.
  2. Head into the mine.
    • At the southwest end and talk to Assistant Greely. Turn in The Gallywix Labor Mine and get Kaja’Cola Gives you Ideas! Head a bit east and grab a Kaja’Cola Zero-One then return and turn in the quest. Get all the new quests.
    • Kill Blastshadow the Brutemaster and smash his soulstone on his corpse, Kill 6 Brute Overseer, and collect enough Kaja’Cola Zero One and free 6 Kezan Citizen, Goober, Ace, and Izz. Then, turn the quests in and get Light at the End of the Tunnel.
  3. Head out the tunnel, turn the quest in at the mine cart, and get Wild Mine Cart Ride.
  4. At Coach Crosscheck, turn in your quest. Get Shredder Shutdown and The Ultimate Footbomb Uniform.
  5. Head south and kill 8 Steamwheedle Shark and collect 8 Spare Shredder Parts.
    • Return to Coach Crosscheck and turn in the quests. Get Oil Change, Release the Valves, and What Kind of Name is Chip, Anyway OR The Fastest Way to His Heart (depending on your gender)
  6. Go to the KTC Oil Platform.
    • Below the platform in the water release Valve #4 on the north side and Valve #3 on the west side.
    • On the platform, Kill Chip. Gather 6 Kajaro 0W Grade Oil, and release Valve #1 and #2.
    • Then, go on the platform and turn in your quest and get Good-bye, Sweet Oil. Push the big red button.and activate the Platform Control Panel.
    • Return to Bilgewater Lumber Yard and turn in your quests. Get The Slave Pits, and you’ll ride to Sassy Hardwrench.
  1. At Sassy Hardwrench, turn in your quest and get She Loves Me, She Loves Me Not / What Kind of Name is Candy, Anyways (depending on your gender), Southsea Scum, and Escape Velocity.
  2. Kill Candy Cane, Launch 8 Cages, and Kill 6 Southsea Mercenary
    • Return to Sassy and turn in your quests. Get Final Confrontation
  3. Go up to the platform and kill Trade Prince Gallywix. Give Thrall a minute to grab aggro, then use your all your abilities to attack and finally bring him down. Return and turn in the quest and get the Victory! Turn in that quest and get Warchief’s Emissary. Board the ship, talk to Sassy Hardwrench to leave to Orgrimmar.
    • Turn in your quest and get Message for Garrosh. You’ll ride to Garrosh. Turn in your quest to Garrosh and get Report to the Labor Captain.