Shadowmoon Village
01) As you enter Shadowmoon Valley you will run into the Horde town Shadowmoon Village just north. At the entrance to the town accept “Besieged!” 30.32.
02) Just inside the town accept (from the Wanted Poster) “Wanted: Uvuros, Scourge of Shadowmoon” 30.31.
03) Just to the NE at the large catapult accept “The Sketh’lon Wreckage” 31.30.
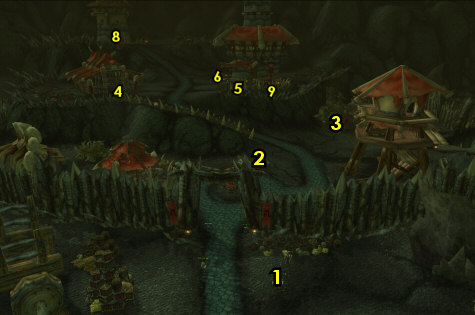
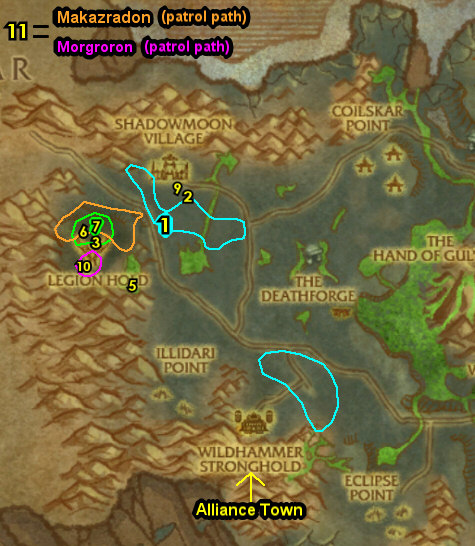
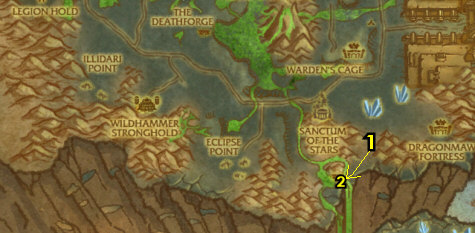
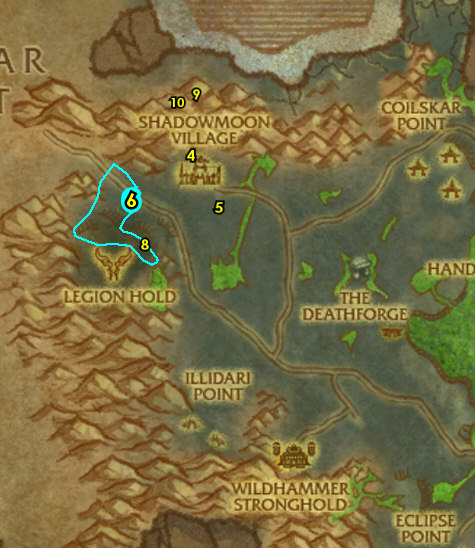
04) Go up in town and at the flying mount stables turn in “The Apprentice’s Request” (29.29, #1 on map).
FLYING MOUNTS: You should be fairly close to level 70 now, and may hit it at any point in this guide (if you haven’t already). When you hit 70, you can buy flying mounts from this NPC which will allow you to do some of the quests listed in this guide throughout Shadowmoon Valley and many others throughout Outland. When you turn 70 you should get your flying mount ASAP.
05) Near you at the bottom of the watch tower/Inn (by the mailbox) accept “What Strange Creatures…” 30.28 .
06) Next to you accept “A Haunted History” 30.28.
07) Go inside the Inn next to you and talk to the Innkeeper 30.28 to make Shadowmoon Village your new home.
08) NW in town, in the hut, accept “The Hand of Gul’dan“, “A Grunt’s Work…” and “The Path of Conquest” 28.26.
09) Get the Flight Path in the middle of the town from the Wind Rider Master /target 30.29.
01) Just south of Shadowmoon Village around 31.35 do “Besieged!“: kill 10 Infernal Attackers.
02) At the southern entrance to Shadowmoon Village turn in “Besieged!” 30.32, accept “To Legion Hold“.
03) Go SW to Legion Hold, up on a ledge to the exact coords of 23.6 36.9 do “To Legion Hold“: use the Box o’ Tricks quest item at the small purple infernal image.
04) Back at the southern entrance to Shadowmoon Village turn in “To Legion Hold” (30.32, #2 on map), accept “Setting Up the Bomb“.
05) Go SW up to The Fetid Pool and do “Setting Up the Bomb“: pick up the Fel Reaver Power Core underneath the green water 26.41.
06) NW at Legion Hold loot the Fel Reaver Armor Plating 22.36.
07) While at Legion Hold kill/loot an Overseer Ripsaw /target and an item will drop which starts “Illidari-Bane Shard“, accept it.
08) Back at the southern entrance to Shadowmoon Village turn in “Setting Up the Bomb” (30.32, #2 on map), accept “Blast the Infernals!“.
09) Just inside Shadowmoon Village (at the forge) turn in “Illidari-Bane Shard” 30.31, “Capture the Weapons“.
10) Go SW to Legion Hold and do “Blast the Infernals!“: use the Fel Bomb quest item on the green circle 23.40.
11) GROUP: 2+ Players (or soloable): Around Legion Hold do “Capture the Weapons“: kill/loot the two Elite mobs at Legion Hold. Morgroron /target patrols around the immediate area there (near the green circle), he is a huge dragon with a green sword. And Makazradon /target patrols just north around 23.34, he is a huge dragon with a spear.
NOTE: If you cannot solo these or find help, then it can be skipped.]
12) Back at the southern entrance to Shadowmoon Village turn in “Blast the Infernals!” (30.32, #2 on map), accept “The Deathforge“.
13) Just inside Shadowmoon Village (at the forge, 30.31, #9 on map) turn in (if you did it) “Capture the Weapons“.
NOTE: The follow up quest “The Hermit Smith” will not be covered in my guide as it requires a lot of running around at various places. The final quest in this chain leads to some decent demon fighting weapons to obtain if you would like to do this on your own.
01) Just east above the main path at Sketh’lon Wreckage around 36.32 do “The Sketh’lon Wreckage“: keep kill/looting the Dark Conclave arakkoa mobs until you get the 3 pages (they can drop randomly from any arakkoa mob).
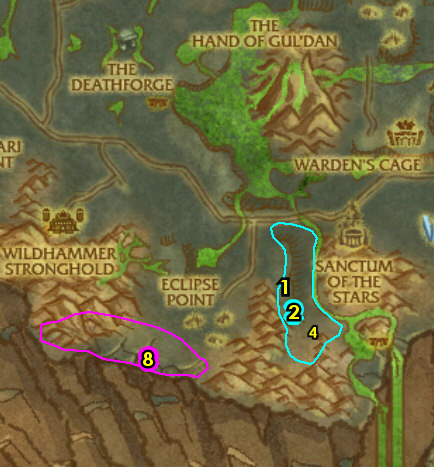
02) Do the following 3 quests together around western Shadowmoon Valley, mostly around the green lake 31.39:
03) “A Grunt’s Work…“: kill 20 wildlife. Focus mostly on the Felboar and Vilewing Chimaera 34.40.
04) “What Strange Creatures…“: kill/loot Felfire Diemetradons (mobs around the green water, around 31.39.
05) “A Haunted History“: pick up 15 Ever-burning Ash from the ground. There is a lot around the green lake 31.39. These are mostly around #4 on map.
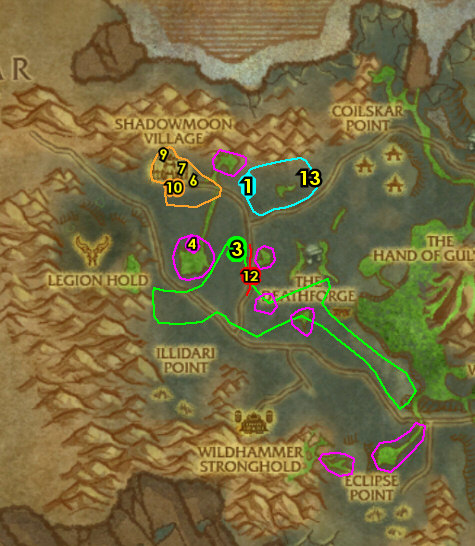
06) Back at Shadowmoon Village, in front of the big catapult, turn in “The Sketh’lon Wreckage” 31.30, accept “Find the Deserter“.
07) Up by the mailbox/Inn turn in “What Strange Creatures…” 30.28, accept “Frankly, It Makes No Sense…“.
08) Next to you turn in “A Haunted History” 30.28, accept “Spectrecles“.
09) NW at the hut turn in “A Grunt’s Work…” 28.26.
10) In the immediate area around Shadowmoon Village do “Spectrecles“: use the Spectrecles quest item (it acts as a Head armor), then kill 12 Shadowmoon Zealots /target.
TIP: You can spot them easily by the yellow mist coming off of them.
11) In front of the Inn’ entrance turn in “Spectrecles” 30.28, accept “Teron Gorefiend – Lore and Legend“.
12) Go SE to the main path and find Parshah /target (he patrols north and south on the path, around 35.39 then turn in “Find the Deserter“, accept “Asghar’s Totem“.
13) Go NE to Sketh’lon Wreckage and do “Asghar’s Totem“: kill/loot Asghar /target. This arakkoa patrols around the area around 40.29.
14) Back SW on the main path, find Parshah /target (around 35.39, #12 on map) and turn in “Asghar’s Totem“, accept “The Rod of Lianthe“.
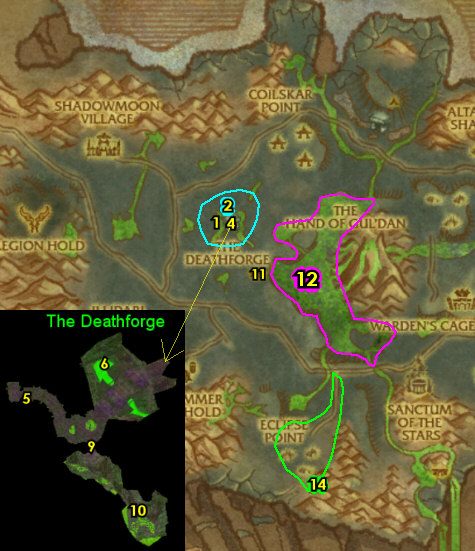
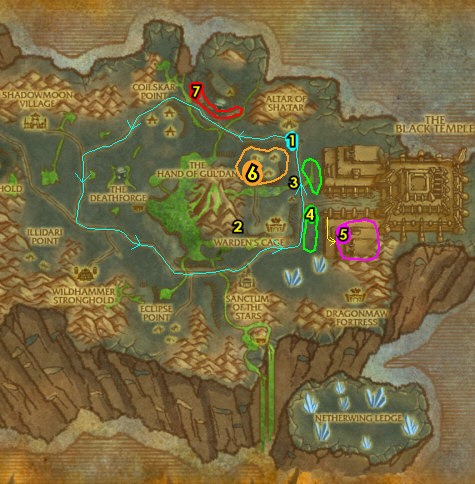
01) Go east to Slag Watch and turn in “The Deathforge” (at the top of the building 39.38), accept “Minions of the Shadow Council“.
02) In the immediate area around The Deathforge do “Minions of the Shadow Council“: kill 10 DeathforgeGuardians and 5 Summoners.
03) Back on top of the building at Slag Watch turn in “Minions of the Shadow Council” (39.38, #1 on map). Accept “The Fate of Kagrosh” and “The Summoning Chamber“.
04) Go down the path and enter The Deathforge (entrance at 40.38).
05) Do “The Fate of Kagrosh“: grind your way deep into The Deathforge and talk to Kagrosh’s /target corpse on the ground 35.40.
06) Do “The Summoning Chamber“: first you need to obtain an Elemental Displacer, which you should have already done so by now from the Deathforge mobs in The Deathforge, it should be in your backpack. Use the Elemental Displacer item down at the Summoning Ritual (the green water down in The Deathforge, 38.39, then kill the Infernal Oversoul that spawns.
07) Leave The Deathforge then turn in (on top of the building, 39.38, #1 on map) “The Fate of Kagrosh” and “The Summoning Chamber“. Accept “Bring Down the Warbringer!“.
08) Go down back inside The Deathforge (entrance at 40.38, #4 on map).
09) Inside The Deathforge click on the Heavy Iron Portcullis (gate, 37.43) to open it, then..
10) At the end of the room do “Bring Down the Warbringer!“: kill/loot Warbringer Razuun /target 39.46.
11) Leave The Deathforge, then go SE to The Altar of Damnation and turn in “The Hand of Gul’dan” 42.45, accept “Enraged Spirits of Fire and Earth“.
12) Just to the east at The Fel Pits around 45.45 do “Enraged Spirits of Fire and Earth“: use the Totem of Spirits quest item near 8 Enraged Earth Spirits and 8 Enraged Fire Spirit, then kill these mobs to collect their spirits.
13) Back west at The Altar of Damnation turn in “Enraged Spirits of Fire and Earth” (42.45, #11 on map), accept “Enraged Spirits of Water“.
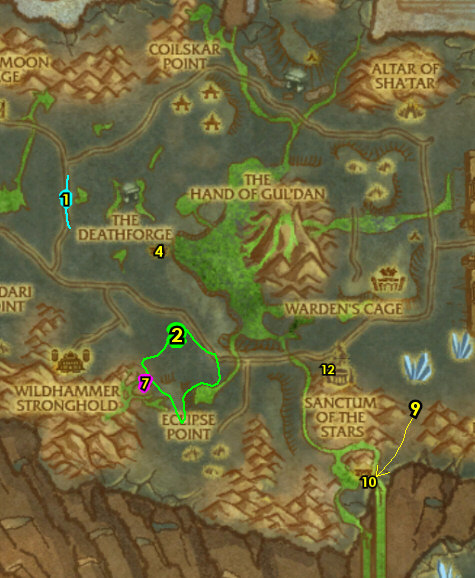
14) Go SE to Eclipse Point and do “The Rod of Lianthe“: kill/loot the Eclipsion blood elf mobs until the Lianthe’s Key drops, then open Lianthe’s Strongbox 48.72.
SCRYER ONLY – Sanctum of the Stars
01) NOTE: If you are not focusing on Scryers then skip to the next section below! The Aldor town (Altar of Shatar) is NE 62.30, which is not covered in this guide yet, but they have a lot of the same quests, which you can use the Scryer Only stuff as a reference for them as well.
02) Get the Flight Path at the Flight Master /target 56.58.
03) Just outside of the Inn’s entrance you can turn in any Sunfury Signets you may have 56.59.
04) In the Inn accept “Tablets of Baa’ri” 56.60.
05) Inside the other building accept “Karabor Training Grounds” 56.58.
06) Just west up on the hill accept “The Ashtongue Broken” 55.58.

LVL 70 ONLY – Netherdrake
01) NOTE: This section requires that you are level 70 and step #5 requires you to have a flying mount. If you do not meet these requirements then skip to the next section below. Doing these quests will help you become Neutral with Netherdrake allowing you to get the Netherdrake Epic Flying Mount. You can always do this section later if you like.
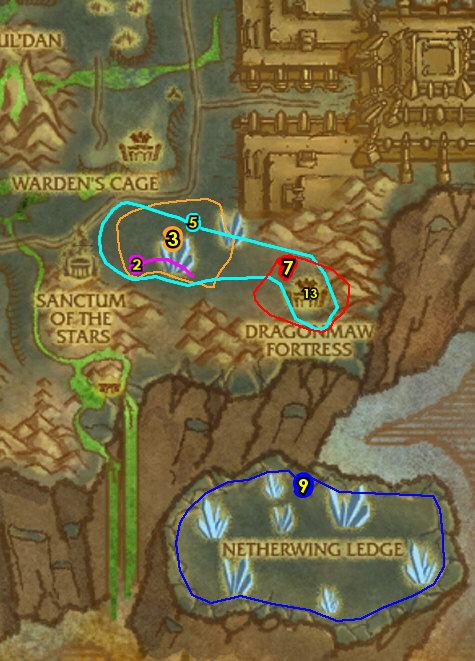
02) East at Netherwing Fields accept from Mordenai /target (he patrols around 63.60) “Kindness“.
03) In the immediate area around Netherwing Fields do “Kindness“: kill/loot Rocknail Flayers for their carcasses, then use the carcasses near the Mature Netherwing Drakes (flying in the air).
04) At Netherwing Fields find Mordenai /target (he patrols around 63.60, #2 on map) and turn in “Kindness“, accept “Seek Out Neltharaku“.
05) At Netherwing Fields find Neltharaku /target flying up in the air (see his patrol path on map) and turn in (you need a flying mount) “Seek Out Neltharaku“, accept “Neltharaku’s Tale“.
06) Do “Neltharaku’s Tale“: simply talk to Neltharaku. Once done turn it in and accept “Infiltrating Dragonmaw Fortress“.
07) Go SE to Dragonmaw Fortress around 67.61 and do “Infiltrating Dragonmaw Fortress“: kill 15 Dragonmaw orcs (any type).
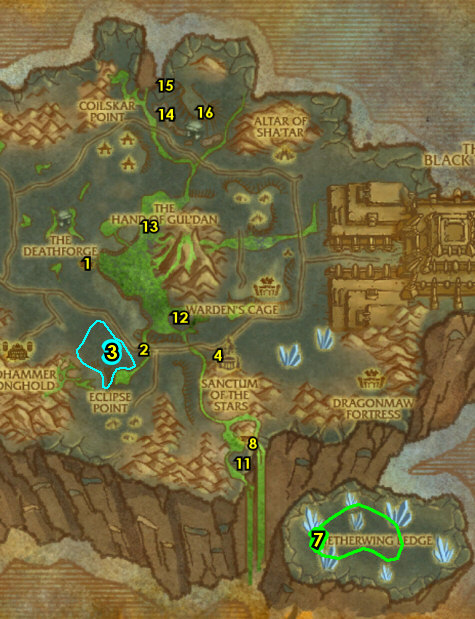
08) At Netherwing Fields find Neltharaku /target flying up in the air (see his patrol path on map, #5 on map) and turn in “Infiltrating Dragonmaw Fortress“, accept “To Netherwing Ledge!“.
09) Go SE to Netherwing Ledge around 70.81 and do “To Netherwing Ledge!“: loot Nethervine Crystals. These are mostly found around the outer edges of the island.
10) Back at Netherwing Fields find Neltharaku /target flying up in the air (#5 on map) and turn in “To Netherwing Ledge!“, accept “The Force of Neltharaku“.
11) Go SE to Dragonmaw Fortress (around 67.61, #7 on map) and do “The Force of Neltharaku“: use the Enchanted Nethervine Crystal quest item on the Enslaved Netherwing Drakes /target.
NOTE: The quest item has a fairly long range of about 35 yards.
12) Back at Netherwing Fields find Neltharaku /target flying up in the air (#5 on map) and turn in “The Force of Neltharaku“, accept “Karynaku“.
13) GROUP: 3+ Players: If you can find a group you can go up into Dragonmaw Fortress and from Karynaku turn in “Karynaku” 70.61. Accept “Zuluhed the Whacked“.
14) GROUP: 3+ Players: In the immediate area do “Zuluhed the Whacked“: kill/loot Zuluhed the Whacked (lvl 72 Elite, 70.62). He drops a key that is used on Karynaku’sZuluhed’s Chains, then turn in “Zuluhed the Whacked“, accept “Ally of the Netherwing“.
15) Talk to Karynaku to send you to Mordenai /target (he patrols around 63.60, #2 on map) and turn in “Ally of the Netherwing“.
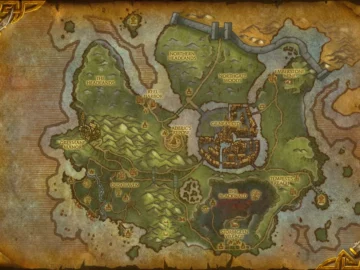
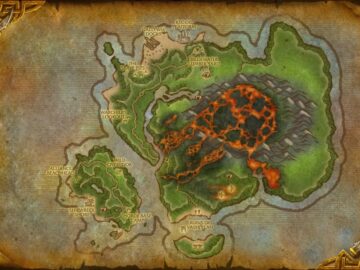
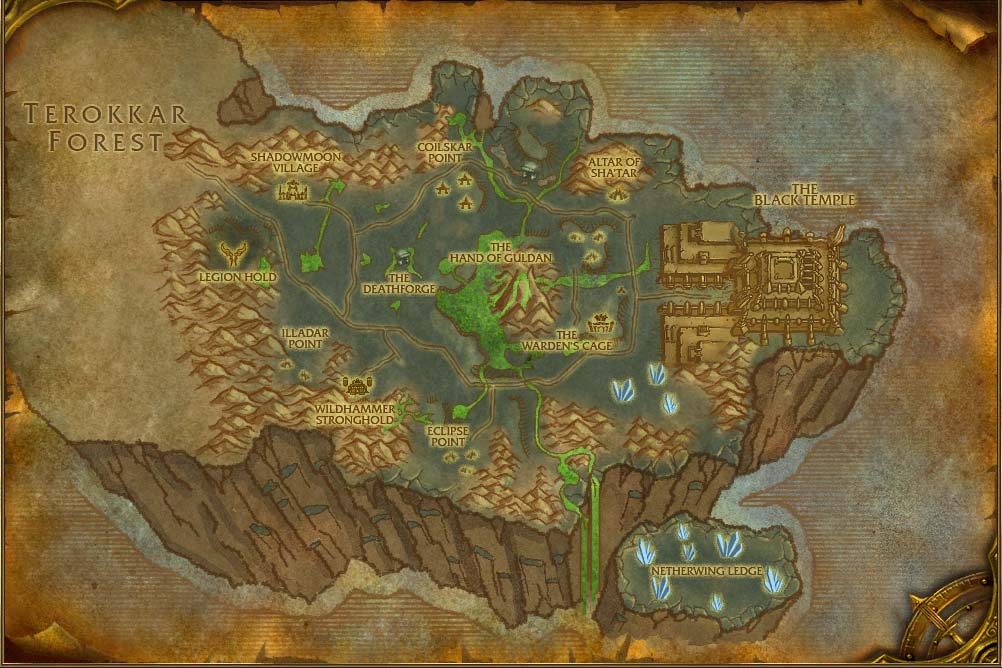
Shadowmoon Valley
01) If you do not have a flying mount then go to Netherwing Pass (entrance at 62.63.
02) Go to The Altar of Shadows 58.71 and turn in “Teron Gorefiend – Lore and Legend“. Accept “Divination: Gorefiend’s Cloak“, “Divination: Gorefiend’s Truncheon” and “Divination: Gorefiend’s Armor“.
The Path of Conquest (Group)
01) GROUP: 2+ Players (or soloable): SW at The Path of Conquest do “The Path of Conquest“: simply go to the coords of 52.64 to get it discovered, then use the Kor’kron Flare Gun quest item at a safe spot (anywhere in Shadowmoon Valley) to turn this in and accept “Breaching the Path“.
02) GROUP: 2+ Players (or soloable): At The Path of Conquest around 52.64 do “Breaching the Path“: kill the required amount of Eclipsion blood elf mobs. This is soloable but could take awhile.
03) At a safe spot anywhere in Shadowmoon Valley use your Kor’kron Flare Gun quest item to turn in “Breaching the Path“, accept “When Worlds Collide“.
04) GROUP: 2+ Players: Back deeper in The Path of Conquest do “When Worlds Collide“: kill Corok the Mighty /target (lvl 70 Elite teal colored rock giant) and Chancellor Bloodleaf /target (lvl 70 Elite female blood elf). Both these mobs patrols around the red wagon 53.70.
05) At a safe spot anywhere in Shadowmoon Valley use your Kor’kron Flare Gun quest item to turn in “When Worlds Collide“, accept “Tabards of the Illidari“.
06) GROUP: 2+ Players: At The Path of Conquest do “Tabards of the Illidari“: kill/loot any of the blood elf mobs (#2 on map).
07) At a safe spot anywhere in Shadowmoon Valley use Kor’kron Flare Gun quest item to turn in “Tabards of the Illidari“, accept “Dissension Amongst the Ranks…“.
08) GROUP: 2+ Players: Go SW to Eclipsion Fields around 43.72 and do “Dissension Amongst the Ranks…“: use Enchanted Illidari Tabard quest item (it acts as a Tabard) and then kill 5 Crazed Colossus.
Shadowmoon Valley
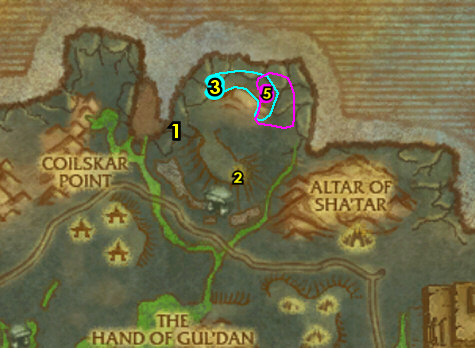
01) Do “Divination: Gorefiend’s Truncheon“: kill/loot the 4 Ghostrider of Karabors /target, they circle around the main path in Shadowmoon Valley counter-clockwise (see map), so to find them just go to the main path, and keep following the main path clockwise around until you get to them (they are 4 non-elite mobs on horses). And you need to wear the Spectrecles to see them! They spawn at 62.32.
02) GROUP: 2+ Players: If you can find one or two other players, you can do “Wanted: Uvuros, Scourge of Shadowmoon“: kill/loot Uvuros (elite, 55.49).
NOTE: He is nearly impossible to solo. If you can’t find a group, then skip it.
03) Go to Ruins of Baa’ri and do “Frankly, It Makes No Sense…“: use the Arcano Control Unit 62.40 to control an Arcano-Scorp, then use it to Tag the Greater Felfire Diemetradons in the green water.
NOTE: Once they’re all tagged, you can leave the scorp by right-clicking the buff at the top of the screen.
04) Go east a bit and do “Divination: Gorefiend’s Cloak“: kill/loot the Cleric of Karabors /target around 64.40 until one of them drops the cloak. You need to wear the Spectrecles to see them. Low drop rate.
05) SCRYER ONLY: Go just east to Ruins of Karabor (entrance at 67.47) and do “Karabor Training Grounds“: kill/loot Demon Hunter Supplicants or Demon Hunter Initiates.
NOTE: The Initiates have a much higher % drop rate.
06) SCRYER ONLY: Go NW to Ruins of Baa’ri around 59.37 and do “Tablets of Baa’ri” along with “The Ashtongue Broken“: kill/loot Ashtongue Workers or loot the green objects from the ground for the 12 fragments. And kill the required amount of Ashtongue mobs.
07) Go NW and do “Enraged Spirits of Water“: use the Totem of Spirits quest item near Enraged Water Spirits around 50.25, then kill them to collect their spirit.
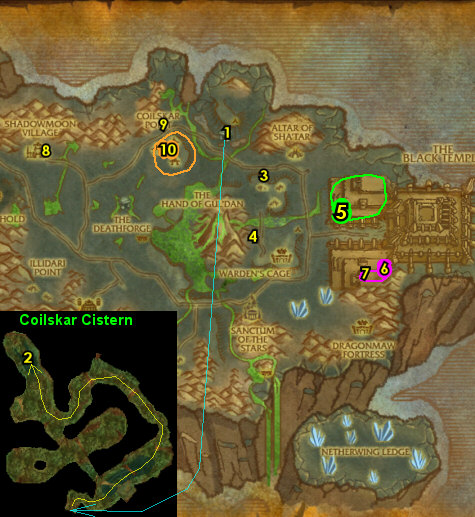
01) Go SW to the main path and find Parshah /target (he patrols north and south on the path, around 35.39) then turn in “The Rod of Lianthe“, accept “Sketh’lon Feathers“.
02) Go SE to Sketh’lon Base Camp around 43.55 and do “Sketh’lon Feathers“: pick up 8 Sketh’lon Feathers from the ground.
03) Back NW at the main path, find Parshah /target (around 35.39, #1 on map) and turn in “Sketh’lon Feathers“, accept “Imbuing the Headpiece“.
04) East at The Altar of Damnation turn in “Enraged Spirits of Water” 42.45, accept “Enraged Spirits of Air“.
05) Do “Imbuing the Headpiece“: wear the Unfinished Headpiece quest item (acts as a Trinket), then use it at the Altar 43.45.
06) Back west at the main path, find Parshah /target (around 35.39, #1 on map) and turn in “Imbuing the Headpiece“, accept “Thwart the Dark Conclave“.
07) Go SE to Sketh’lon Base Camp around 41.60 and do “Thwart the Dark Conclave“: kill all the Dark Conclave Ritualists (the ones with the purple beams on the thing in the green water), then use the Staff of Parshah quest item close to the water.
08) Back west at the main path, find Parshah /target (around 35.39, #1 on map) and turn in “Thwart the Dark Conclave“.
09) NO FLYING MOUNT?: If you do not have a flying mount, go to Netherwing Pass (entrance at 62.63).
10) At The Altar of Shadows 58.71 turn in “Divination: Gorefiend’s Cloak” and “Divination: Gorefiend’s Truncheon“.
11) In the immediate area do “Enraged Spirits of Air“: use the Totem of Spirits quest item near Enraged Air Spirits, then kill them to collect their spirit. You can find more of these mobs throughout Netherwing Pass.
12) SCRYER ONLY: Go to Sanctum of the Stars and up on a hill turn in “The Ashtongue Broken” 55.58, accept “The Great Retribution“.
13) SCRYER ONLY: Down in the building turn in “Karabor Training Grounds” 56.58, accept “A Necessary Distraction“.
14) SCRYER ONLY: In the other building/Inn turn in “Tablets of Baa’ri” 56.60, accept “Oronu the Elder“.
15) Go NW to The Altar of Damnation and turn in “Enraged Spirits of Air” (42.45, #4 on map). Accept “Oronok Torn-heart“.
01) Hearth to Shadowmoon Village.
02) Go to the top of the Inn and turn in (if you did it) “Wanted: Uvuros, Scourge of Shadowmoon” 30.28.
03) Just outside of the Inn, by the Mailbox, turn in “Frankly, It Makes No Sense…” 30.28, accept “Felspine the Greater“.
04) NW at the hut, turn in (if you did it) “Dissension Amongst the Ranks…” 28.26.
05) At the southern entrance of Shadowmoon Village turn in “Bring Down the Warbringer!” 30.32, accept “Gaining Access“.
06) Go SW to Legion Hold around 24.32 and do “Gaining Access“: kill/loot the Mo’arg Weaponsmiths /target until you obtain the Legion Teleporter Control.
NOTE: There are a few of them in the area.
07) Back at the southern entrance of Shadowmoon Village turn in “Gaining Access” (30.32, #5 on map), accept “Invasion Point: Cataclysm“.
08) SW at Legion Hold, enter the green teleporter at 26.36. Once teleported turn in “Invasion Point: Cataclysm“, accept “The Art of Fel Reaver Maintenance“.
09) Go down and do “The Art of Fel Reaver Maintenance“: kill/loot Doctor Maleficus /target 29.20, then use his key to open/loot the strongbox right next to him.
10) Back up the ramp turn in “The Art of Fel Reaver Maintenance” 27.21, accept “The Fel and the Furious“.
11) Go half-way down and do “The Fel and the Furious“: use the Fel Reaver Control Console 28.20 to control a Fel Reaver, and use it to kill 60 Deathforged Infernals.
NOTE: If you have a pet, you need to dismiss it first.
12) Go back up the ramp and turn in “The Fel and the Furious” (27.21, #10 on map), accept “News of Victory“.
13) Go through the green portal next to you 27.22.
NOTE: If you have a flying mount skip this step and just fly to the next step.
14) At the hut NW in Shadowmoon Village turn in “News of Victory” (28.26, #4 on map).
Oronok’s Farm
01)No Flying Mount?: Go east to the ramp (starting at 50.19).
02) Go up into Oronok’s Farm and turn in “Oronok Torn-heart” 54.23, accept “I Was A Lot Of Things…“.
03) Just NE at Shattered Plains around 54.16 do “I Was A Lot Of Things…“: use the Oronok’s Boar Whistle near Shadowmoon Tuber Mounds so that a Domesticated Felboar makes it lootable, then loot it.
TIP: Kill the Ravenous Flayers in the area so they don’t kill the boars. And don’t attack the boars yourself.
04) Back SW at Oronok’s Farm turn in “I Was A Lot Of Things…” (54.23, #2 on map), accept “A Lesson Learned“.
05) Back NE at Shattered Plains around 57.16 do “A Lesson Learned“: click on 10 Ravenous Flayer Eggs.
NOTE: Watch out for the elite /target patrolling the area.
06) Back SW at Oronok’s Farm turn in “A Lesson Learned” (54.23, #2 on map), accept “The Cipher of Damnation – Truth and History “.
07) Do “The Cipher of Damnation – Truth and History “: simply talk to the quest giver. Once done turn in in. Then accept “Grom’tor, Son of Oronok“, “Ar’tor, Son of Oronok” and “Borak, Son of Oronok“.
Shadowmoon Valley
01) GROUP: 2+ Players (or soloable): Go into Coilskar Cistern (cave entrance at 53.25).
NOTE: I easily soloed this escort as a lvl 70 Hunter.
02) GROUP: 2+ Players (or soloable): Work your way deep into the cave then accept and do the escort “Escape from Coilskar Cistern” 52.18: escort Earthmender Wilda /target out of the cave.
03) Go SE to Ruins of Baa’ri and do “Oronu the Elder“: kill/loot Oronu the Elder /target (up at 57.33).
04) Go south a bit at Ruins of Baa’ri and do “Felspine the Greater“: kill/loot Felspine the Greater /target 56.44.
05) SCRYER ONLY: Go east to Ata’mal Terrace (entrance at 67.41) and do “The Great Retribution“: kill the required amount of Shadowmoon orc mobs.
06) SCRYER ONLY: Go south to Ruins of Karabor (entrance at 67.47) and do “A Necessary Distraction“: kill/loot Sunfury Warlocks for a Scroll of Demonic Unbanishing, then use it at the next step:
07) SCRYER ONLY: Use the scroll on Azaloth /target 70.51.
NOTE: You don’t have to kill him once freed, but he will attack anything including you so watch out.
08) Hearth (or go back) to Shadowmoon Village and just outside of the Inn, by the Mailbox, turn in “Felspine the Greater” 30.28.
09) Go east to Coilskar Point and turn in “Grom’tor, Son of Oronok” 44.24, accept “The Cipher of Damnation – Grom’tor’s Charge“.
10) In the immediate area around Coilskar Point do “The Cipher of Damnation – Grom’tor’s Charge“: kill/loot Coilskar naga for the Coilskar Chest Keys, then open the Coilskar Chests until you get the First Fragment of the Cipher of Damnation.
11) Back north turn in “The Cipher of Damnation – Grom’tor’s Charge” (44.24, #9 on map), accept “The Cipher of Damnation – The First Fragment Recovered “.
12) Stop at Shadowmoon Village (or hearth there if you can) and stock back up/repair if you need to (30.31, #8 on map).
Illidari Point
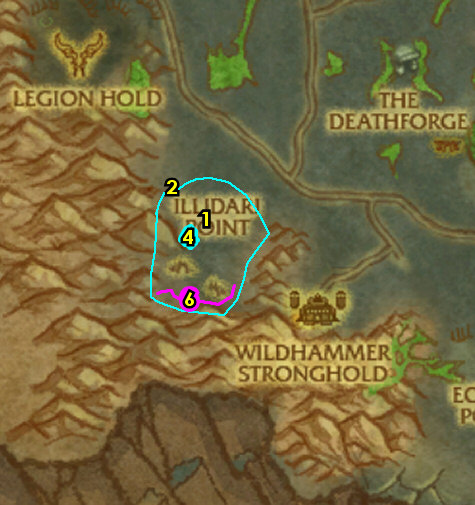
01) Go south to Illidari Point and at the purple circle turn in “Ar’tor, Son of Oronok” (30.50), accept “Demonic Crystal Prisons“.
02) Just NW in Illidari Point do “Demonic Crystal Prisons“: kill/loot Painmistress Gabrissa (big succubus demon, 28.48).
03) back SE at the purple circle turn in “Demonic Crystal Prisons” (30.50, #1 on map). Then next to you accept “Lohn’goron, Bow of the Torn-heart“.
04) In the immediate area around Illidari Point do “Lohn’goron, Bow of the Torn-heart“: kill/loot any of the demons until you get the Lohn’goron, Bow of the Torn-Heart.
05) Back at the purple circle turn in “Lohn’goron, Bow of the Torn-heart” (30.51, #1 on map), accept “The Cipher of Damnation – Ar’tor’s Charge“.
06) Do “The Cipher of Damnation – Ar’tor’s Charge“: lead the Spirit Hunter south into Illidari Point and then kill/loot Veneratus the Many /target around 29.57.
NOTE: This can be soloable by clearing the mobs along the path first before doing the quest and healing the Spirit Hunter while doing this.
07) Back north at the purple circle turn in (if you did it) “The Cipher of Damnation – Ar’tor’s Charge” (30.51, #1 on map), accept “The Cipher of Damnation – The Second Fragment Recovered “.
01) Go east to The Altar of Damnation and turn in (if you did it) “Escape from Coilskar Cistern” 42.45 .
02) Go SE next to the bridge turn in “Borak, Son of Oronok” 48.57, accept “Of Thistleheads and Eggs…“.
03) Just west at Sketh’lon Base Camp around 44.56 do “Of Thistleheads and Eggs…“: loot Rotten Arakkoa Eggs until you get an actual Rotten Arakkoa Egg.
04) SCRYER ONLY: Go east to Sanctum of the Stars and up on the hill turn in “The Great Retribution” 55.58.
05) SCRYER ONLY: Down in the building turn in “A Necessary Distraction” 56.58, accept “Altruis“.
06) SCRYER ONLY: In the other building/Inn turn in “Oronu the Elder” 56.60, “The Ashtongue Corruptors“.
07) GROUP 5 Players: I assume by now most players should be level 70 in this guide, if so you can get a 5 man group (when you can) to go SE to Netherwing Ledge. Your group will either need flying mounts or warlock summons to the island. Then do “Divination: Gorefiend’s Armor“: make sure your Spectrecles are on then kill/loot Vhel’kur /target. This 70 Elite undead dragon patrols in a circle clockwise around the island. Spawns at (65.84). If you cant do it then skip it for now.
08) At The Altar of Shadows turn in (if you did it) “Divination: Gorefiend’s Armor” 58.71. Accept (if you can) “Teron Gorefiend, I am…“.
09) If you have it do “Teron Gorefiend, I am…“: first talk to the quest giver to begin. You will then transform into the quest giver. Use your new abilities on the pet bar to kill Karsius the Ancient Watcher right there in the immediate area.
10) SCRYER ONLY: Do “The Ashtongue Corruptors“: kill/loot the following 4 mobs spread around Shadowmoon Valley:
11) SCRYER ONLY: Kill/loot Haalum /target 57.74.
12) SCRYER ONLY: Kill/loot Eykenen /target 51.53.
13) SCRYER ONLY: Kill/loot Uylaru /target 48.40.
14) SCRYER ONLY: Kill/loot Lakaan /target 50.23.
15) No Flying Mount?: Go east to the ramp (starting at 50.19).
16) Go up into Oronok’s Farm 54.23 and turn in “The Cipher of Damnation – The First Fragment Recovered ” and “The Cipher of Damnation – The Second Fragment Recovered “.
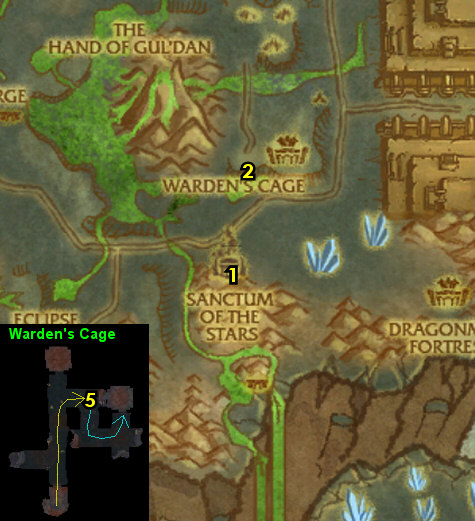
01) SCRYER ONLY: Go south to Sanctum of the Stars and in the Inn turn in “The Ashtongue Corruptors” 56.60, accept “The Warden’s Cage“.
02) SCRYER ONLY: Go north to Warden’s Cage, drop down in the hole at 57.50 and turn in “The Warden’s Cage“, accept “Proof of Allegiance“.
03) SCRYER ONLY: Go back up out of the hole, then up further on the ledges do “Proof of Allegiance“: kill Zandras /target. This satyr demon patrols around on top of the ledges. Spawns at 57.49.
TIP: You can pull him down from below if you want to.
04) SCRYER ONLY: Back down in the hole turn in “Proof of Allegiance” (57.50, #2 on map), accept “Akama“.
05) SCRYER ONLY: Go into the sewer to 58.48, then go down into the water through a passage to get to Akama, then turn in “Akama“, wait a moment then accept “Seer Udalo“.
NOTE: “Seer Udalo” is a dungeon quest done at Tempest Keep, so hold on to this quest for when you are ready to do this with a full group later.
06) Hearth (or go back) to Shadowmoon Village and just outside of the Inn, turn in (if you have it) “Teron Gorefiend, I am…“.
07) Shadowmoon Valley is now FINISHED!
At this point, you should be level 70 by now, if not, then you can grind the rest of the way to 70 on anything you like, preference is the Shadow Council Warlocks at Legion Hold 22.38 since they die very fast.