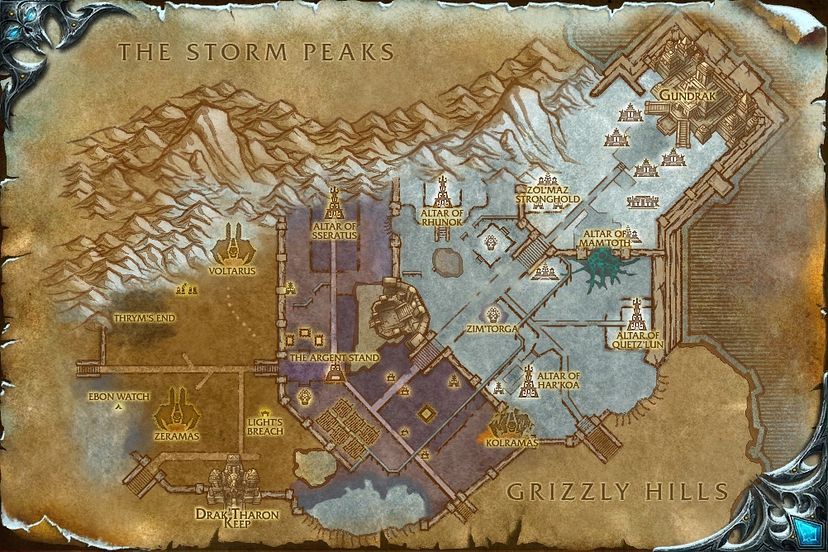
You should be level 77 by now, in which case before you enter Zul’Drak, you should learn Cold Weather Flying, and purchase your epic flying mount if you have enough gold for it, cost: 5,000g training + 1,000g Cold Weather training + 100g for the mount.

(Optional but Highly Recommended – Group) A note as you enter Zul’Drak – you may remember the Ring of Blood quest series from Nagrand. In Zul’Drak, there’s once again a series of arena fights which is just like the Ring of Blood – its a series called The Amphitheater of Anguish. As soon as you enter the zone, look out for people looking for more for the “Ring of Blood” or “Amphitheater” or “Arena” quests. Find a group of five people with a tank and healer.
The process of making sure the entire group starts and completes the quest together is having one person be the designated quest starter. Have everybody gather around the quest giver, then one person starts the quest, which will allow everyone to start the quest. Then, after making sure everybody’s turned in the quest, the quest starter starts the next quest, and so on and so on.

With a group of five with a tank and a healer, it will be the fastest burst of experience that is in the game, 192,900 XP in just minutes, along with an extremely good weapon, and about 120 Gold! Keep an eye out for groups throughout your entire time in Zul’Drak because there are no pre-requisites. If you find a group, go there and then continue questing where you left off.
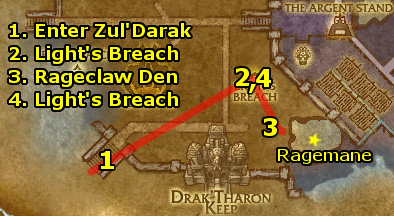
- Fly to Venomspite, Dragonblight. Ride northeast into Zul’Drak.
- Ride to Light’s Breach. Turn in Into the Breach! and get the quests:
- In Search of Answers
- This Just In: Fire Still Hot!
- Trolls Is Gone Crazy!
- Wanted: Ragemane’s Flipper (Group)Look around to see if anybody wants to do Wanted: Ragemane’s Flipper. Any team of two people should be able to do him. If you don’t find anyone, get around to it later.
- Ride southeast to Rageclaw Den. Complete all of the following objectives simultaneously:
- Clear your way to the Orders From Drakuru, turn in In Search of Answers, and get the follow-up Orders From Drakuru.
- Kill Drakuru Blood Drinkers for Drakuru “Lock Openers”.
- Free 8 Captured Rageclaw by using the Drakuru “Lock Openers” on them.
- Use the Rageclaw Fire Extinguisher to Douse 15 Huts. You’ll have to use them multiple times to put out the fires. You can just spam the item to douse fires very quickly.
- If you have a partner, ride southeast to Rageclaw Lake and kill Ragemane.
- Return to Light’s Breach. Turn in your quests:
- Orders From Drakuru and get the follow-ups The Ebon Watch and Crusader Forward Camp
- This Just In: Fire Still Hot!
- Trolls Is Gone Crazy!
- Wanted: Ragemane’s Flipper (if you did it)

- Ride northwest to the Crusader Forward Camp and turn in Crusader Forward Camp. Get the follow-up quests:
- That’s What Friends Are For…
- Making Something Out Of Nothing
- Ride north to Crusader Dargath.
- Ride southwest to Thrym’s End. Talk to Gymer and get his quest, A Great Storm Approaches.
- Ride west to Gerk and get Light Won’t Grant Me Vengeance.
- Ride west to find Burr.
- Finish killing 15 Vargul and gathering 10 Scourge Scrap Metal then go back to Gerk and turn in Light Won’t Grant Me Vengeance.
- Finish killing 15 Vargul and gathering 10 Scourge Scrap Metal then go back to Gerk and turn in Light Won’t Grant Me Vengeance.
- Return to the Crusader Forward Camp. Turn in:
- A Great Storm Approaches and get the follow-up Gymer’s Salvation.
- Making Something Out Of Nothing
- That’s What Friends Are For…
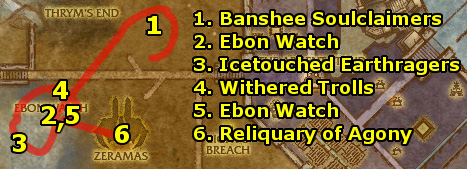
- Ride north and kill Banshee Soulclaimers for 6 Banshee Essence.
- Ride southwest to Ebon Watch. Turn in The Ebon Watch and get the follow-up Kickin’ Nass and Takin’ Manes.
- Ride around the camp to the south and the west and kill Icetouched Earthragers for 6 Diatomaceous Earth.
- Ride around the camp to the north and the east and kill 10 Withered Trolls and use Stefan’s Steel Toed Boot after each kill to collect 10 Hair Samples. You should also get an Unliving Choker which starts the quest An Invitation, of Sorts…
- Ride back to Ebon Watch and turn in:
- Kickin’ Nass and Takin’ Manes and get the follow-up Taking a Stand
- An Invitation, of Sorts… and get the follow-up Near Miss. Talk to Bloodrose Datura nearby to complete it and get the follow-up You Can Run, But You Can’t Hide.
- Ride east to the Reliquary of Agony and collect 5 Gooey Ghoul Drool (scattered around on the ground) and kill Putrid Abominations for 5 Putrid Abomination Guts.
- Then, return to Ebon Watch and turn in You Can Run, But You Can’t Hide and get the follow-up Dressing Down.
- Then, ride back to the Reliquary of Agony and use the Ensorcelled Choker to disguise yourself as a ghoul. Talk to Gristlegut and buy a Bitter Plasma. Also, accept his quest Feedin’ Da Goolz.
- Circle around the area and use the Bowels and Brains Bowl near Decaying Ghouls and Feed 10 of them.
- Return to Gristlegut and turn in Feedin’ Da Goolz.
- Finally, ride back to Ebon Watch and turn in Dressing Down. Get the follow-up Infiltrating Voltarus.
- Then, return to Ebon Watch and turn in You Can Run, But You Can’t Hide and get the follow-up Dressing Down.
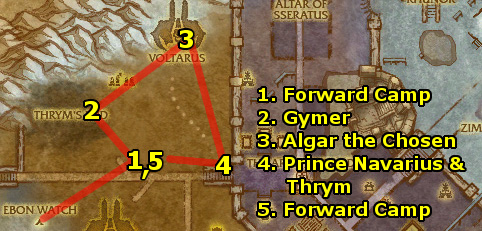
- Ride to the Crusader Forward Camp and turn in Ormer’s Salvation. Get the follow-up Our Only Hope.
- Ride northwest to Gymer. Blow up the cage and turn in Our Only Hope and get the follow-up The Storm King’s Vengeance. Now you get to ride an incredibly destructive Storm Giant!
The abilities are:- Ability 1: Gymer’s Smash – Spam this to do big AoE damage to all nearby enemies. You have to have an enemy targeted.
- Ability 2: Gymer’s Roar – fairly useless – knocks people back.
- Ability 3: Gymer’s Grab – use this on bosses, followed up with Ability 4 to do a lot of damage. You can also pick up Storm Cloud to heal and become more powerful.
- Ability 4: Gymer’s Throw – throw the Vargul in Gymer’s hand to do a lot of explosion damage.
- Ride northeast to Algar the Chosen and kill him by spamming Gymer’s Smash, and using Gymer’s Grab and Gymer’s Throw whenever up as well.
- Ride southeast to Prince Navarius and kill him by spamming Gymer’s Smash, and using Gymer’s Grab and Gymer’s Throw whenever up as well. This spawns Thrym who is bigger than you! Run and grab a Storm Cloud, then turn and face him using the usual attack pattern.
- Ride back to the Crusader Forward Camp and dismount. Turn in The Storm King’s Vengeance.
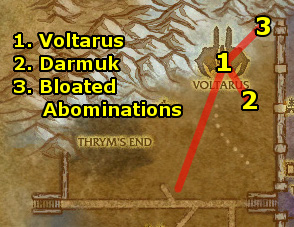
- Ride north to Voltarus. This is a quest-filled area where you will have to keep reporting back to Drakuru on top of the necropolis, then go just a short distance to complete the objective, before warping back to Drakuru and using Stefan’s Horn to turn in quests to Stefan as well. Due to the small running distance, the experience comes quick here!
- Use your Ensorcelled Choker to put on the disguise and get atop the platform to warp to Voltarus. Get Dark Horizon from Drakuru.
- Head to the southeast area of the flying necropolis and talk to Gorebag. Take the tour of Zul’Drak, then turn in Dark Horizon to Drakuru.
- Head out of the necropolis by running into the green area to go down. Use Stefan’s Horn to summon Stefan and turn in Infiltrating Voltarus. Get the follow-up, So Far, So Bad.
- Enter the necropolis again with the disguise on and get It Rolls Downhill from Drakuru.
- Head out of the necropolis by running into the green area to go down. Use Stefan’s Horn to summon Stefan and turn in Infiltrating Voltarus. Get the follow-up, So Far, So Bad.
- Exit the necropolis, and use the Scepter of Suggestion on Blight Geists, then command them to gather Blight Crystals. Wait for the blight geist to walk onto the teleporter and getting credit for collecting a crystal before controlling a new one. Collect 7 Crystals.
- At the same time, wander around the edge of the Reliquary of Pain and use the Diluting Additive into 5 Blight Cauldrons. Use it quickly then run away to avoid the mob that spawns.
- Warp back up to Drakuru and turn in So Far, So Bad.
- Warp down and use Stefean’s Horn to summon Stefan. Turn in So Far, So Bad and get the follow-up Hazardous Materials.
- Warp back up to Drakuru and get Zero Tolerance. While on top of the necropolis, walk around and open crates for 5 Harvested Blight Crystals. Note that each time you pick up a crate, there’s a chance your disguise will soon fail.
- Warp back up to Drakuru and turn in So Far, So Bad.
- Use your Ensorcelled Choker to put on the disguise and get atop the platform to warp to Voltarus. Get Dark Horizon from Drakuru.
- Warp down. Head southeast and use the Scepter of Empowerment on a Servant of Drakuru. Send it to fight Darmuk, who is further south on the platform. You will need to remain in ghoul form this entire time, so solely use your pet to fight. First, send in the servant and use the Ferocious Enrage ability. Then, use Gut Rip and Stunning Force on cooldown. If you use those abilities on cooldown you should win handily.
- Warp back up to Drakuru and turn in Zero Tolerance.
- Warp back down. Use the horn to summon Stefan and turn in Hazardous Materials. Get the follow-up Sabotage.
- Warp back up to Drakuru and get Fuel for the Fire.
- Warp back up to Drakuru and get Fuel for the Fire.
- Warp down and head northeast. Use the Explosive Charges next to 5 Scourgewagons to blow them up.
- Warp back up to Drakuru and turn in Zero Tolerance.
- Use the Scepter of Command on a Bloated Abomination. Run it through the trolls by ordering your pet to attack in sequence the trolls in a camp, and keep using the Flatulate ability in order to stay ahead of them and “kite” them. Gather as many as you can before it dies, then Explode it. Repeat this until you kill 60 Drakkari Skullcrushers. Note: You will not get credit if you explode the abomination while the trolls are knocked down with Flatulate. When you’ve finished gathering as many as you can up, explode without using Flatulate. A good safe number to gather and kill each run is 10.
- Warp back up to Drakuru and turn in Fuel for the Fire. Get the follow-up Disclosure.
- Take the portal upwards (step into the upper blue circle in the middle of the room). Open the Musty Coffin and follow Malmortis.
- Take the green circle portal back to Drakuru and turn in Disclosure.
- Warp back to the ground and use the horn to summon Stefan. Turn in Sabotage. Get the follow-up Betrayal.
- Warp back to the ground and use the horn to summon Stefan. Turn in Sabotage. Get the follow-up Betrayal.
- NOTE: The following fight is challenging solo! Make sure you have your Scepter of Domination hotkeyed or dragged to a very easy-to-use place first before starting, you will need to use it immediately. Read the entire section before talking to Drakuru.
Warp back up and talk to Drakuru and tell him you’re ready to join him. When you’re on the upper level, your disguise will start fading. Quickly use the Scepter of Domination on a Brightblood Troll. Send it to attack Drakuru and use its first two damage dealing abilities on cooldown (Concussion Blow and Powerful Strike). In the meantime, you have to run (try strafing in a circle) and avoid the crystals Drakuru throws at you. If you’re low in health, you can use the third ability (Brightblood Infusion) to have your pet heal you. You can and should attack Drakuru as well during the entire fight.
Your pet does not have enough health to take down Drakuru – you will have to take control of another one right after it dies, then send it to fight Drakuru again. During this time Drakuru will throw shadowbolts at you – use the heal ability of the new troll the moment you get it.
When Drakuru dies, loot the Drakuru’s Skull and Drakuru’s Last Wish. Use the last wish to leave the necropolis.
Summon Stefan with the horn and turn in Betrayal.
- Warp back up to Drakuru and turn in Fuel for the Fire. Get the follow-up Disclosure.
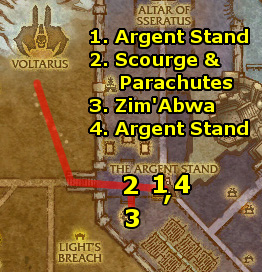
- Ride southeast to The Argent Stand. Get the Flight Path. Turn in Taking a Stand. Get the quests there:
- Defend the Stand
- Parachutes for the Argent Crusade
- The Blessing of Zim’Abwa
- Head a short distance west and kill 10 Scourge (Tip to do this faster – all you have to do is tap them even with just a little damage, and if the NPC finishes it off, you’ll get credit), and select the soldiers and then use your Crusader Parachute on 10 Argent Forces.
- Ride south to Zim’Abwa and complete the quest The Blessing of Zim’Abwa.
- Return to The Argent Stand and turn in:
- Defend the Stand
- Parachutes for the Argent CrusadeGet the new quests:
- New Orders for Sergeant Stackhammer
- Pa’Troll
- Trouble at the Altar of Sseratus
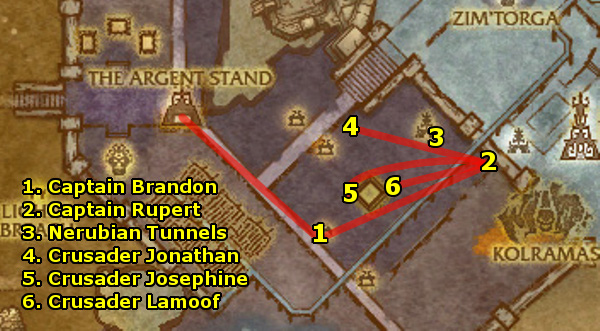
- Head southeast to Captain Brandon and get Something for the Pain.
- Head northeast to Captain Rupert and get the quests:
- Leave No One Behind
- Throwing Down
- Head west. Look for Nerubian Tunnels in the area with nerubians around. Stand near them and use the High Impact Grenades to Seal 5 Nerubian Tunnels.
- All the Crusaders are in buildings, look in the buildings at the map markings. First, go to Crusader Jonathan and use the Crusader’s Bandage on him.
- Then return to Dr. Rogers. Note that you can ride far ahead of the NPCs – The crusaders will follow you and will not aggro anything and will not even make you lose credit if you get far ahead of it – it will continue following you all the way back to the building. So, just ride directly back to Dr. Rogers.
- Then return to Dr. Rogers. Note that you can ride far ahead of the NPCs – The crusaders will follow you and will not aggro anything and will not even make you lose credit if you get far ahead of it – it will continue following you all the way back to the building. So, just ride directly back to Dr. Rogers.
- Use the Crusader’s Bandage on Crusader Josephine.
- Then, return to Dr. Rogers.
- Then, return to Dr. Rogers.
- Use the Crusader’s Bandage on Crusader Lamoof.
- Then, return to Dr. Rogers. Turn in your quests:
- Leave No One Behind
- Throwing Down
- Cocooned!
- Death to the Necromagi
- Skimmer Spinnerets
- Then, return to Dr. Rogers. Turn in your quests:
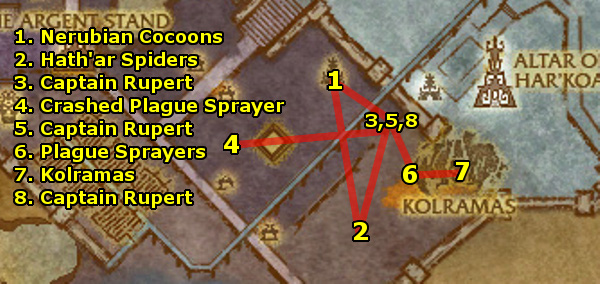
- Ride west and destroy Nerubian Cocoons until you Free 3 Captain Footmen.
- Ride southeast and kill Hath’ar Skimmers for 5 Intact Skimmer Spinneret and 8 Hath’ar Necromagus. There are more Necromagi in the Kolramas building northeast if you need more.
- Return to Captain Rupert and turn in your quests:
- Cocooned!
- Death to the Necromagi
- Skimmer SpinneretsGet the new quests:
- Crashed Sprayer
- Malas the Corrupter (Group)
- Pure EvilLook for a partner for Malas the Corrupter.
- Ride southwest and pick up the Plague Sprayer Parts from the Crashed Plague Sprayer.
- Return to Captain Rupert and turn in Crashed Sprayer and get the follow-up Tangled Skein.
- Head east and look in the sky for Plague Sprayers – use your Tangled Skein Thrower on 5 of them to destroy them.
- Head into Kolramas. Pick up 10 Chunk of Saronite inside the necropolis. On the top of the necropolis is Malas the Corrupter – try to find a partner to kill him. You can do it if you’re a strong class for a tough 1 v 1 fight as well.
- Return to Captain Rupert and turn in your quests:
- A Tangled Skein
- Malas the Corrupter (Group) if done
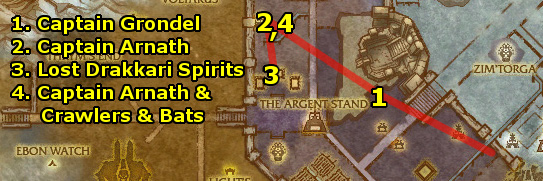
- Ride west to Captain Grondel and get Creature Comforts.
- Head northwest to Captain Arnath and get the quests:
- Siphoning the Spirits
- Lab Work
- First, head to the north area of the lab. You can find the Muddy Mire Maggot, Withered Batwing, and Amberseed here.
- Then, head to the south area of the lab. You can find the Chilled Serpent Mucus there. Turn in Lab Work.
- Head south to the pools and kill Lost Drakkari Spirits (the neutral ones) for 5 Ancient Ectoplasm. The aggressive ghosts don’t drop them.
- Return to Captain Arnath and turn in Siphoning the Spirits. Get the follow-ups:
- Clipping Their Wings
- Stocking the Shelves
- The area around the building is full of Trapdoor Crawlers and Zul’Drak Bats. Kill them for 7 Fresh Spider Ichor and 7 Unblemished Bat Wings.
- Then, return to Captain Arnath and turn in Clipping Their Wings and Stocking the Shelves.

- Ride northeast to Sergeant Stackhammer and turn in New Orders for Sergeant Stackhammer. Get the follow-up quests:
- Argent Crusade, We Are Leaving!
- Mopping Up
- Head north and kill 10 Sseratus Trolls and talk to 10 Argent Soldiers. You will get a Strange Mojo from the trolls which will start the quest Strange Mojo.
- Ride to the top of the temple and get credit for investigating the Altar of Sseratus.
- Return to Sergeant Stackhammer and turn in:
- Argent Crusade, We Are Leaving!
- Mopping Up
- Ride south to the Argent Stand and turn in:
- Pure Evil
- Strange Mojo
- Trouble at the Altar of Sseratus
- Precious Elemental Fluids
- The Drakkari Do Not Need Water Elementals!
- Ride south to the Drak’Sotra Fields. Here, complete the following objectives:
- Gather 5 Mature Water-Poppy
- Kill Crazed Water Spirits for 3 Water Elemental Links. Once you get 3 (you cannot get more than 3), use them to create a Tether to the Plane of Water. Use the tether to summon a Watery Lord and kill it for Precious Elemental Fluids. Repeat this step for a total of 3 Precious Elemental Fluids.
- Kill 10 Drakkari Water Binders.
- Ride east to Captain Brandon. Turn in Something for the Pain.
- Ride northwest to The Argent Stand. Turn in:
- Precious Elemental Fluids
- The Drakkari Do Not Need Water Elementals
- Gluttonous Lurkers
- Mushroom Mixer
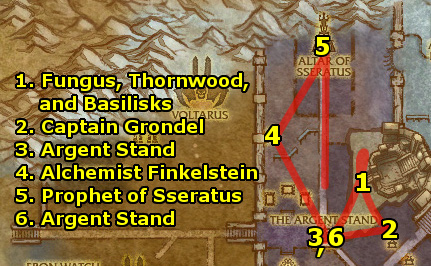
- Ride northeast to the water area. Complete all these objectives at the same time:
- Collect 10 Muddlecap Fungus
- Collect 20 Dead Thornwood
- Collect Zul’drak Rats. When you get 5, target a Luring Basilisk and throw all 5 at it. Then, collect the Basilisk Crystal. Collect a total of 5 crystals.
- Then, return to Captain Grondel and turn in Creature Comforts.
- Return to The Argent Stand and turn in Gluttonous Lurkers and Pa’Troll and get the follow-up Too Much of a Good Thing.
- Ride northwest to Alchemist Finkelstein and turn in Gluttonous Lurkers.
- Ride northeast to the Prophet of Sseratus and throw the Modified Mojo at him, then kill him.
- Return to The Argent Stand and turn in Too Much of a Good Thing and get the follow-up The Witch Doctor.
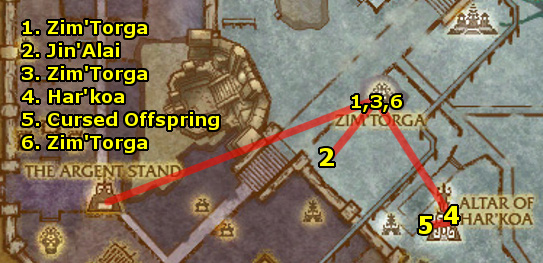
- Ride northeast to Zim’Torga. Get the Flight Path. Turn in To the Witch Doctor. Get the quests:
- Breaking Through Jin’Alai
- The Blessing of Zim’Torga
- The Leaders at Jin’Alai
- Just Checkin’Turn in The Blessings of Zim’Torga at the center statue.
- Head southwest to Jin’Alai. Near the rectangular “plaza”, you can find the four cauldrons on each corner of the rectangle. Click on all four of them. Also, kill a lot of trolls. Once you’ve killed enough, a Troll Chieftain will spawn – kill it and gather its treasure that spawns at its corpse. When you’re done killing all 3 Chieftains, return to Zim’Torga. Turn in:
- Breaking Through Jin’Alai
- The Leaders at Jin’Alai
- Relics of the Snow Leopard Goddess
Get the new quests: - Sealing the Rifts
- The Frozen Earth
- To Speak With Har’koa
- Ride southeast to Har’koa. Turn in To Speak With Har’koa and get the follow-up But First My Offspring.
- Ride west. Kill 7 Cursed Offspring of Har’koa and use Whisker of Har’koa on their corpses. Also, gather 10 Har’koan Relics.
- Then, return to Har’koa and turn in But First My Offspring. Get the follow-up Spirit of Rhunok.
- Then, return to Har’koa and turn in But First My Offspring. Get the follow-up Spirit of Rhunok.
- Ride northwest back to Zim’Torga. Turn in Relics of the Snow Leopard Goddess and get the follow-ups:
- Plundering Their Own
- The Blessing of Zim’Rhuk
- Tails Up
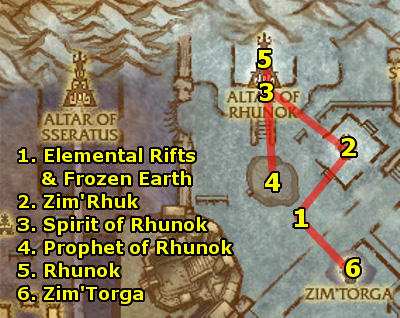
- Ride northwest. Kill 7 Elemental Rifts and kill Frozen Earth for 7 Essence of the Frozen Earth.
- Ride northeast to Zim’Rhuk and turn in The Blessing of Zim’Rhuk.
- Ride northwest to the Spirit of Rhunok and turn in Spirit of Rhunok. Get the follow-up My Prophet, My Enemy.
- Ride south to the lake. Kill the Prophet of Rhunok for the Arctic Bear God Mojo, and kill the Priests of Rhunok around the area for 7 Rhunokian Artifacts.
- Return tothe Spirit of Rhunok and turn in My Prophet, My Enemy and get the follow-up An End to the Suffering.
- Return tothe Spirit of Rhunok and turn in My Prophet, My Enemy and get the follow-up An End to the Suffering.
- Head into the temple and use the Torment’s Incense on Rhunok, then kill it.
- Return to the Spirit of Rhunok and turn in An End to the Suffering. Get the follow-up Back to Har’koa.
- Return to the Spirit of Rhunok and turn in An End to the Suffering. Get the follow-up Back to Har’koa.
- Ride southeast to Zim’Torga.
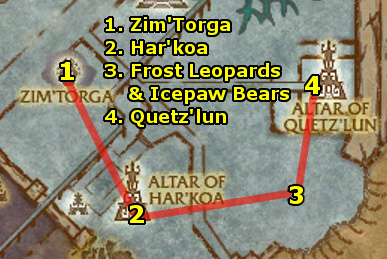
- At Zim’Torga, get turn in all your quests:
- Plundering Their Own
- Sealing the Rifts
- The Frozen Earth
- Bringing Down Heb’Jin
- Scalps!
- Ride southeast to Har’koa and turn in Back to Har’koa. Get the follow-up I Sense a Disturbance. Talk to her again and tell her to call for a ride. Once you’re done, turn in the quest and get the follow-up Preparations for the Underworld.
- Kill the trolls around the area for 8 Sacred Adornments, then turn in Preparations for the Underworld and get the follow-up Seek the Wind Serpent Goddess.
- Kill the trolls around the area for 8 Sacred Adornments, then turn in Preparations for the Underworld and get the follow-up Seek the Wind Serpent Goddess.
- Ride east to an area with Frost Leopards and Icepaw Bears. Use your To’kini’s Blowgun on them then approach them while they’re sleeping and check them. Find 3 Female Frost Leopards and 3 Female Icepaw Bears.
- Ride northeast to Quetz’lun.
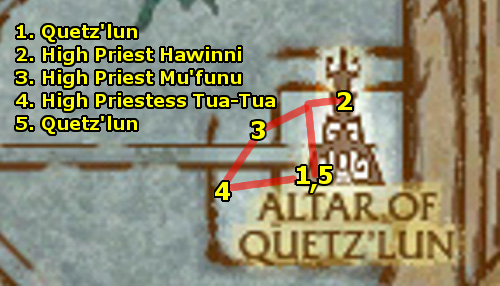
- At Quetz’lun, turn in Seek the Wind Serpent Goddess. Get the follow-up Setting the Stage.
- Then, head west downstairs and collect 10 Underworld Power Fragment.
- Then, return to Quetz’lun and turn in Setting the Stage and get the follow-up Foundation for Revenge.
- Then, head west downstairs again and kill 12 Trolls while they’re near a Soul Font.
- Then, return to Quetz’lun and turn in Foundation for Revenge. and get the follow-up Hell Hath a Fury.
- Then, head west downstairs and collect 10 Underworld Power Fragment.
- Hex High Priest Hawinni.
- Hex High Priest Mu’funu.
- Hex High Priestess Tua-Tua.
- Then, return to Quetz’lun and turn in Hell Hath a Fury. Get the follow-up One Last Thing.
- Once done, ride southwest back to Har’koa.

- At Har’koa, turn in One Last Thing and get the follow-up Blood of a Dead God.
- Ride to Heb’Drakkar. Kill and scalp 10 Heb’Drakkar Trolls using Ahunae’s Knife, and use the drum to bring Heb’Jin down. Use the Bat Net on his bat, then kill Heb’jin.
- Ride northeast to the lower part of the Altar of Mam’toth. Kill Blood of Mam’toth for 7 Blood of Mam’toth.
- Return to Har’koa.
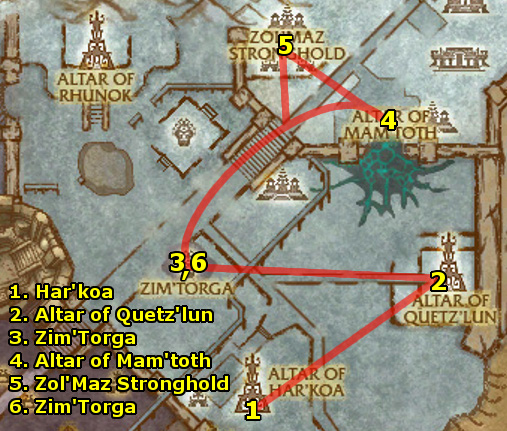
- At Har’koa, turn in Blood of a Dead God. Get the follow-up You Reap What You Sow.
- Ride northeast to the Altar of Quetz’lun and use the Quetz’lun Ritual on the Prophet of Quetz’lun, then kill him.
- Ride west to Zim’Torga and turn in your quests:
- Bringing Down Heb’Jin
- Scalps!
- You Reap What You Sow
- Tails Up
- Enchanted Tiki Warriors
- Hexed Caches
- The Key of Warlord Zol’Maz
- Wooly Justice
- Ride northeast up the steps and to the upper level of the Altar of Mam’toth. Use your Medallion of Mam’toth on an Enraged Mammoth, then mount it.
Use Rushing Charge (Ability 1) to charge Mam’toth Disciples, then spam Trample (Ability 2) to kill them. Kill 12 Mam’toth Disciples. (Tip: just run through the altar and keep pulling and spamming Trample to kill many quickly. If your Mammoth dies, just get a new one.) - Ride northwest to Zol’Maz Stronghold.
- Kill Yara for Yara’s Sword (downstairs, southwest area)
- Kill Drek’Maz for Drek’Maz’s Tiki (downstairs, southeast area)
- Kill Tiri for Tiri’s Magical Incantation (upstairs, northeast area)
- Use any of the items to combine them into the Tiki Dervish Ceremony. Go up to the top of the stronghold and use it to get Warlord Zol’Maz to open the gate and attack you. Make sure to let your Tiki Dervish tank, then attack once it has enough aggro.
- Collect 12 Zol’Maz Stronghold Caches
- Kill 12 Enchanted Tiki Warriors
- Return to Zim’Torga.
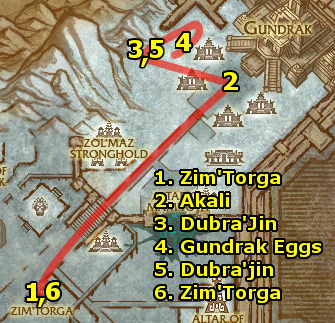
- At Zim’Torga,turn in your quests:
- Enchanted Tiki Warriors
- Hexed Caches
- The Key of Warlord Zol’Maz
- Wooly JusticeGet the follow-up, Rampage.
- Ride northeast to Akali. Unlock all four Akali Chain Anchors.
- Ride west to Dubra’Jin. Get the Flight Path. Turn in Just Checkin’ and get the follow-ups:
- For Posterity (Dungeon – Gundrak)
- One of a Kind (Dungeon – Gundrak)Also, get Eggs for Dubra’Jin.
- Look around the bunches of trees to the northeast and southeast to collect 12 Gundrak Raptor Eggs. Also, kill Gundrak Raptors – they have a chance to drop them.
- Return to Dubra’jin and turn in Eggs for Dubra’Jin.
- Take the flight back to Zim’Torga and turn in Rampage. Get the follow-up The Gods Have Spoken (Group)
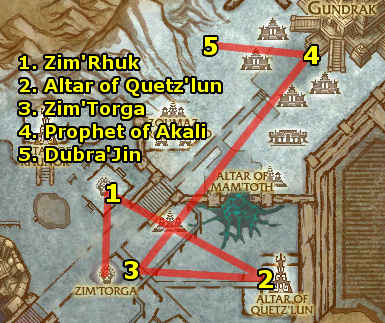
- The final parts of this zone are all group quests. If you can find someone to do them with you then great, if not, move on to the next zone.
First, ride northwest to Zim’Rhuk and kill the Guardians of Zim’Rhuk until you get an Unblemished Heart of the Guardian. - Ride southeast to the Altar of Quetz’lun and kill Altar Wardens until you get a Gusty Essence of the Warden.
- Return to Zim’Torga and turn in The Gods Have Spoken and get the follow-up Convocation at Zol’Heb.
- Ride northeast to Zol’Heb and use the Prophet of Akali Convocation at the circle of power to summon the Prophet of Akali. Kill him. Turn in Convocation at Zol’Heb and get the follow-up Unfinished Business.
- Ride west to Dubra’Jin and turn in Unfinished Business and get the follow-up Gal’darah Must Pay (Dungeon – Gundrak).
If you’d like to do the Gundrak dungeon, you now have all the quests for it.
