You should have the following two quests:
- [75] Into the Breach!
- [74] To Conquest Hold, But Be Careful!
If you don’t have them, it’s not a big deal, but they’re easily attainable. Just go to my Dragonblight guide and search for them with your browser’s search function (CTRL + F).
Time to go to Grizzly Hills.
Fly to Venomspite.
Ride east until you enter Grizzly Hills.
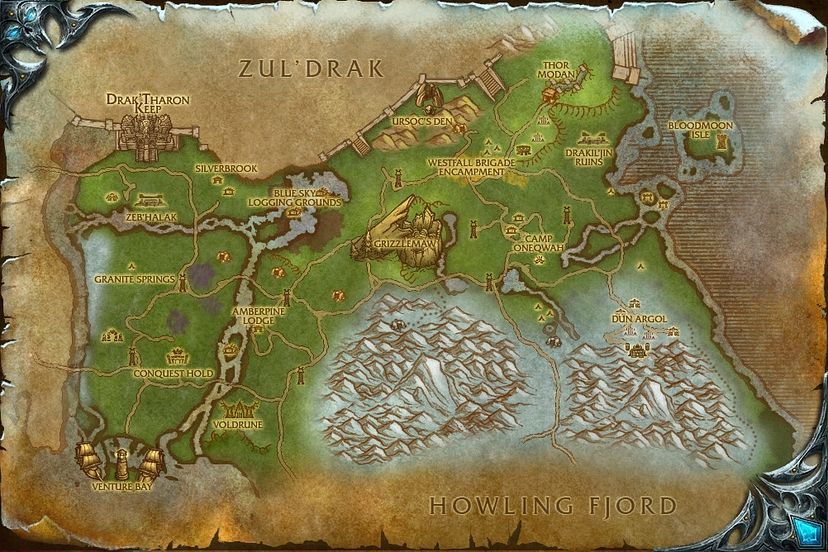
In Grizzly Hills, ride east to Conquest Hold (21,63).
Turn in [74] To Conquest Hold, But Be Careful, get [74] The Conqueror’s Task.
 Go to the inn and make it your home location.
Turn in [74] The Conqueror’s Task.
Get all the available quests from Conquest Hold BESIDES [75] The Magical Kingdom of Dalaran:
- [74] A Show of Strength
- [74] The Flamebinders’ Secret
- [74] Gray Worg Hides
- [74] Supplemental Income
![]() Get the new flight path.
Get the new flight path.
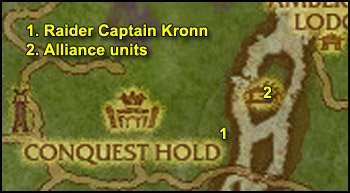
==Note== Kill Graymist Hunters on the way.
1. Get out of Conquest Hold by the southern gate.
Ride east to to Raider Captain Kronn (26.5,67).
==Warning== This is a PvP Daily Quest. It’s very quick, easy and rewarding, and there most likely won’t even be any PvP involved. So I suggest doing it. However, if you don’t want to have anything to do with PvP, you can skip this and go to the next circuit. This quest doesn’t count towards the zone quest achievement, but it does count for the Daily PvP Quest Achievement: Grizzled Veteran. So it’s up to you!
Get the quest [74] Blackriver Brawl.
2. Go to the isle northeast and kill 10 Alliance Units or Players.
Go back to Raider Captain Kronn, turn in [74] Blackriver Brawl.
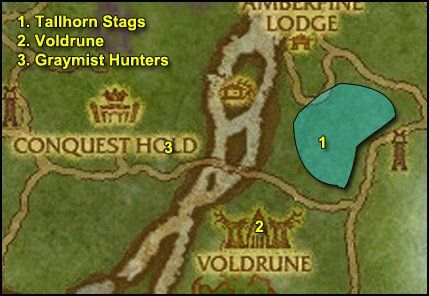
1. Southeast you should see a bridge.
Cross it and then go northeast to an area with a lot of Tallhorn Stags (34,65).
Stay there and kill Tallhorn Stags until you finish [74] Supplemental Income.
2. Ride southwest to Voldrune (31,75). Two objectives here:
- Kill 12 Dragonflayer Huscarls
- Kill Dragonflayer Flamebinders until you’ve looted 3 Flame-Imbued Talismans
3. Go northwest and cross the same bridge again.
Kill Graymist Hunters until you finish [74] Gray Worg Hides on your way back to Conquest Hold.
In Conquest Hold, turn in:
- [74] Supplemental Income
- [74] Gray Worg Hides, get [74] A Minor Substitution
- [74] A Show of Strength
- [74] The Flamebinders’ Secret, get [74] The Thane of Voldrune
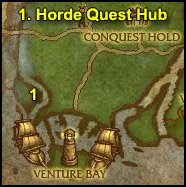
==Warning== PvP Daily Quest Circuit. Skip this circuit and the next one if you don’t want any PvP. However please note that [74] Seeking Solvent counts for the zone quest achievement. Those quests are really quickly done and give 20K XP each, so I recommend doing them, even if you dislike pvp.
1. Ride southwest to Venture Bay. The horde quest hub is on the western side of Venture Bay (11,77).
Get the 4 daily pvp quests:
- [74] Seeking Solvent
- [74] Keep Them at Bay!
- [74] Smoke ‘Em Out
- [74] Crush Captain Brightwater!
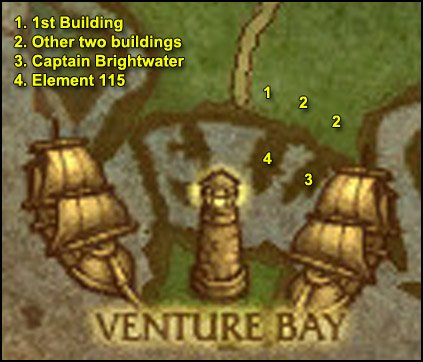
1. Go east to the area north of the docks in venture bay.
Enter the first building you encounter at (14,77).
Inside the building you should see Venture Co. Stragglers.
 Use the Smoke Bomb on them.
Tip: Just run in the building, gather them all in one bunch and then use the Smoke Bomb on them.
2. Go to the next two buildings to the east and do the same thing.
==Note== Kill Alliance Units & Players on the way
You should be done with [74] Smoke ‘Em Out very quickly if you bomb the 3 buildings.
3. Go to the easternmost ship. On the main deck you’ll find Captain Brightwater (17,81.5). He’s elite but should be easily soloable for any class. Just make sure you pull him solo.
HP: 30,000
Avg. Hit on Cloth: 800
Can be slowed, stunned, feared.
Now Finish [74] Keep Them at Bay! before going to the next step.
4. Go to the middle ship (16,80). It’s the same model as the boat from Booty Bay to Ratchet.
Go inside the cabin and clear the way to the last room.
==Warning== I really mean CLEAR the way. Kill all the Venture Co. in your way, even if you are a stealth class.
Once the way is clear, go to the last room where you should see the Element 115.
Loot it. You’ll get the following debuff:

That means it’s useless to mount or to sprint or anything like that. Just run straight back to the quest NPCs. You have only 3 Minutes to get there.
Go as fast as you can, avoid fights, and turn in [74] Seeking Solvent first.
Then turn in the other 3 quests:
- [74] Keep Them at Bay!
- [74] Smoke ‘Em Out
- [74] Crush Captain Brightwater!
Hearthstone back to Conquest Hold (or ride back if you’re HS is on cooldown).
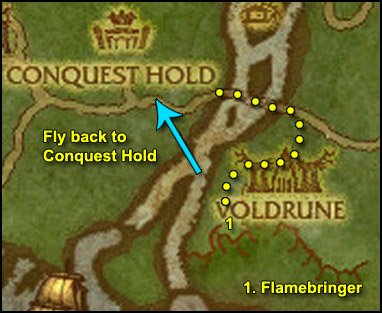
1. Ride southeast, cross the bridge and go to Voldrune.
This time clear the way towards the southwestern part of Voldrune, where you should find a chained proto-drake called Flamebringer (26,80).
Now check out my video on how to do this quest, it will make it much easier, as it’s kinda buggy and tricky at the moment. The only difference is that you should fly back to Conquest Hold at the end of the video, instead of towards Venture Bay.
I recommend watching the video in High Quality.
Video: [74] The Thane of Voldrune
==Note== If the video was useful to you, please don’t forget to rate it! 😉
After having watched the video you should be more than ready.
Kill the thane and then fly to Conquest Hold.
Turn in [74] The Thane of Voldrune, get [74] Onward to Camp Oneqwah.
Also get [75] My Enemy’s Friend.
Sell junk, repair and re-stock food/drink.
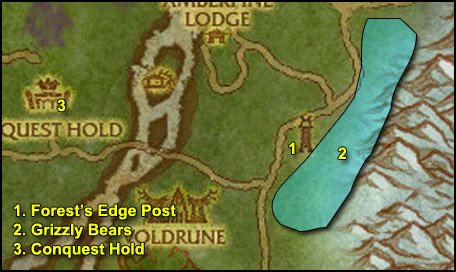
1. Ride southeast to the bridge and cross it again.
Then ride east to Forest’s Edge Post (36,67).
- Kill Vladek, he’s in the tower
- Kill 8 Silverbrook Hunters
- Keep on killing them until you loot Mikhail’s Journal
 Right-click it to start [74] Mikhail’s Journal.
2. All around the eastern and southern side of Forest’s Edge Post you should find a lot of Grizzly Bears, as shown on my map.
Kill Grizzly Bears until you finish [74] A Minor Substitution
3. Go back to Conquest Hold, turn in:
- [75] My Enemy’s Friend, get [74] Attack on Silverbrook
- [74] Mikhail’s Journal, get [74] Gorgonna
- [74] Gorgonna, get [74] Tactical Clemency
- [74] A Minor Substitution, get [74] Jun’ik’s Coverup
Mount up.
Go about 20 yards southeast to the merchant, buy a stack of 5 Simple Flour.
Go northeast across the conquest hold pit and buy 1 Coal from the NPC.
Get the following 2 quests:
- [74] Eyes Above
- [74] Good Troll Hunting
Turn in [74] Jun’ik’s Coverup, get [74] Delivery to Krenna.
Go inside the inn and turn in [74] Delivery to Krenna.
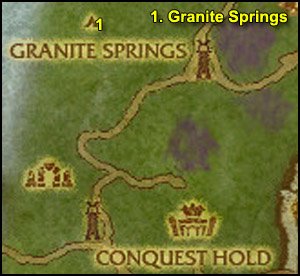
Ride northwest to Granite Springs (16,47.5).
Turn in [73] Good Troll Hunting! and get [74] Filling the Cages.
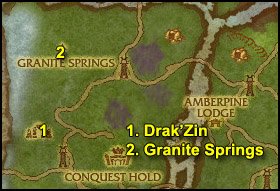
1. Talk to Budd, a human with a troll mask sitting in one of huts. Click on the text.
Mount up, ride southwest to Drak’Zin (14,58).
Find a SOLO troll.
 Use Budd’s Ability #4. This will put the troll to sleep for 15 seconds.
 Right-click the Bounty Hunter’s Cage on the troll (must be in melee range).
If you fail, you’ll have to go back to Granite Springs and talk to Budd again.
2. Go back to Granite Springs.
Turn in [74] Filling the Cages, get [73] Truce? from Drakuru.
Next to the cage you should find a Dull Carving Knife planted in a tree stump:
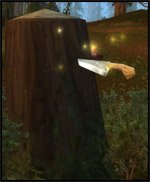
Loot it.
 Right-click the Dull Carving Knife from your inventory.
Talk to Drakuru and click on the text.
Turn in [73] Truce? and get [74] Vial of Visions.
Go to Ameenah, a troll female NPC selling , buy a stack of 5 Imbued Vials from her.
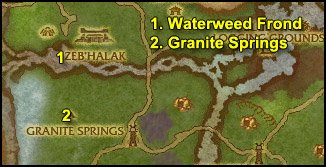
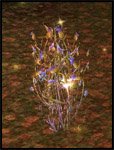
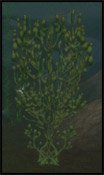
==Note== From now on, look for Hazelwood Bushes on the way and loot 3 Haze Leafs:
1. Go north/northwest to the lake at (15,39).
Dive in and loot a Waterweed Frond.
2. Go back to Granite Springs, turn in [74] Vial of Visions, get [74] Subject to Interpretation.
Get [74] Scourgekabob from Prigmon just a few steps northwest.
Loot a Scourged Troll Mummy.
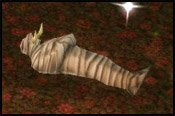
Go southeast to Mack Fearsen, who stands in front of a bonfire with mummies burning.
 Right-click the Scourged Troll Mummy from you inventory.
Turn in [74] Scourgekabob, get [74] Seared Scourge.
Go back to Prigmon and get [75] Shimmercap Stew.
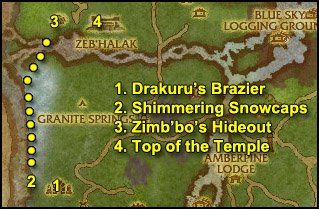
1. Ride southwest to Drak’Zin. Complete the following 2 objectives:
Kill Trolls until you’ve looted 5 Frozen Mojo
Kill Ice Serpents until you’ve looted 5 Ice Serpent Eyes
Go to Drakuru’s Brazier, which is up some ruined stairs in the middle of Drak’Zin (13,61).
 Right-click Drakuru’s Elixir.
Turn in [74] Subject to Interpretation, get [74] Sacrifices Must be Made.
2. Now go west towards the river, look for Shimmering Snowcaps, they can be found close to trees along the river bank:

Go north along the river bank and loot 5 Shimmering Snowcaps.
3. Ride further north to Zimb’bo’s Hideout (15,37). It’s the biggest hut on the western side of the Zeb’Halak.
Kill Warlord Zimb’bo and loot Zimb’bo’s Mojo.
==Note== From now on, loot Sweetroot on the way:
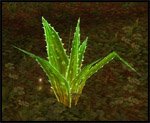
4. Clear the way to the top of the temple east (18,36).
Right-click the Seer of Zeb’Halak, click on the text. You’ll receive the Eye of the Prophets.
Go to Drakuru’s Brazier, which is a few steps west of the Seer of Zeb’Halak.
 Right-click Drakuru’s Elixir.
Turn in [74] Sacrifices Must be Made, get [74] Heart of the Ancients.
Go back down and gather Sweetroots until you have 5.
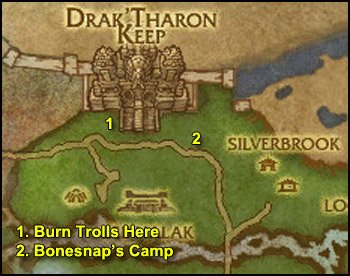
1. Go north to Drak’Tharon Keep.
Go to the area west of the stairs and you’ll see many trolls running around (16,30):
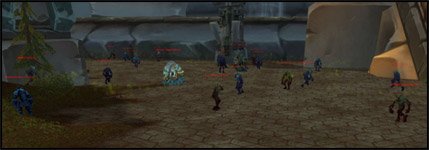
 Throw Mack’s Dark Grog at them. It has a huge range, so you’ll probably need to back off a little.
Repeat until you finish [74] Seared Scourge.
2. Go east to Bonesnap’s Camp. Turn in [74] Tactical Clemency.
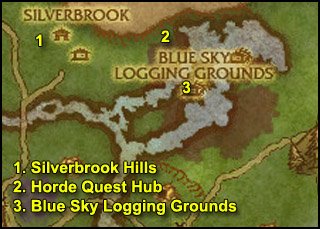
1. Ride east to Silverbrook Hills (26,31).
Kill 8 Silverbrook Defenders.
2. Ride east/northeast to the Horde Quest Hub at the Blue Sky Logging Grounds (34,33).
==Warning== There might be some PvP action involved in the following circuit. So if you want to avoid PvP at all costs, skip it. They don’t count for the zone quest achievement, but they do give nice XP and are quickly done.
Get all the quests from here:
- [74] Keep ‘Em On Their Heels
- [74] Overwhelmed
- [74] Making Repairs
- [74] Shred the Alliance
3. Go east to the central isle of Blue Sky Logging Grounds. Our main objective is to deliver 3 Shredders while completing as much as the other quests on the way:
- Kill 15 Alliance Units (NPCs and players both count)
 Use the Renewing Tourniquet on 10 Wounded Skirmishers
- Gather the following parts until you finish [74] Making Repairs:

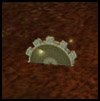
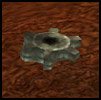
Do that on the way while looking for a Broken-down Shredder:
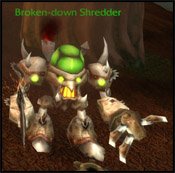
Jump into one, face toward the bridge west and use ability #3 to sprint.
If you get attacked:
Use Ability#1 to pushback your enemy.
Use Ability#2 to blind nearby enemies (must be in melee range)
Go back to the quest giver and use ability #5 to deliver the shredder.
Finish all 4 quests, go turn them in.
You should be level 76 or somewhere around it. If you are ahead, that’s great, keep following the guide normally, don’t skip anything. If you are behind, that’s not a problem either, just keep following the guide normally. You’ll catch up eventually and there will be a lot of extra circuits at the end anyway 😉
Level 76
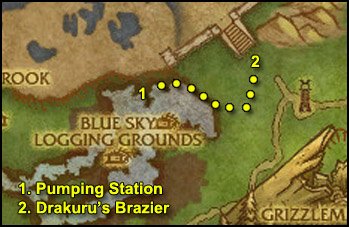
1. Go east to the pumping station at (37,32).
Clear the way to the top, go inside the cabin, turn in [74] Heart of the Ancients, get [74] My Heart is in Your Hands.
2. Go to the eastern point of the lake, and from there ride northeast to Drak’atal Passage (44,30).
Kill Drakkari Defenders and Injured Drakkari Refugees until you’ve looted 5 Desperate Mojo.
Go to Drakuru’s Brazier, found at the bottom of the big stairs.
 Right-click Drakuru’s Elixir.
Turn in [74] My Heart is in Your Hands, get [75] Voices From the Dust.
Hearthstone back to Conquest Hold. (Or ride back there if your HS is on cooldown).
Turn in [74] Attack on Silverbrook, get [75] Ruuna The Blind from Gorgonna.
Also get the two quests from Windseer Grayhorn:
- [74] The Darkness Beneath
- [74] Vordrassil’s Fall
Outside of the Conquest Hold Pit, there should be a new quest available, but don’t take it yet.
Optional: [74] The Conquest Pit
[74] The Conquest Pit: Bear Wrestling! is the first step of a chain similar to the Ring of Blood quest chain in Nagrand.
So you will need a group for it. You don’t need a full group though, 3 player is more than enough:
1 healer, 1 tank or pet class and 1 DPS class to make it faster.
==Note== Certain classes might be able to solo the first 3 bosses depending on their gear (Death Knights, Hunters, Warlocks with Voidwalker tanking, Feral Druids, Paladins, Shamans with Earth Elemental Totem up), but not the last 2 quests in the chain.
So I recommend finding a group for it, it’s really much easier and faster that way.
Proceed with the guide and keep on looking for a group for this quest chain.
Once you have a group, have your tank accept the quest first (that way, he’ll get the initial aggro), and check the info below about the bosses you’ll have to fight:
1st boss: Ironhide. Easy tank and spank battle.
2nd boss: Torgg Thundertotem. Do NOT destroy the Fire Nova Totems. They do 8K damage if you destroy them, so leave them alone and MOVE AWAY from them before they explode. The Furbolg can be interrupted and stunned.
3rd boss: Rustblood. Simple tank and spank. Knockbacks and attacks the 2nd person highest on the threat list. So make sure your tank is awake.
4th boss: Horgrenn Hellcleave. He charges people which are out of his melee range randomly. So have everyone stay close to him and he won’t charge anyone. However, he also does a Whirlwind, quickly move away from him when he does that. When he’s done with Whirlwind, go back in close melee range.
5th boss: Krenna. This one is actually easier than the previous two bosses. It’s a simple tank and spank fight and you also get help from Gorgonna.
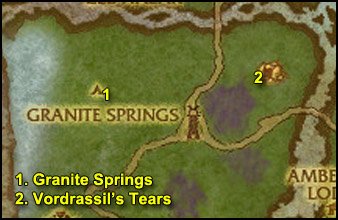
1. Ride northwest to Granite Springs (16,47.5). Turn in:
- [74] Seared Scourge, get [74] Search and Rescue, don’t get the daily quest
- [75] Shimmercap Stew, get [74] Say Hello to my Little Friend
2. Ride east/northeast to Vordrassil’s Tears, you’ll find a cave entrance at (28,45).
Kill Entropic Oozes on the way and loot Slime Samples off them.
Clear the way to the bottom of the cave until you find an area with black smoke.
 Right-click the Geomancer’s Orb from your inventory.
Get out of the cave.
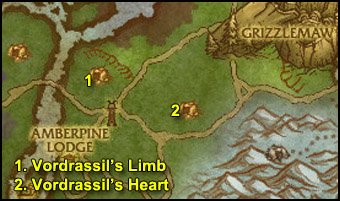
==Note== From now on, look for Imperial Eagles on your way:
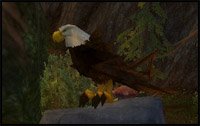
 Target them and use the Silver Feather from your inventory.
We’re not in any hurry to finish that quest, so just do it on the way, don’t go looking for them.
1. Ride east to Vordrassil’s Limb (33,49).
Clear the way to the bottom of the cave.
 Right-click the Geomancer’s Orb from your inventory.
2. Ride east/southeast to Vordrassil’s Heart
Clear the way to the bottom of the cave.
 Right-click the Geomancer’s Orb from your inventory.
Now kill Entropic Oozes until you’ve looted 6 Slime Samples.
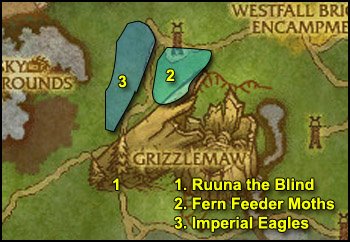
1. Ride east to Ruuna the Blind (44,48).
Turn in [75] Ruuna The Blind, get [75] Ruuna’s Request.
2. Go to the area north/northeast I colored on the map.
Kill Fern Feeder Moths until you’ve looted 4 Gossamer Dusts.
3. Also finish [74] Eyes Above, there are a lot of Imperial Eagles just west of the area I colored.
Ride back to Ruuna the Blind.
Turn in [75] Ruuna’s Request, get [75] Out of Body Experience.
 Right-click the Gossamer Potion.
Watch the scene until you get a complete message, then cancel the “Out of Body Experience” buff.
Turn in [75] Out of Body Experience, get [75] Fate and Coincidence.
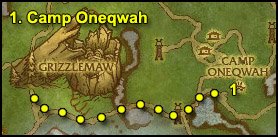
1. Follow the road east and then northeast to Camp Oneqwah (65,47).
Turn in [74] Onward to Camp Oneqwah. Gather all the available quests from here:
- [75] An Expedient Ally
- [75] The Horse Hollerer
- [75] The Unexpected ‘Guest’
![]() Get the new flight path.
Get the new flight path.
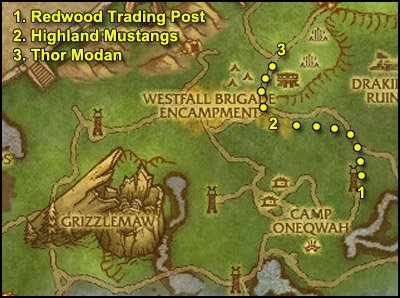
==Note== Kill Silvercoat Stags on the way from now on.
1. Go northeast to Redwood Trading Post (69,40).
Get [75] A Bear of an Appetite.
2. Go north until you hit the Path of Iron. Then go northwest to an area where you’ll find Highland Mustangs.
 Use the Flashbang Grenade on them.
You’re not supposed to finish this quest now, just do this on the way.
3. Keep following the path of iron until you arrive in Thor Modan.
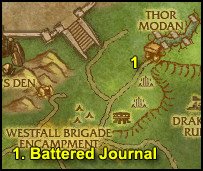
1. Go a little northeast and you’ll find a Battered Journal on the floor (64,20).
Get the quest [75] The Damaged Journal.
Gather 8 Missing Journal Pages off the ground:
 Right-click the Incomplete Journal.
Hearthstone back to Conquest Hold. Turn in:
- [74] The Darkness Beneath
- [74] Vordrassil’s Fall
- [74] Eyes Above
Get the 2 follow ups:
- [74] A Possible Link
- [75] The Bear God’s Offspring
Sell junk, repair and re-stock food/drink.
Fly back to Camp Oneqwah. Turn in [75] The Damaged Journal, get [75] Deciphering the Journal.
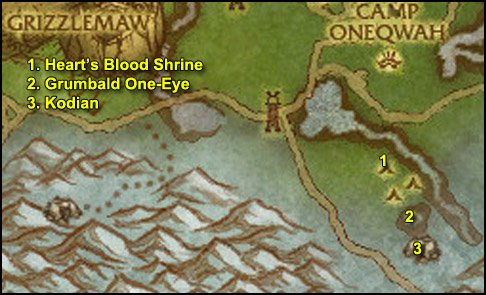
1. Ride south to Heart’s Blood Shrine (64,55).
Kill Redfang Hunters on the way and loot Crazed Furbolg Blood.
2. Clear the way southeast and you’ll find Grumbald One-Eye (66,59).
Kill him, loot a Spiritsbreath.
3. Go a little further southeast to a cave at (67,62).
Talk to Kodian, go through his text and you’ll get the quest update “Kodian’s Story“.
==Reminder== Kill Silvercoat Stags on the way.
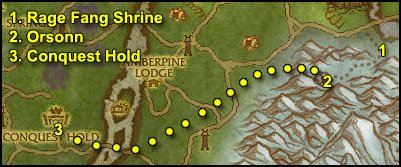
1. Ride west/northwest to to Rage Fang Shrine (55,53).
==Note== Kill Frostpaw Warriors and Frostpaw Shamans on the way and loot Crazed Furbolg Blood off them.
2. Clear the way southwest to the cave where you will find Orsonn (48,59).
Go through his text and you’ll get the quest update “Orsonn’s Story“.
Now finish killing Frostpaw Warriors/Shamans until you’ve looted 8 Crazed Furbolg Blood.
3. Behind the cave where you found Orsonn, you should see a small snowy path going west. Take it and ride back to Conquest Hold.
Turn in:
- [74] A Possible Link
- [75] The Bear God’s Offspring
Get the two follow ups:
- [74] Vordrassil’s Seeds
- [75] Destroy the Sapling
Fly to Camp Oneqwah.
Turn in [75] Deciphering the Journal, get the two follow ups:
- [75] Pounding the Iron
- [75] The Runic Prophecies (becomes available 20 seconds later)
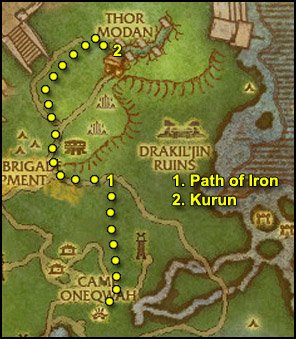
1. From the northeastern exit of Camp Oneqwah, go straight north, kill Silvercoat Stags on the way.
Keep going north until you reach the Path of Iron.
2. Follow the Path of Iron until you reach the intersection.
==Reminder== Don’t forget to use the Flashbang Grenade on Highland Mustangs on the way.
From there follow the dots on my map and you’ll find Kurun, who stands at the very top of the hill above Thor Modan (65.5,18).
Turn in [75] An Expedient Ally and get [75] Raining Down Destruction.
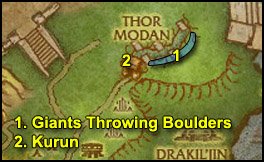
1. Northeast of Kurun you should see Giants throwing boulders down in the trench below.
Look for a Boulder:
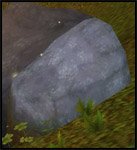
Loot 5 of them.
Go to the edge of the trench.
 Right-click the Boulder from your inventory and aim for a dwarf down in the trench.
Repeat 5 times.
In this area you should also find plenty of Silvercoat Stags. Now is the time to finish [75] The Unexpected ‘Guest’.
2. Go back to Kurun. Check this very short video to see how to get back up to Kurun:
Video: Way Back Up to Kurun
Turn in [75] Raining Down Destruction, get [75] Rallying the Troops.
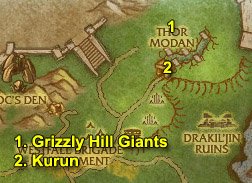
1. Go to the area north of the trench (68,11).
Target a Grizzly Hill Giant (it doesn’t work on the giants throwing boulders from the side, you have to find a giant fighting in the middle of the field)
 Right-click the Shard of the Earth on the Grizzly Hill Giant.
An Iron Rune Avenger will come out of the ground and attack you. Kill it.
Repeat 5 times.
After that, go finish [75] The Horse Hollerer. There are many Highland Mustangs just west of here.
2. Go back to Kurun, turn in [75] Rallying the Troops, get [75] Into the Breach.
Now we’re gonna jump down in the trench, check out this very short video to see exactly where I want you to jump down:
Video: Into the Breach Shortcut (horde)
No map needed for the following circuit.
1. You should find Iron Thane Argrum (70,13) right next to where we jumped down in the video.
Kill him.
2. Cross the small bridge, go a few paces south and you’ll find the Second Rune Plate (70,14.5).
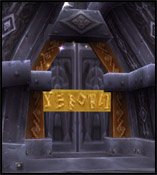
Righ-click it.
3. Go a few paces southwest to the other side of the bridge, you’ll find the First Rune Plate (69,14.5).
Right-click it.
4. Cross the small bridge south and you should find the Third Rune Plate (68.5,16).
Now clear the way out while finishing [75] Pounding the Iron.
==Note== If you already got a flying mount, fly out of the trench, fly to Kurun and turn in [75] Into the Breach, get [75] Gavrock.
If you don’t have a flying mount, clear the way out (or ride out if you feel like taking a risk).
Then go turn in [75] Into the Breach, get [75] Gavrock.
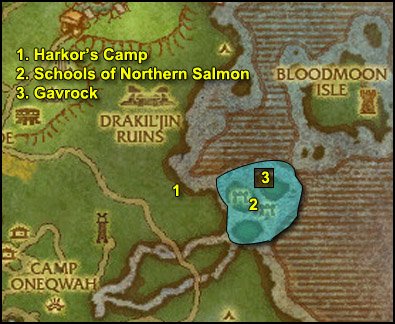
1. Go southeast to Harkor’s Camp (74,34).
Turn in [74] Say Hello to my Little Friend, get all the available quests from here:
- [75] Nice to Meat You
- [75] Therapy
- [75] It Takes Guts…
2. Go southeast to the isles called the Ruins of Tethys (78,37).
Once you’re on the isles, look around for a School of Northern Salmon:
 Get very close to it and right-click the Fishing Net.
Repeat this until you have 6 Northern Salmon. You can find more Schools of Northern Salmon all around those isles.
Tip: The water is shallow here, so you can mount up while looking for schools.
3. Go northeast to Gavrock (80,34).
Turn in [75] Gavrock, get [75] Runes of Compulsion.
==Note== From now on, kill Duskhowl Prowlers and Longhoof Grazers on sight.
1. Go southwest, back to Camp Oneqwah. Turn in:
- [75] The Unexpected ‘Guest’, get [75] An Intriguing Plan
- [75] The Horse Hollerer
- [75] Pounding the Iron
- [75] The Runic Prophecies, get [75] In the Name of Loken
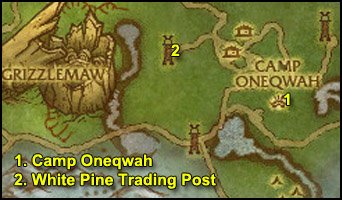
2. Go northwest to White Pine Trading Post (57.5,41).
Turn in [75] Fate and Coincidence, get the 2 follow ups:
- [75] Sasha’s Hunt
- [75] Anatoly Will Talk
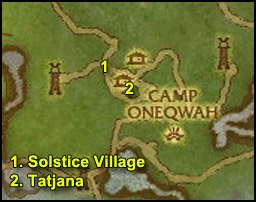
1. Go east to Solstice Village (60,40).
Kill Solstice Hunters and Duskhowl Prowlers on sight.
2. Once you’ve killed 12 Solstice Hunters, go to the center of the village.
A few paces south of the bonfire you should see Tatjana on her horse:
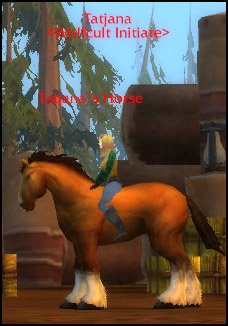
 Target Tatjana and right-click the Tranquilizer Dart.
Right-click the horse and you’ll be taken back to Sasha.
Turn in:
- [75] Sasha’s Hunt
- [75] Anatoly Will Talk, get [75] A Sister’s Pledge
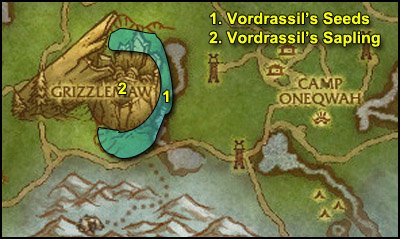
1. Go west to Grizzlemaw.
Look for Vordrassil’s Seeds:
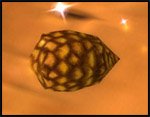
They can be found lying around in the furbolg camps all around the huge tree.
Gather 8 Vordrassil’s Seeds.
2. Find the slope taking you inside the tree and ride all the way down.
You should see a small tree down below:
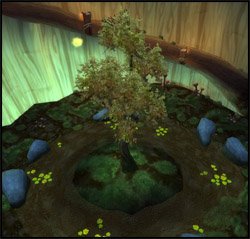
Go next to this tree.
 Right-click the Verdant Torch from your inventory.
Hearthstone back to Conquest Hold. Turn in:
- [74] Vordrassil’s Seeds
- [75] Destroy the Sapling
Get the follow up [75] Ursoc, the Bear God.
Fly to Camp Oneqwah.
Optional: [75] Ursoc, the Bear God.
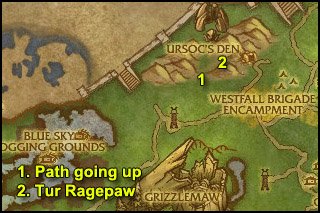
1. From Camp Oneqwah. Ride northwest until a narrow path going up at (51.5,27).
2. Follow this path up and you’ll find Tur Ragepaw (52,24).
Now before you talk to him, read the following paragraph.
Despite being a 3-man group quest, [75] Ursoc, the Bear God is soloable for tank and healer classes if you use the help of Tur Ragepaw correctly.
- If you are a tank or pet class (Protection Warrior, Paladin, Feral Druid, Death Knight, Hunter, Warlock). Tell Tur Ragepaw “We could use a healer“. He will heal your tank or your pet through the fight.
- If you are a healer class, tell Tur Ragepaw “Assume your druidic bear form, Tur.” And he will tank for you as long as you keep him alive with your heals.
- For other classes/specs it might be too difficult to solo the quest. With my mage in quest greens I couldn’t do it. It might be possible for rogues and dps warriors if they ask Tur Ragepaw to assume the role of a healer, depending on gear.
If you can’t solo it, try to look for a group. Duo’ing this quest should be easy.
==WARNING== During the fight, Ursoc will release a small black sludge called Blood of the Old God. Kill it ASAP, it only has 2K HPs, but it’s very annoying (does 1K damage + stun every 5 seconds or so).
 After the fight is over, target Ursoc’s corpse and use the Purified Ashes of Vordrassil.
==Note== You can also use the Purified Ashes of Vordrassil on the corpse even if someone else killed Ursoc.
If you can’t find a group, just save this quest for when you reach level 80.
Go turn in [75] Ursoc, the Bear God whenever you’re close to Conquest Hold or when your hearthstone is ready. I won’t tell you when to turn it in in the guide, so it’s up to you.
Go back to Camp Oneqwah.
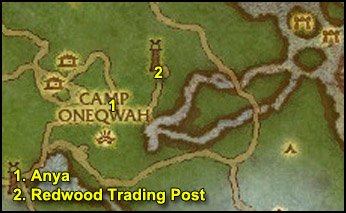
1. Go north of Camp Oneqwah and you’ll find a cave (65,43).
Go inside and you’ll find Anya.
Turn in [75] A Sister’s Pledge.
Sasha will come, get her quest [75] Hour of the Worg.
2. Go northeast to Redwood Trading Post, turn in [75] A Bear of an Appetite.
Talk to Hugh Glass, click on the text saying “Calm down, I want to ask you about the Iron Dwarves and Loken”
Let him speak until you get a quest update.
==Reminder== Kill Duskhowl Prowlers and Longhoof Grazers on sight.
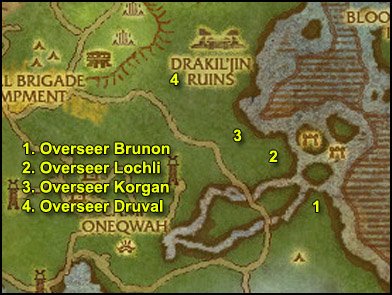
1. Go east/southeast to a summoning circle with 4 dwarves Iron Rune-Weavers channeling (79,44):
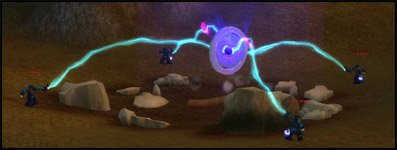
Kill the 4 Dwarves, Overseer Brunon will spawn. Kill him.
2. Go northwest to another summoning circle (75,37).
Kill the 4 Dwarves, Overseer Lochli will spawn. Kill him.
3. Go northwest to another summoning circle (72,34).
Kill the 4 Dwarves, Overseer Korgan will spawn. Kill him.
4. Go northwest to another summoning circle (68,30).
Kill the 4 Dwarves, Overseer Druval will spawn. Kill him.
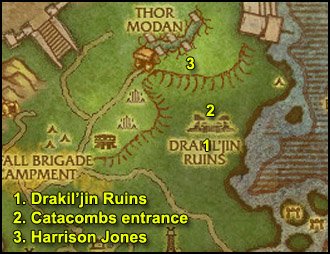
1. Go northeast to Drakil’jin Ruins (71,27).
==Note== Kill Drakkari Protectors and Drakkari Oracles on the way while going north.
2. Further north you’ll find an entrance to the catacombs at (71.5,23).
Look for Drakkari Canopic Jars:

Loot 5 of them.
3. Go deeper in the catacombs until you see a yellow “!” on your minimap (69.5,17.5). If there’s no “!” on the minimap, it means someone else is doint the escort quest, so you’ll have to wait a little.
Go to that room and you’ll find Drakkari Tablets in a corner:
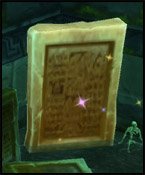
Loot the Drakkari Tablets.
Now talk to Harrison Jones and start the escort quest [75] Dun-da-Dun-tah!
It’s an easy escort quest as long as you let Harrison Jones tank the elite snake for you.
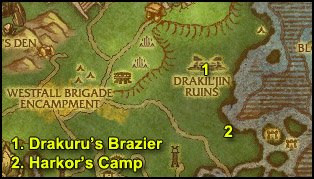
1. After the escort. Kill trolls in the ruins until you’ve looted 5 Sacred Mojo.
Then go to the middle of the Drakil’jin Ruins and find Drakuru’s Brazier, up some broken stairs (71.5,26).
 Right-click Drakuru’s Elixir.
Turn in [75] Voices From the Dust, get [75] Cleansing Drak’Tharon.
Now kill trolls around Drakil’jin Ruins until you finished [75] Therapy.
Optional – Instance: Drak’Tharon Keep.
Now we’ve got all the quests for Drak’Tharon Keep:
- [74] Search and Rescue
- [75] Cleansing Drak’Tharon
So from now on, if you feel like it, you should look for a group for Drak’Tharon Keep. It’s a very nice instance for level 74-76 players, I recommend it.
If you don’t feel like it or if you don’t find a group, you can abandon [74] Search and Rescue, it can easily be picked up in the future at the Granite Springs, if you change your mind. However, do not abandon [75] Cleansing Drak’Tharon, as it’s rather annoying to get that quest again if you abandon it.
2. Ride southeast back to Harkor’s Camp. Turn in:
- [75] Therapy
- [75] Dun-da-Dun-tah!
- [75] It Takes Guts…, get [75] Drak’aguul’s Mallet
Optional: [75] Hour of the Worg
This group quest is supposedly soloable by certain classes (Death Knights, Paladins, Hunters, Warlocks, Druids, etc). But it’s of course much easier to get a 2 or 3-man team for it.
So look for a group while following the rest of my guide, and when you find a group, come back to this section.
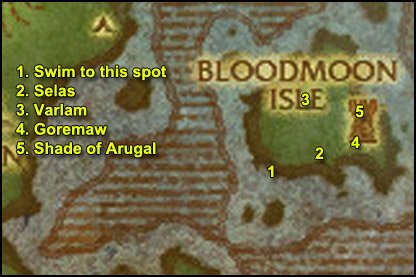
1. Swim northeast to Bloodmoon Isle (83,28).
2. Follow the path up and there will be a camp to your right, where you should find a big worgen called Selas (85.5,27.5). Kill it.
3. Get back on the path and further up to your left you’ll find another camp, where you will find Varlam (85,24). Kill him.
4. Once you reach the top of the hill, go around to the tower towards the southern side and you’ll find a big worg called Goremaw. Kill it.
5. Enter the tower, fight your way to the top. There you will find the Shade of Arugal.
Shade of Arugal Strategy
HP: 107,000
Phase 1: Shadowbolts for ~1500 dmg. Goes to Phase 2 at 75-70% HP.
Phase 2: Becomes invulnerable and summons 3 adds. Kill the adds to go back to Phase 1. When he hits 50% HP, he goes to Phase 3.
Phase 3: Becomes invulnerable again. Mind controls a party member which you’ll have to bring down to 35% health.
Once you break the Mind Control, Arugal goes back to Phase 1.
Bring him down to 25% HP and he’ll go to Phase 4.
Phase 4: It’s just like Phase 2, but with 9 adds instead of 3.
Kill the adds, then kill Arugal.
Sasha will show up and help you finish him off during the last phase. After the fight is over, turn in [75] Hour of the Worg.
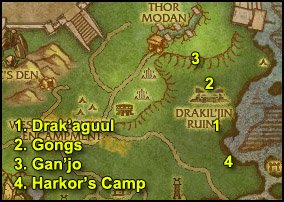
1. Now look for Drak’aguul. A big troll who spawns at (74,30) and patrols on the path towards Drakil’jin Ruins.
Kill him, loot the Drakil’jin Mallet.
Go back to Harkor’s Camp, turn in [75] Drak’aguul’s Mallet, get [75] See You on the Other Side.
2. Ride to Drakil’jin Ruins, go to the gongs infront of the catacombs entrance (71.5,25):
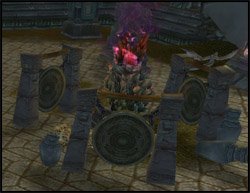
 Right-click the Drakil’jin Mallet while being very close to the one of the gongs.
You’ll die shortly after, it’s normal.
3. Go inside the catacombs and go deeper until you find Gan’jo.
Turn in [75] See You on the Other Side, get [75] Chill Out, Mon.
Right next to Gan’jo you should see Gan’jo’s Chest:
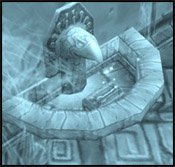
Right-click it and loot the Snow of Eternal Slumber.
Talk to Gan’jo and ask him to return you to the living.
Go back to the previous room.
 Target an Ancient Drakkari Warmonger or Soothsayer and right-click the Snow of Eternal Slumber.
Follow the Ancient Drakkari when it starts to run and then loot the Drakkari Spirit Particles after its mummy burns.
Repeat this 5 times.
4. Get out of the ruins, mount up and ride back to Harkor’s Camp.
Turn in [75] Chill Out, Mon, get [75] Jin’arrak’s End.
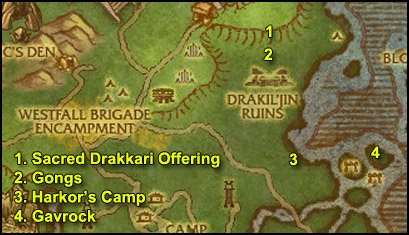
1. Ride to the Drakil’jin Ruins again.
Go inside the catacombs and look for a Sacred Drakkari Offering in the first room:

Loot it.
 Right-click the Drakkari Spirit Dust from your inventory.
2. Get out and go to the gongs just ouside the catacombs.
 Right-click the Infused Drakkari Offering from your inventory.
3. Go back to Harkor’s Camp. Turn in [75] Jin’arrak’s End.
Sell junk at the merchant here.
4. Go east to Gavrok, turn in [75] Runes of Compulsion, get [75] Latent Power.
Talk to Gavrock and click on the text saying “What can you tell me about Loken and the Iron Dwarves?”
Let him speak until you get a quest update.
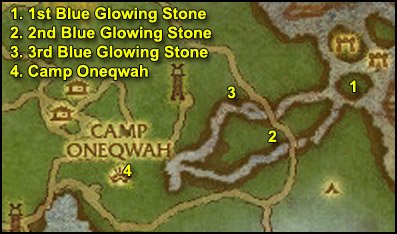
1. Go south/slightly southwest to an isle with a stone surrounded by a blue glow (79,40).
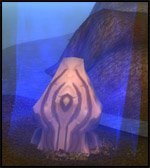
 Right-click the Shard of Gavrock.
==Note== Don’t forget to kill Longhoof Grazers on sight if you still need them for [75] Nice to Meat You.
2. Go southwest to another of those blue glow stones (74,44).
 Right-click the Shard of Gavrock.
3. Go northwest to another of those blue glow stones (71,39.5).
 Right-click the Shard of Gavrock.
4. Go southwest to Camp Oneqwah.
Turn in [75] In the Name of Loken, get [75] The Overseer’s Shadow.
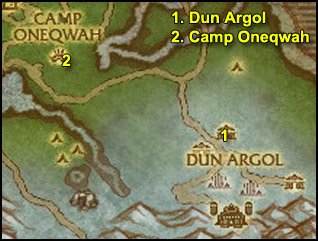
1. Go southeast to Dun Argol (75,55).
Complete the following 2 objectives:
- Kill Iron Rune-Smiths until you’ve looted the Golem Blueprint Section 1, 2 and 3
- Kill an Iron Rune Overseer, loot an Overseer’s Uniform
They’re mostly inside the buildings.
2. Go back to Camp Oneqwah, turn in:
- [75] The Overseer’s Shadow, get [75] Cultivating an Image
- [75] An Intriguing Plan, get [75] From the Ground Up
No map needed for this circuit.
1. Go back to Dun’Argol.
Two objectives again:
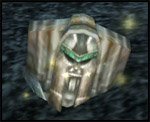
 Kill a dwarf, loot it, target the corpse and use Rokar’s Camera from your inventory. Repeat 8 times
- Gather 8 War Golem Parts
2. Go back to Camp Oneqwah, turn in:
- [75] Cultivating an Image, get [75] Loken’s Orders
- [75] From the Ground Up, get [75] We Have the Power
1. Mount up.
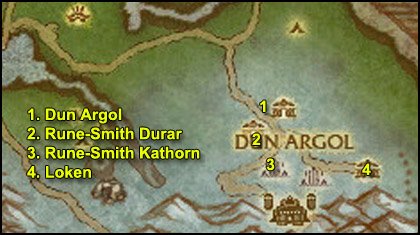
Ride back to Dun’Argol.
 Once in Dun’Argol, right-click the Overseer Disguise Kit. Yes, it works while mounted, and only if you are already mounted!
2. Ride up to the next tier with the two dwarven buildings.
First, go to the building on your right-hand side. You should find Rune-Smith Durar inside (75,57).
Cancel the Iron Rune Overseer Disguise buff. Kill Rune-Smith Durar, loot Durar’s Power Cell.
3.  Use the Overseer Disguise Kit again.
Get out of the building and go straight ahead, towards the next building (77,59).
Kill Rune-Smith Kathorn, loot Kathorn’s Power Cell.
4. Get out of the building.
Mount up.
 Use the Overseer Disguise Kit again.
Go about 20 yards north and you should see a path going east.
Follow this path until you reach the easternmost dwarven building (81,60).
Inside the building, right-click Loken’s Pedestal, listen to Loken’s speech and you’ll get a quest udpate.
Get out of the building.
Mount up.
Use the Overseer Disguise Kit.
Ride back to Camp Oneqwah.
==WARNING== Do NOT turn in [75] Loken’s Orders. The disguise will be very useful for the rest of the quests.
ONLY turn in [75] We Have the Power, get [75] … Or Maybe We Don’t.
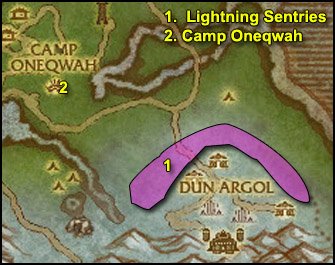
1. Ride to the snowy hills surrounding Dun’Argol (73,55)
 Right-click the Golem Control Unit from your inventory.
Kill 10 Lightning Sentries, your golem should reach Charge level 10.
Go back to Camp Oneqwah.
Turn in [75] … Or Maybe We Don’t, get [75] Bringing Down The Iron Thane
2. Ride back to Dun’Argol.
 Use the Overseer Disguise Kit again.
Ride to the very top of Dun’Argol and go inside the big dwarven building.
Take one of the elevators going down, you should find Iron Thane Furyhammer and The Anvil in this room.
 Now right-click the Golem Control Unit.
Go next to Iron Thane Furyhammer.
Now do this:
1. Use Ability #2
2. Cancel the Overseer Disguise buff.
3. Target Iron Thane Furyhammer and use Ability #1 whenever it’s up. Also use Ability#2 again whenever The Anvil recovers from the EMP.
4. Once Iron Thane Furyhammer is dead, stay in the Golem Suit and run away until they give up on following you. Don’t bother killing The Anvil. (Please note that you take no falling damage in the suit, so you can jump off high cliffs too to escape).
Once they’ve given up on you, mount up and ride back to Camp Oneqwah.
Turn in the 2 quests:
- [75] Bringing Down The Iron Thane
- [75] Loken’s Orders
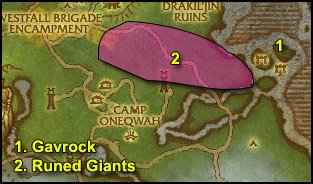
1. Ride northeast to Gavrock, turn in [75] Latent Power, get [75] Free at Last.
2. Ride southwest to a plains area at (72,37).
 Look for Runed Giants and use Gavrock’s Runebreaker on them.
- If it works, the giant will become friendly and you’ll get a quest update
- If it doesn’t work, the giant will attack you but will be in a much weaker state. So you’ll just have to re-use Gavrock’s Runebreaker until it works. Meanwhile, try to stun or to kite the giant until the item cools down.
Keep doing this until you’ve 4 Runed Giants Freed.
While you’re here, also kill Longhoof Grazers and Duskhowl Prowlers until you finish [75] Nice to Meat You!
No map needed for this part.
1. Ride to Harkor’s Camp. Turn in [75] Nice to Meat You!
2. Ride to Gavrock. Turn in [75] Free at Last.
You should be level 77 or somewhere around it. If you are ahead, that’s great, keep following and don’t skip anything. If you are behind, that’s not a problem either, just keep following normally. You’ll catch up eventually and there will be a lot of extra circuits at the end anyway.
