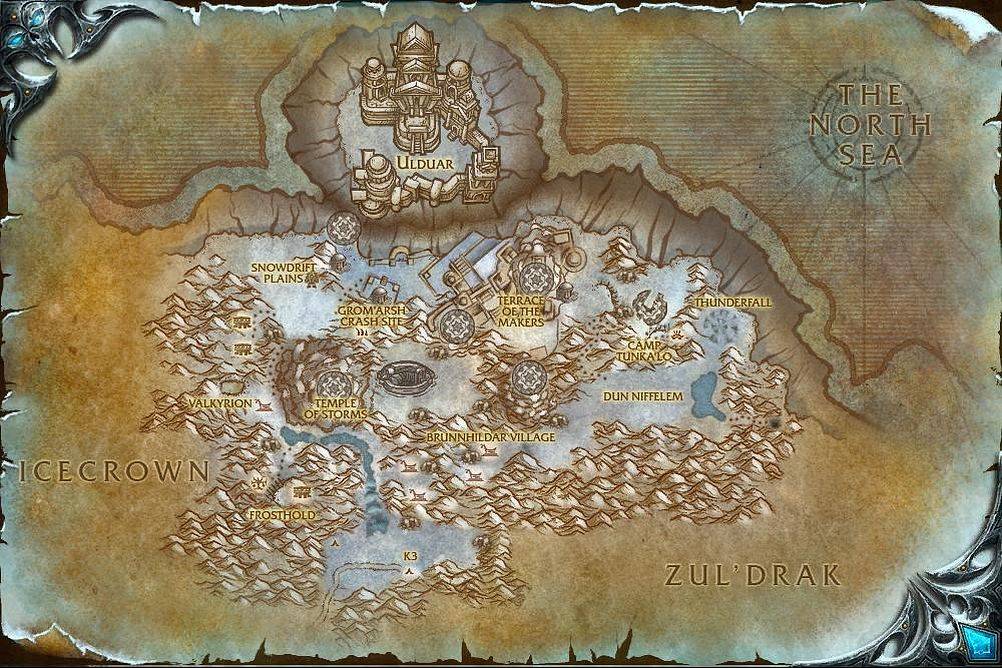
- Fly north out of Dalaran into K3. Get the quests:
- Clean Up
- Expression of Gratitude
- Reclaimed Rations
- Equipment Recovery
- They Took Our Men!
- Pick up 10 Charred Wreckage just west of K3.
- Then, return to K3 and turn in Clean Up. Get the follow-up Just Around the Corner.
- Ride west into the Minefield and pick up Sparksocket’s Tools in the center of the minefield. This is a no-fly zone so navigate your way through the maze or just simply let yourself get bumped through the mines towards the center.
- Fly west to the western area of the gnoll camp and kill Gnarlhide. Pick up 16 Dried Gnoll Rations from the crates around camp.
- Then, fly back to K3. (avoid the Minefield area)
- At K3, turn in:
- Expression of Gratitude
- Just Around the Corner and get the follow-up Slightly Unstable. Turn that in and get the follow-up A Delicate Touch
- Reclaimed Rations and get the follow-up Ample Inspiration
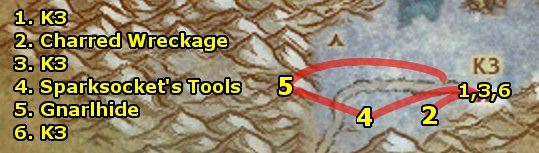
- Fly east to Garm’s Bane. The mobs won’t attack you, so you can just dismount and lay Improved Land Mines at your leisure. Lay them in a line, and stack each spot with two mines for quickest killing results.
- Fly northwest to Tore Rumblewrench and get her quests:
- Moving In
- Ore RepossessionHead into Crystalweb Cavern.
- Clear your way through and get the quest Only Partly Forgotten from An Injured Goblin Miner.
- Head deep into the cavern all the way east and kill Crystalweb Weaver for an Icetip Venom Sac.
- In the opening right before the long tunnel to the weaver, kill Snowbolds for 5 Impure Saronite Ore.
- Go back to an Injured Goblin Miner and complete Only Partly Forgotten. Get the escort quest Bitter Departure. Talk to the goblin again to start the escort. Finish killing 12 Crystalweb Spiders on the way out.
- Turn in Moving In and Ore Repossession to Tore Rumblewrench.
- Pick up an U.D.E.D. from the dispenser next to Tore Rumblewrench. Mount and quickly search for an Ironwool Mammoth (They wander around – ride southwest along the yellow line and look for one) then throw the U.D.E.D at it and gather 8 Hearty Mammoth Meat.
- Fly back to K3.

- At K3, turn in your quests:
- Ample Inspiration
- A Delicate Touch
- Bitter DepartureGet the new quest, Opening the Backdoor.
- Fly east and pick up the Transporter Power Cell right at where the waves start spawning at Garm’s Bane.
- Fly east up the ramp to the Teleportation Pad. Use the Transporter Power Cell while standing on it. You will warp back to K3.
- Turn in Opening the Backdoor. Get the follow-up Know No Fear then warp back by stepping onto the teleportation pad in K3.
- Talk to Gino and get A Flawless Plan.
- Head into the cave and clear to the very end of it, killing 6 Garm Watcher and 8 Snowblind Devotee on the way. Place the Explosive Bundle, and kill Tormar Frostgut. Then, get out of the cave. Turn in A Flawless Plan and get the follow-up Demolitionist Extraordinaire.
- Turn in Opening the Backdoor. Get the follow-up Know No Fear then warp back by stepping onto the teleportation pad in K3.
- Take the teleporter back to K3. Turn in Know No Fear and Demolitionist Extraordinaire.
Get the follow-up quests Overstock and When All Else Fails. - Fly northwest to Sifreldar Village Kill Sifreldar Storm Maidens for Cold Iron Keys and Free 5 Goblin Prisoners and collect 8 K3 Equipment.
- Fly back to K3 and turn in Equipment Recovery and They Took Our Men!
Get the follow-up Leave No Goblin Behind.
Finally, Talk to Ricket and take the flight further into the Storm Peaks, to Frosthold.
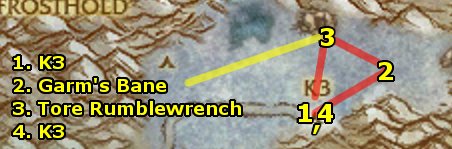
- You will arrive in Frosthold. Get the Flight Path. Turn in When All Else Fails and get the quests:
- Ancient Relics
- Loyal Companions
- Offering Thanks
- On Brann’s TrailTurn in Offering Thanks and get the follow-up Missing Scouts.Fly up slightly southeast and get Royal Companions.
- Fly east to Bor’s Fall and talk to the Frostborn Scout.
- Fly up northeast to the Abandoned Camp. Search the Disturbed Snow for the Burlap-Wrapped Note.
- Fly further northeast to The Foot Steppes. Kill Ice Steppe Rhinos for 8 Fresh Ice Rhino Meat.
- Fly up over the mountain south into The Forlorn Mine. Talk to Lok’lira the Crone and turn in Leave No Goblin Behind. Get the follow-up The Crone’s Bargain.
- Kill Overseer Syra, just east in the next big room (She also patrols into the tunnels to the north and south), for the Runes of the Yrkvinn, then return to Lok’lira the Crone and turn in The Crone’s Bargain and get the follow-up Mildred the Cruel.
- Head east and talk to Mildred the Cruel. Turn in Mildred the Cruel and get the follow-up Discipline. Head into the north and south tunnels in the room and use your Disciplining Rod on 6 Exhausted Vrykul. Then, return to Mildred the Cruel and turn in Discipline and get the follow-up Examples to be Made.
- Head east to Garhal just in the next room and kill him. Then, return to Mildred the Cruel and turn in Examples to be Made and get the follow-up A Certain Prisoner.
- Return west to Lok’lira the Crone and turn in A Certain Prisoner. Get the follow-up A Change in Scenery.
- Kill Overseer Syra, just east in the next big room (She also patrols into the tunnels to the north and south), for the Runes of the Yrkvinn, then return to Lok’lira the Crone and turn in The Crone’s Bargain and get the follow-up Mildred the Cruel.

- Head into the Forlorn Mine.
- Talk to Lok’lira the Crone and turn in Leave No Goblin Behind. Get the follow-up The Crone’s Bargain.
- Kill Overseer Syra, just east in the next big room (She also patrols into the tunnels to the north and south), for the Runes of the Yrkvinn, then return to Lok’lira the Crone and turn in The Crone’s Bargain and get the follow-up Mildred the Cruel.
- Head east and talk to Mildred the Cruel. Turn in Mildred the Cruel and get the follow-up Discipline. Head into the north and south tunnels in the room and use your Disciplining Rod on 6 Exhausted Vrykul. Then, return to Mildred the Cruel and turn in Discipline and get the follow-up Examples to be Made.
- Head east to Garhal just in the next room and kill him. Then, return to Mildred the Cruel and turn in Examples to be Made and get the follow-up A Certain Prisoner.
- Return west to Lok’lira the Crone and turn in A Certain Prisoner. Get the follow-up A Change in Scenery.
- Kill Overseer Syra, just east in the next big room (She also patrols into the tunnels to the north and south), for the Runes of the Yrkvinn, then return to Lok’lira the Crone and turn in The Crone’s Bargain and get the follow-up Mildred the Cruel.
- Head east out of the mine to Brunnhildar Village. Turn in A Change in Scenery and get the follow-up Is That Your Goblin?
- Head just southeast and talk to Agnetta Tyrsdottar and challenge and kill her.
- Return to Lok’lira the Crone and turn in Is That Your Goblin? and get the follow-up The Hyldsmeet. Talk to Lok’lira again and go through her dialogue Turn in the quest and get the follow-up Taking On All Challengers.
- Look around camp for 6 Victorious Challengers and challenge and kill them. Then, return to Lok’lira the Crone and turn in Taking on All Challengers and get the follow-up You’ll Need a Bear.
- Head just southeast and talk to Agnetta Tyrsdottar and challenge and kill her.
- Head east to Brijana and turn in You’ll Need a Bear and get the follow-up Going Bearback. You’ll enter into an automated ride. Keep using your Flaming Arrow (Ability 1) on cooldown and don’t Sprint until you’re done and just want to get back faster.

- Once you return to Brijana and complete the quest, turn in Going Bearback and get the follow-up Cold Hearted.
- Fly east to Dun Niffelem and mount directly onto a Captive Proto-Drake. Once on, use Ice Shard on Brunnhildar Prisoners and make sure you stay in range as they get grabbed by your drake. Free 3 since you can only carry that many, then fly back west. You need to rescue 9, so make two more trips. When done, turn in Cold Hearted. Get the follow-up Deemed Worthy.
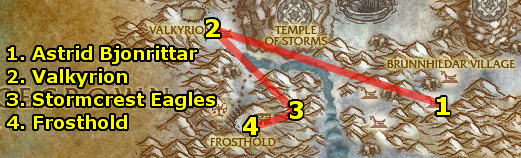
- Talk to Astrid Bjonrittar in the southern area of Brunnhildar Village. Turn in Deemed Worthy and get the follow-up Making a Harness. Also, get the following quests in the next house to the west:
- Aberrations
- Off With Their Wings
- Yuda’s Folly
- Fly southwest and kill Icemane Yetis for 3 Icemane Yeti Hides.
- Fly further southwest to Garm’s Bane and lay out the Improved Land Mines and kill 12 Garm Invaders with them.
- Return to Astrid Bjonrittar and turn in Making a Harness. Get the follow-ups The Last of Her Kind and The Slithering Darkness.
- Fly east and enter the cave. First, kill 8 Ravenous Jormungars as you clear to the back of the cave. When done, mount the Injured Icemaw Matriarch and take the ride out of the cave.
- Return to Astrid Bjonrittar.
- At Astrid Bjonrittar, turn in The Last of Her Kind and The Slithering Darkness. Get the follow-up The Warm-Up.
- Head northeast to Kirgaraak. Spam Maul (Ability 4) as your main damage dealer. You can also do a combo attack by using Smash (Ability 5) to knock your opponent away then using Charge (Ability 6) right after. Do that attack on cooldown as well.
- Turn in The Warm-Up and get the follow-up Into the Pit. Enter the pit and get on the bear. Kill 6 Hyldsmeet Warbears. Make sure to keep an eye on your own health too! Then, turn in Into the Pit and get the follow-up Prepare for Glory.
- Head northwest to Lok’lira the Crone and turn in Prepare for Glory. Get the follow-up Lok’lira’s Parting Gift.
- Speak to Gretta the Arbiter at the northeastern area of the village and turn in Lok’lira’s Parting Gift. Get the follow-up The Drakkensryd. You’ll be flown to the Temple of Storms. Use your Hyldnir Harpoon to jump onto a targeted drake and enter hand to hand combat with an Hyldsmeet Drakerider. You can use your normal abilities to kill it, and can eat and drink on the drake if need be. Kill 10 Hyldsmeet Drakeriders. Finish by using your Hyldnir Harpoon on a Column Ornament at the temple. Turn in The Drakkensryd to Thorim. Get the follow-up Sibling Rivalry. Talk to him and go through the dialogue to complete the quest and get the follow-up Mending Fences.
- Head northeast to Kirgaraak. Spam Maul (Ability 4) as your main damage dealer. You can also do a combo attack by using Smash (Ability 5) to knock your opponent away then using Charge (Ability 6) right after. Do that attack on cooldown as well.
- Fly west to Valkyrion. In the area, complete the following objectives while killing 12 Nascent Val’kyr and killing Valkyrion Aspirants for about 6 Vials of Frost Oil.
- Kill Yulda the Stormspeaker. Get Valkyrion Must Burn from the Harpoon Crate next to her.
- Use a Valkyrion Harpoon Gun and aim the Flaming Harpoon on the stacks of hay to start 6 Fires. You may want to use the other set of harpoon guns as well to get different angles for aiming.
- Throw the Vials of Frost Oil onto the eggs and freeze 30 Proto-Drake Eggs. The eggs are mostly in groups of 6.
- Fly southeast atop the mountain and use your Fresh Ice Rhino Meat to Feed 8 Stormcrest Eagles.
- Fly southwest to Frosthold and turn in your quests:
- Ancient Relics
- Loyal Companions and get the follow-up Baby Stealers
- Missing Scouts and get the follow-up Stemming the Aggressors
- On Brann’s Trail and get the follow-up Sniffing Out the Perpetrator
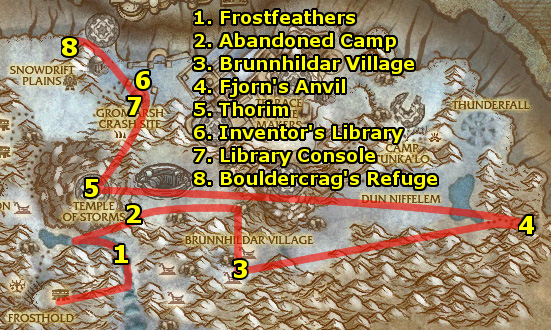
- Fly east and kill 8 Frostfeather Screechers and 8 Frostfeather Witches and pick up 15 Stormcrest Eagle Egg along the frozen river.
- Fly north and use the Frosthound Collar at the Abandoned Camp. Use abilities on cooldown: Net (Ability 1) to net Pursuers and use Ice Slick (Ability 2) on the ground behind you to slow them down.
When you reach the cave, kill Tracker Thulin. Get Brann’s Communicator and use it and turn in Sniffing Out the Perpetrator. Get the follow-up Pieces to the Puzzle. - Fly southeast to Brunnhildar Village. Turn in your quests:
- Aberrations
- Off With Their Black Wings
- Valkyrion Must Burn
- Yulda’s Folly
- Fly east to Fjorn’s Anvil. Pick up a Granite Boulder off the ground then target a Stormforged Iron Giant and use Thorim’s Charm of Earth. You can only hold one boulder at a time. You will also get a Slag Covered Metal – start the quest The Refiner’s Fire from it.
- Kill Seething Revenants for 10 Furious Sparks.
- Head further east to the actual Anvil in Fjorn’s Anvil. Kill Fjorn (by picking up a Granite Boulder and using Thorim’s Charm of Earth as usual). Then, use the Anvil to complete The Refiner’s Fire. Also, finish killing 5 Stormforged Iron Giants.
- Kill Seething Revenants for 10 Furious Sparks.
- Fly to Thorim and turn in Mending Fences and The Refiner’s Fire and get the follow-up Forging an Alliance.
- Fly northwest to The Inventor’s Library.
- Kill Library Guardians for 6 Investor’s Disk Fragments, then combine it into the Investor’s Disk.
Then, use Brann’s Communicator to summon Brann Bronzebeard. Turn in Pieces of the Puzzle and get the follow-up Data Mining. - Use the Investor’s Disk on 7 Databanks to gather 7 Hidden Data.
Then, use Brann’s Communicator to summon Brann Bronzebeard. Turn in Data Mining. Get the follow-up The Library Console.
- Kill Library Guardians for 6 Investor’s Disk Fragments, then combine it into the Investor’s Disk.
- Go southwest into the actual library building. Click the Library Console and turn in The Library Console. Get the follow-up Norgannon’s Shell. Use the Charged Disk to summon Archivist Mechaton. Kill it for Norgannon’s Shell
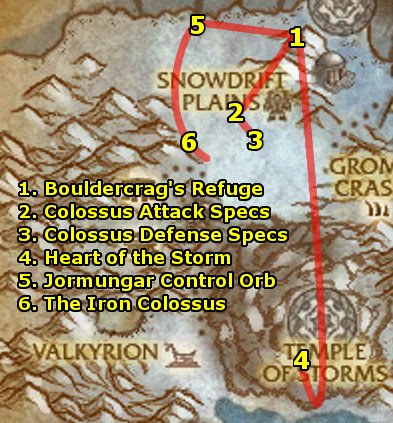
Then, use Brann’s Communicator to summon Brann Bronzebeard. Turn in Norgannon’s Shell. Get the follow-ups Aid from the Explorers’ League and The Exiles of Ulduar. - Fly northwest to Bouldercrag’s Refuge.
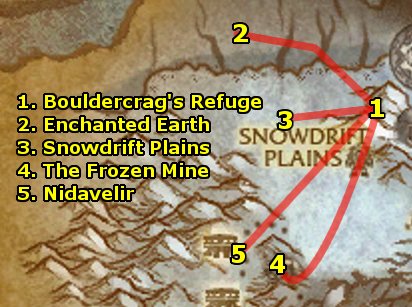
- At Bouldercrag’s Refuge, Get the Flight Path. Turn in The Earthen of Ulduar and get the follow-up Rare Earth. Also, Set your Hearthstone to Bouldercrag’s Refuge.
- Fly northwest down the cliff face. Mine 7 Enchanted Earth.
- Then, Hearth back to Bouldercrag’s Refuge and turn in Rare Earth. Get follow-ups Fighting Back and Relief for the Fallen.
- Then, Hearth back to Bouldercrag’s Refuge and turn in Rare Earth. Get follow-ups Fighting Back and Relief for the Fallen.
- Fly northeast down to the Snowdrift Plains. Kill 10 Stormforged Attackers and use your Telluric Poultice to heal 8 Fallen Earth Defenders.
- Then, return to Bouldecrag’s Refuge. Turn in Fighting Back and Relief for the Fallen. Get the follow-ups Slaves of the Stormforged and The Dark Ore.
- Then, return to Bouldecrag’s Refuge. Turn in Fighting Back and Relief for the Fallen. Get the follow-ups Slaves of the Stormforged and The Dark Ore.
- Fly southwest to The Frozen Mine. Collect 5 Dark Ore Samples, Kill 3 Stormforged Taskmasters, and talk to 8 Captive Mechagnomes and attempt to free them.
- Then, return to Bouldercrag’s Refuge. Turn in Slaves of the Stormforged and The Dark Ore. Get the follow-ups The Gifts of Loken and Facing the Storm.
- Then, return to Bouldercrag’s Refuge. Turn in Slaves of the Stormforged and The Dark Ore. Get the follow-ups The Gifts of Loken and Facing the Storm.
- Fly southwest to Nidavelir.
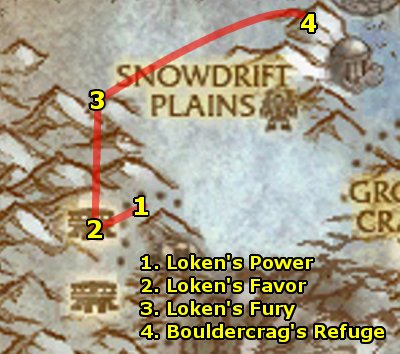
In Nidavelir, kill a Stormforged War Golem for a Dark Armor Plate. This starts the quest Armor of Darkness. While flying in the next three steps to destroy Loken’s items, kill 10 Nidavelir Stormforged and get 4 Dark Armor Samples from the Stormforged War Golems.
All of the items to destroy are inside small buildings.
- Destroy Loken’s Power.
- Destroy Loken’s Favor.
- Destroy Loken’s Fury.
- Then, return to Bouldercrag’s Refuge.

- At Bouldercrag’s Refuge, turn in:
- Armor of Darkness and get the follow-up The Armor’s Secrets
- Facing the Storm
- The Gifts of Loken
- Fly southeast to the other side of the mountain to Mimir’s Workshop. Talk to Attendant Tock and wait for him to finish investigating the Armor Plate.
- Then, return to Bouldercrag’s Refuge. Turn in The Armor’s Secret. Get the follow-up Valduran the Stormborn.
- Then, return to Bouldercrag’s Refuge. Turn in The Armor’s Secret. Get the follow-up Valduran the Stormborn.
- Fly southwest to Valduran the Stormborn. Use Bouldercrag’s War Horn to summon Bruor and Bouldercrag to help you. Kill Valduran.
- Then, return to Bouldercrag’s Refuge. Turn in Valduran the Stormborn. Get the follow-ups Destroy the Forges! and Hit Them Where it Hurts.
- Then, return to Bouldercrag’s Refuge. Turn in Valduran the Stormborn. Get the follow-ups Destroy the Forges! and Hit Them Where it Hurts.
- Fly to the Forges and use Bouldercrag’s Bomb to destroy the North, Central, and South Lightning Forge. They are all very close to each other. Kill 10 Stormforged Artificer as well.
- Then, return to Bouldercrag’s Refuge.
- At Bouldercrag’s Refuge, turn in Destroy the Forges! and Hit Them Where it Hurts. Get the follow-up A Colossal Threat.
- Fly back to the forge area. Get the Colossal Attack Specs.
- Get the Colossal Defense Specs.
- Then, return to Bouldercrag’s Refuge. Turn in A Colossal Threat and get the follow-up The Heart of the Storm.
- Then, return to Bouldercrag’s Refuge. Turn in A Colossal Threat and get the follow-up The Heart of the Storm.
- Fly in from a small hole on the south side of the Temple of Storms (fly north, facing the S in the Temple of Storms on the map) and fly in all the way to the Heart of the Storm. “Attempt” to loot the Heart of the Storm.
- Then, Hearth back to Bouldercrag’s Refuge. Turn in Heart of the Storm and get the follow-up The Iron Colossus.
- Then, Hearth back to Bouldercrag’s Refuge. Turn in Heart of the Storm and get the follow-up The Iron Colossus.
- Fly northwest and use a Jormungar Control Orb to take control of a Tamed Jormungar. Its abilities are:
- Ability 1: Submerge – you can only move while submerged. When you submerge, you gain the ability to Emerge – you can only attack while emerged.
- Ability 2: Jormungar Strike – powerful melee strike. Use this attack on cooldown.
- Ability 3: Acid Breath – powerful stacking dot. Use this attack on cooldown as well.
- Head west to The Iron Colossus. (Submerge first to move).
Emerge next to him and then start spamming your two attack abilities, Jormungar Strike and Acid Breath. The big gimmick to the fight is that when The Iron Colossus emotes: “The Iron Colossus prepares to slam the ground in front of him!” you must immediately Submerge and run BEHIND him (you can and should start moving even before the animation for being underground shows up – you can move right after submerging). Emerge behind him, then continue attacking. Rinse and repeat each time he emotes. You cannot get hit by his ground slam attack – if you manage to dodge it each time, you’ll kill him hanildy.- Finally, return to Bouldecrag’s Refuge to turn in the final part of this long quest chain.
To conclude with this area, turn in your remaining quests:
- Fly to Frosthold and turn in:
- Baby Stealers
- Stemming the Aggressors and get the follow-up Sirana Iceshriek (Group)
- Fly to K3 and turn in Overstock.
Congratulations! You should have hit level 80 by now, and have turned in all the most convenient quests.