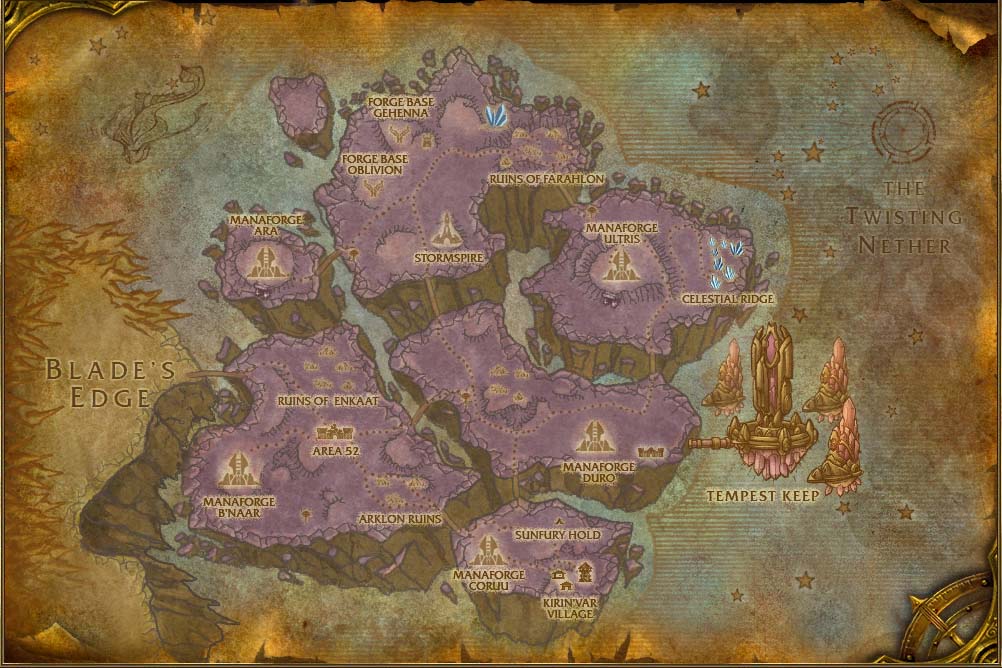
Area 52
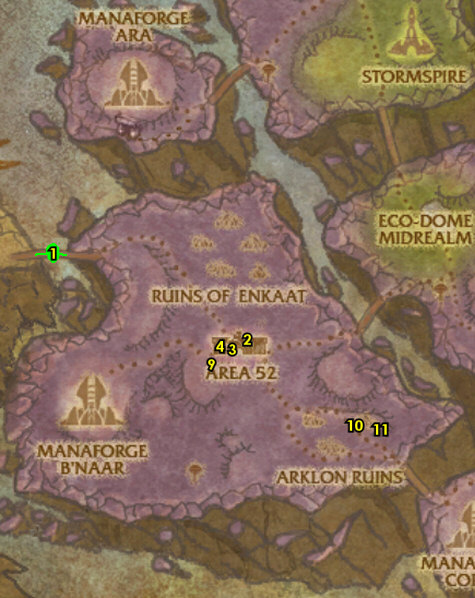
01) As you enter Netherstorm, on Gyro-Plank Bridge, accept (from the patrolling goblin /target) “Off To Area 52” 21.55.
NOTE: If you cannot accept it, make sure you abandon any quests that are currently in your quest log that takes you to Netherstorm, as you will then be able to accept this quest and reap more rewards from it.
02) Head SE to Area 52 and just at the NE outskirts of the town get the Flight Path from the Flight Master /target 34.64.
03) Go into Area 52 and turn in “Off To Area 52” 33.65, accept “You’re Hired!“.
04) Go in the Inn (the northern hut in town) and from the Innkeeper /target 32.64 make Area 52 your new home.
05) In the Inn, accept (SCRYER ONLY) “Manaforge B’naar” 32.64.
06) Just outside of the Inn, on your right, from the Wanted Poster 32.65, accept “Wanted: Annihilator Servo!” and “Breaking Down Netherock“.
07) On the east outside of the Inn, from the ethereal 32.64, accept “Consortium Crystal Collection“.
08) Next to you from the goblin under the red canopy, accept “Securing the Shaleskin Shale“32.64.
09) SW in town accept “The Archmage’s Staff” 31.66.
10) Go SE to Arklon Ruins and do “The Archmage’s Staff“: use the Conjuring Powder quest item near the Arklon Brazier 41.72, then kill/loot Ekkorash the Inquisitor when she spawns.
11) Just east a bit do “Consortium Crystal Collection“: kill/loot Pentatharon /target (big dread lord demon 42.73).
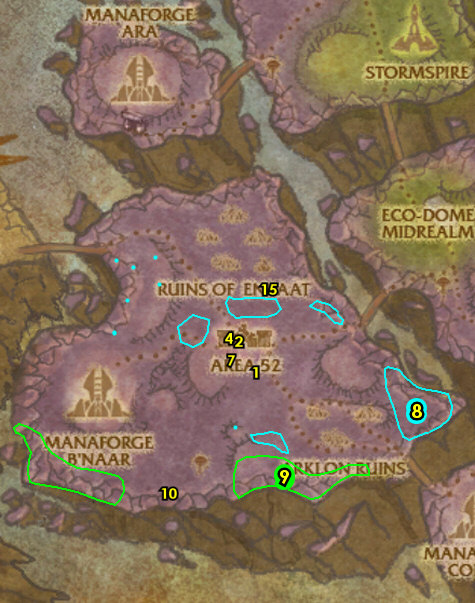
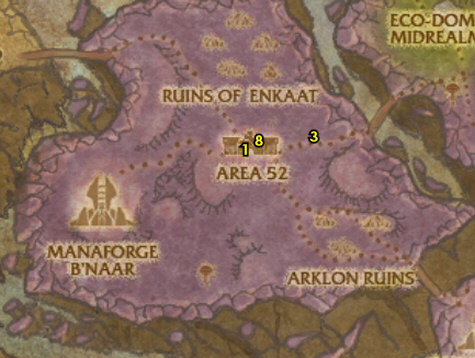
12) Go back NW to Area 52 and next to the Inn turn in “Consortium Crystal Collection” (32.64, #4 on map), accept “A Heap of Ethereals“.
13) SW in town turn in “The Archmage’s Staff” (31.66, #9 on map), accept “Rebuilding the Staff“.
14) NE in town accept “Pick Your Part” (33.65, #3 on map).
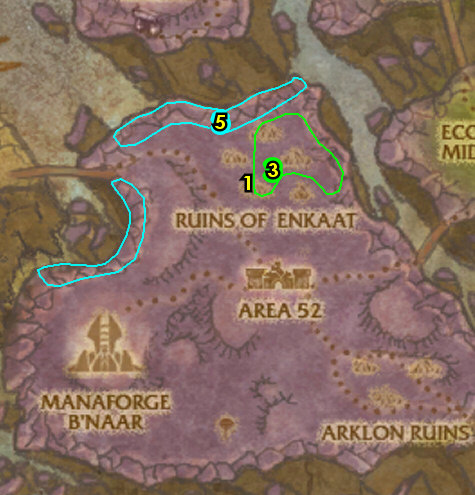
Ruins of Enkaat
01) Go north to the Ruins of Enkaat and accept (from the goblin) “Recharging the Batteries” 31.57.
02) From the orange robot right next to you accept and do the long but easy escort “Mark V is Alive!“: escort the robot /target around the ruins.
NOTE: If the robot is not there, that means someone else is currently doing the escort, if so keep checking back as you are doing the next few steps.
ALSO NOTE: While doing the escort, work on the following step as well:
03) At the the Ruins of Enkaat do “Rebuilding the Staff” along with “You’re Hired!“: kill/loot the Disembodied (ghost mobs) for the 4 crystals and pick up 10 red Etherlithium Matrix Crystals.
04) Back at the goblin at Ruins of Enkaat turn in (if you did it) “Mark V is Alive!” (31.57, #1 on map).
05) Go to the northern edges of Ruins of Enkaat around 30.52 and do “Recharging the Batteries“: use the Battery Recharging Blaster quest item on Phase Hunters right when they have very little health left.
06) Back at the goblin at Ruins of Enkaat turn in “Recharging the Batteries” (31.57, #1 on map).
NOTE: You can check to see if you can do the “Mark V is Alive!” escort here if you haven’t yet.
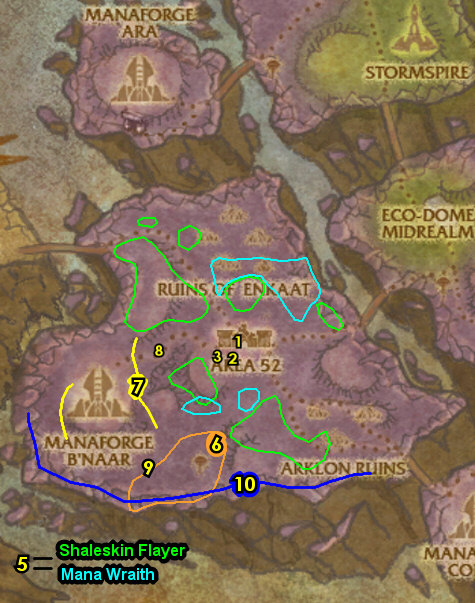
Area 52
01) Go back south to Area 52 and in the middle of town turn in “You’re Hired!” 33.65. Accept “Invaluable Asset Zapping” and “Report to Engineering“.
02) South in town turn in “Report to Engineering” 32.67, accept “Essence for the Engines“.
03) SW in town turn in “Rebuilding the Staff” 31.66, accept “Curse of the Violet Tower“.
04) Use Archmage Vargoth’s Staff (in your backpack) anywhere to summon Image of Archmage Vargoth, then turn in “Curse of the Violet Tower“, accept “The Sigil of Krasus“.
05) All around the outskirts of Area 52 do “Securing the Shaleskin Shale” along with “Essence for the Engines“: kill/loot the Shaleskin Flayers and Mana Wraiths.
06) Go south to The Heap around 31.75 and do “A Heap of Ethereals” along with “Pick Your Part“: kill/loot the Zaxxis ethereal mobs, and pick up 10 Ethereal Technology objects on the ground.
07) Go SW to Manaforge B’naar around 26.67 and do “Wanted: Annihilator Servo!“: kill/loot an Arcane Annihilator (lvl 68 Elite yellow robot /target).
NOTES: There are a few patrolling around the area. These should be soloable with good skill, but be prepared. Keep the next step in mind:
08) SCRYER ONLY: At Manaforge B’naar do “Manaforge B’naar“: kill/loot Captain Arathyn /target 28.65.
09) GROUP 3+ Players (or soloable): South at The Heap you can accept “It’s a Fel Reaver, But with Heart” 27.77, then do it just south a bit by using the Fel Zapper quest item on the huge Scrapped Fel Reaver (lvl 70 Elite) then kill/loot it. Then turn it in.
NOTES: The Fel Reaver itself does not attack, but the adds keep coming. This quest can be soloable by avoiding the adds. You can accomplish that easily with a flying mount at 70 by landing on the rock next to him (if you choose to wait to do it then), or there are is a trick where you start the event (shock it first), then move back to the tent where you got the quest, wait about 4-5 minutes until the adds despawn then the fel reaver is a free kill at that point.
10) GROUP 2+ Players (or soloable?): South at The Heap do “Breaking Down Netherock“: kill Netherock /target (lvl 68 Elite). This big black rock giant with purple spikes patrols at the southern edge of the island.
NOTES: Most classes should be able to solo this with good skill, a good tip would be to clear the mobs around him first and kill his mini rock adds last. If you cant do it then skip it.
Arklon Ruins
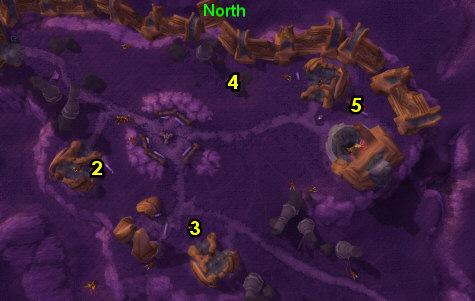
01) Go east to Arklon Ruins and do “Invaluable Asset Zapping“: click on these 4 objects around the ruins:
02) Click on Multi-Spectrum Terrain Analyzer 40.73.
03) Click on Hyper Rotational Dig-A-Matic 41.74.
04) Click on Servo-Pneumatic Dredging Claw 41.72.
05) Click on Big Wagon Full of Explosives 42.72.
Area 52
01) Go back NW to Area 52 and down in the ravine turn in “Invaluable Asset Zapping” 34.68. Accept “Dr. Boom!“.
02) Go into the NE part of town and turn in “Pick Your Part” and “Wanted: Annihilator Servo!” 33.65. Accept “In A Scrap With The Legion” and “Help Mama Wheeler“.
03) Next to you in the middle of town, turn in (if you did it) “Breaking Down Netherock” 33.65.
04) From the ethereal north in town turn in “A Heap of Ethereals” 32.64. Accept “Warp-Raider Nesaad“. NOTE: “Another Heap of Ethereals” is a repeatable rep quest for The Consortium, but no XP.
05) Next to you from the goblin under the red canopy, turn in “Securing the Shaleskin Shale” 32.64, accept “That Little Extra Kick“.
06) SCRYER ONLY: In the Inn next to you turn in “Manaforge B’naar” 32.64, accept “High Value Targets“. And next to you accept “BloodGem Crystals“.
NOTE: My guide will not list and continue these quest chains, but you can do them if you are going to increase scryer rep along with some more XP, but this is not needed to get to level 70.
07) South in town turn in “Essence for the Engines” 32.67, accept “Elemental Power Extraction“.
08) Do “That Little Extra Kick“: kill/loot Nether Rays. There is a large concentration of these SE around 44.71, and you can find more sporadically spaced out around the island.
09) South at the island around 35.77 do “Elemental Power Extraction“: use the Elemental Power Extractor quest item on living Warp Aberrations or Sundered Rumblers, then loot the blue object dropped with the corpse.
10) West at The Heap do “Warp-Raider Nesaad“: kill Warp-Raider Nesaad /target (ethereal standing at 28.79).
11) Hearth to Area 52.
12) Outside of the Inn on your left, from the ethereal turn in “Warp-Raider Nesaad” (32.64, #4 on map), accept “Request for Assistance“.
13) Next to you from the goblin under the red canopy, turn in “That Little Extra Kick” 32.64.
14) South in town turn in “Elemental Power Extraction” (32.67, #7 on map).
15) Go NE to Camp of Boom 35.60 and do “Dr. Boom!“: use the Boom’s Doom quest item to kill Dr. Boom /target.
NOTE: Watch out for his bombs, they do a lot of damage, you can also manually attack him, but he has a LOT of hit points. A big trick is to stand on the spikes next to him and the bombs won’t touch you, See Image.
16) Go to the SE outskirts of Area 52, in the ravine, turn in “Dr. Boom!” (34.68, #1 on map).
Town Square
01) Head SE to the southern island in Netherstorm and at Manaforge Coruu do “The Sigil of Krasus“: kill/loot Spellbinder Maryana /target around 52.82.
NOTE: She has a bright white staff, and patrols all around the outside of Manaforge Coruu.
02) Use Archmage Vargoth’s Staff (in your backpack) to turn in “The Sigil of Krasus“, accept “Krasus’s Compendium“.
03) Head east to Town Square and at the stables accept “Needs More Cowbell” and “Indispensable Tools” 58.85.
04) South a bit at the tower 58.86 accept “The Unending Invasion“, “A Fate Worse Than Death“, “The Sunfury Garrison” and “Malevolent Remnants“.
05) Follow the path east, then north across a bridge to Chapel Yard and at the farm turn in (if Bessy /target is there) “Needs More Cowbell” 59.79. Accept and do the easy escort “When the Cows Come Home” by escorting Bessy /target to the next step:
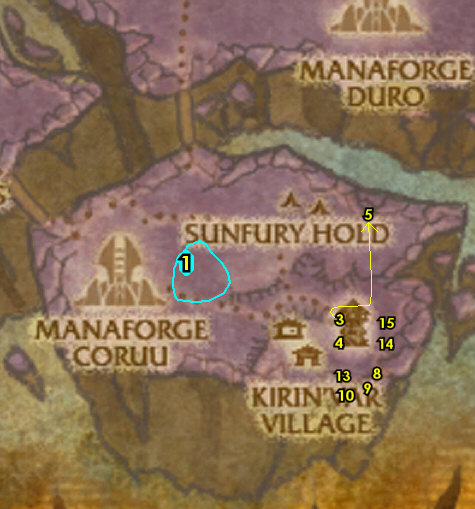
06) At the stables turn in “When the Cows Come Home” (58.85, #3 on map).
NOTE: If Bessy was not there, then consider checking back at the Chapel Yard farm later to see if you can do this!
07) SE around Town Square do “Krasus’s Compendium“: pick up the 3 Chapters of the Compendium located in the small houses listed below:
08) Pick up Chapter 3 (in the hut 59.88).
09) Pick up Chapter 1 (in the hut 59.89).
10) Pick up Chapter 2 (in the hut 57.90).
11) Use Archmage Vargoth’s Staff (in your backpack) to turn in “Krasus’s Compendium“, accept “Unlocking the Compendium“.
12) Find and kill these 3 mobs, they all drop an item which starts a quest. They all patrol outside of buildings:
13) Find and kill Abjurist Belmara /target (female human with an orange staff, 58.89), drops a tome that starts “Abjurist Belmara“, accept it.
14) Find and kill Cohlien Frostweaver /target (male gnome dressed in blue, 60.87), drops a cap that starts “Cohlien Frostweaver“, accept it.
15) Find and kill Conjurer Luminrath /target (male blood elf with an orange sword, 60.85), drops a mantle that starts “Conjurer Luminrath“, accept it.
01) East around the forge building around 61.85 do “Indispensable Tools“: kill/loot Kirin’Var Apprentices /target (worker mobs) until one drops the Smithing Hammer.
02) All around Town Square finish up “Malevolent Remnants“: kill 20 Severed Spirits /target (ghosts).
03) Back west at the tower turn in “Malevolent Remnants” 57.86, accept “The Annals of Kirin’Var“. And next to you accept “Torching Sunfury Hold“.
04) Down by the stables turn in “Indispensable Tools” 58.85, accept “Master Smith Rhonsus“.
05) SE do “The Annals of Kirin’Var“: kill/loot Battle-Mage Dathric /target (in the Town Hall Building, 60.88). He also drops an item, which starts “Battle-Mage Dathric“, accept it.
06) NE a bit do “Master Smith Rhonsus“: kill Rhonsus /target. He patrols around the old forge and spawns at 61.85.
07) Back west at the stables turn in “Master Smith Rhonsus” (58.85, #4 on map).
08) At the tower turn in “The Annals of Kirin’Var” (57.86, #3 on map), accept “Searching for Evidence“.
09) Go NE to Chapel Yard and in the barn click on the Necromantic Focus 60.78 to turn in “Searching for Evidence“, accept “A Lingering Suspicion“.
10) All around the immediate area of the Chapel Yard do “A Lingering Suspicion“: kill/loot TormentedSouls and Citizens.
11) Back SW at the tower turn in “A Lingering Suspicion” (57.86, #3 on map), accept “Capturing the Phylactery“.
12) Go NE to Chapel Yard and behind the old Inn building do “Capturing the Phylactery“: click on the middle outhouse 60.80 to get the Phylactery.
13) Back SW at the tower turn in “Capturing the Phylactery” (57.86, #3 on map), accept “Destroy Naberius!“.
14) GROUP 2+ Players (or soloable): At the very NE of the island, in the church do “Destroy Naberius!“: kill Naberius /target (lvl 69 Elite undead lich, 63.79).
NOTE: If he is too hard to solo for you, then either find help or simply skip it, there is no follow up quest.
TIP: This mob casts Death Coil on the ground that does a lot of damage quickly overtime, when he casts this you should move away from it immediately!
15) Back SW at the tower turn in (if you did it) “Destroy Naberius!” (57.86, #3 on map).
Wizard Row
01) Just west at Wizard Row start working on “A Fate Worse Than Death” by killing Mana Seekers and Mageslayers. While working on this do the next 5 quests:
02) “The Unending Invasion“: pick up the Mana Bomb Fragment (in the middle of the area, 56.87).
03) “Cohlien Frostweaver“: use Cohlien’s Cap at the Footlocker 55.88.
04) “Abjurist Belmara“: use Belmara’s Tome at the Bookshelf 55.86.
05) “Battle-Mage Dathric“: use Dathric’s Blade at the Weapon Rack (in the hut, 57.87).
06) “Conjurer Luminrath“: use Luminrath’s Mantle at the Dresser 56.88.
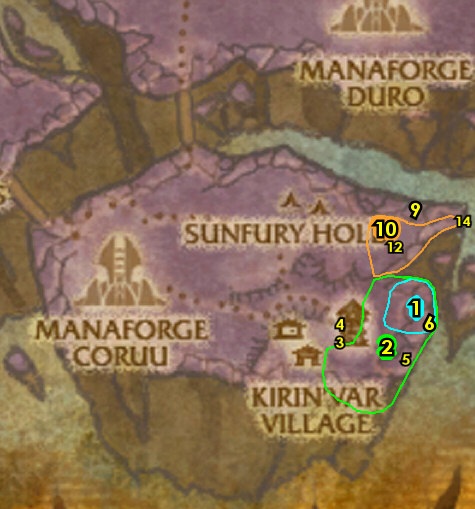
07) Make sure “A Fate Worse Than Death” is finished: kill 10 Mana Seekers and 10 Mageslayers around Wizard Row (#1 on map).
08) Back east at the tower 57.86 turn in all quests and accept new ones: Turn in “A Fate Worse Than Death“, “Cohlien Frostweaver“, “Abjurist Belmara“, “Conjurer Luminrath“, “Battle-Mage Dathric” and “The Unending Invasion“, accept “Potential Energy Source“.
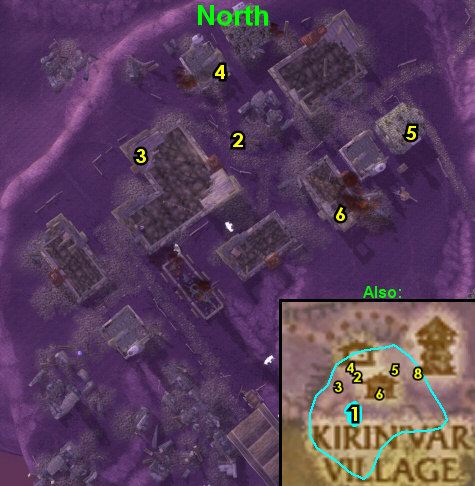
Town Square
01) West at Manaforge Coruu around 52.82 do “Potential Energy Source“: pick up 10 Energy Isolation Cubes on the ground.
02) Back east at the tower turn in “Potential Energy Source” 57.86, accept “Building a Perimeter“.
03) Around SE of the island do “Building a Perimeter“: use the Rune Activation Device quest item at these 3 runes (they look like floating blue circles):
04) Activate Eastern Rune 59.85.
05) Activate Northeastern Rune (up at 57.83).
06) Activate Western Rune 54.86.
07) Up north at Sunfury Hold around 55.80 do the following 3 quests together:
08) “Torching Sunfury Hold“: kill/loot a Sunfury Flamekeeper /target to obtain a Flaming Torch, then use it on 4 Ballistas and 4 Tents.
09) “The Sunfury Garrison“: kill 10 Sunfury Archers.
10) “Unlocking the Compendium“: kill/loot Spellreaver Marathelle /target, she patrols around everywhere here. She is the only one with a blue sword and a long brown cape. She spawns at 56.79.
11) Use Archmage Vargoth’s Staff (in your backpack) to turn in “Unlocking the Compendium“, accept “Summoner Kanthin’s Prize“.
12) Back south at the tower (57.86, #2 on map) turn in “Building a Perimeter“, “Torching Sunfury Hold” and “The Sunfury Garrison“, accept “Down With Daellis“.
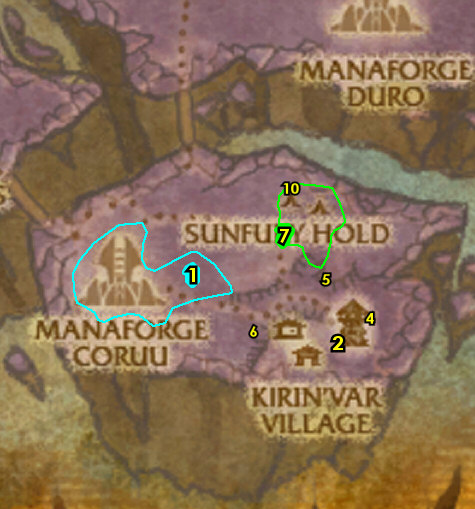
01) Go north across the bridge to Manaforge Duro and do “Down With Daellis“: kill Master Daellis Dawnstrike /target. He runs around in that area and dressed in black and red. He spawns at 56.66. Keep the next step in mind:
02) Also around Manaforge Duro do “Summoner Kanthin’s Prize“: kill/loot Summoner Kanthin /target. Dressed in a purple robe with a water elemental pet. He patrols around. You can pull him away from other mobs at certain points along his patrol path.
03) Use Archmage Vargoth’s Staff (in your backpack) to turn in “Summoner Kanthin’s Prize“, accept “Ar’kelos the Guardian“.
04) Back south at the tower turn in “Down With Daellis” 58.86.
05) In the bottom of the tower next to you do “Ar’kelos the Guardian“: kill Ar’kelos /target 58.86.
06) Climb the stairs to the top of the tower and turn in “Ar’kelos the Guardian” (at Archmage Vargoth himself, not the image). Wait a few seconds then accept “Finding the Keymaster“.
07 )GROUP 2+ Players (or soloable): North just across the bridge then on your right do “Finding the Keymaster“: kill/loot Apex /target. This lvl 67 Elite purple giant wonders around 52.67.
NOTE: I think most classes should be able to solo this, if you can’t do it, then skip to the Midrealm Post section below.
08) Go back to the top of the Violet Tower (58.86, #4 on map) and use the Apex’s Crystal Focus item (in your backpack) at Archmage Vargoth’s Orb (at the top of the tower). Then turn in “Finding the Keymaster“.
NOTE: “Capturing the Keystone” is a dungeon quest that my guide will not cover.
Midrealm Post
01) Hearth to Area 52 and stock back up/repair.
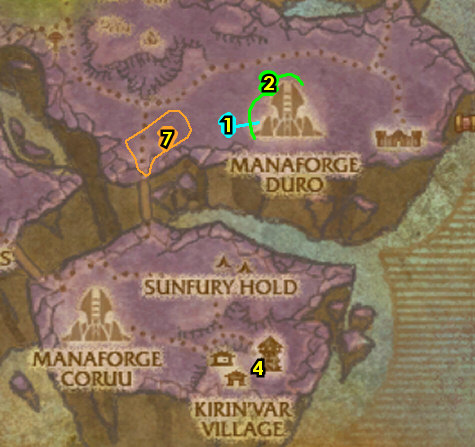
02) Head east across the bridge to Midrealm Post 47.56 and turn in all quests and accept new ones there: Turn in (from the orange ethereal) “Request for Assistance“, accept “Rightful Repossession” and “Drijya Needs Your Help“.
03) From the female goblin 47.57 turn in “Help Mama Wheeler“, accept “One Demon’s Trash…“.
04) From the purple ethereal 46.56 accept “Run a Diagnostic!” and “New Opportunities“.
05) From the male goblin 46.56 accept “Keeping Up Appearances“.
06) GROUP 3+ Players (or soloable): Go south and turn in “Drijya Needs Your Help” 48.63. Accept and try to do the escort quest “Sabotage the Warp-Gate!“.
NOTE: Escort Drijya /target at the warp gate. This escort is not easy, but can be soloed with good skill. If you can’t do it or find help for it, then simply skip it, or try again later if you find a group.
07) Go east to Manaforge Duro around 57.64 and do “Rightful Repossession“: pick up 10 Boxes of Surveying Equipment from the ground.
TIP: There are a lot of easy ones to pick up inside the big building there.
08) Go NW to The Scrap Fields around 50.59 and do “In A Scrap With The Legion” along with “One Demon’s Trash…“: kill 15 Gan’arg Engineers, 5 Mo’arg Doomsmiths. And pick up 10 Fel Reaver Parts on the ground.
09) Back NW at Midrealm Post (47.56, #2 on map) turn in (from the orange ethereal) “Rightful Repossession“, accept “An Audience with the Prince“. And turn in (if you did it) “Sabotage the Warp-Gate!“.
10) From the female goblin turn in “One Demon’s Trash…” 47.57, accept “Declawing Doomclaw“.
11) Go SE to The Scrap Fields and do “Declawing Doomclaw“: kill/loot Doomclaw /target 51.57.
12) Back NW at Midrealm Post (47.56, #2 on map) turn in (from the female goblin) “Declawing Doomclaw“, accept “Warn Area 52!“.
13) Slightly east at Eco-Dome Midrealm do “Run a Diagnostic!“: click on the Diagnostic Equipment 48.55.
14) Back west from the purple ethereal turn in “Run a Diagnostic!” (46.56, #2 on map), accept “Deal With the Saboteurs“.
15) All around the Eco-Dome Midrealm do the following 3 quests together (doesn’t matter what order):
16) “Deal With the Saboteurs“: kill 8 Barbscale Crocolisks (around the pond, 46.53).
17) “New Opportunities“: loot 15 Ivory Bells.
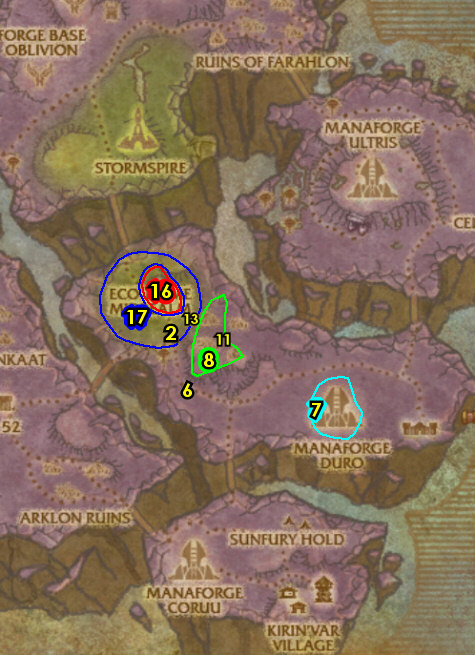
18) “Keeping Up Appearances“: kill/loot Ripfang Lynx (cats, also #17 on map).
19) Once all 3 are done, go back to Midrealm Post (46.56, #2 on map) and turn them all in and accept new quests: Turn in (at the male goblin) “Keeping Up Appearances“, accept “The Dynamic Duo“.
20) From the purple ethereal 46.56 turn in “New Opportunities” and “Deal With the Saboteurs“, accept “To the Stormspire“.
The Stormspire
01) Head north to The Stormspire and right before you go up the lift to the spire accept “Flora of the Eco-Domes” 42.33.
02) In the immediate area do “Flora of the Eco-Domes“: use the Energy Field Modulator on 10 Farahlon Lashers, then kill them.
03) Back at the The Stormspire lift turn in “Flora of the Eco-Domes” (42.33, #1 on map), accept “Creatures of the Eco-Domes“.
04) In the immediate area do “Creatures of the Eco-Domes“: use the Talbuk Tagger on 12 Talbuks (of any type) when their health is below 20%.
05) Back at the The Stormspire lift turn in “Creatures of the Eco-Domes” (42.33, #1 on map), accept “When Nature Goes Too Far“.
06) Just NE at the lake do “When Nature Goes Too Far“: kill/loot Markaru /target (big hydra in the water, 44.28).
07) Back at the The Stormspire lift turn in “When Nature Goes Too Far” (42.33, #1 on map).
08) Go up the lift next to you to take you up to The Stormspire. Once up there turn in “To the Stormspire” 43.35, accept “Diagnosis: Critical“.
09) In the middle of town accept “In Search of Farahlite” 44.36.
10) Go up the ramp and at the southern part of town turn in “The Dynamic Duo” 45.37, accept “Retrieving the Goods“.
11) East in the building next to you turn in “An Audience with the Prince” 46.36, accept “Triangulation Point One“.
12) Exit the building and on your right get the Flight Path from the Flight Master /target 45.35.
13) Go down the ramp and make a sharp right to accept “Surveying the Ruins“, “The Minions of Culuthas” and “Fel Reavers, No Thanks!” 45.35.
14) On the west side of town go in the Inn and talk to the Innkeeper /target 43.36 to make The Stormspire your new home.
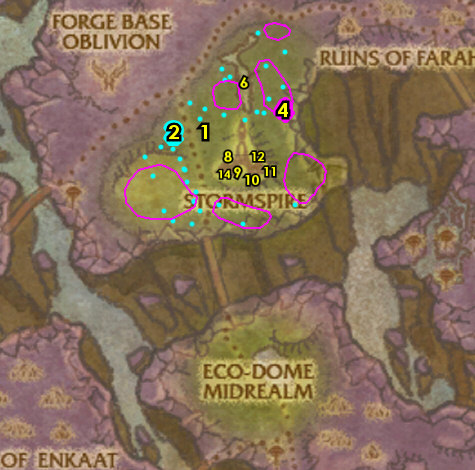
01) NW in town go down the lift and then head NE to do “Diagnosis: Critical“: use the Diagnostic Device quest item at those generators 48.27.
02) Hearth to The Stormspire.
03) West in town turn in “Diagnosis: Critical” 43.35, accept “Testing the Prototype“.
04) Go NW to Forge Base: Oblivion around 39.28 and do “Fel Reavers, No Thanks!“: kill/loot Gan’arg Mekgineers /target to collect 5 Condensed Nether Gas, then turn in the collection of gas at an Inactive Fel Reaver (large robots).
05) Head NE to Eco-Dome Farfield and turn in “Testing the Prototype” 45.14, accept “All Clear!“.
06) All around the immediate area at Eco-Dome Farfield do “Retrieving the Goods” along with “All Clear!“: pick up 10 Dome Generator Segments from the ground. And kill 12 Scythetooth Raptors.
07) Back SW in Eco-Dome Farfield turn in “All Clear!” (45.14, #5 on map). Wait a few seconds then accept “Success!“.
08) GROUP 2+ Players (or soloable): Just south at Netherstone around 46.19 do “In Search of Farahlite“: kill/loot the Farahlon Breakers (Elite purple giants).
NOTE: If they are too hard for you to kill, then you can simply skip this quest or try again later if you find help. Drop rate is 100%. Try to pick off the lvl 69s.
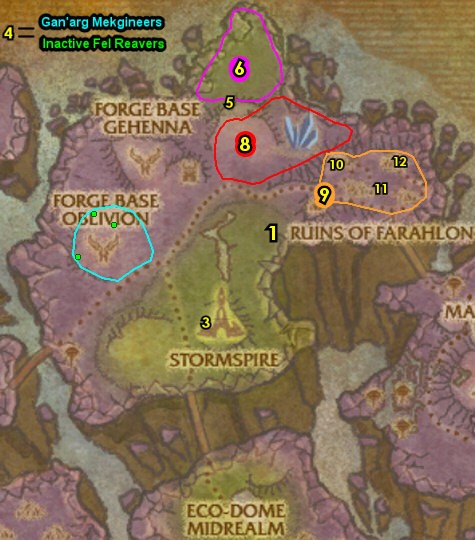
09) Go east to Ruins of Farahlon and do “The Minions of Culuthas” along with “Surveying the Ruins“: kill 10 Hound of Culuthas and 5 Eye of Culuthas. And use the Surveying Markers quest item at these 3 locations:
10) Place Surveying Marker One 52.20.
11) Place Surveying Marker Two 55.23.
12) Place Surveying Marker Three 56.20.
Protectorate Watch Post
01) Head SE to Protectorate Watch Post 58.32 and accept ALL quests there (use the minimap to find the exclamation marks): “A Not-So-Modest Proposal“, “Electro-Shock Goodness!“, “Recipe for Destruction“, “Captain Tyralius” and “The Ethereum” (this one requires lvl 70 to accept).
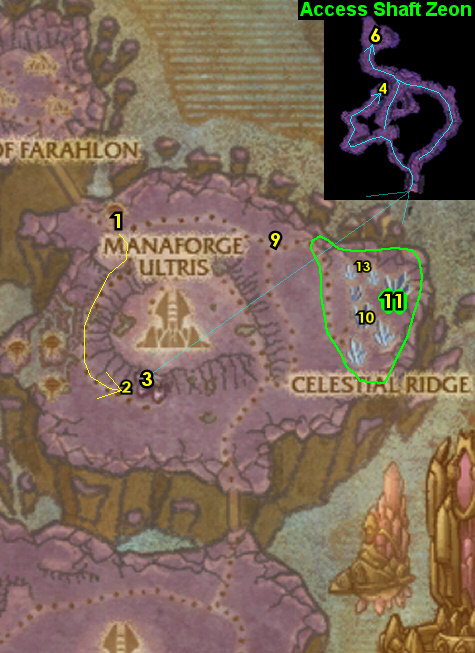
02) Follow the path south to Access Shaft Zeon and accept “The Flesh Lies…” 59.45.
03) Just east enter Access Shaft Zeon (entrance at 61.45).
04) When entering the mine, make a sharp left, then keep making left turns continuously until you get to the ethereal Agent Ya-Six and accept “Arconus the Insatiable” 61.41. While working your way there start working on “The Flesh Lies…” by using the Protectorate Igniter quest item on Withered Corpses /target on the ground.
05) Next to you do “A Not-So-Modest Proposal“: click on the Teleporter Power Pack (its behind Agent Ya-Six).
06) Go north through the mine and then do “Arconus the Insatiable“: kill Arconus the Insatiable (big void walker demon, 60.40).
07) As you work your way south to exit the mine (exit at 61.45) finish “The Flesh Lies…“: use the Protectorate Igniter quest item on 12 Withered Corpses /target on the ground.
08) Outside the mine, go west slightly to turn in “The Flesh Lies…” (59.45, #2 on map).
09) Go NE to the exact coords of 66.7 33.8 and do part of “Triangulation Point One“: at those coords use the Triangulation Device quest item at this spot, then make sure you walk underneath the red arrow.
10) Go SE down the path to Celestial Ridge and click the Ethereal Teleport Pad 71.39 to summon an NPC to turn in “A Not-So-Modest Proposal“, accept “Getting Down to Business“
11) In the immediate area around Celestial Ridge do “Getting Down to Business“: kill/loot the Nether Drakes and Dragons.
12) At the Shrouded Figure (behind the Ethereal Teleport Pad, #10 on map) turn in “Getting Down to Business” 71.39, accept “Formal Introductions“.
13) Go north in Celestial Ridge and turn in “Formal Introductions” 71.35, accept “A Promising Start“.
14) In the immediate area around Celestial Ridge (#11 on map) do “A Promising Start“: pick up 15 Nether Dragonkin Eggs from the ground.
15) Back north in Celestial Ridge turn in “A Promising Start” (71.35, #13 on map), accept “Troublesome Distractions“.
01) Go NW to Protectorate Watch Post and turn in “Arconus the Insatiable” 60.32.
02) NW in town turn in “Triangulation Point One” 58.31, accept “Triangulation Point Two“.
03) Do “Troublesome Distractions“: right next to you, talk to Wind Trader Marid /target 58.32, follow him, then kill him.
04) Go back east down into the northern part of Celestial Ridge and turn in “Troublesome Distractions” 71.35, accept “Securing the Celestial Ridge“.
05) GROUP 2+ Players (or soloable): South in Celestial Ridge at the Dragon Skeleton 72.43 do “Securing the Celestial Ridge“: use the Challenge of the Blue Flight quest item to call down Veraku /target (lvl 70 Elite) then kill him.
NOTE: This elite is not that hard, just be prepared and kill the mobs around the area first.
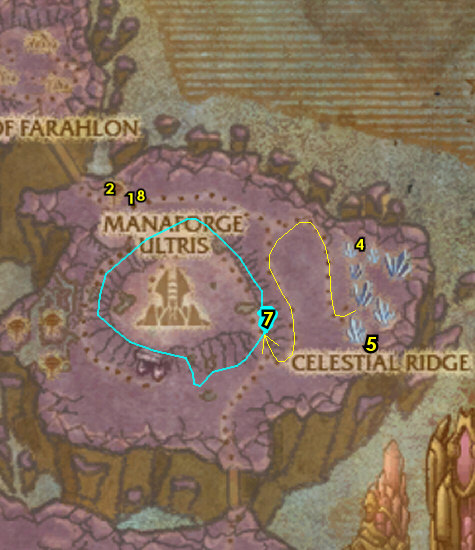
06) Back north in Celestial Ridge turn in “Securing the Celestial Ridge” (71.35, #4 on map).
07) Go up west around Manaforge Ultris around 66.42 and do “Recipe for Destruction” (kill/loot Unstable Voidwraiths and Voidshriekers) along with the first part of “Electro-Shock Goodness!“: drink Navuud’s Concoction quest item, then attack Seeping Sludges then kill the Seeping Sludge Globule that spawn.
NOTE: we will do the Void Wastes later.
08) Go north to Protectorate Watch Post and turn in “Recipe for Destruction” 60.32, accept “On Nethery Wings“.
09) Do “On Nethery Wings“: use the Protectorate Nether Drake (right next to the quest giver) to fly up to the top of Manaforge Ultris, then keep spamming the Phase Disruptor quest item until the Void Conduit is destroyed.
10) Turn in “On Nethery Wings” 60.32.
NOTE: “Dimensius the All-Devouring” can be done if you can find a group. It involves first talking to Captain Saeed /target 61.32 to start an escort quest that leads into Manaforge Ultris, then killing Dimensius the All-Devouring /target (lvl 70 Elite).
Ethereum Staging Grounds
01) NOTE: Sometimes there is an escort quest at the Ethereum Staging Grounds started by Captured Protectorate Vanguard /target 57.37 called “Escape from the Staging Grounds“. This becomes available if the Vanguard defeats the Ethereum Gladiator /target (or you help kill the Gladiator). If you see it, accept it and do it. If he’s not there then you can simply skip this, and move on to the next quests:
02) Start working on the last part of “Electro-Shock Goodness!“: drink Navuud’s Concoction quest item, attack Void Wastes then kill the Void Waste Globules that spawn. While working on this do the next steps:
03) Do “Captain Tyralius“: kill/loot Warden Icoshock /target for the key (patrols around 55.41). Then see the next step for where to use the key:
04) Click on Captain Tyralius’s Prison (the pink sphere on purple rug, 53.41).
05) Finish “Electro-Shock Goodness!“: drink Navuud’s Concoction quest item, attack Void Wastes, then kill 30 Void Waste Globules that spawn.
06) Back NE at Protectorate Watch Post 59.33 turn in “Captain Tyralius“, “Electro-Shock Goodness!” and (if you did it) “Escape from the Staging Grounds“.
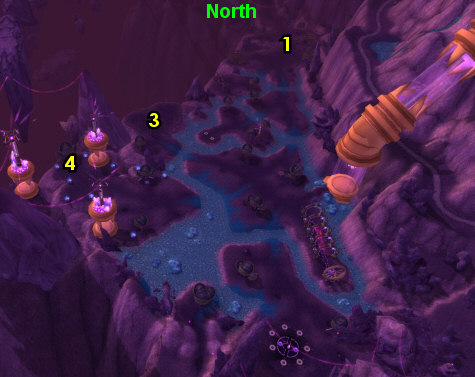
Ethereum Staging Grounds (LVL 70 ONLY)
01) If you are level 70 you can accept this quest at Protectorate Watch Post “The Ethereum” 59.32. If not then skip to the Cosmowrench section below.
02) At Ethereum Staging Grounds do “The Ethereum“: kill 5 EthereumAssassins, 5 Shocktroopers, 2 Researchers and Captain Zovax /target (orange ethereal patrols at the bottom of the entrance ramp around 57.37).
03) At Ethereum Staging Grounds use the Ethereum Transponder Zeta 57.39 to turn in “The Ethereum“, accept “Ethereum Data“.
04) Do “Ethereum Data“: loot the Ethereum Data Cell on the ground 56.40.
05) Use the Ethereum Transponder Zeta (57.39, #3 on map) to turn in “Ethereum Data“, accept “Potential for Brain Damage = High“.
06) Do “Potential for Brain Damage = High“: kill/loot Ethereum Relay /target.
07) Use the Ethereum Transponder Zeta (57.39, #3 on map) to turn in “Potential for Brain Damage = High“, accept “S-A-B-O-T-A-G-E“.
08) Do “S-A-B-O-T-A-G-E“: keep kill/looting EthereumOverlords /target or Archons /target until the Prepared Ethereum Wrapping drops.
09) Use the Ethereum Transponder Zeta (57.39, #3 on map) to turn in “S-A-B-O-T-A-G-E“, accept “Delivering the Message“.
10) Do “Delivering the Message“: escort Protectorate Demolitionist /target to Manaforge Ultris.
11) Use the Ethereum Transponder Zeta (57.39, #3 on map) to turn in “Delivering the Message“.
12) GROUP 5 Players: If you can find a group, you can accept and do “Nexus-King Salhadaar“: use the Protectorate Disruptor quest item on the 3 energy generators surrounding Nexus-King Salhadaar /target (lvl 72 Elite, 54.42), then kill him.
13) Use the Ethereum Transponder Zeta (57.39, #3 on map) to turn in (if you did it) “Nexus-King Salhadaar“.
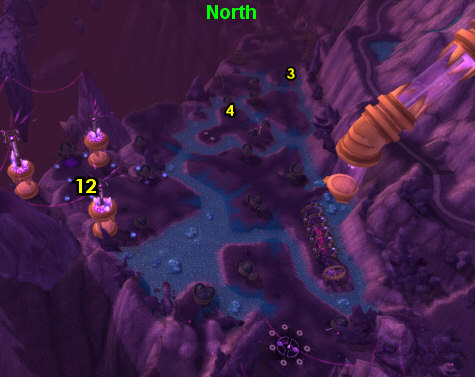
Cosmowrench
01) Head south to Cosmowrench and get the Flight Path from the Flight Master /target 65.67.
02) Inside the building accept “Bloody Imp-ossible!” 66.67.
03) All around the immediate area of The Vortex Fields do “Bloody Imp-ossible!“: use Zeppit’s Crystal quest item to summon an imp, then kill Warp Chasers and let the imp obtain the blood.
04) Back SE in the building at Cosmowrench turn in “Bloody Imp-ossible!” (66.67, #2 on map).
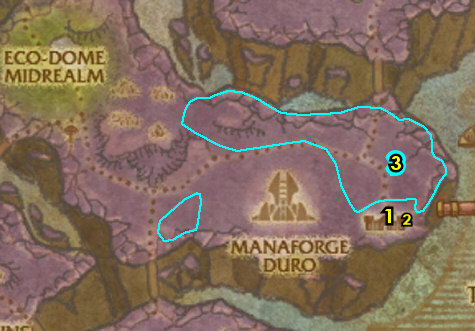
The Stormspire
01) Hearth to The Stormspire.
02) At The Stormspire turn in all quests and accept all new ones (use the minimap to help you find the question marks): Just outside of the Inn turn in (if you did it) “In Search of Farahlite” 44.36, accept “Hitting the Motherlode“.
03) NW in town turn in “Success!” 43.35.
04) Up the ramp south in town turn in “Retrieving the Goods” 45.37.
05) Down in the middle of town 45.35 turn in “Surveying the Ruins“, “The Minions of Culuthas“, “Fel Reavers, No Thanks!“, accept “The Best Defense“.
06) Go north to Forge Base: Gehenna around 40.25 and do “The Best Defense“: kill 12 Wrathbringers.
07) Go SW to Tuluman’s Landing 35.38 and accept “Dealing with the Foreman” and “Neutralizing the Nethermancers“.
08) Go west inside the Trelleum Mine (down below) and turn in “Dealing with the Foreman” 26.42, accept “Dealing with the Overmaster“.
09) At the northern most end of the mine do “Dealing with the Overmaster“: kill Overmaster Grindgarr /target 27.36.
10) Leave the mine south then go east to Manaforge Ara around 30.44 and do “Neutralizing the Nethermancers“: kill 15 Sunfury Nethermancers. Work your way up to do the next quest in the same area:
11) Up at Manaforge Ara go to the exact coords of 28.7 41.3 and do part of “Triangulation Point Two“: at those coords use the Triangulation Device quest item at this spot, then make sure you walk underneath the red arrow.
12) Go NE across the bridge to Tuluman’s Landing (35.38, #7 on map) and turn in “Neutralizing the Nethermancers“, “Triangulation Point Two” (accept “Full Triangle“) and “Dealing with the Overmaster“.
13) GROUP 2+ Players (or soloable): Go NE to Netherstone and do “Hitting the Motherlode“: kill/loot Cragskaar /target (elite, 48.20).
NOTES: He is a big purple giant that looks just like the other ones in the area, except he has bigger spikes on his back. If you can’t find him, or if you can’t kill him, then skip it!
14) GROUP 2+ Players (or soloable): Go east up at Ruins of Farahlon and do “Full Triangle“: kill/loot Culuthas /target (elite, 53.21).
NOTE: He isn’t to hard to solo. If you can’t do it, then skip it.

01) Hearth to The Stormspire.
02) Just outside of the Inn turn in (if you did it) “Hitting the Motherlode” 44.36.
03) Down in the middle of town turn in “The Best Defense” 45.35, accept “Teleport This!“.
04) Go up in the building and turn in “Full Triangle” 46.36. Wait a moment then accept “Special Delivery to Shattrath City“.
05) OPTIONAL: You can skip or do “Teleport This!” north at Forge Base: Gehenna, especially if you want to just get to Shadowmoon Valley sooner or don’t desire the quest reward for it. This can also be not so easy going solo with so many mobs crammed together. This is done by using the Mental Interference Rod quest item on a Cyber-Rage Forgelord /target (they are around the teleporters listed below) then use its Detonate Teleporter ability to destroy these 3 teleporters:
06) Western Gehenna Teleporter 39.20.
07) Central Gehenna Teleporter 41.20.
08) Eastern Gehenna Teleporter 42.21.
09) Hearth (or go back) to The Stormspire and down in the middle of town turn in (if you did it) “Teleport This!” (45.35, #3 on map).
10) Go up to the Flight Master /target 45.35 and fly to Area 52.
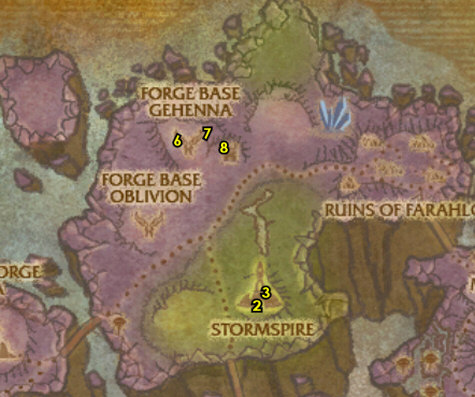
01) Go into Area 52 and on your right turn in “In A Scrap With The Legion” 33.65.
02) Next to you turn in “Warn Area 52!“, accept “Doctor Vomisa, Ph.T.” 33.65.
03) Go east to The Proving Grounds and turn in “Doctor Vomisa, Ph.T.” 37.64.
04) GROUP 3+ Players: If you can find a group, you can do “You, Robot“: use the Scrap Reaver X6000 Controller quest item (right next to the quest giver) to control a Scrap Reaver X6000, and then kill the mobs that come.
NOTE: Unless you want a really tough solo challenge then don’t even attempt to solo this, it will take to long, and you probably won’t be able to do it. If you can’t find a group then skip it.
05) Turn in (if you did it) “You, Robot” (37.64, #3 on map), accept “Back to the Chief!“.
06) Back west at Area 52 turn in (if you have it) “Back to the Chief!” (33.65, #1 on map).
07) Netherstorm is now FINISHED!
NOTE: You can safely abandon any quests that are currently in your Quest Log for Netherstorm. You should keep “Special Delivery to Shattrath City” and “The Apprentice’s Request“.
08) On the NE outskirts of Area 52 go to the Flight Master /target 34.64 and fly to Shattrath City.
Shattrath City
01) At A’dal directly in the middle of the city turn in “Special Delivery to Shattrath City” 54.45.
NOTE: “How to Break Into the Arcatraz” is a Dungeon quest that my guide will not cover.
02) SCRYER ONLY: Go south to Scryer’s Tier and turn in any Signets you may have 45.81.
03) SCRYER ONLY: If you happen to have any Arcane Tomes with you, you can turn them in for some Scryer reputation points (south in the city at 43.92). Only the first Arcane Tome gives XP (but no XP after turning the first one in).
04) Since you should be at least lvl 68 its highly recommended to port to a Major City (portals are down at 52.53 in Shattrath City) to get new spells/abilities if you haven’t yet, THEN/OR..
05) Go to the Flight Master /target (64.41 in Shattrath City) and fly to Stonebreaker Hold, Terokkar Forest.
06) From Stonebreaker Hold, head east into Shadowmoon Valley…

