Sylvanaar
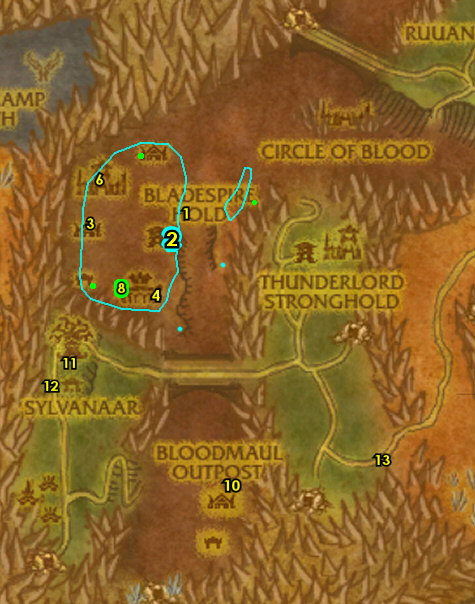
01) From Orebor Harborage follow the path NE through Blade Tooth Canyon and at the cave entrance accept “Killing the Crawlers” 32.91.
02) Go through the cave while doing “Killing the Crawlers“: kill 6 Cavern Crawlers. Work your way to the next step:
03) Work your way north to Sylvanaar, make a left at the entrance and in the building turn in “No Time for Curiosity” 36.68.
NOTE: If he is not in there, he patrols over to the Wanted Poster near by 37.67.
04) Just outside to your left accept “The Encroaching Wilderness” 36.67.
05) Next to you at the Wanted Poster accept “The Den Mother” 37.67.
06) Go up to the entrance of the tree tower and turn in “Killing the Crawlers” 36.66. Accept “The Bloodmaul Ogres“.
07) Across the path from the female dryad accept “Malaise” 37.66.
08) At the entrance of the merchant building next to you accept “Strange Brew” 37.65.
09) Next to you accept “Into the Draenethyst Mine” 37.65.
10) Go in the Inn NW in town and talk to the Innkeeper 36.64 to make Sylvanaar your new home.
11) Go up to the Hippogryph Master NE in town to get the Flight Path 38.61.
12) South of Sylvanaar start working on “The Encroaching Wilderness” by killing any Grovestalker Lynx you see along the way:
13) Go SW to Veil Lashh (around 36.74) and do “Malaise“: kill/loot the Lashh’an arakkoa mobs.
NOTE: When this is almost done, work your way to the next step:
14) Go to the tree ramp (at 35.77).
15) Go to the top of the tree houses at Veil Lashh and click on a Lashh’am Tome (there’s several of them sitting on tables through out the tree tops) to turn in “Malaise” 34.77, accept “Scratches“.
16) West in Veil Lashh do “Scratches“: use your Fistful of Feathers quest item at the spell circle 35.77.
NOTE: After using the feather you will get a pet bird which lasts for 10 minutes, during that time you need to bring that pet bird to the next step before the timer ends.
17) Back north at Sylvanaar turn in (from the female dryad) “Scratches” (#7 on map 37.66).
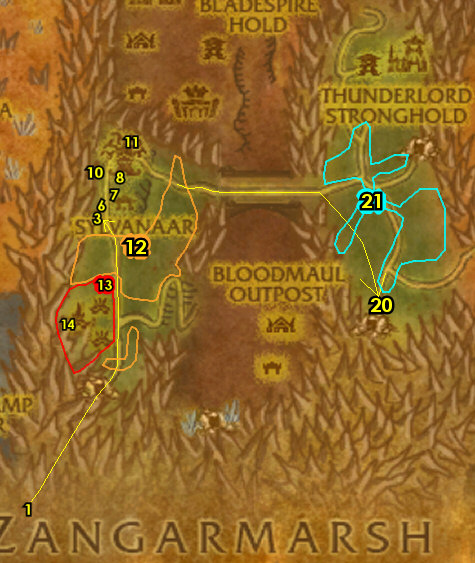
18) South of Sylvanaar around 38.71 finish “The Encroaching Wilderness“: kill 12 Grovestalker Lynx (#12 on map).
19) SW in Sylvanaar turn in “The Encroaching Wilderness” 36.67 , accept “Marauding Wolves“.
20) Go east across the bridge then south (see path on map) and do “The Den Mother“: kill Rema (gray wolf 52.75).
21) Around the immediate area around Jagged Ridge do “Marauding Wolves“: kill/loot Thunderlord Dire Wolves.
22) Hearth (or go back) to Sylvanaar and turn in (at the tree tower entrance) “The Den Mother” (#6 on map 36.66).
23) SW in town turn in “Marauding Wolves” 36.67 , accept “Protecting Our Own“.
24) Just south of Sylvanaar around 37.70 do “Protecting Our Own“: click on the Grove Seedlings on the ground (around #12 on map).
25) Back at Sylvanaar, SW in town, turn in “Protecting Our Own” 36.67, accept “A Dire Situation“.
Bloodmaul Outpost
01) Go to the ramp down (entrance at 39.75).
02) Around Bloodmaul Ravine start working on “A Dire Situation” by using Rina’s Diminution Powder quest item on Bloodmaul Dire Wolves:
03) Go in the Draenethyst Mine (entrance at 43.84) and do “Into the Draenethyst Mine“: loot the Draenethyst Mine Crystals. The ogres in the mine can drop the crystals as well.
04) Leave the mine and around Bloodmaul Outpost 43.83 do “The Bloodmaul Ogres” along with “Strange Brew“: kill 30 Bloodmaul ogres (any type). And loot Bloodmaul Brew Kegs (barrels), and the Bloodmaul Brewmasters (the ones carrying mugs in their hands) can drop the brew as well.
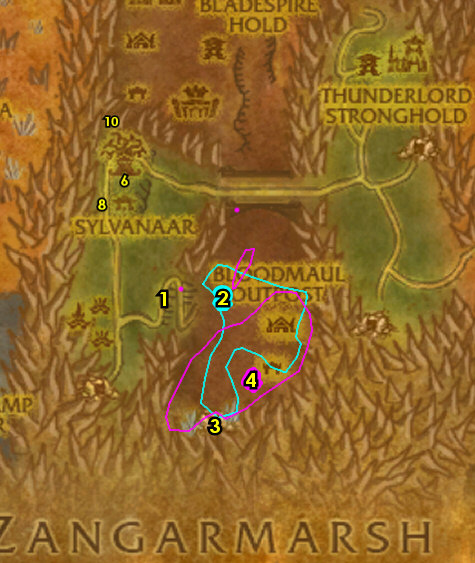
05) Make sure “A Dire Situation” is finished: use Rina’s Diminution Powder quest item on Bloodmaul Dire Wolves around the ravine (#2 on map).
06) Hearth (or go back) to Sylvanaar and at the entrance of the merchant building turn in “Strange Brew” 37.65. Accept “Getting the Bladespire Tanked“.
07) Next to you turn in “Into the Draenethyst Mine” 37.65.
08) At the entrance of the tree tower turn in “The Bloodmaul Ogres” 36.66 , accept “The Bladespire Ogres“.
09) SW in town turn in “A Dire Situation” 36.67.
10) Go north in Sylvanaar at 37.61, then carefully take a few drops down, if done right you should live. OR EASY ROUTE: Or if you would rather try a more easier but longer route: go to the ramp down (entrance at 39.75).
Bladespire Hold
01) Go north to Bladespire Hold and from the caged Draenei accept “The Trappings of a Vindicator” 44.52.
02) Around Bladespire Hold around 43.53 start working on “The Bladespire Ogres” along with “Getting the Bladespire Tanked“: kill Bladespire Ogres (of any type). And use the Bloodmaul Brutebane Keg quest item near ogres (that are not in combat) to get them drunk. Continue on with the next quests while doing these along the way:
03) Do “The Trappings of a Vindicator“: kill/loot Droggam (in the hut, 38.52).
TIP: In order to do this solo: First kill the 2 non-elites closest to the entrance by pulling/killing them individually. Then get as close as you can get without pulling the 2 elites and place a Bloodmaul Brutebane Keg on the floor. This will stun the elites allowing you to kill the named one. See the next step for Mugdorg:
04) Kill/loot Mugdorg (in the southern barracks 43.60). Do this with the same strategy as previous step.
05) From the caged Draenei turn in “The Trappings of a Vindicator” (#1 on map 44.52), accept “Gorr’Dim, Your Time Has Come…“.
06) Do “Gorr’Dim, Your Time Has Come…“: kill Gorr’Dim (in the NW barracks 39.49) by using the same strategy as before.
07) From the caged Draenei turn in “Gorr’Dim, Your Time Has Come…” (#1 on map 44.52) , accept “Planting the Banner“.
08) Do part of “Planting the Banner“: kill/loot a Bladespire Champion. Some easy spawns are: (in a hut 40.58), or (in a hut 41.47 ) or (up the ramp in a hut 39.58). We will do the other part to this quest in a bit..
09) Around Bladespire Hold (#2 on map around 43.53) finish “The Bladespire Ogres” along with “Getting the Bladespire Tanked“: kill 30 Bladespire Ogres (of any type). And use the Bloodmaul Brutebane Keg quest item near ogres (that are not in combat) to get them drunk.
10) Go south to Bloodmaul Outpost and do the last part of “Planting the Banner“: use the Bladespire Clan Banner quest item on top of the Northmaul Tower 47.75. You will have to kill 3 waves of ogres, then kill/loot Gurn Grubnosh.
NOTE: Don’t place your banner down if someone else is doing the quest or you will not be able to do the quest and lose your banner!
11) Hearth (or go back) to Sylvanaar and at the entrance of the merchant building turn in “Getting the Bladespire Tanked” 37.65.
12) At the entrance of the tree tower 36.66 turn in “The Bladespire Ogres” and “Planting the Banner“. Accept “Where Did Those Darn Gnomes Go?“.
13) Go east across the bridge, then SE to turn in “Where Did Those Darn Gnomes Go?” 55.73, accept “Follow the Breadcrumbs“.
Toshley’s Station
01) Go east to Toshley’s Station, make a right in the town, up to the Gryphon Master 61.70 and get the Flight Path. From him accept (if you are lvl 67) “Building a Better Gryphon“.
02) Go down and turn in “Follow the Breadcrumbs” 61.69. Accept “Picking Up Some Power Converters“.
03) West next to you accept “Crystal Clear” 60.69.
04) North next to you accept “Test Flight: The Zephyrium Capacitorium” 60.68.
05) East in the Inn/hut talk to the Innkeeper 61.68 to make Toshley’s Station your new home. Also from him accept “What Came First, the Drake or the Egg?“.
06) NOTE: You will also see (if you are lvl 67) “Parts for the Rocket-Chief” available in town. SKIP it.
07) In town do “Test Flight: The Zephyrium Capacitorium“: speak to Rally Zapnabber /target 60.69.
08) South around Singing Ridge around 59.73 do “Crystal Clear” along with “What Came First, the Drake or the Egg?“: kill 10 Crystal Flayers. And click the Nether Drake Eggs then use your quest item Temporal Phase Modulator on the small Nether Whelp that comes out of the egg. Then, kill/loot the required mobs.
NOTE: You can use the quest item multiple times on the same spawn to change it to something else.
09) Hearth (or go back) to Toshley’s Station and turn in “Crystal Clear” 60.69, accept “Gauging the Resonant Frequency“.
NOTE: Turn in next step’s quest first if you were able to hearth!
10) NE In the Inn turn in “What Came First, the Drake or the Egg?” 61.68.
11) Near you turn in “Test Flight: The Zephyrium Capacitorium” 60.68 , accept “Test Flight: The Singing Ridge“.
12) Do “Test Flight: The Singing Ridge“: use your Tally Waiver quest item here at the quest giver 60.68. Then:
13) Near by, talk to Rally Zapnabber /target 60.69 to have him take you to Singing Ridge.
14) There at Singing Ridge (#8 on map around 60.74) do “Gauging the Resonant Frequency“: use your quest item Oscillating Frequency Scanners in a way that when you stand amongst them, you are hit by 5 overlapping Oscillation fields. It can’t be used within 25 yards of each other and can only extend within a 40 yard radius. You must be at Singing Ridge to do this.

01) Hearth (or go back) to Toshley’s Station and turn in “Test Flight: The Singing Ridge” 60.68.
02) Near you turn in “Gauging the Resonant Frequency” 60.69.
03) Go north to Bladespire Outpost around 58.61 and do “Picking Up Some Power Converters“: loot the Power Converters on the ground then immediately use your quest item Protovoltaic Magneto Collector on the Electromental that spawns, then kill it.
04) Hearth (or go back) to Toshley’s Station and turn in “Picking Up Some Power Converters” 61.69 , accept “Ride the Lightning“.
05) Next to you accept “Ridgespine Menace” 60.69.
06) Find Razak Ironsides /target (he patrols around the town) and from him accept “Cutting Your Teeth“.
07) In town, talk to Rally Zapnabber /target 60.69 to have him take you to Singing Ridge.
08) Go east to Scalewing Shelf around 68.72 then work your way north to do “Ridgespine Menace” along with “Ride the Lightning” and “Cutting Your Teeth“: kill 10 Ridgespine Stalkers (stealthy spiders). Use your quest item Repolarized Magneto Sphere when your fighting the Scalewing Serpents to absorb the lightning strikes (loot these too). And kill/loot the Daggermaw Lashtails.
09) Hearth (or go back) to Toshley’s Station and turn in “Ride the Lightning” 61.69, accept “Trapping the Light Fantastic“.
10) Next to you turn in “Ridgespine Menace” 60.69. Accept “More than a Pound of Flesh“.
11) Find Razak Ironsides /target (he patrols around the town) and from him turn in “Cutting Your Teeth“.
12) In town accept “Test Flight: Razaan’s Landing” (#1 on map 60.68).

01) Do “Test Flight: Razaan’s Landing“: in town, talk to Rally Zapnabber /target 60.69 to have him take you to Razaan’s Landing.
02) At Razaan’s Landing around 67.44 do “Trapping the Light Fantastic” and “More than a Pound of Flesh“: use your quest item Multi-Spectrum Light Trap anywhere in Razaan’s Landing. It should attract the small orbs floating around, repeat until your done. And kill/loot the Fiendling Flesh Beasts.
03) Hearth (or go back) to Toshley’s Station and turn in “Test Flight: Razaan’s Landing” (#1 on map 60.68).
04) Near you turn in “More than a Pound of Flesh” 60.69.
05) Next to you turn in “Trapping the Light Fantastic” 61.69, accept “Show Them Gnome Mercy!“.
06) In town, talk to Rally Zapnabber /target 60.69 to have him take you to Razaan’s Landing.
07) At Razaan’s Landing (#2 on map around 67.44) do “Show Them Gnome Mercy!“: keep killing the Razaani mobs until Nexus-Prince Razaan /target shows up, kill him and loot the cube.
NOTE: When the Prince spawns he yells “Who dares to interrupt my operations?“, when you see that in your chat, look for him and kill him.
08) Hearth (or go back) to Toshley’s Station and turn in “Show Them Gnome Mercy!” 61.69.
09) In town accept “Test Flight: Ruuan Weald” 60.68.
10) Do “Test Flight: Ruuan Weald“: in town, talk to Rally Zapnabber /target 60.69 to have him take you to Ruuan. Use your quest item Nether-Weather Vane while your flying in the air.
Evergrove
01) When you land at Evergrove get the Flight Path from the Flight Master /target 62.40.
02) Accept ALL quests at Evergrove: In front of you by the moonwell accept “A Time for Negotiation…” 62.39.
03) Next to you at the moonwell accept “Creating the Pendant” 62.39.
04) At the gnome SE in town turn in “Test Flight: Ruuan Weald” 63.40.
05) Go in the Inn next to you and talk to the Innkeeper /target 63.38 to make Evergrove your new home.
06) Make a right out of the Inn and next to the Mailbox accept “Culling the Wild” 63.38.
07) West a bit by the small wagon 62.38 accept “A Date with Dorgok” and “Crush the Bloodmaul Camp!“.
08) At the west part of town, accept (from the big Ancient /target, 61.38) “Little Embers” and “From the Ashes“.
09) Do “A Time for Negotiation…“: find and talk to Overseer Nuaar /target (male draenei), he patrols around the left side and the south side of Ruuan Weald.
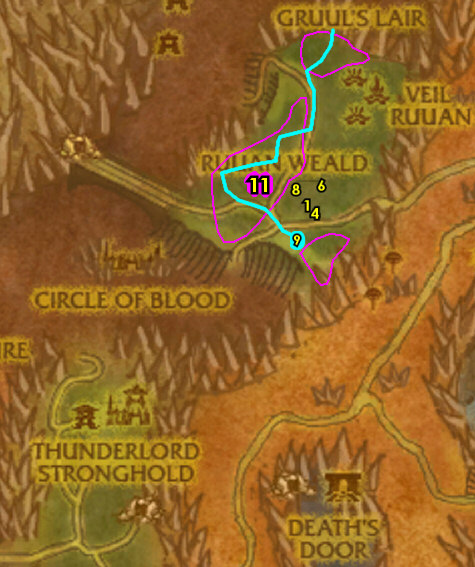
10) Back at Evergrove by the moonwell turn in “A Time for Negotiation…” (62.39, #1 on map), accept “…and a Time for Action” and (next to you) “Poaching from Poachers“.
11) All around Evergrove (aka Ruuan Weald) do “…and a Time for Action” along with “Poaching from Poachers“: kill 10 Wyrmcult Hewer (they wield axes) and kill/loot the Wyrmcult Poachers (they wield bows). While doing these quests you should find an item which starts “Did You Get The Note?“, accept it.
01) Go to the ramp down (at 60.29).
02) Go up in the hut (ramp entrance at 55.25) and then do “A Date with Dorgok“: kill Dorgok. He will drop Gorgrom’s Favor, which starts “Favor of the Gronn“, accept it. Keep the next step in mind:
03) Within the immediate area around Bloodmaul Camp do “Crush the Bloodmaul Camp!“: kill 10 BloodmaulMaulers and 5 Warlocks.
04) Hearth (or go back) to Evergrove and by the moonwell 62.39 turn in “Poaching from Poachers” (accept “Whelps of the Wyrmcult“), “…and a Time for Action” and “Did You Get The Note?“. Accept “Wyrmskull Watcher“.
05) North a bit by the small wagon 62.38 turn in “A Date with Dorgok“, “Favor of the Gronn” and “Crush the Bloodmaul Camp!“. Accept “Pay the Baron a Visit“.
06) Go north to Veil Ruuan and do “Creating the Pendant“: kill/loot the Ruuan’ok mobs (arakkoa) for 6 claws, then use them at the green summoning circle 64.33, and kill/loot the bird mob /target that spawns.
07) Back south at Evergrove by the moonwell turn in “Creating the Pendant” (62.39, #4 on map), accept “Whispers of the Raven God“.
Baron Sablemane
01) Go to the ramp down (at 60.44).
02) Go west to the northern outside part of Circle of Blood and turn in “Pay the Baron a Visit” 53.41, accept “Into the Churning Gulch“.
03) Just to the west at Churning Gulch 49.42 do “Into the Churning Gulch“: kill/loot Young or Greater Crust Bursters.
04) Back at the northern outside part of Circle of Blood turn in “Into the Churning Gulch” (#2 on map 53.41), accept “Goodnight, Gronn“.
05) Go east to Cursed Hollow and do “Goodnight, Gronn“: use your quest item Sabkemane’s Sleeping Powder on Grulloc 61.48 then loot Grulloc’s Sack on the ground next to him.
06) Back at the northern outside part of Circle of Blood turn in “Goodnight, Gronn” (#2 on map 53.41), accept “It’s a Trap!“.
07) Go to the ramp up (at 59.46).
08) Go to Evergrove and NW in town next to the small wagon 62.38 turn in “It’s a Trap!“, accept “Gorgrom the Dragon-Eater“. And next to you accept “Slaughter at Boulder’mok“.
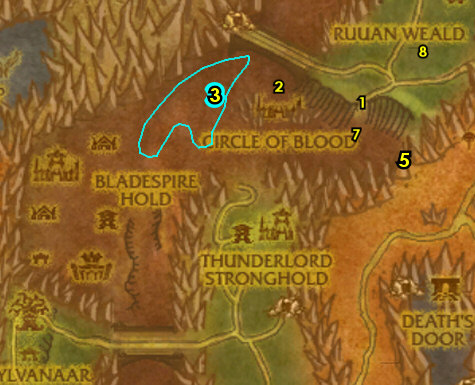
Grishnath
01) Go west across the bridge and turn in “Wyrmskull Watcher” 50.36 (he patrols a bit), accept “Longtail is the Lynchpin“.
02) Go in Wyrmskull Tunnel next to you and do “Longtail is the Lynchpin“: kill Draaca Longtail /target (draenei), she is wondering around near the end of the tunnel around 46.33.
NOTE: You can mount while in this tunnel.
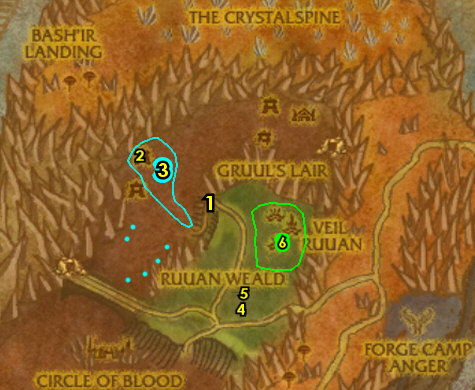
03) Back at the tunnel entrance next to the bridge turn in “Longtail is the Lynchpin” (50.36, #1 on map), accept “Meeting at the Blackwing Coven“.
04) Go back through the tunnel to the other side, then north at Grishnath around 41.22 and do “Whispers of the Raven God“: kill a Grishna Falconwing /target to obtain a 2 min buff that will allow you to then view the Prophecies (listed below).
NOTE: While doing this quest, you should find an item which starts “The Truth Unorbed“, accept it. Here are the locations of the 4 Prophecies to view:
05) View The First Prophecy (up in the tree house, 39.17).
06) View The Third Prophecy (on the ground by the swamp, 41.18).
07) View The Second Prophecy (up in the tree house, lower deck, 42.22).
08) View The Fourth Prophecy (on the ground between a hut and a red canopy, 40.23).
09) Go west to Boulder’mok and do “Slaughter at Boulder’mok” along with “Gorgrom the Dragon-Eater“: kill 5 Boulder’mokBrutes and 3 Shamans, then click on Gorgrom’s Altar 31.22. Gorgrom the Dragon-Eater will spawn and then drop dead at the altar, then use 3 Grisly Totems quest item (collected from the ogres) on his corpse.
10) Go SW to Blackwing Coven (cave entrance at 32.34) and do “Whelps of the Wyrmcult“: use the Blackwhelp Net quest item on the Wyrmcult Blackwhelps (dragon whelps) in the cave.
11) In Blackwing Coven (cave) do “Meeting at the Blackwing Coven“: first collect 5 Costume Scraps from the Wyrmcult mobs in the cave (you might already have enough). Then click on it in your backpack to make an Overseer Disguise, then use it to talk to Kolphis Darkscale /target (male orc 33.37) in the cave.
12) Hearth to Evergrove.
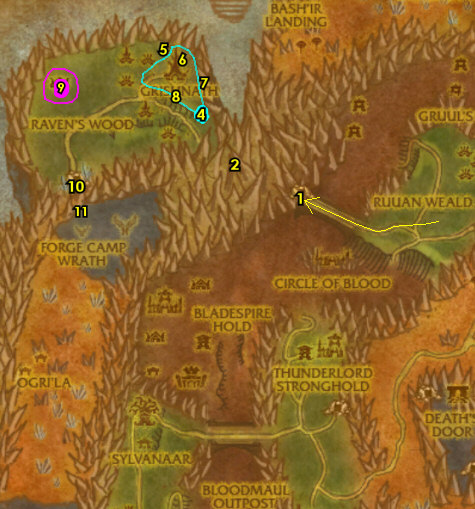
01) West in town by the small wagon 62.38 turn in “Gorgrom the Dragon-Eater“, accept “Baron Sablemane Has Requested Your Presence“. And turn in “Slaughter at Boulder’mok“.
02) At the moonwell turn in “Whispers of the Raven God” 62.39.
03) At the other side of the moonwell 62.39 turn in “Meeting at the Blackwing Coven” (accept “Maxnar Must Die!“), “The Truth Unorbed” and “Whelps of the Wyrmcult“. Accept “Treebole Must Know“.
04) Go NE to Bladed Gulch (starting around 69.37) and do “Culling the Wild“: kill 4 Felsworn Scalewings (serpents), 4 Felsworn Daggermaw (raptors) and 2 Fel Corrupters.
NOTE: While doing this quest, the Fel Corrupters can drop an item which starts “Damaged Mask“, accept it.
05) Go north to Skald around 72.22 and do “Little Embers” along with “From the Ashes“: kill 8 Scorch Imps, and click on these 3 Volcanic Soil mounds:
06) Click on Southern Fertile Volcanic Soil mound 72.22.
07) Click on Central Fertile Volcanic Soil mound 72.20.
08) Click on Northern Fertile Volcanic Soil mound 72.18.
09) Hearth (or go back) to Evergrove and turn in all quests and accept new ones:
10) At the male gnome SE in town turn in “Damaged Mask” 63.40, accept “Mystery Mask“.
11) From Wildlord Antelarion (male dryad patrolling around the moonwell) turn in “Mystery Mask“, accept “Felsworn Gas Mask“.
12) At the west part of town, turn in (from the big Ancient, 61.38) “Little Embers” and “From the Ashes“.
13) Next to the mailbox/Inn turn in “Culling the Wild” 63.38.

Forge Camp Anger
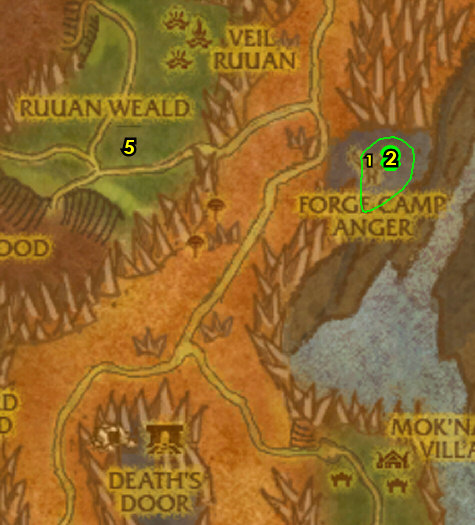
01) Go east to Forge Camp: Anger and do “Felsworn Gas Mask“: first equip the Felsworn Gas Mask quest item, if you do not have the mask you can get another one from the dryad walking around in Evergrove. Once the mask is equipped go to the Legion Communicator 73.40 and turn this quest in and accept “Deceive thy Enemy“.
NOTE: You may have to take the mask off and on to get the communicator to work right.
02) In the immediate area around Forge Camp: Anger do “Deceive thy Enemy“: kill 4 DoomforgeAttendants and 4 Engineers.
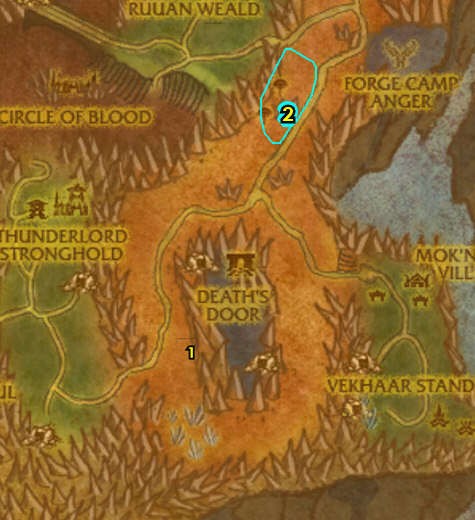
03) Back at the Legion Communicator (73.40, #1 on map) turn in “Deceive thy Enemy“, accept “You’re Fired!“.
04) In the immediate area around Forge Camp: Anger (#2 on map) do “You’re Fired!“: kill/loot the Anger Guards in the immediate area to obtain 5 Camp Anger Keys, then use the keys at the 5 Legion Obelisks in the area to summon and kill Doomcryer /target (lvl 68 Elite).
NOTE: This quest recommends you have 2 players but with good skill this can be soloed. If you can’t do it, don’t worry about it and skip it.
05) Hearth (or go back) to Evergrove and turn in (if you did it) “You’re Fired!” (at the male dryad walking around the moonwell, 62.39), accept “Death’s Door“.
Death’s Door
01) NOTE: The steps in this section can only be done if you completed and turned in “You’re Fired!“. If you did not do it, then skip to the Raven’s Wood section below.
02) At the Flight Master in Evergrove 62.40 fly to Toshley’s Station. Then when landing at Toshley’s Station, from the Gryphon Master accept (if you haven’t yet, requires lvl 67) “Building a Better Gryphon“.
03) At the east side of Toshley’s Station drop down to Death’s Door. Be careful as you are dropping down as there are several long falls, but you should be able to make it alive if you are careful.
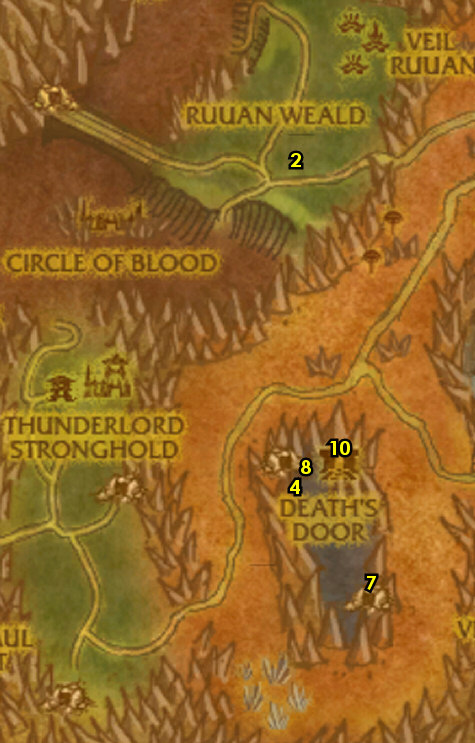
04) Once you get down to Death’s Door 62.60 use the Druid Signal quest item, wait a few seconds then at the Druid that spawns turn in “Death’s Door“, accept “Harvesting the Fel Ammunition“.
05) In the immediate area all around Death’s Door do “Harvesting the Fel Ammunition“: kill/loot any mobs (except the hounds) to obtain the 5 Fel cannonballs.
06) Any where at Death’s Door use the Druid Signal quest item, wait a few seconds then at the Druid that spawns turn in “Harvesting the Fel Ammunition“, accept “Fire At Will!“.
07) Do “Fire At Will!“. First clear out the Death Mights around the south Death’s Door Fel Cannon 65.68, then use your Naturalized Ammunition quest item on it. You will get a pet-bar to control the cannon, keep spamming the Artillery on the Warp-Gate ability (about 10 times to kill the Warp-Gate), while you kill the imps that come out with the Flame Thrower.
NOTE: DO NOT summon a pet/minion during this or it will remove of the cannon bar. And see next step for the north one:
08) Use the Naturalized Ammunition quest item at the north Death’s Door Fel Cannon 62.60. Then do the same thing you did in the previous step.
09) Anywhere at Death’s Door use the Druid Signal quest item, wait a few seconds then at the Druid that spawns turn in “Fire At Will!“, accept “The Hound-Master“.
10) North at Death’s Door by the big portal do “The Hound-Master“: get close to Baelmon the Hound-Master /target (lvl 68 Elite, 64.59) and use the Evergrove Wand quest item to summon Evergrove Ancients to help you kill him.
11) Hearth (or go back) to Evergrove and turn in (if you did it) “The Hound-Master” (at the male dryad walking around the moonwell, 62.39, #2 on map).
Raven’s Wood
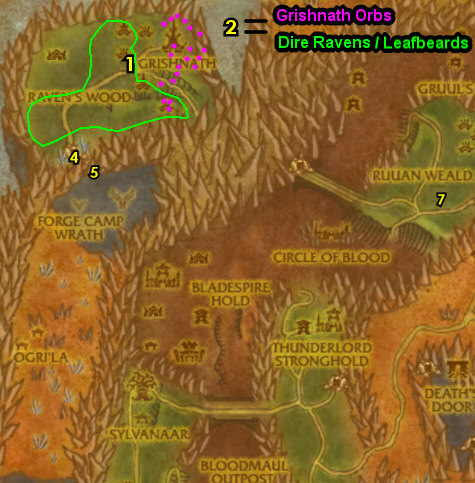
01) Head west across the bridge/tunnel to Raven’s Wood and at Treebole /target (big ancient, 37.22) turn in “Treebole Must Know“, accept “Exorcising the Trees“.
02) All around Raven’s Wood in the immediate area do “Exorcising the Trees“: first obtain 5 Grishnath Orbs (purple orb objects NE at the arakkoa village Grishnath), then kill/loot Dire Ravens to obtain 5 Dire Pinfeathers, and then combine them by clicking on them in your backpack to make 5 Exorcism Feathers. Then use these Feathers on 5 Raven’s Wood Leafbeards /target (all around Raven’s Wood) to release their Koi-Koi Spirits, then finally kill those spirits.
03) Back at Treebole /target (big ancient, 37.22, #1 on map) turn in “Exorcising the Trees“.
04) Go SW and enter Blackwing Coven (cave entrance at 32.34).
05) At the end of the cave do “Maxnar Must Die!“: kill Maxnar the Ashmaw /target 34.35.
NOTE: Watch out this guy does a fire attack that does about 4,000 fire damage!
06) Hearth to Evergrove, if hearthstone is still on a cooldown, just die on purpose and res at the spirit healer.
07) By the moonwell at Evergrove turn in “Maxnar Must Die!” 62.39.
OPTIONAL GROUP (or soloable?) – Gruul’s Lair
NOTE: This section is optional and involves killing elite mobs (they can be soloed but could take awhile). You can skip them all if you like (especially if you want a break from Blade’s Edge Mountains). If you decide to skip them, then go to the Journey to Netherstorm section below:
01) Go to the ramp down (at 59.44).
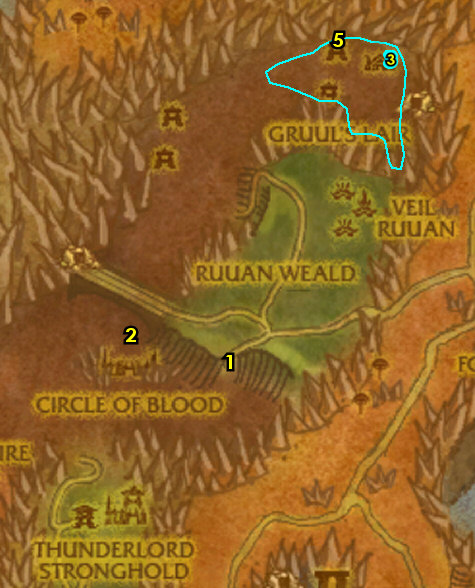
02) Go west to the northern outside part of Circle of Blood and turn in “Baron Sablemane Has Requested Your Presence” 53.41, accept “Massacre at Gruul’s Lair“.
03) Go north to Gruul’s Lair and do “Massacre at Gruul’s Lair“: kill the required amount of Bladespire (elite) mobs. Fingrom is at the top of the hut (ramp entrance at 66.20).
04) Back at the northern outside part of Circle of Blood turn in “Massacre at Gruul’s Lair” (#2 on map 53.41), accept “Showdown“.
05) Back north down at Gruul’s Lair do “Showdown“: use Sablemane’s Signet quest item at the Altar of Goc 64.18, then kill Goc /target (lvl 70 Elite) when he comes.
TIP: Let Baren Sablemane fight him for a little while first so he builds up aggro, so Goc does not come after you.
06) Back at the northern outside part of Circle of Blood turn in “Showdown” (#2 on map 53.41).
Journey to Netherstorm
01)Blades Edge Mountains is now FINISHED!
NOTE: You can safely abandon any quests that are currently in your Quest Log (EXCEPT “Building a Better Gryphon“).
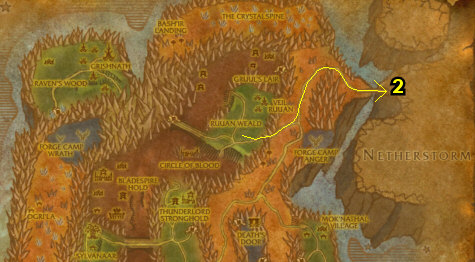
02) Follow the main path NE to Netherstorm.
