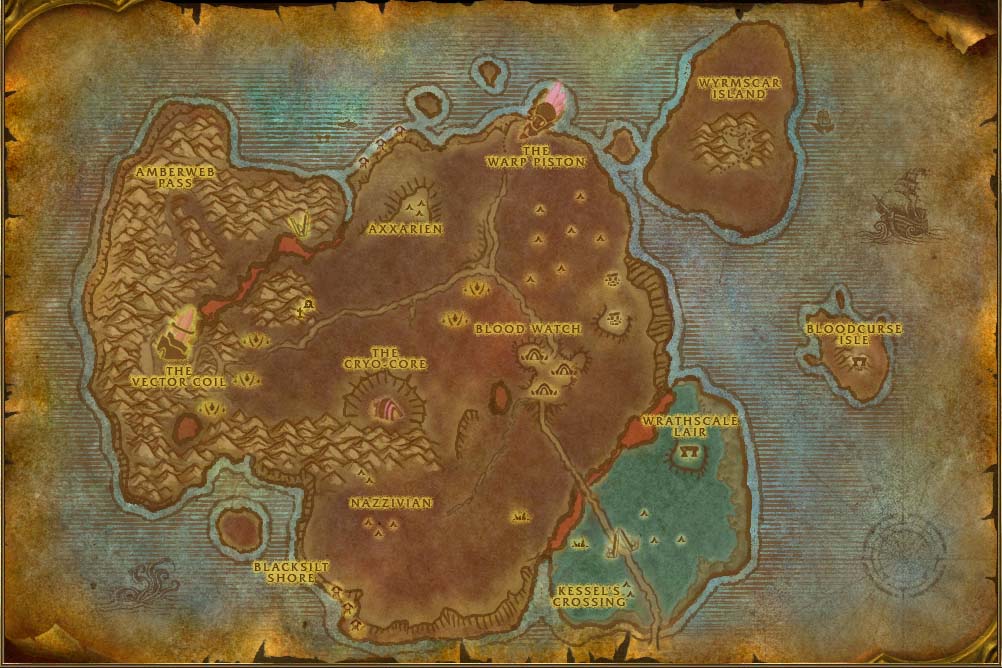
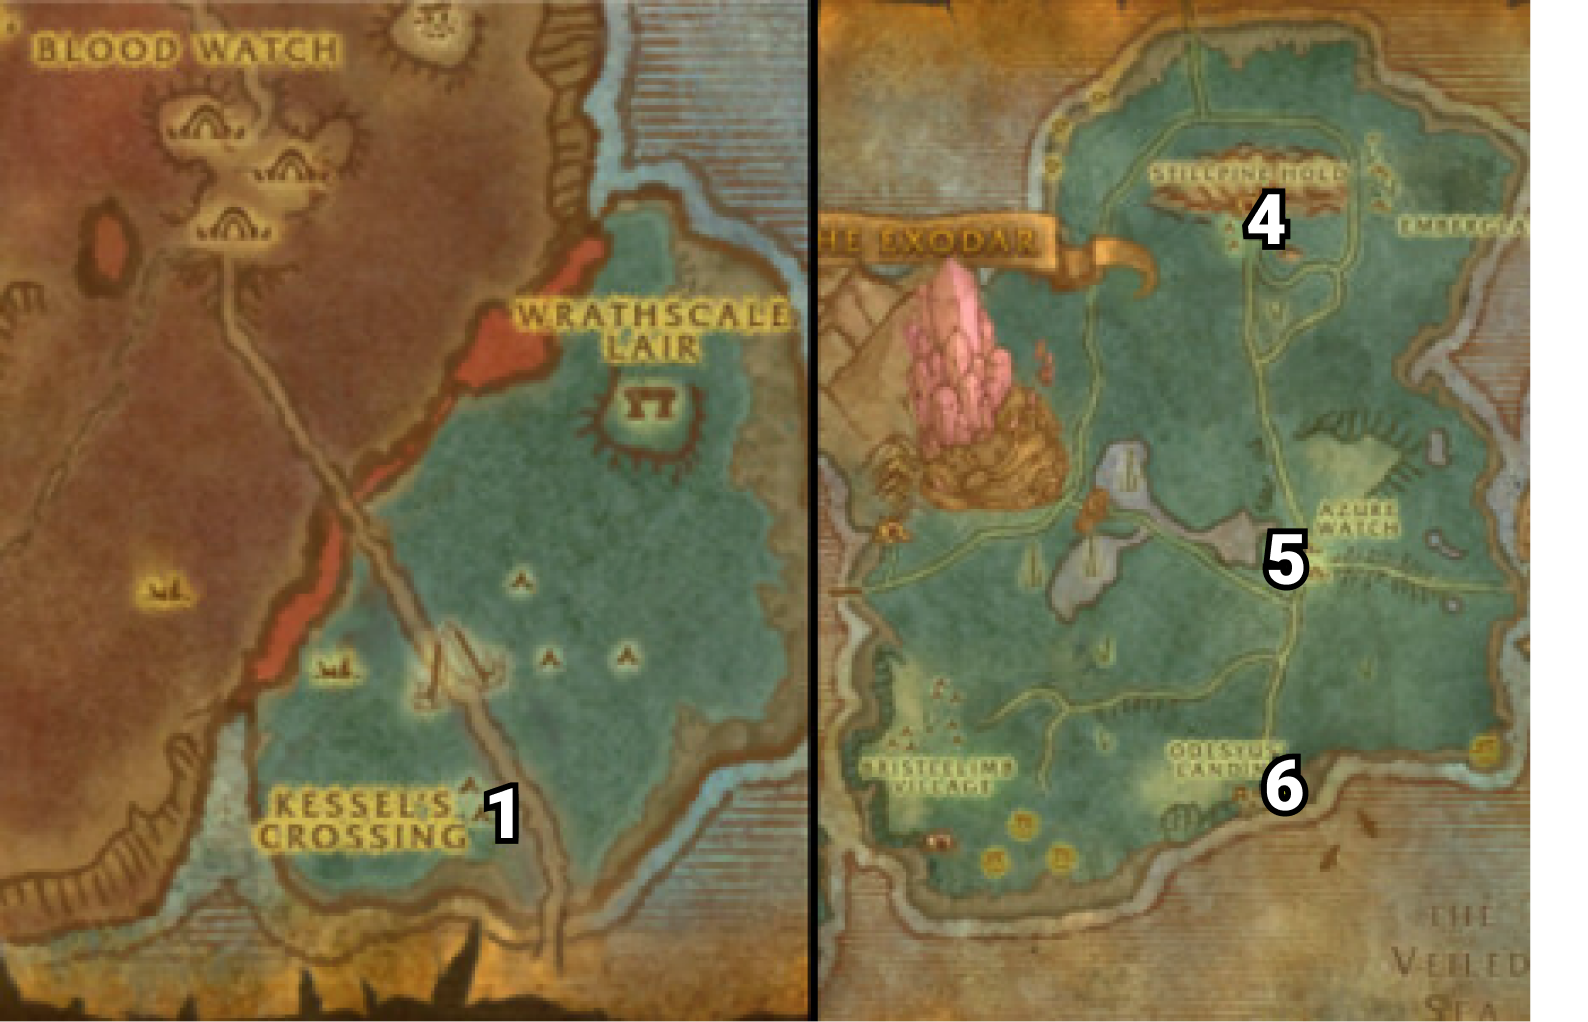
Kessel’s Crossing
01) Once you enter Bloodmyst Isle, accept “A Favorite Treat” 63.89.
02) Next to you turn in “Elekks Are Serious Business” 63.88 . Accept “Alien Predators“. And next to you accept “The Kessel Run“.
03) Do “The Kessel Run“: talk to the follow 3 NPCs below at Azuremyst Isle. NOTE: You will get a 100% mount to do this quest but there is a timer of 15 minutes. If done quickly you should be able to do this in about 6 minutes.
04) Talk to High Chief Stillpine /target at Stillpine Hold 47.21.
05) Talk to Exarch Menelaous /target at Azure Watch 47.51.
06) Talk to Admiral Odesyus /target at Odesyus’ Landing 47.70.
07) Return to Kessel’s Crossing in Bloodmyst Isle and turn in “The Kessel Run” (#1 on map 63.88), accept “Declaration of Power“.
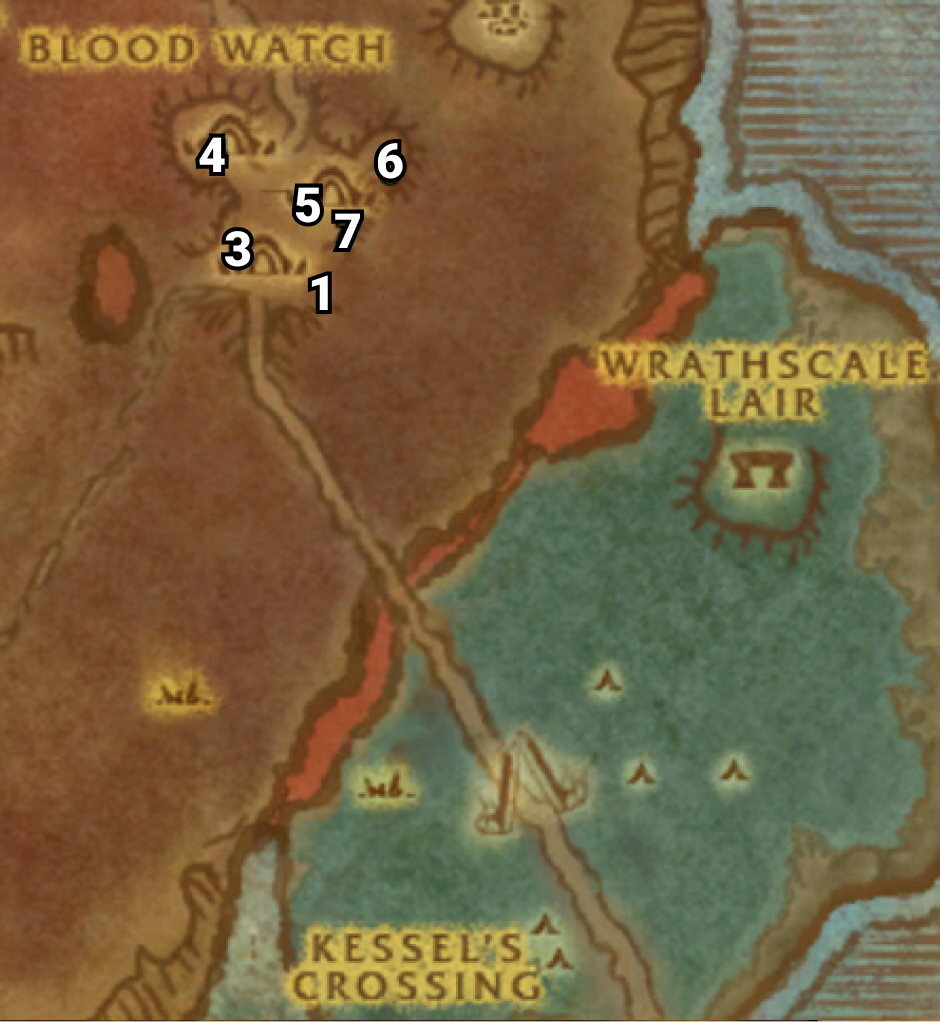
Blood Watch
01) Go north into Blood Watch, make a right into the Inn and make Blood Watch your new home. Also accept “Beds, Bandages, and Beyond“.
02) Make a right out of the Inn and from the Wanted Poster accept “WANTED: Deathclaw” 55.59.
03) Accept “Catch and Release” 53.58.
04) At the building 53.53, accept “What Argus Means to Me“. And next to you accept “Learning from the Crystals“.
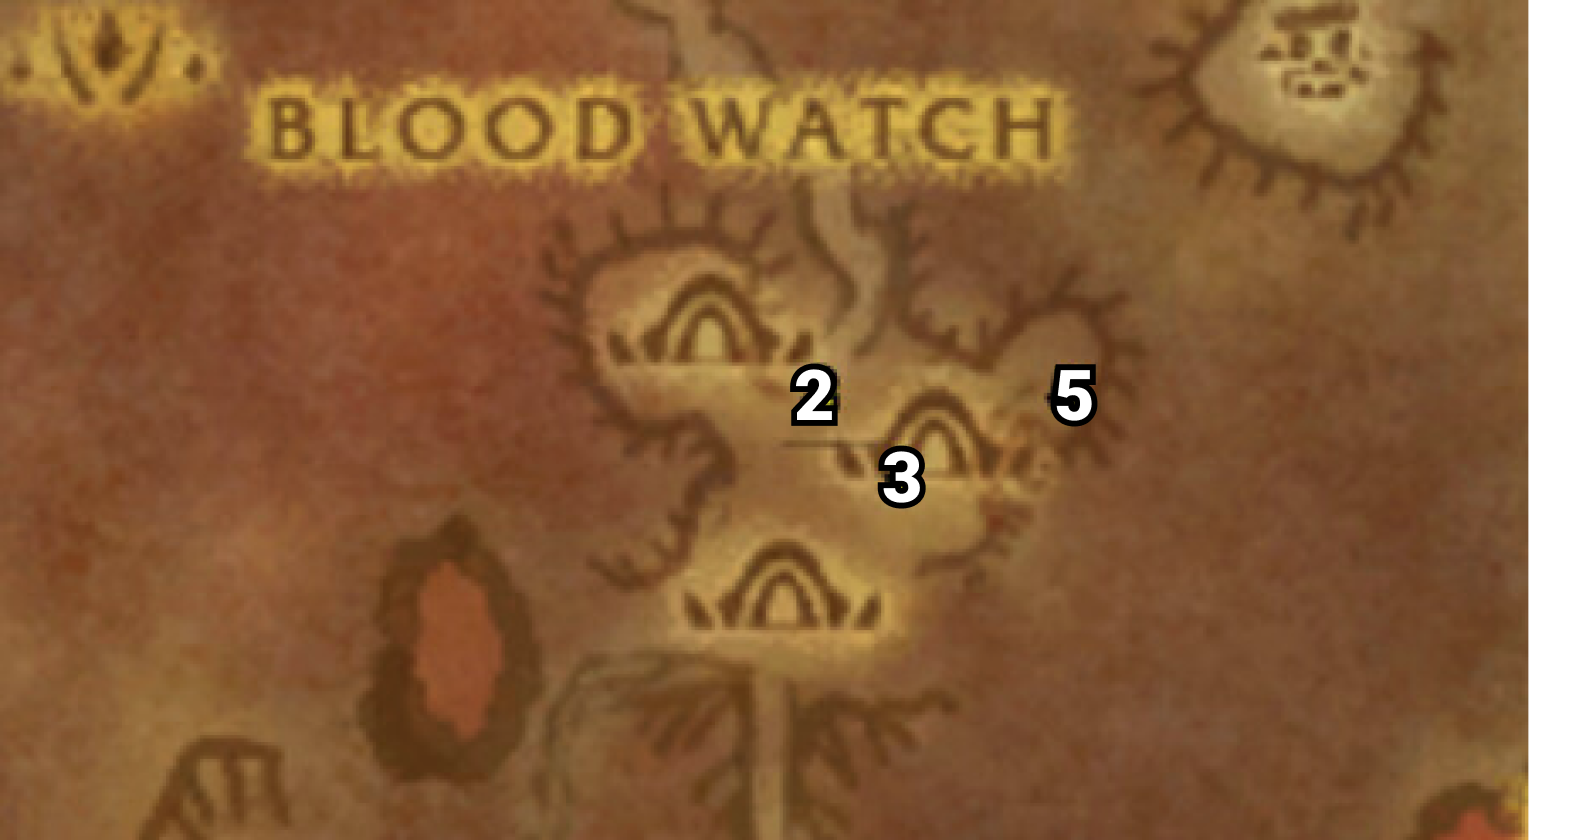
05) In the middle of the town turn in “What Argus Means to Me” 55.55, accept “Blood Watch“. Also accept (if you are level 13) “Irradiated Crystal Shards“.
NOTE: “Irradiated Crystal Shards” suppose to kill/looting almost any mob in Bloodmyst Isle. You can also start collecting the shards without accepting the quest.
06) Turn in “Beds, Bandages, and Beyond” to the Hippogryph Master 58.54, SKIP “On the Wings of a Hippogryph” (for now).
07) Accept “Mac’Aree Mushroom Menagerie” 56.57.
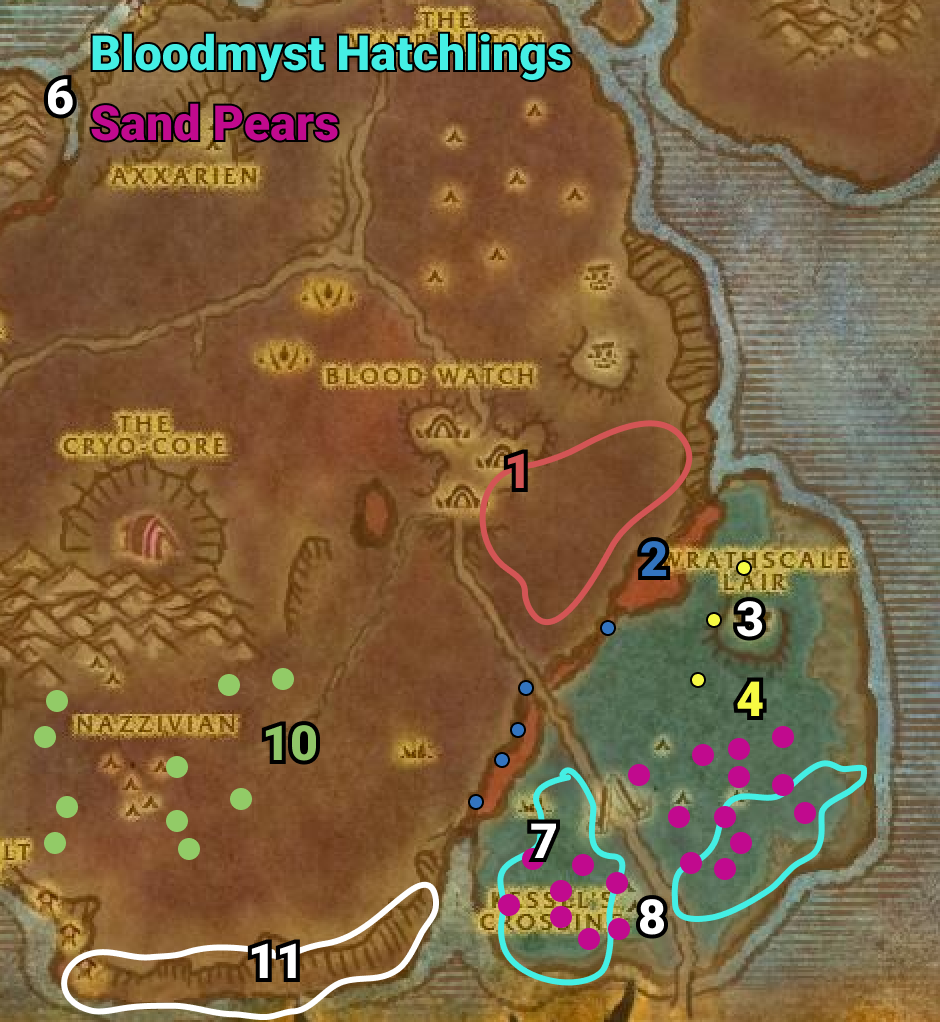
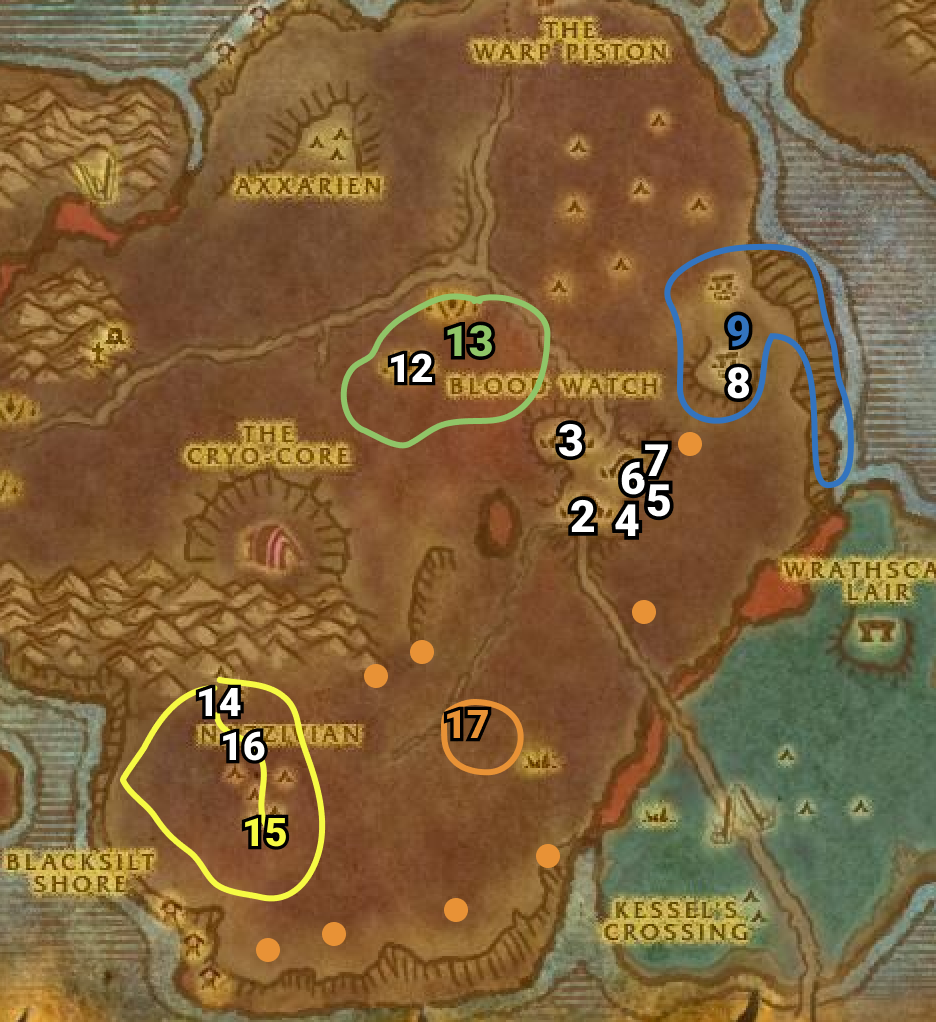
01) Just SE of Blood Watch do part of “Mac’Aree Mushroom Menagerie“: loot a Blood Mushroom. Look for them under the trees, grinding to 64.61.
02) At the blood river you can do part of “Mac’Aree Mushroom Menagerie“: try to loot a Aquatic Stinkhorn. It can spawns at 64.62 . If not we will try again later.
03) Go to Wrathscale Lair and do “Declaration of Power“: kill Lord Xiz /target (lvl 13 naga at the temple 69.68) then use the Draenei Banner quest item on his corpse. Do the next step around.
04) Loot a Ruinous Polyspore for “Mac’Aree Mushroom Menagerie“: here is most of the possible spawns: 69.65, 68.67, 67.70, 69.72 .
05) If you still need part of “Mac’Aree Mushroom Menagerie“: loot a Aquatic Stinkhorn (#2 on map).
Try these possible spawns: 61.68, 58.73, 57.76, 57.79, 55.82 . NOTE: The Stinkhorn Striker (fishes) can drop this shroom as well.
06) Around Kessel’s Crossing do “A Favorite Treat” along with “Alien Predators“: loot 10 Sand Pears. And kill 10 Bloodmyst Hatchlings (these are found mostly west of the path around Kessel’s Crossing).
07) Just NW of Kessel’s Crossing do “Learning from the Crystals“: use your quest item Crystal Mining Pick at the Impact Site Crystal (red crystal 58.83).
08) Turn in “A Favorite Treat” 63.89 .
09) Also turn in “Alien Predators” and “Declaration of Power“, accept “Report to Exarch Admetius“.
10) Go west and do the last part of “Mac’Aree Mushroom Menagerie“: loot a Fel Cone Fungus. Try these possible spawns: 44.82, 43.81, 41.80, 43.84, 44.86 .
11) Go south to Blacksilt Shore around 44.94 and do “Catch and Release“: use your quest item Murloc Tagger on 6 Blacksilt Scouts /target (purple colored murlocs). NOTE: The range for the quest item is about 30 yards.
01) Use Hearthstone (or die on purpose and ressurect at spirit) to Blood Watch.
02) Turn in “Catch and Release” 53.58, accept “Victims of Corruption“.
03) In the building NW in town 53.53 turn in “Report to Exarch Admetius” and “Learning from the Crystals“, accept “The Missing Survey Team“.
04) Accept “Know Thine Enemy” 55.58.
05) Turn in “Mac’Aree Mushroom Menagerie” 56.57.
06) In the middle of the town accept (if you haven’t yet, you should be lvl 13 by now) “Irradiated Crystal Shards” 55.55 .
REMINDER: “Irradiated Crystal Shards” involves kill/looting almost any mob in Bloodmyst Isle and will naturally get done by doing the other quests at the same time. You may already have enough to turn this in. Turn these in as you get them.
07) NE in town by the Forge accept “Explorers’ League, Is That Something for Gnomes?” 56.54.
08) At Ruins of Loreth’ Aran turn in “The Missing Survey Team” 61.48, accept “Salvaging the Data“.
09) Nearby Ruins of Loreth’ Aran do “Salvaging the Data“: kill/loot the Wrathscale naga until you get the Survey Data Crystal.
10) Use Hearthstone (or go back SW) to Blood Watch, and in the building NW in town turn in “Salvaging the Data” (#3 on map 53.53), accept “The Second Sample“.
11) If you are level 14: East in town accept “Constrictor Vines” and “The Bear Necessities” (#5 on map 56.57). NOTE: If you were able to accept this now then keep in mind to kill/loot any Elder Brown Bears and Mutated Constrictors (pink flowers) you see on your way.
12) Go west to Bladewood and do “The Second Sample“: use your Crystal Mining Pick quest item at the Altered Bloodmyst Crystal 46.48.
13) While here complete “Blood Watch“: kill 10 Sunhawk Spies.
14) Go SW to Nazzivian and do “Know Thine Enemy“: loot the Nazzivus Monument Glyphs (wall plaque 37.71). Keep the next step in mind.
15) At Nazzivian see if you can find and then kill/loot Tzerak /target. This felguard demon spawns at 38.82 then walks north to where the wall plaque is at with the previous step. When he is summoned he yells “Fools! Weaklings! Tzerak has no need of your assistance!”. If you can find/kill/loot him, he drops an item that starts “Signs of the Legion“, accept and then do it by killing 8 Nazzivus Satyr /target and 8 Nazzivus Felsworn /target around Nazzivian. Keep the next step in mind.
16) At Nazzivian do “Victims of Corruption” kill/loot the Corrupted Treants. There is a few of these mob spawns around the red crystal tree around 36.75.
17) Grinding to Middenvale 50.74 and finish “Victims of Corruption“: kill/loot Corrupted Treants.
18) Use Hearthstone (or go back) NE to Blood Watch and turn in “Victims of Corruption” (#2 on map 53.58).
19) Turn in “Know Thine Enemy” (#4 on map 55.58). Wait a few seconds then accept “Containing the Threat“. Also turn in (if you did it) “Signs of the Legion“.
20) Near you accept (if you haven’t yet) “Constrictor Vines” and “The Bear Necessities” (#5 on map 56.57).
21) Turn in “Blood Watch” (#6 on map 55.55). Accept “Intercepting the Message“. Also turn in (if its finished) “Irradiated Crystal Shards“. NOTE: “More Irradiated Crystal Shards” is a repeatable quest for a buff item only, no XP.
22) In the building NW in town turn in “The Second Sample” (#3 on map 53.53), accept “The Final Sample“.
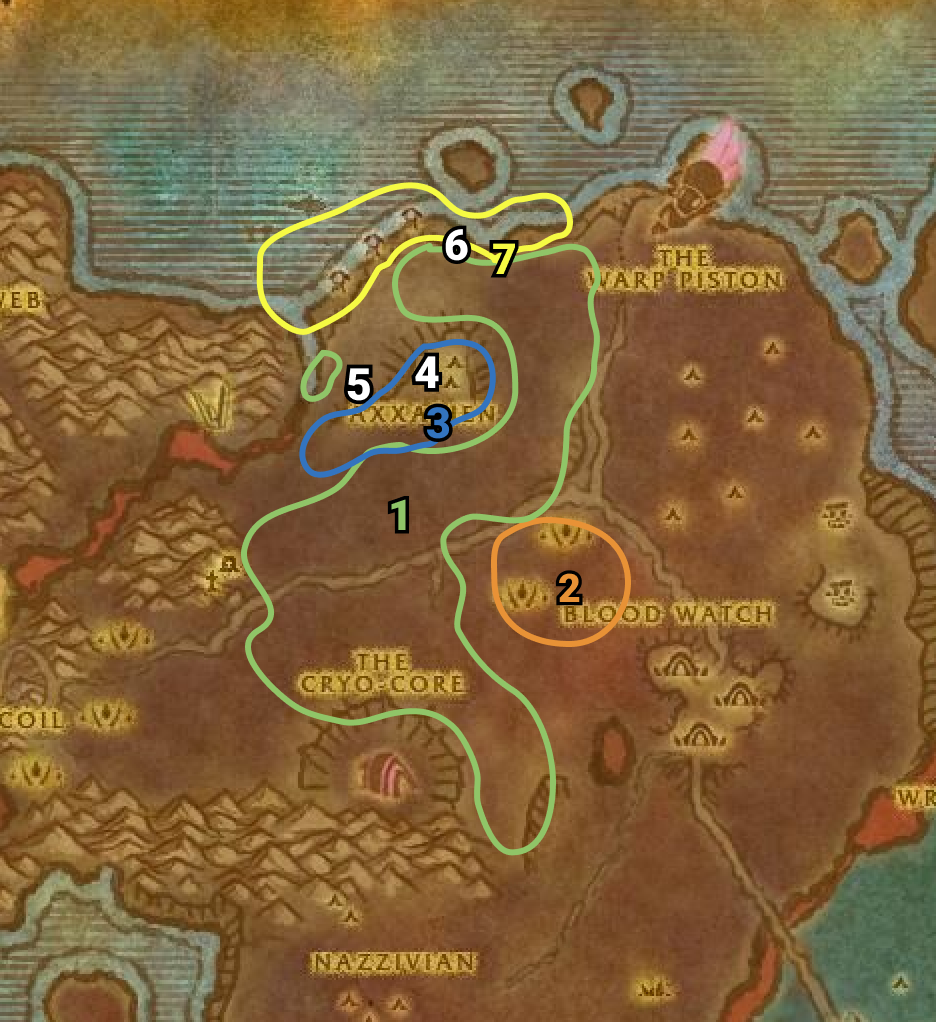
01) Start doing “The Bear Necessities” along with “Constrictor Vines” by kill/looting Elder Brown Bears and Mutated Constrictors (pink flowers) you may come across.
02) Go NW to Bladewood around 49.48 and do “Intercepting the Message“: kill/loot the Sunhawk blood elves until you get the Sunhawk Missive (5% drop rate). NOTE: If you run out of mobs to kill you can go SW to The cryo-Core around 40.60 and kill/loot the Sunhawk Reclaimers (they are a few levels higher though).
03) At Axxarienand do “Containing the Threat“: kill 5 Axxarien Shadowstalkers, 5 Hellcallers, loot 5 Corrupted Crystals and kill Zevrax (purple satyr standing at 42.30).
04) Also at Axxarien do “The Final Sample“: use your Crystal Mining Pick quest item at the Axxarien Crystal (big red crystal 41.30).
05) Go west and do “WANTED: Deathclaw“: kill/loot Deathclaw /target. This lvl 17 bear patrols around 37.30.
06) Go NE to The Bloodwash and under the large turtle shell turn in “Explorers’ League, Is That Something for Gnomes?” 42.21. Accept “Pilfered Equipment” and “Artifacts of the Blacksilt“. NOTE: You can get get restocked at this NPC.
07) Along the shore do “Pilfered Equipment” with “Artifacts of the Blacksilt“: loot Clopper’s Equipment. This box has 4 possible spawn locations around the murloc huts: 40.20, 38.22, 44.22, 46.20 . Also kill/loot the Blacksilt Seers for the 3 Idols and kill/loot Blacksilt Warriors and Blacksilt Shorestrikers for the 6 Knives.
08) Return to the shell (#6 on map 42.21 ) and turn in “Pilfered Equipment“. Also turn in “Artifacts of the Blacksilt“. Turning this in rewards you an item that starts “A Map to Where?“, accept it.
09) Finish “Constrictor Vines“: kill/loot Mutated Constrictors (pink flowers). These are #1 on map. Finish this as you go back to Blood Watch.
01) At Blood Watch, In the middle of town turn in “Intercepting the Message” 55.55, accept “Translations…“.
ALSO: While at Blood Watch keep an eye out for Messenger Hermesius /target, he patrols around the town, from him accept/complete “Urgent Delivery“.
02) Turn in “Translations…” 54.54, accept “Audience with the Prophet“.
03) In the building NW at Blood Watch 53.53 turn in “The Final Sample” and “WANTED: Deathclaw“. IF you are level 16 accept “Talk to the Hand“.
04) IF you are level 16: SW in town accept “The Missing Expedition” 53.57.
05) Take “Searching for Galaen” 53.58.
06) Turn in “Containing the Threat” 55.58.
07) SE in town 56.57 turn in “Constrictor Vines” and (if you did it) “The Bear Necessities“. Accept “Culling the Flutterers“.
08) East in town accept “Ysera’s Tears” 56.57.
09) You should have found Messenger Hermesius /target by now, he patrols around the town, from him accept/complete (if you haven’t yet) “Urgent Delivery“. Then stop at the Mailbox (by the Inn 55.59) and retrieve the Admiral Odesyus letter, from it accept “The Bloodcurse Legacy“.
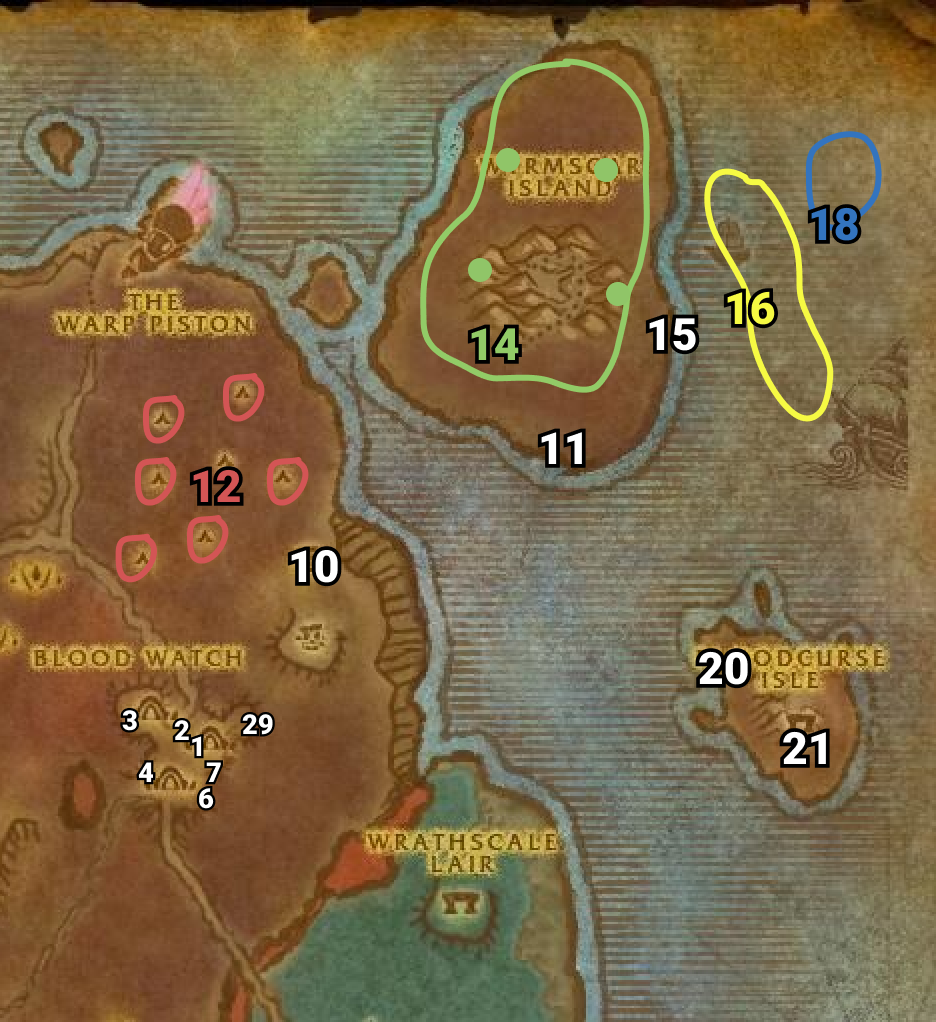
10) Grind to Ruins of Loreth’Aran and up in the old temple, from the Battered Ancient Book on the ground 61.42, turn in “A Map to Where?“, accept “Deciphering the Book“.
11) Go NE to the southern edge of Wyrmscar Island and accept “Restoring Sanctity” patrols around 75.34.
12) At the Ragefeather Ridge do “Restoring Sanctity“: loot 8 Dragon Bones from the ground.
13) Back east at the southern edge of Wyrmscar Island turn in “Restoring Sanctity” (#11 on map patrols around 75.34). Accept “Into the Dream“.
14) On the Island do “Into the Dream” along with “Ysera’s Tears“: kill 5 Veridian Whelps and 5 Broodlings. Also loot 2 Ysera’s Tears (green mushrooms) from the ground, here are some possible locations: 70.26, 68.22, 72.12, 75.16, 77.22 .
15) Eastside turn in “The Bloodcurse Legacy” 79.23, accept “The Bloodcursed Naga“.
16) In the sea 81.23 do “The Bloodcursed Naga“: kill 10 Bloodcursed Naga. NOTE: Accepting this quests gives you a swim speed & water breathing buff that has a 20 minute timer. You can always go back to the quest giver to obtain it again and replenish the 20 minute timer for it if you need to.
17) Back at the eastern side of Wyrmscar Island turn in “The Bloodcursed Naga” (#15 on map 79.23), accept “The Hopeless Ones…“.
18) Again in the sea do “The Hopeless Ones…“: kill/loot Bloodcursed Voyager /target. These neutral male humans are down at the sea floor.
19) Talk to Captain Edward Hanes (#15 on map 79.23) to buff you again (you will not be able to obtain it again). Then turn in “The Hopeless Ones…“, accept “Ending the Bloodcurse“.
20) Swim SE to Bloodcurse Isle (entrance at 83.49).
21) Follow the path up the hill then do “Ending the Bloodcurse“: click on the Statue of Queen Azshara 86.54 then kill Atoph the Bloodcursed.
22) Swim to the southern edge of Wyrmscar Island and turn in “Into the Dream” (#11 on map patrols around 75.34 ).
23) Go NE to the eastern side of Wyrmscar Island and turn in “Ending the Bloodcurse” (#15 on map 79.23).
24) Die on purpose and ressurect at spirit.
25) At the east side of town turn in “Ysera’s Tears” 56.57.
26) In the middle of town, from the First Aid Trainer /target 55.54, turn in “Deciphering the Book“.
27) Accept (if you haven’t yet) “Talk to the Hand” in the building NW in town (#3 on map 53.53).
28) Back at the First Aid Trainer /target in the middle of town accept “Nolkai’s Words” 55.54.
29) Up NE in town, from the Hippogryph Master /target 58.54 accept “On the Wings of a Hippogryph” (no exclamation mark). Then have him fly you to The Exodar.
The Exodar
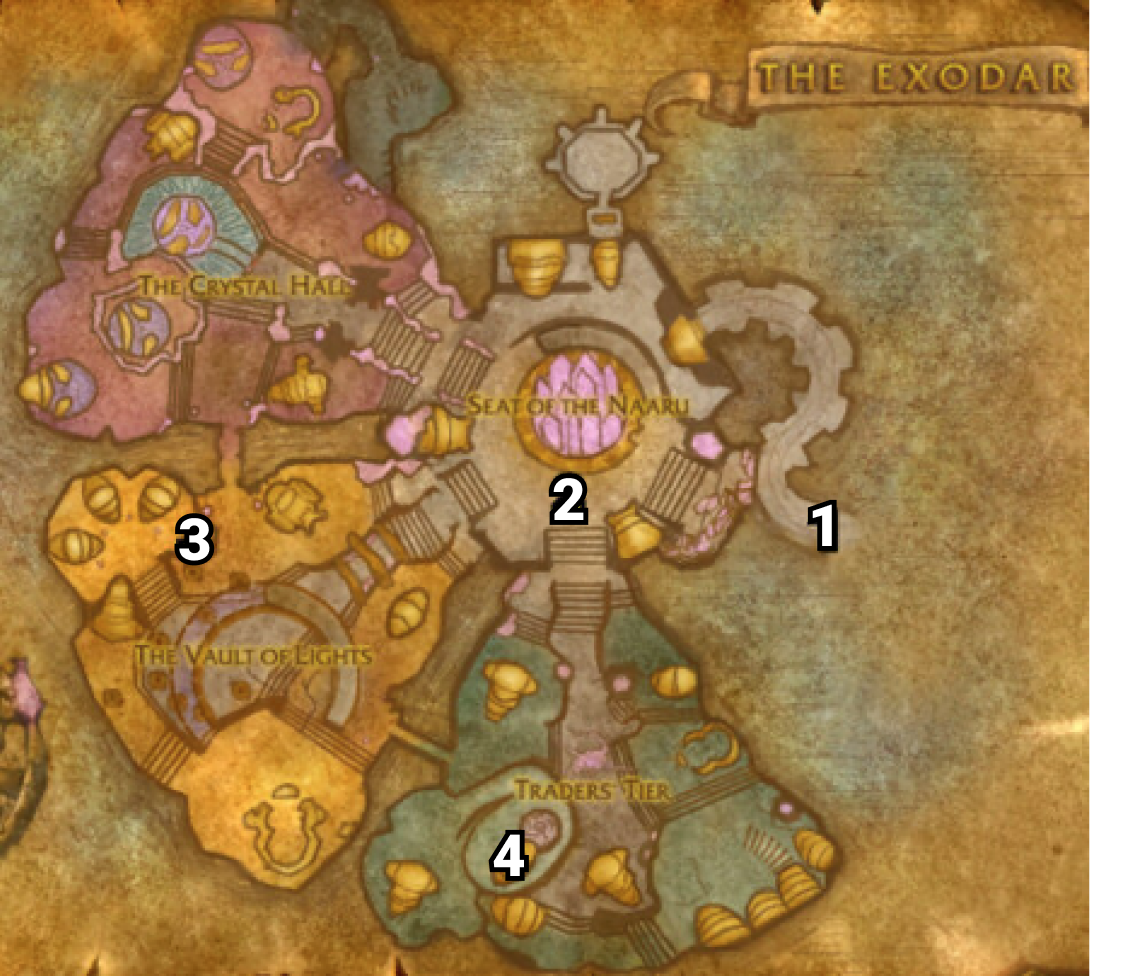
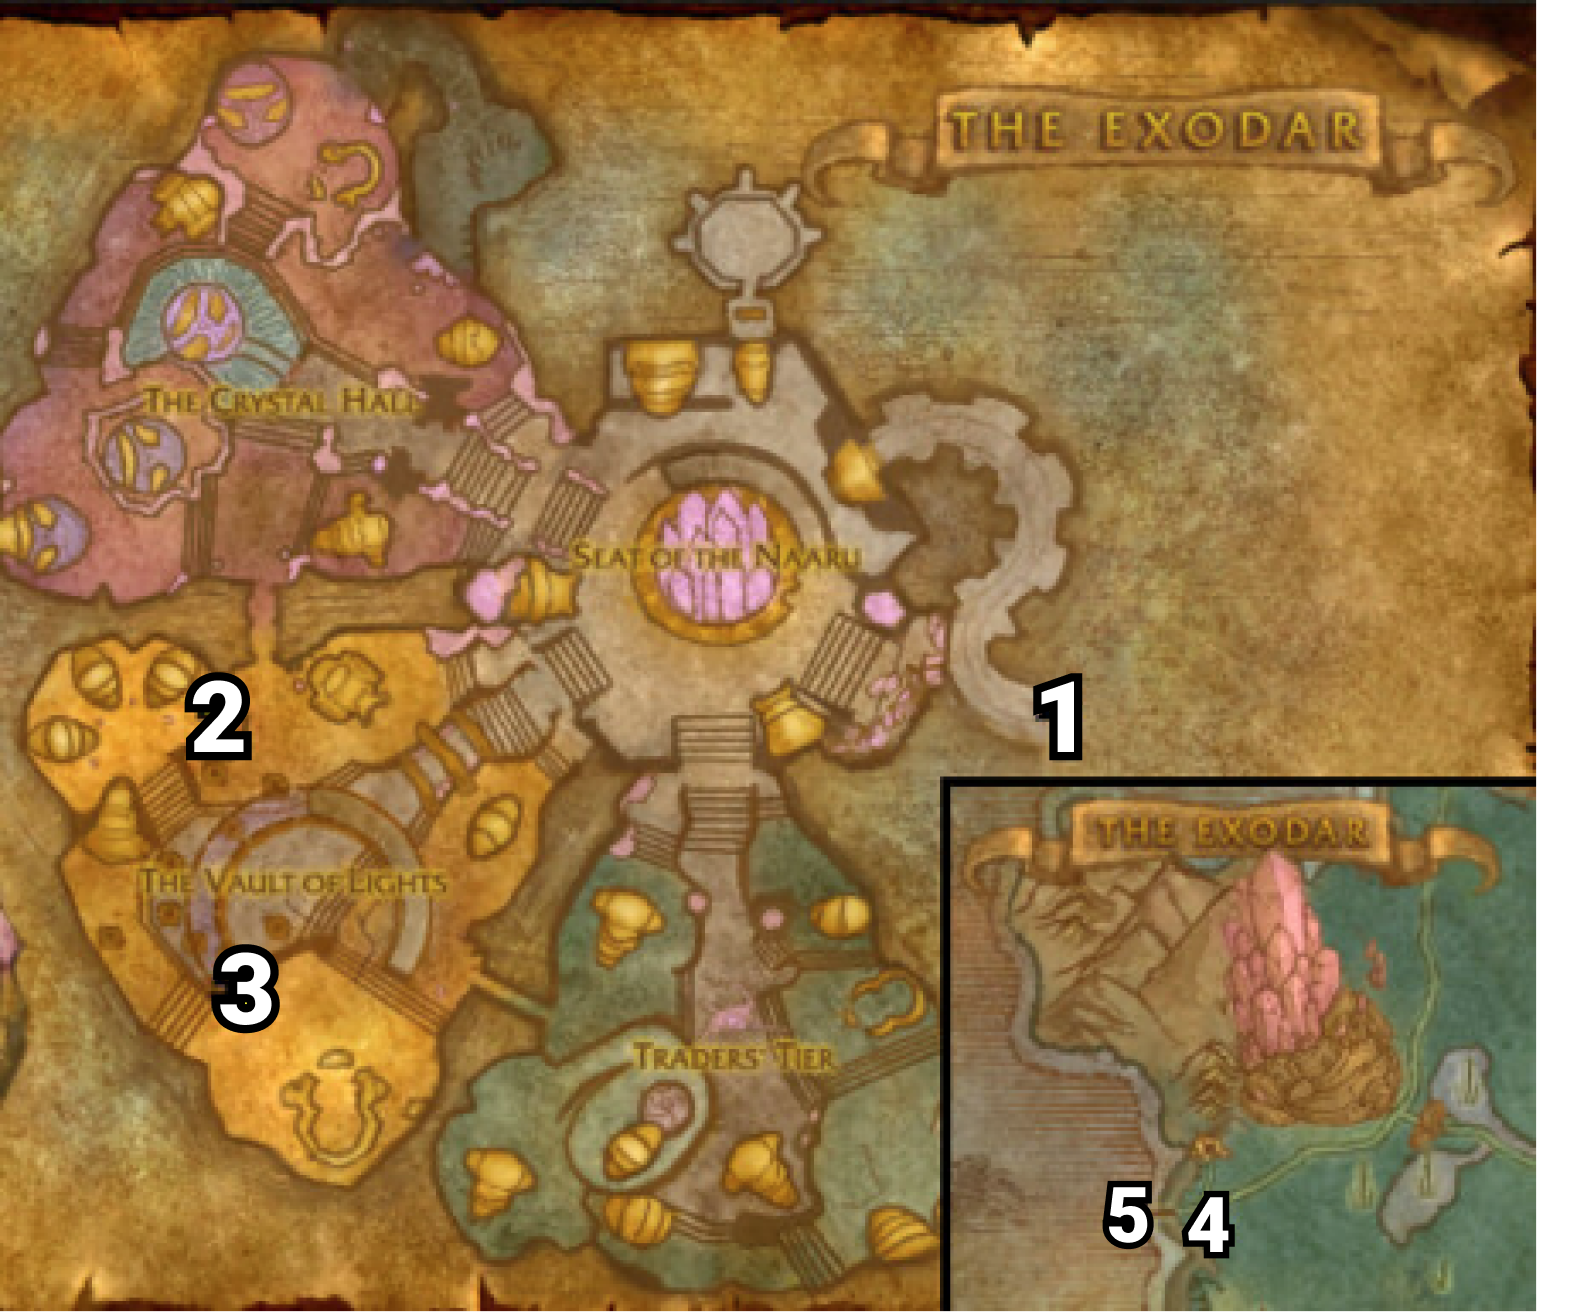
01) Enter The Exodar (entrance at 33.44 in Azuremyst Isle).
02) In The Exodar go to Seat of the Naaru and turn in “On the Wings of a Hippogryph” 57.50, SKIP “Hippogryph Master Stephanos“.
03) Go to The Vault of Lights and turn in “Audience with the Prophet” 33.54, accept “Truth or Fiction“.
(GET NEW CLASS ABILITIES) Find your class trainer to learn new spells/abilities. You can find an Exodar Peacekeeper /target to find your class trainer.
04) NOTE: One thing that can be done in the city is to learn new weapon abilities at the Weapon Master /target up at Trader’s Tier 53.86. You can learn Daggers or Two-Handed Swords from him.
05) Use Hearthstone to Blood Watch.
Blood Watch
01) In the middle of town turn in “Truth or Fiction” 55.55, accept “I Shoot Magic Into the Darkness“.
02) Go NE to Ruins of Loreth’Aran and from the Mound of Dirt 61.50 turn in “Nolkai’s Words“.
03) Start doing “Culling the Flutterers” by killing any Royal Blue Flutterer (blue moths) you see along the way.
04) Go north to The Warp Piston 52.22 and do “I Shoot Magic Into the Darkness“: kill 5 Void Anomaly.
05) Use Hearthstone (or run back) to Blood Watch and in the middle of the town turn in “I Shoot Magic Into the Darkness” (#1 on map 55.55). Then next to you accept “The Cryo-Core“.
06) Go west to The Cryo-Core and inside the building turn in “Searching for Galaen” 37.61, accept “Galaen’s Fate“. And next to you from Galaen’s Journal on the ground accept “Galaen’s Journal – The Fate of Vindicator Saruan“.
07) Around The Cryo-Core do “Galaen’s Fate” along with “The Cryo-Core“: keep kill/looting Sunhawk Reclaimers until you get Galaen’s Amulet (5% drop rate) along with the 12 Medical Supplies. NOTE: The Medical Supplies can also be found in containers around the area.
08) Use Hearthstone (or go back) to the SW part of Blood Watch and turn in “Galaen’s Fate” 53.58.
09) In the middle of town turn in “The Cryo-Core” and “Galaen’s Journal – The Fate of Vindicator Saruan” (#1 on map 56.55). Accept “Matis the Cruel“.
10) Next to you accept “Don’t Drink the Water“. NOTE: If you are lvl 18, we will cover “What We Know…” later.
11) SE in town turn in (if its finished) “Culling the Flutterers” 56.57.
12) Accept (if you haven’t yet) SW in town “The Missing Expedition” (#8 on map 53.57).
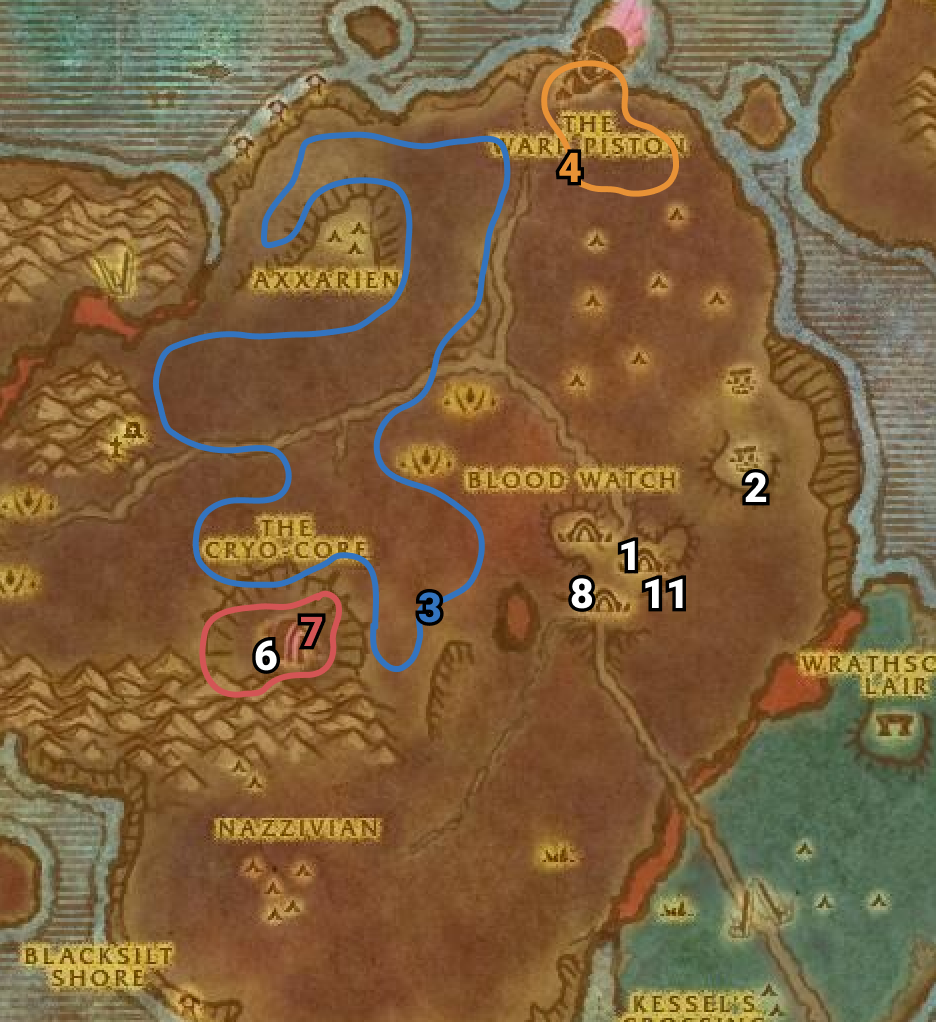
Vindicator’s Rest
01) Try to do “Matis the Cruel“: go west and along the path starting at 41.45 keep an eye out for Matis the Cruel /target (male blood elf on a fiery horse, see patrol path on map). If you see him use your Flare Gun quest item near him to spawn friendly NPCs to tank him then simply get his health down half way to complete the quest. He spawns at 27.52 . If you could not find him yet, then keep an eye out for him while doing this section.
02) Head west to Vindicator’s Rest 31.47 and accept “Fouled Water Spirits” and “Oh, the Tangled Webs They Weave“.
03) Next to you there turn in “Talk to the Hand” 30.46 . Accept “Cutting a Path“. And next to you accept “Critters of the Void“.
04) Start doing “Cutting a Path” along with “Oh, the Tangled Webs They Weave” by killing Enraged Ravagers and Mutated Tanglers (purple flowers) you see along the way.
05) North at The Foul Pool around 29.38 do “Fouled Water Spirits“: kill 6 Fouled Water Spirits. Work your way to the next step while finishing this one.
06) Accept “They’re Alive! Maybe…” 25.34.
07) Go to Amberweb Pass (path entrance at 21.36) and do “The Missing Expedition” along with “They’re Alive! Maybe…“: kill 8 Myst Leechers, 8 Spinners and Zarakh (patrols at the end of Amberweb Pass around 18.38). Also destroy the Webbed Creatures until you have freed 5 researchers.
TIP: Hitting the webs from a distance will allow you to not need to attack a mob if one comes out.
08) Back at the cliff turn in “They’re Alive! Maybe...” (#6 on map 25.34).
09) Go back to Vindicator’s Rest 31.47 finishing “Cutting a Path” along with “Oh, the Tangled Webs They Weave“: kill 10 Enraged Ravagers and 8 Mutated Tanglers (purple flowers). These are #4 on map.
10) At Vindicator’s Rest (#2 on map 31.47) turn in “Oh, the Tangled Webs They Weave” and “Fouled Water Spirits“.
11) Next to you there turn in “Cutting a Path” 30.46.
12) Finish (if you still need to) “The Bear Necessities” with “Culling the Flutterers“: kill/loot Elder Brown Bears and kill 10 Royal Blue Flutterer (blue moths).
13) You can try again for “Matis the Cruel” (if you have not done this yet): see if you can find Matis the Cruel (male blood elf on a firey horse, his patrol path is #1 on map). If you see him use your Flare Gun quest item near him to spawn friendly NPCs to tank him then simply get his health down half way to complete the quest. If you could not find him yet, then it can be skipped or tried again later (but my guide wont mention it again).
14) Go to The Bloodwash’s waterfall and do “Don’t Drink the Water“: use your Water Sample Flask quest item at the bottom of the waterfall 34.34.
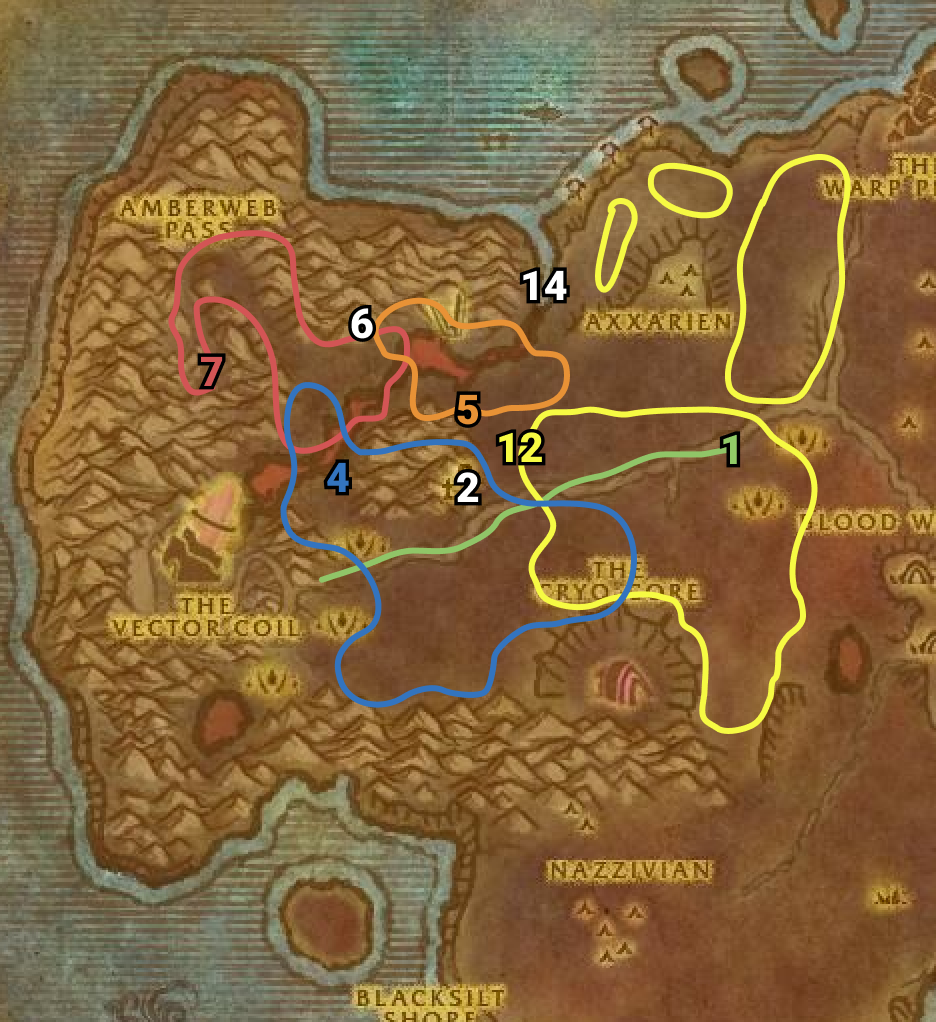
01) Hearth to Blood Watch.
02) East in town turn in (if you still need to) “The Bear Necessities” and “Culling the Flutterers” 56.57.
03) In the middle of town 55.55 turn in “Don’t Drink the Water” (accept “Limits of Physical Exhaustion“) and (if you did it) “Matis the Cruel“. Also accept “What We Know…“
04) In the building NW in town turn in “What We Know…” 53.53, accept “What We Don’t Know…“.
05) Do “What We Don’t Know…“: talk to the Captured Sunhawk Agent to get disguised as a blood elf, go in the cage at Blood Watch 54.54.
06) Back in the building NW in town turn in “What We Don’t Know…” (#4 on map 53.53), accept “Vindicator’s Rest“.
07) SW in town turn in “The Missing Expedition” 53.57.
08) Go to 21.62 and do “Limits of Physical Exhaustion” along with “Critters of the Void“: kill 10 Sunhawk Pyromancers and 10 Defenders. Also kill 12 Void Critters (tiny low level demons around actual #8 on map).
09) Use Hearthstone (or run back) to Blood Watch and in the middle of town turn in “Limits of Physical Exhaustion” (#3 on map 56.55), accept “The Sun Gate“. Also turn in “Critters of the Void“.
10) Head back west just south of The Vector Coil around 20.64 and do “The Sun Gate“: click on the 4 Sunhawk Portal Controllers (purple diamonds) next to the lake. Then go in the lake and click on the The Sun Gate. This is around actual #8 on map.
11) Head NE to Vindicator’s Rest and turn in “Vindicator’s Rest” 31.47.
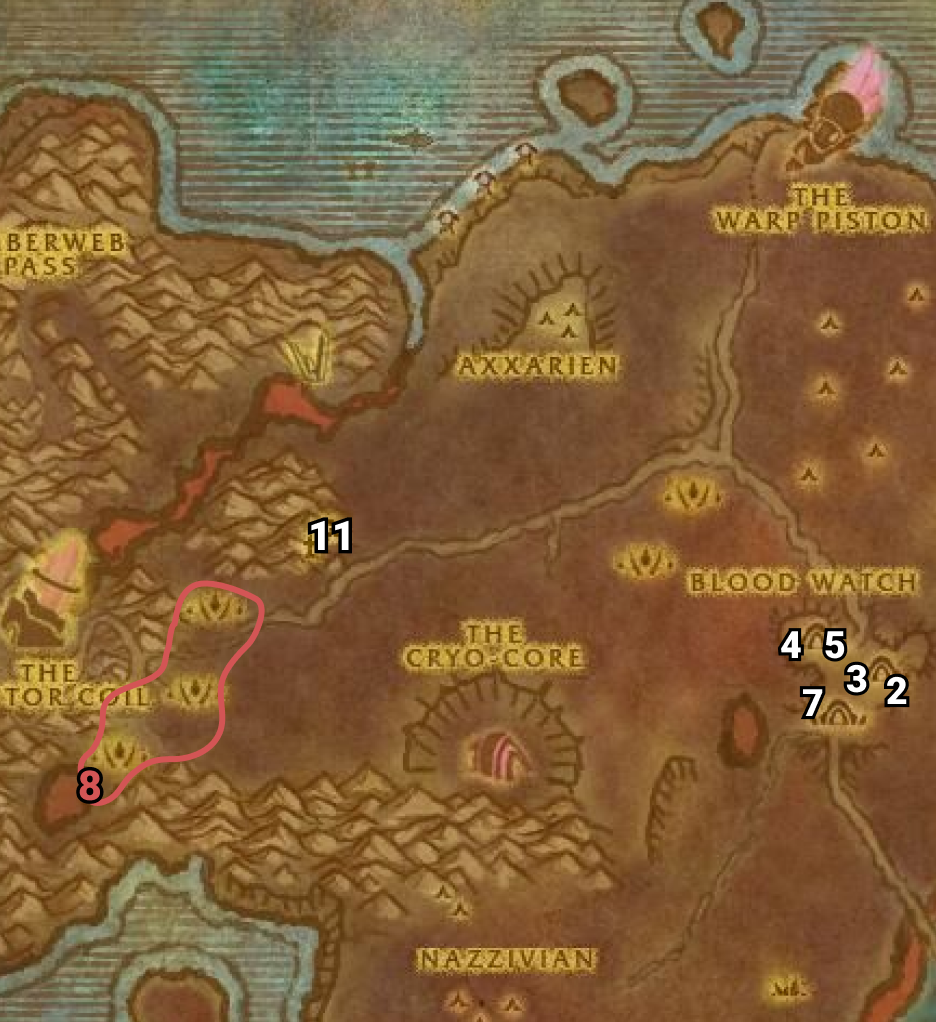
Group Quests
01) The quests below require to have 2+ Players for each of these quests. If you can’t find a party, just skipю
02) At Vindicator’s Rest accept “Clearing the Way” and next to you accept and do the escort “Ending Their World” 31.47. If Demolitionist Legoso (escortee) /target is not there means someone else is currently doing the escort. NOTE: Legoso is a beefy NPC, so let him do most of the tanking while you stay the distance and either heal or provide some DPS for him. If you are careful enough this can be soloed.
03) At The Vector Coil around 22.54 finish “Clearing the Way“: kill 8 Sunhawk Agents and 8 Saboteurs.
04) Back east at Vindicator’s Rest turn in “Clearing the Way” 31.47.
05) Use Hearthstone (or run back) to Blood Watch and in the building NW in town turn in (if you did it) “Ending Their World” 53.53, accept “The Unwritten Prophecy“.
06) In the middle of town turn in “The Sun Gate” 56.55.
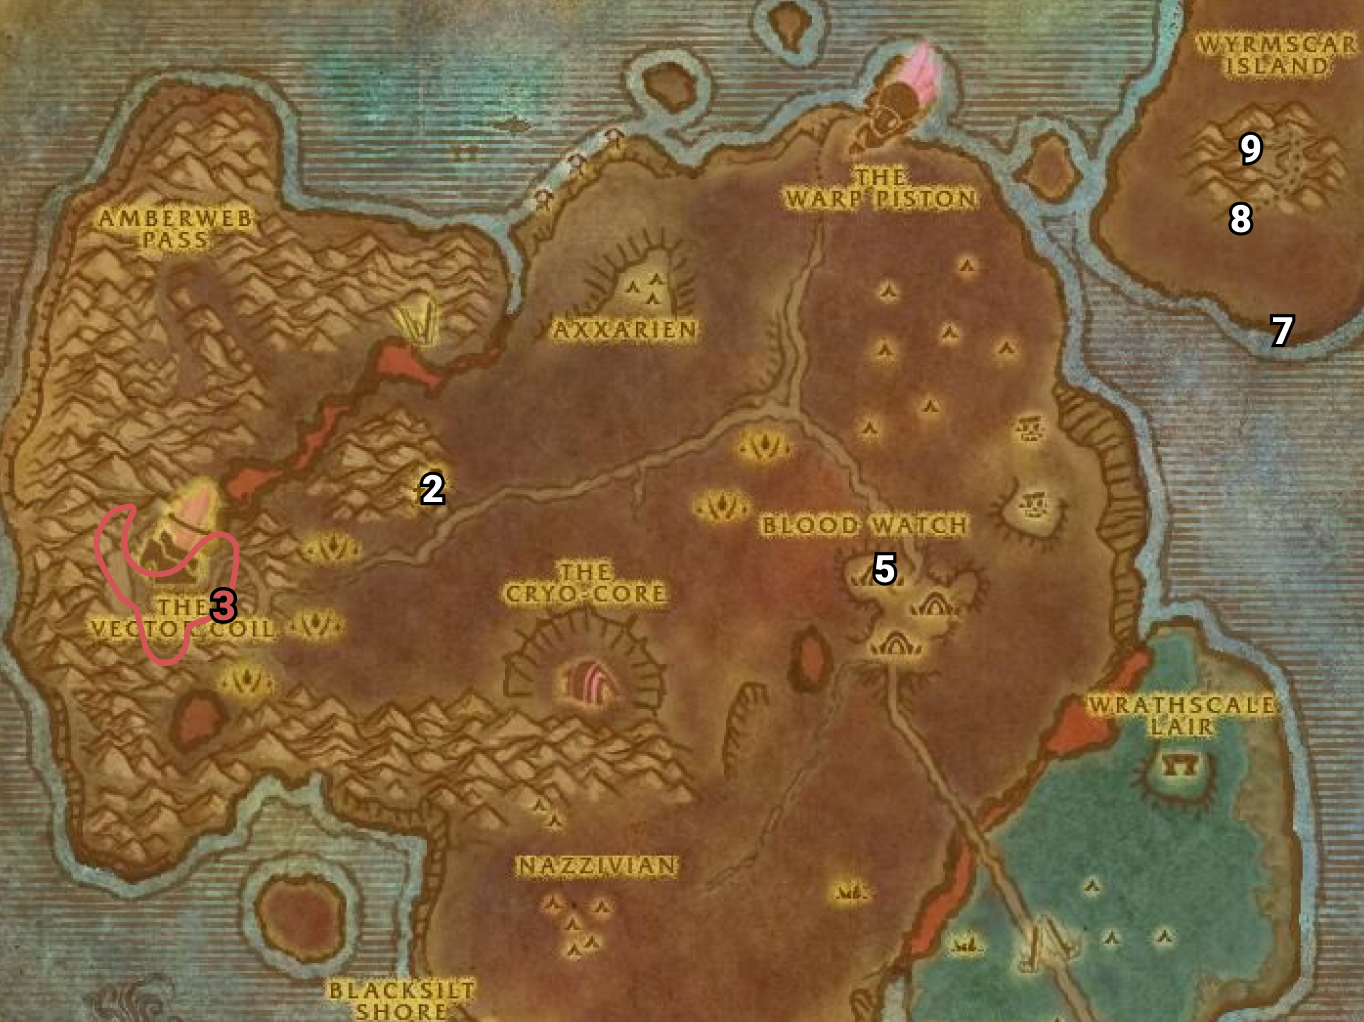
07) At the Island accept “Razormaw” 75.34.
08) Go to the mountain entrance at 72.26.
09) Go to the top of the mountain and do “Razormaw“: click on the Ever-burning Pyre 73.21 and then kill Razormaw (lvl 20 Elite undead dragon) when he comes down. With good skill, most classes could solo this.
10) Back at the southern edge of Wyrmscar Island turn in “Razormaw” (#7 on map 75.34).
Finishing Bloodmyst Isle
01) At this point make sure you are level 20. Keep grinding on any mobs until you are.
02) Use Hearthstone or go to Blood Watch and accept “Newfound Allies” 55.54.
03) In the middle of town turn in (if you haven’t yet) “The Sun Gate” 55.55 . Also turn in any remaining Irradiated Crystal Shards in for “More Irradiated Crystal Shards“.
04) Bloodmyst Isle is now FINISHED! You can abandon any quests you did not do for Bloodmyst Isle (EXCEPT for “Newfound Allies” and “The Unwritten Prophecy” if you have them).
05) Up NE in town, have the Hippogryph Master 58.54 fly you to The Exodar.
The Exodar
01) Enter The Exodar (entrance at 33.44 in Azuremyst Isle).
02) (IF YOU HAVE IT): Go to The Vault of Lights and turn in “The Unwritten Prophecy” 33.54.
(GET NEW CLASS ABILITIES) Find your class trainer to learn new lvl 20 spells/abilities. You can find an Exodar Peacekeeper /target to find your class trainer.
03) Take the ramp exit at 35.74.
04) Go up the ramp to exit The Exodar then go south a bit to turn in “Newfound Allies” 24.54, accept “The Way to Auberdine“.
05) Go west a bit to the end of the dock 20.54 and wait for the boat to arrive to take you to Auberdine, Darkshore.
Auberdine, Darkshore
01) Left the dock accept “Journey to Astranaar” 34.42. NOTE: Remember to turn this in when you get to Astranaar.
02) Go in the Inn and talk to the Innkeeper /target 37.44 to make Auberdine your new home.
03) Just south of the Inn, go up on the platform and from the Hippogryph Master 36.46, get the Flight Path.
04) There on the hippogryph dock accept (no exclamation mark /target) “Washed Ashore” 37.46.
05) Do “Washed Ashore“: go along the shore to the Beached Sea Creature 36.51 and stand in the middle of it where the neck meets the body and then click on it to loot the Sea Creature Bones.
06) Go back north to Auberdine and on the Hippogryph dock, turn in “Washed Ashore” (#3 on map 37.46), accept the next part.
07) Go west out in the sea and do “Washed Ashore“: loot the Skeletal Sea Turtle’s head 32.46.
08) Back east on the Hippogryph dock turn in “Washed Ashore” (#3 on map 37.46). NOTE: Doing this quest chain will open up many easy to do quests later on!
09) Just outside of the Inn, from the WANTED: Murkdeep! sign 37.44, accept “WANTED: Murkdeep!“.
10) Next to the mailbox accept “Cave Mushrooms” 37.44.
11) Go north across the bridge and on your left accept “The Absent Minded Prospector” 37.42 .
12) Go north in the merchant building and turn in “The Way to Auberdine” 37.40 . Accept “Onward to Ashenvale“.
NOTE: Remember to turn this in when you get to Astranaar.
13) in the SE building go upstairs and accept “The Tower of Althalaxx” 39.43.
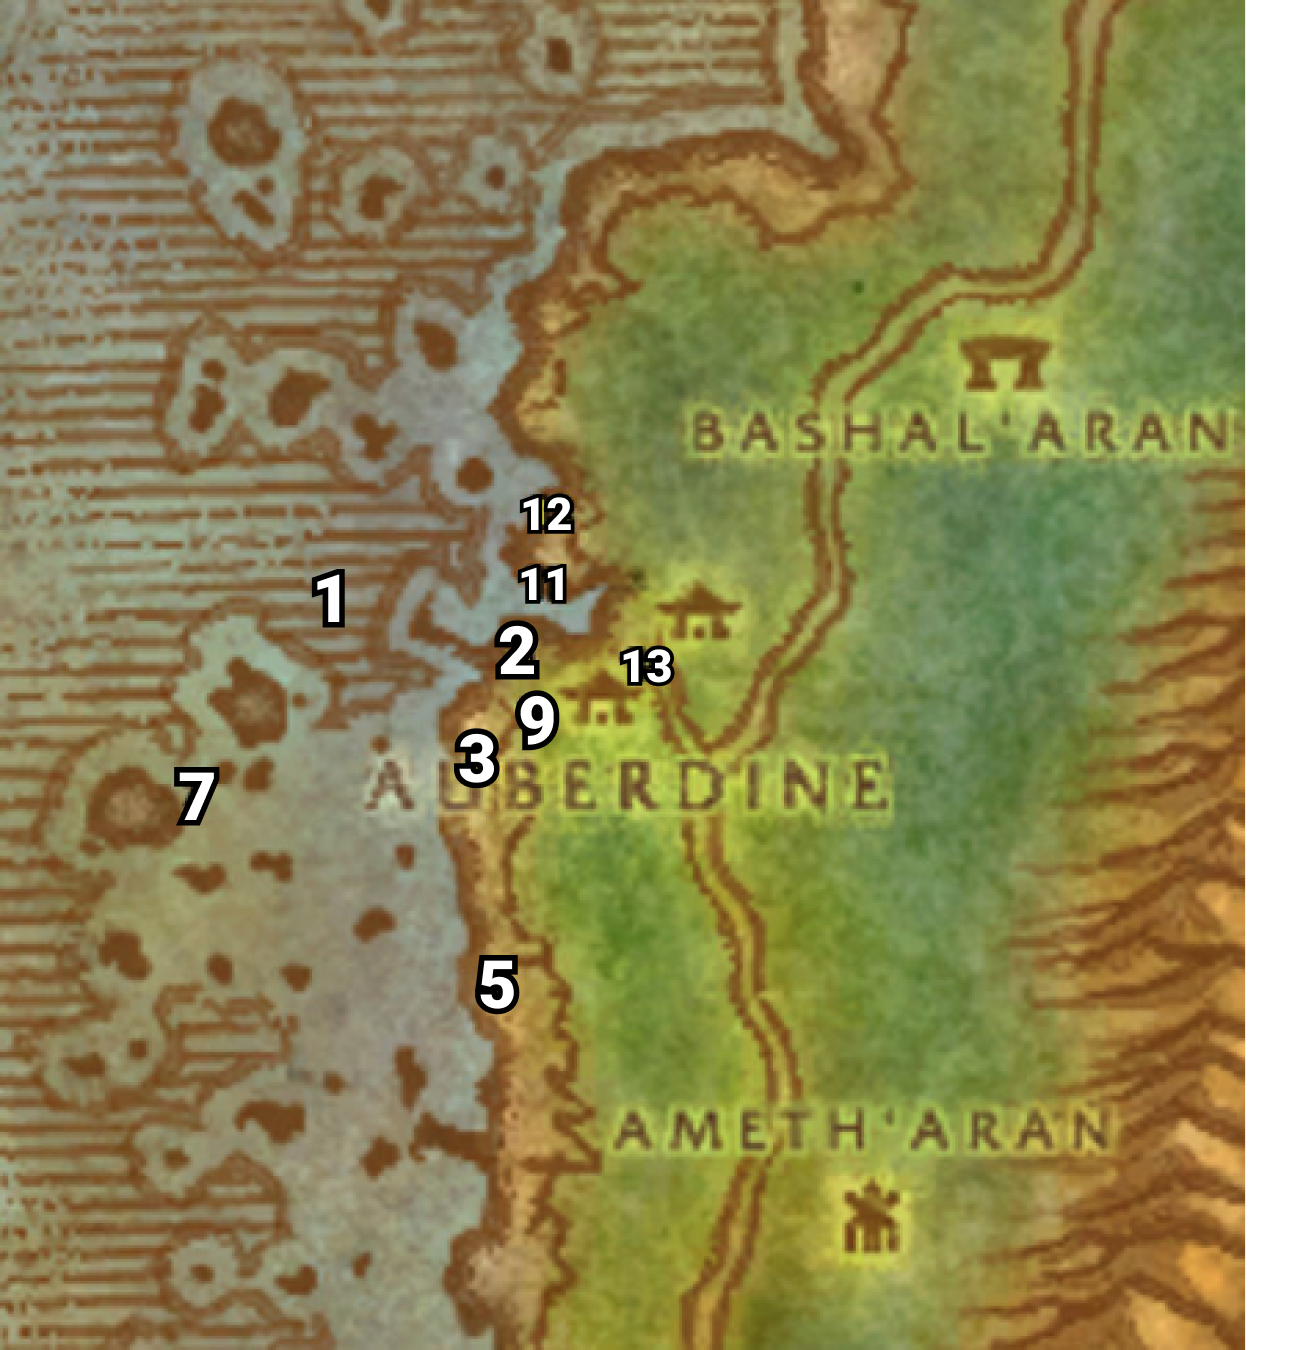
01) Go NE along the shore, to the Beached Sea Creature 42.31, click on it to accept “Beached Sea Creature“.
02) Go north on the shore and click on the Beached Sea Turtle’s arm 44.21 to accept “Beached Sea Turtle“.
03) Go east along the shore and click on the Beached Sea Turtle’s head 53.18 to accept “Beached Sea Turtle“.
04) Go SE and just off the main path next to a rock, turn in “The Tower of Althalaxx” 55.25, accept the next part.
05) Go SE a bit (around the tower, 55.27) and do “The Tower of Althalaxx“: kill/loot Dark Strand Fanatics (female humans).
06) Turn in “The Tower of Althalaxx” (55.25, #4 on map), accept the next part.
07) Go south, then up and through the waterfall in front of the cave (path entrance at 55.32) do “Cave Mushrooms“: loot the mushrooms on the ground in the cave.
08) Use Hearthstone (or go back) to Auberdine and up on the hippogryph dock turn in ALL “Beached Sea” quests you have 37.46.
09) Just outside of the Inn by the mailbox turn in “Cave Mushrooms” 37.44 , accept “Onu“.
