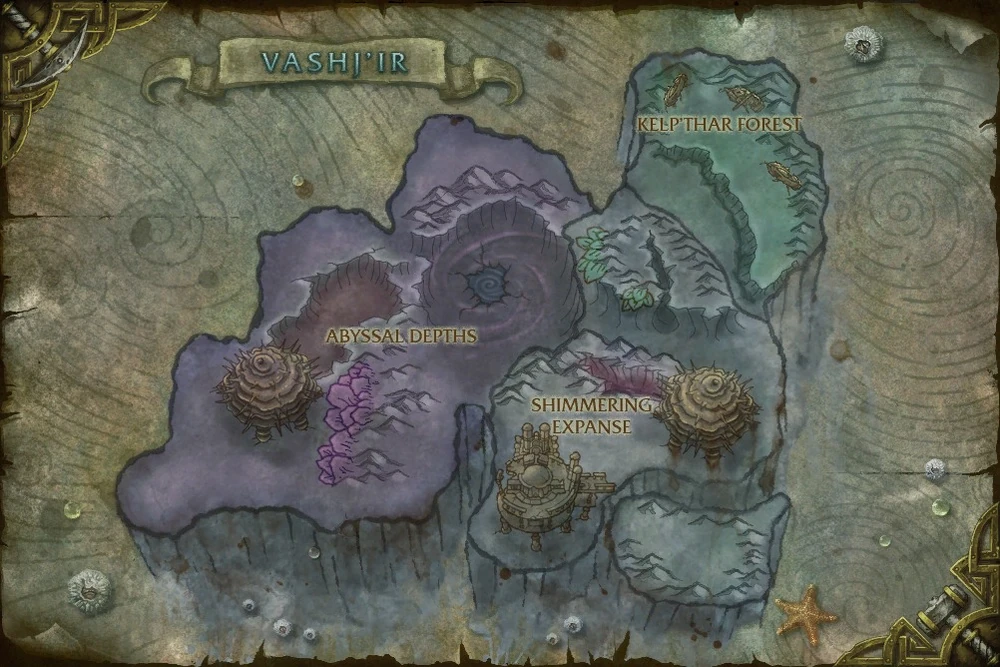
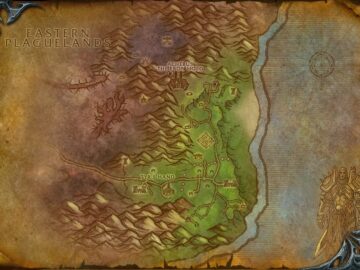
- In Stormwind, Get To the Depths.
- At Stormwind Harbor, turn in your quest and Get Call of Duty.
- Wait for the ship on the northern dock, and board it.
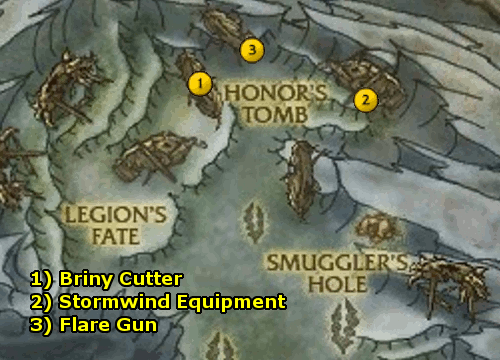
- You’ll arrive at The Briny Cutter. Turn in your quest. Get Sea Legs. Set your Hearthstone to The Briny Cutter.
- Just outside on the ocean floor, gather 3 Saltwater Starfish and 1 Conch Shell.
- Return to The Briny Cutter and turn in your quest. Get Pay it Forward.
- Rescue 6 Drowning Soldiers around the area with your Enchanted Conch Shell.
- Return to The Briny Cutter and turn in your quest. Get Rest For the Weary. Complete the quest and get Buy Us Some Time and Traveling on Our Stomachs.
- Kill 8 Zin’jatar Raiders and gather 8 Succulent Crab Meat from killing Crabs.
- Return and turn in your quests. Get To Arms and Stormwind Elite Aquatic and Land Forces.
- Gather 6 Stormwind SEAL Equipment, 5 Stormwind Breastplate, 5 Stormwind Helm, 5 Stormwind Spear, and 5 Stormwind Shield off the ocean floor as well as from the Gilblin Scavengers.
- Return to The Briny Cutter and turn in your quests. Get Finders, Keepers.
- Get Captain Taylor’s Flare Gun.
Return and turn in your quest. Get All or Nothing. Defend the ship.
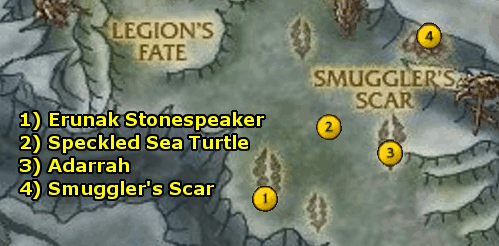
- You’ll arrive at Erunak Stonespeaker. Turn in All or Nothing. Get Better Late Than Dead.
- Use Moanah’s Meatstick on a Speckled Sea Turtle. It will get eaten, but that’s fine.
- Return to Shallow’s End and turn in your quest. Get The Abyssal Ride.
- Click on the Braided Rope nearby. Subdue the Abyssal Seahorse by following the directions and turn in your quest. Get Good Deed Left Undone.
- Go to Adarrah and Get Gimme Shelter!
- Go to Smuggler’s Scar. Go into the cave, then back out. Then, back in again.
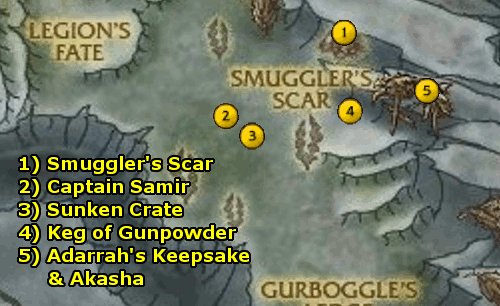
- At Smuggler’s Scar, turn in your quest and get Ain’t Too Proud to Beg.
- Go to the Captain Samir. Talk to him to rescue him. Also, kill Sabreclaw Skitterer for a Crumped Treasure Map which starts Kliklak’s Craw.
- Return to Smuggler’s Scar and turn in your quests. Get A Girl’s Best Friend, A Taste for Tail, and Can’t Start a Fire Without a Spark.
- Kill Clacksnap Pincers for 4 Clacksnap Tail. One will drop a Tattered Treasure Map. Also, at the Sunken Crate, get the quest A Case of Crabs. As well, look for Kliklak (who wanders north/south a long distance). Kill him for the Corroded Key.
- Grab the Keg of Gunpowder.
- Gather 6 Adarrah’s Keepsake around the sunken boat. Kill Akasha for the Horde Chest Key. Behind the boat, go to the Sunken Horde Chest and turn in your quest.
- Return to Smuggler’s Scar.
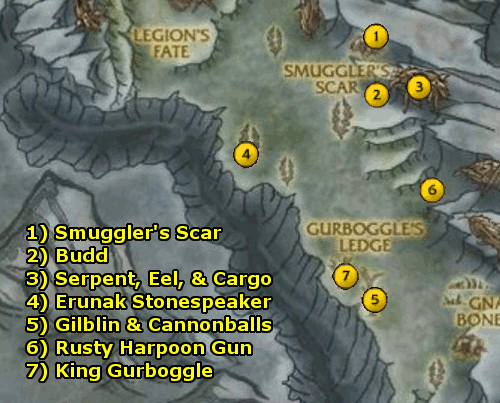
- At Smuggler’s Scar, turn in your quests. Get Ophidophobia and Nerve Tonic.
- At Budd, get Oh, the Insanity!
- Kill 4 Brinecale Serpent and Gather 5 Sunken Cargo. Also, kill a Slickskin Eel to start the quest Once More, With Eeling – then, kill 7 more Eels.
- Return to Smuggler’s Scar. Get A Desperate Plea.
- Go to Erunak Stonespeaker and turn in your quests. Get Undersea Sanctuary. Use Erunak’s Scrying Orb. Complete your quest and get Spelunking.
- Kill a Gilblin Collector for Lady La-La’s Necklace, which starts Lady La-La’s Medallion. Kill Gilblin Hoarders for 5 Medallion Fragments and as well as just picking them off the ground for 50 Pilfered Cannonball. Use the Medallion Fragments to create Lady La-La’s Medallion and complete the quest.
- Return to Budd. Complete your quest. Get Dah, Nunt… Dah, Nunt…
- At the Rusty Harpoon Gun, use the Booby-Trapped Bait. Complete your quest and get Shark Weak. Gather 5 of Gnaws’ Tooth nearby.
- Return to Budd. Complete your quest. Get DUN-dun-DUN-dun-DUN-dun.
- Go to the Rusty Harpoon Gun. Use Budd’s Chain. Fire the Harpoon Gun when allowed to.
- Return to Budd. Complete your quest. Get A Bone to Pick.
- Kill King Gurboggle and loot the Pewter Pounder.
- Return to Budd. Complete your quest. Get Decisions, Decisions.
- Use The Pewter Pounder to destroy The Pewter Prophet. Then, complete your quest.
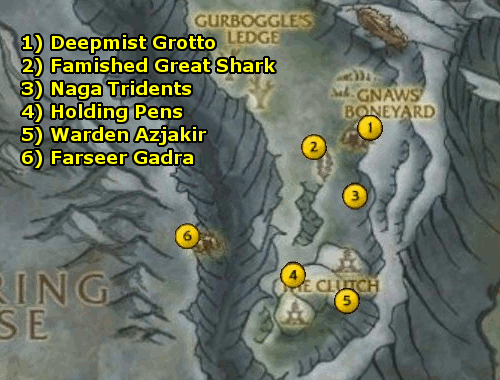
- Go to the Deepmist Grotto, Turn in Spelunking. Get Debriefing. Talk to Gurrok. Then, complete your quest. Get Wake of Destruction.
- Outside, use the Orb of Suggestion on a Famished Great Shark. Eat 25 Naga at the Holding Pens.
- Then, use Ability 3 – Return to Safety. Turn in your quest. Get What? What? In My Gut…?, Decompression, and Come Hell or High Water.
- Go to the Naga Tridents and get How Disarming.
- Go to the Holding Pens and complete all your tasks here: Kill 12 Zin’jatar Naga. Rescue 10 Imprisoned Soldiers with the Breathstone, Destroy 6 Naga Weapons, and Gather 7 Wiggleweed Sprout. Complete Hell or High Water and get The Warden’s Time.
- Kill Warden Azjakir.
- Return to the Deepmist Grotto. Turn in your quests. Get Across the Great Divide.
- Go through the cave to Farseer Gadra.
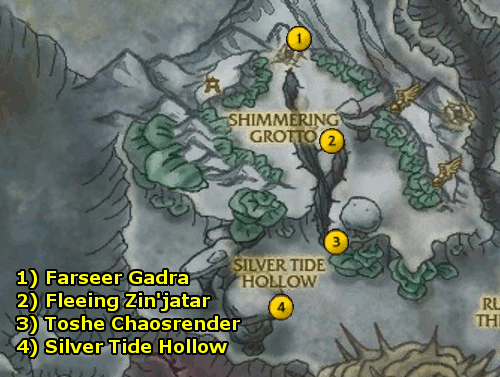
- At Farseer Gadra, turn in your quest. Get The Looming Threat. Talk to Gadra and complete the quet. Get Backed Into a Corner. Finish the fight, then turn in your quest. Get Rundown.
- Use Toshe’s Hunting Spears on 20 Fleeing Zin’jatar Fathom Stalkers.
- Go to Toshe Chaosrender and turn in your quest. Get Silver Tide Hollow.
- Go to Silver Tide Hollow and turn in your quest.
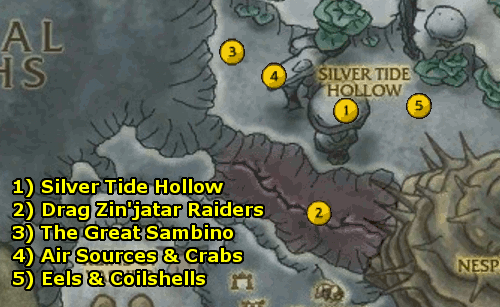
- At Silver Tide Hollow, Get A Distracting Scent, The Great Sambino, Slippery Threat, and Don’t be Shellfish.
- At the southern side of the cave, there are several Dead Zin’jatar Raiders. Drag three of them, one by one, to the Glimmerdeep Gorge.
- Go to The Great Sambino. Turn in your quest and get Undersea Inflation and Crabby Patrons.
- Use Sambino’s Air Balloon near 10 glowing air sources. Kill 10 Green Sand Crab and keep killing them until you get Sambino’s Air Valve.
- Return to Sambino. Turn in your quests. Get Totem Modification.
- Nearby in the sand, Use Sambino’s Modified Strength of Earth Totem and fend off the waves. Return to Sambino. Turn in the quest. Get Back in One Piece
- Kill 12 Spiketooth Eel and gather 10 Coilshell Sifter.
- Return to Silver Tide Hollow.
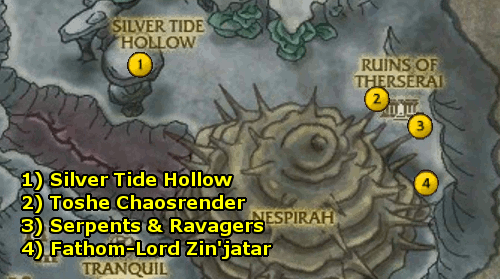
- At Silver Tide Hollow, turn in your quests. Get Toshe’s Vengeance.
- Go to Toshe Chaosrender. Turn in your quest. Get Vengeful Heart and Vortex.
- Use the Globes of Tumultuous Water near the Swarming Serpents and trap 30 of them. Also, kill 10 Zin’jatar Ravagers.
- Return to Toshe and turn in your quests. Get Fathom-Lord Zin’jatar.
- Kill Fathom-Lord Zin’jatar. You’ll also get a Luminescent Pearl which starts A Pearl of Wisdom.
- Return to Toshe and turn in your quest.
- Return to Silver Tide Hollow.
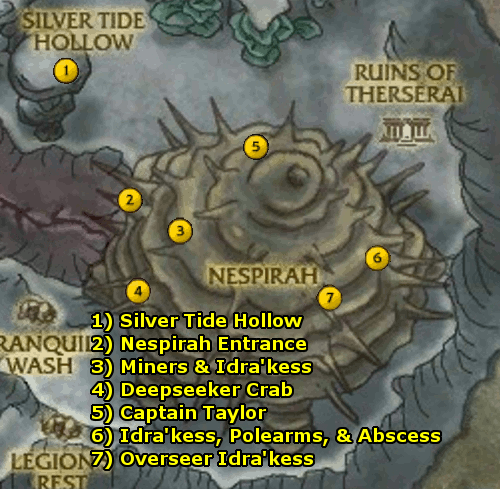
- At Silver Tide Hollow, turn in your quest. Get Nespirah.
- Enter Nespirah from the location marked. Follow Earthmender Duarn and turn in your quest. Get Making Contact. Talk to Duarn to complete the quest. Get Slave Labor and Stick it to Them.
- Near the Giant Pearls, use Duarn’s Rope to rescue 8 Pearl Miners. Kill 7 Idra’kess Sentinel and 7 Idra’kess Enchantress.
- Return to Earthmender Duarn and turn in your quests. Get Capture the Crab.
- Use Duarn’s Net on a Deepseeker Crab. Click the crab to capture it.
- Return to Earthmender Duarn and turn in your quest. Get Breaking Through. Complete your quest by talking to Duarn and get We Are Not Alone.
- Go to Captain Taylor and turn in your quest. Get Body Blows, Still Valuable, and Hopelessly Gearless.
- Kill Idra’kess Warlords and Prophets for 5 Mysterious Pearl, loot 4 Purloined Polearm from the weapon racks, and Attack 7 Nespirah Abscess.
- Return to Captain Taylor and turn in your quests. Get Overseer Idra’kess.
- Kill the Idra’kess Mistresses next to Overseer Idra’kess to make him vulnerable to attack. After some time, you can kite Idra’kess over the Nespirah Fluid to do massive damage to him.
- Return to Earthmender Duarn and turn in your quest. Follow Erunak and board his seahorse.
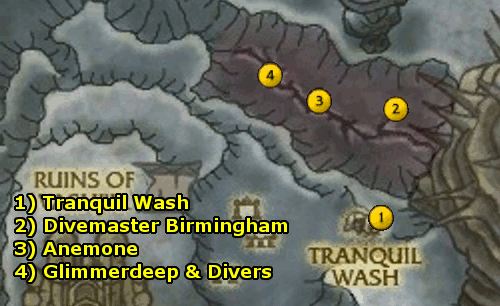
- You’ll arrive at Tranquil Wash. Turn in Waking the Beast. Get Cold Welcome and A Powerful Need to Eat
- Go to Divemaster Birmingham and turn in your quest. Get Clamming Up and Art of Attraction.
- Along the cliff walls, go up to the anemone and use the Anomne Chemical Extraction Device to gather 8 Chemicals.
- Return to Divemaster Birmingham and turn in your quest. Get Odor Coater.
- Use your Anemone Chemical Application Device on 8 Clam Divers, Kill 10 Glimmerdeep Tidehunter and gather 16 Glimmerdeep Clam.
- Return to Divemaster Birmingham and turn in your quests. Get Bellies Await.
- Return to Tranquil Wash.
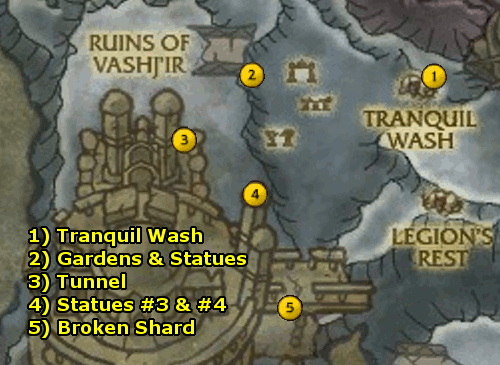
- At Tranquil Wash, turn in your quests. Get Swift Approach, A Better Vantage, Caught Off-Guard, and An Occupation of Time. During the next steps, kill 10 Azsh’ir Patroller and 8 Azsh’ir Monitor.
- Scout the Northern Quel’Domir Gardens & Examine the statues of Laestharia Vashj & Queen Azshara
- Scout the Tunnel.
- Examine the statues of High Priestess Siralen & Ranger Valarian.
- Go to the Broken Shard to get the quest Upon the Scene of Battle.
- Return to Tranquil Wash.
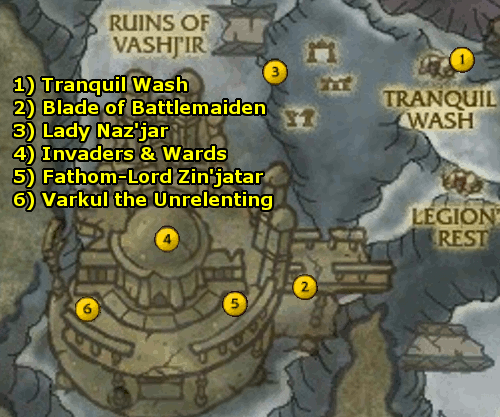
- At Tranquil Wash, turn in all your quests. Get Visions of the Past: The Invasion of Vashj’ir.
- Go to the Vision of the Battlemaiden and use the Blade of the Naz’jar Battlemaiden. Get Reoccupation at Fathom-Stalker Azjentus.
- Kill 10 Kvaldir nearby. Return to Azjentus and turn in your quest. Get The Revered Lady.
- Go to Lady Naz’jar and turn in your quest. Get To the Fathom-Lord’s Call and Built to Last.
- Swim up to the top of the terrace. Kill 16 Kvaldir Invaders and activate 8 Nar’shola Wards.
- Go to Fathom-Lord Zin’jatar and turn in your quests. Get Not Soon Forgotten.
- Kill Varkul the Unrelenting. Make sure that those attacking the Sira’kess Sea Witches are killed. Complete your quest, then outside your vision complete Visions of the Past: The Invasion of Vash’jir. Get Looking Forward. Hop onto the Tamed Sea Horse.
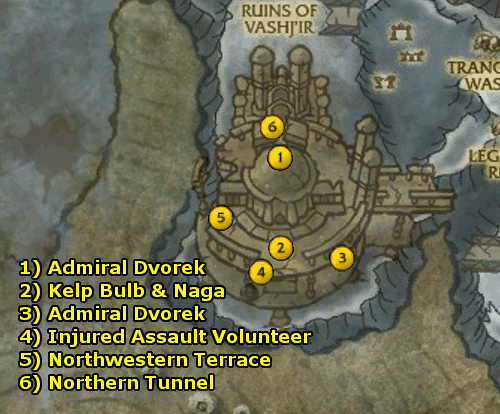
- At Admiral Dvorek, turn in your quest. Get Clear Goals, Not Entirely Unprepared, and Properly Inspired.
- Around the area at the ledges, use the Box of Crossbow Bolts to restock 8 Alliance Lookouts.
- Kill 10 Naga and gather 8 Bloated Kelp Bulb hanging off the plants.
- Return to Admiral Dvorek and turn in your quests. Get Swift Action. Talk to Engineer Hexascrub to begin the assault. Blow up 150 Naga.
- You’ll return to Admiral Dvorek’s new location. Then, turn in your quest. Get Gauging Success and Fallen But Not Forgotten.
- Rescue 6 Injured Assault Volunteer.
- Scout the northwestern terrace.
- Scout the tunnel to the north.
- Return to Admiral Dvorek’s new location. At Admiral Dvorek, turn in your quests. Get Visions of the Past: The Slaughter of Biel’aran Ridge.
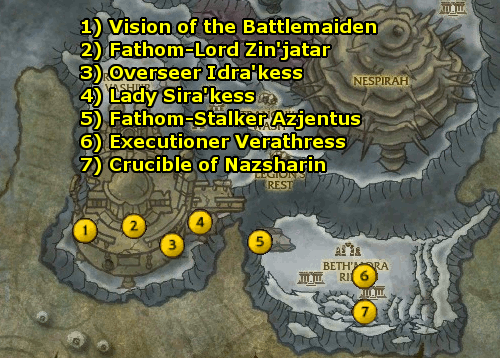
- Go to the Vision of the Battlemaiden and use the Blade of the Naz’jar Battlemaiden. As a naga, at Lady Naz’jar, get By Her Lady’s Word.
- Go to Fathom-Lord Zin’jatar and talk to him.
- Go to Overseer Idra’kess and talk to him.
- Go to Lady Sira’kess and talk to her.
- Go to Fathom-Stalker Azjentus and turn in your quest. Get No Trespass Forgiven and Stolen Property.
- Go to Executioner Verathress. Get Setting an Example.
- Attack a Kvaldir High Shaman in a nearby building, then lure him back to Executioner Verathress. Turn in your quest.
- Go to the Crucible of Nazsharin and turn in your quest. Kill 20 Kvaldir on the way. Get Chosen Burden.
- Return to Fathom-Stalker Azjentus and turn in your quests. Get The Culmination of Our Efforts. Then, complete the quest as well as Visions of the Past: The Slaughter of Biel’aran Ridge. Get Losing Ground. Mount the Tamed Sea Horse.
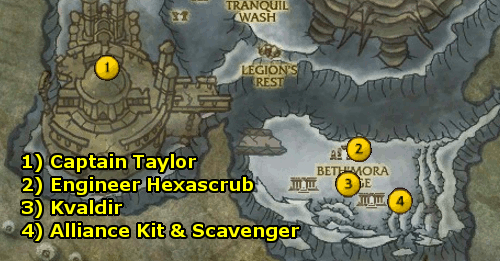
- Turn in Losing Ground to Captain Taylor. Get Desperate Plan.
- Go to Engineer Hexascrub and turn in your quest. Get Come Prepared, Unfurling Plan, and Hostile Waters.
- Kill Kvaldir for 8 Coils of Kvaldir Rope.
- Kill 10 Muckskin Scavenger and get the Alliance Survival Kit inside the boat.
- Return to Engineer Hexascrub and turn in your quests. Get Honor and Privilege. Swim up and use the Survival Kit Remnants. Use the Rescue Flare. Turn in your quest and get Welcome News.
- Return to Captain Taylor and turn in your quest.
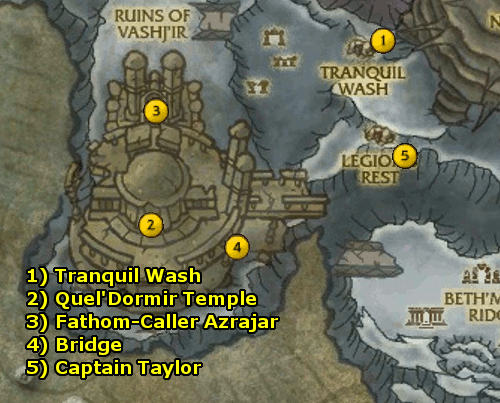
- At Tranquil Wash, turn in your quest and get Visions of the Past: Rise from the Deep.
- Swim to the Quel’Dormir Temple. Use your Blade of the Naz’jar Battlemaiden on the top floor inside the temple. Get Devout Assembly. Right outside the temple, get Her Lady’s Hand.
- Look around the area. Speak to Fathom-Caller Azrajar. Kill the Kvaldir to Relieve 8 Naz’jar Honor Guard. Speak to 6 Sira’kess Tide Priestess.
- Return to the Quel’Dormir Temple and turn in your quests. Get At All Costs.
- Kill 20 Attacking Kvaldir outside, then return and turn in your quest. Get Final Judgement.
- Go to the bridge and defend it for 6 minutes to complete your quest.
- Return to Tranquil Wash. Turn in your quest. Get A Breath of Fresh Air.
- Go to Captain Taylor, aboard the Voldrin’s Hold. Get to roughly that spot on the map and use your Boom Boots to be able to see the ships. Turn in your quest and get Full Circle and The War Has Many Fronts. Wait for The Verne to dock, then get aboard.
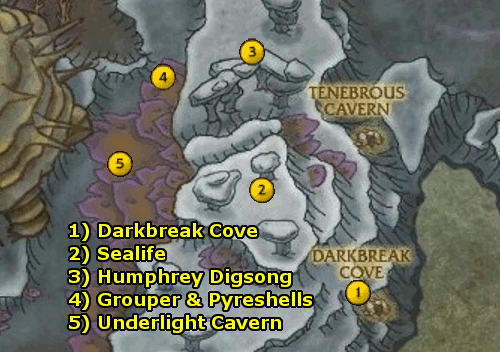
- You’ll arrive at Darkbreak Cove. Turn in your quests. Get Environmental Awareness.
- Kill the various sealife and use the Oil Extraction Pump to gather 4 Terrapin Oil, 4 Remora Oil, and 4 Hammerhead Oil. The Terrapin and Hammerhead tend to be on the bottom of the ocean while the Remora tend to be right below cover.
- Return to Darkbreak Cove and turn in your quests. Get The Perfect Fuel.
- Go to the Fuel Sampling Station. Mix 2 Remora Oil Sample and 3 Hammerhead Oil Sample. Complete your quest. Get Orako.
- Swim to Orako and turn in your quest. Get “Glow-Juice”.
- Kill the Luxscale Grouper and Pyrehsell Scuttlers for 6 Glow-Juice.
- Then, return to Orako and turn in your quest. Here Fishie Fishie and Die Fishman Die.
- Put on the Fish Hat. At the Underlight Cavern, Kill 4 Coldlight Oracle and 4 Coldlight Hunter. You’ll get an Enormous Eel Egg, which starts I Brought You This Egg. Attract 30 Underlight Nibblers by swimming near them.
- Return to Orako and turn in your quests. Get Here Fishie Fishie 2: Eel-Egg-Trick Boogaloo and Orako’s Report.
- Back at the Underlight Canyon, use the Eel-splosive Device on a Devious Great-eel, then kill it.
- Return to Orako and turn in your quest.
- Return (Hearth) to Darkbreak Cove. Turn in your quest.
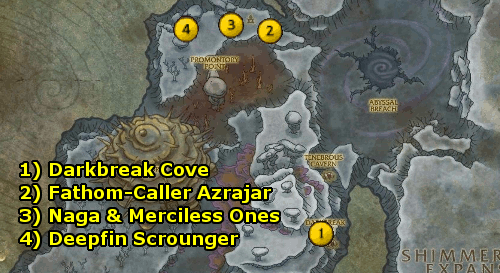
- At Darkbreak Cove, turn in your quest and get the four new quests: Treasure Reclamation, Those Aren’t Masks, Sira’kess Slaying, and A Standard Day for Azrajar.
- Kill Fathom-Caller Azrajar and place the Alliance Standard on his corpse.
- Kill 10 Sira’kess Naga and Merciless Ones for 6 Merciless Heads.
- Kill Deepfin Scrounger and open the chests for 6 Deepfin Plunder.
- Return to Darkbreak Cove.

- At Darkbreak Cove, turn in your quests. Get Promontory Point.
- Go to Promontory Point and turn in your quest. Get the four quests: The Wavespeaker, Clearing the Defiled, Scalding Shrooms, and Into the Totem.
- When facing the Faceless Defilers, first make sure to use Erunak’s Confinement Totem. Kill 5 Faceless Defilers, 8 Defiled Sealife, and Gather 5 Scalding Shrooms.
- Go to Wavespeaker Valoren and turn in your quest. Get Free Wil’Hai.
- Use Valoren’s Shrinkage Totem at the tentacles, then kill them to Free Wil’Hai.
- Return to Wavespeaker Valoren and turn in your quest.
- Return to Promonotory Point and turn in your quests. Get … It Will Come.
- Use Stonespeaker’s Luring Totem. Kill Ick’thys the Unfathomable. Make sure to get out of the Void Zones.
- Return to Promonotory Point and turn in your quest. Get Unplug L’ghorek and Fiends From the Netherworld.
- Swim under L’ghorek. Kill the three ogres and 8 Nether Fiends.
- Return to Promonotory Point.
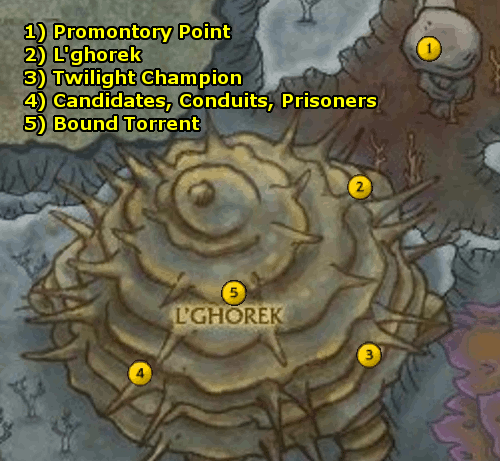
- At Promonotory Point, turn in your quests. Get Communing with the Ancient.
- Go into L’ghorek by entering in the tube to the left of his face. Turn in Communing with the Ancient. Get Runestones of Binding and Ascend No More!
- Kill a Twilight Champion to get a Twilight Cage Key. It starts the quest Prisoners.
- Kill Twilight Candidates for 7 Runestones of Binding, Destroy 5 Ancient Conduits, and Free 5 Horde Prisoners. Complete Prisoners.
- Return to L’gohrek and turn in your quests. Get Twilight Extermination.
- Walk through the monsters and use the Attuned Runestone of Binding on a Bound Torrent.
- Use Ability 3 to shield yourself with Aquatic Shield, then Ability 2 to Vortex to suck in all nearby units, then spam Watery doom Ability 1. Use Consume Essence Ability 4 to heal.
- Enter the center temple and fight Hallazeal the Ascended. Use Consume Essence to heal, Concussive Splash to interrupt the massive attack, and spam Aquatic Blast.
- Return to L’ghorek and turn in your quest. Get Back to Darkbreak Cove.
- To complete the area, Hearth to Darkbreak Cove. Turn in your quest. Get Defending the Rift. Talk to Erunak again and go through the epic Battle for the Rift. Once complete, turn in Defending the Rift.
- Return to Stormwind.
