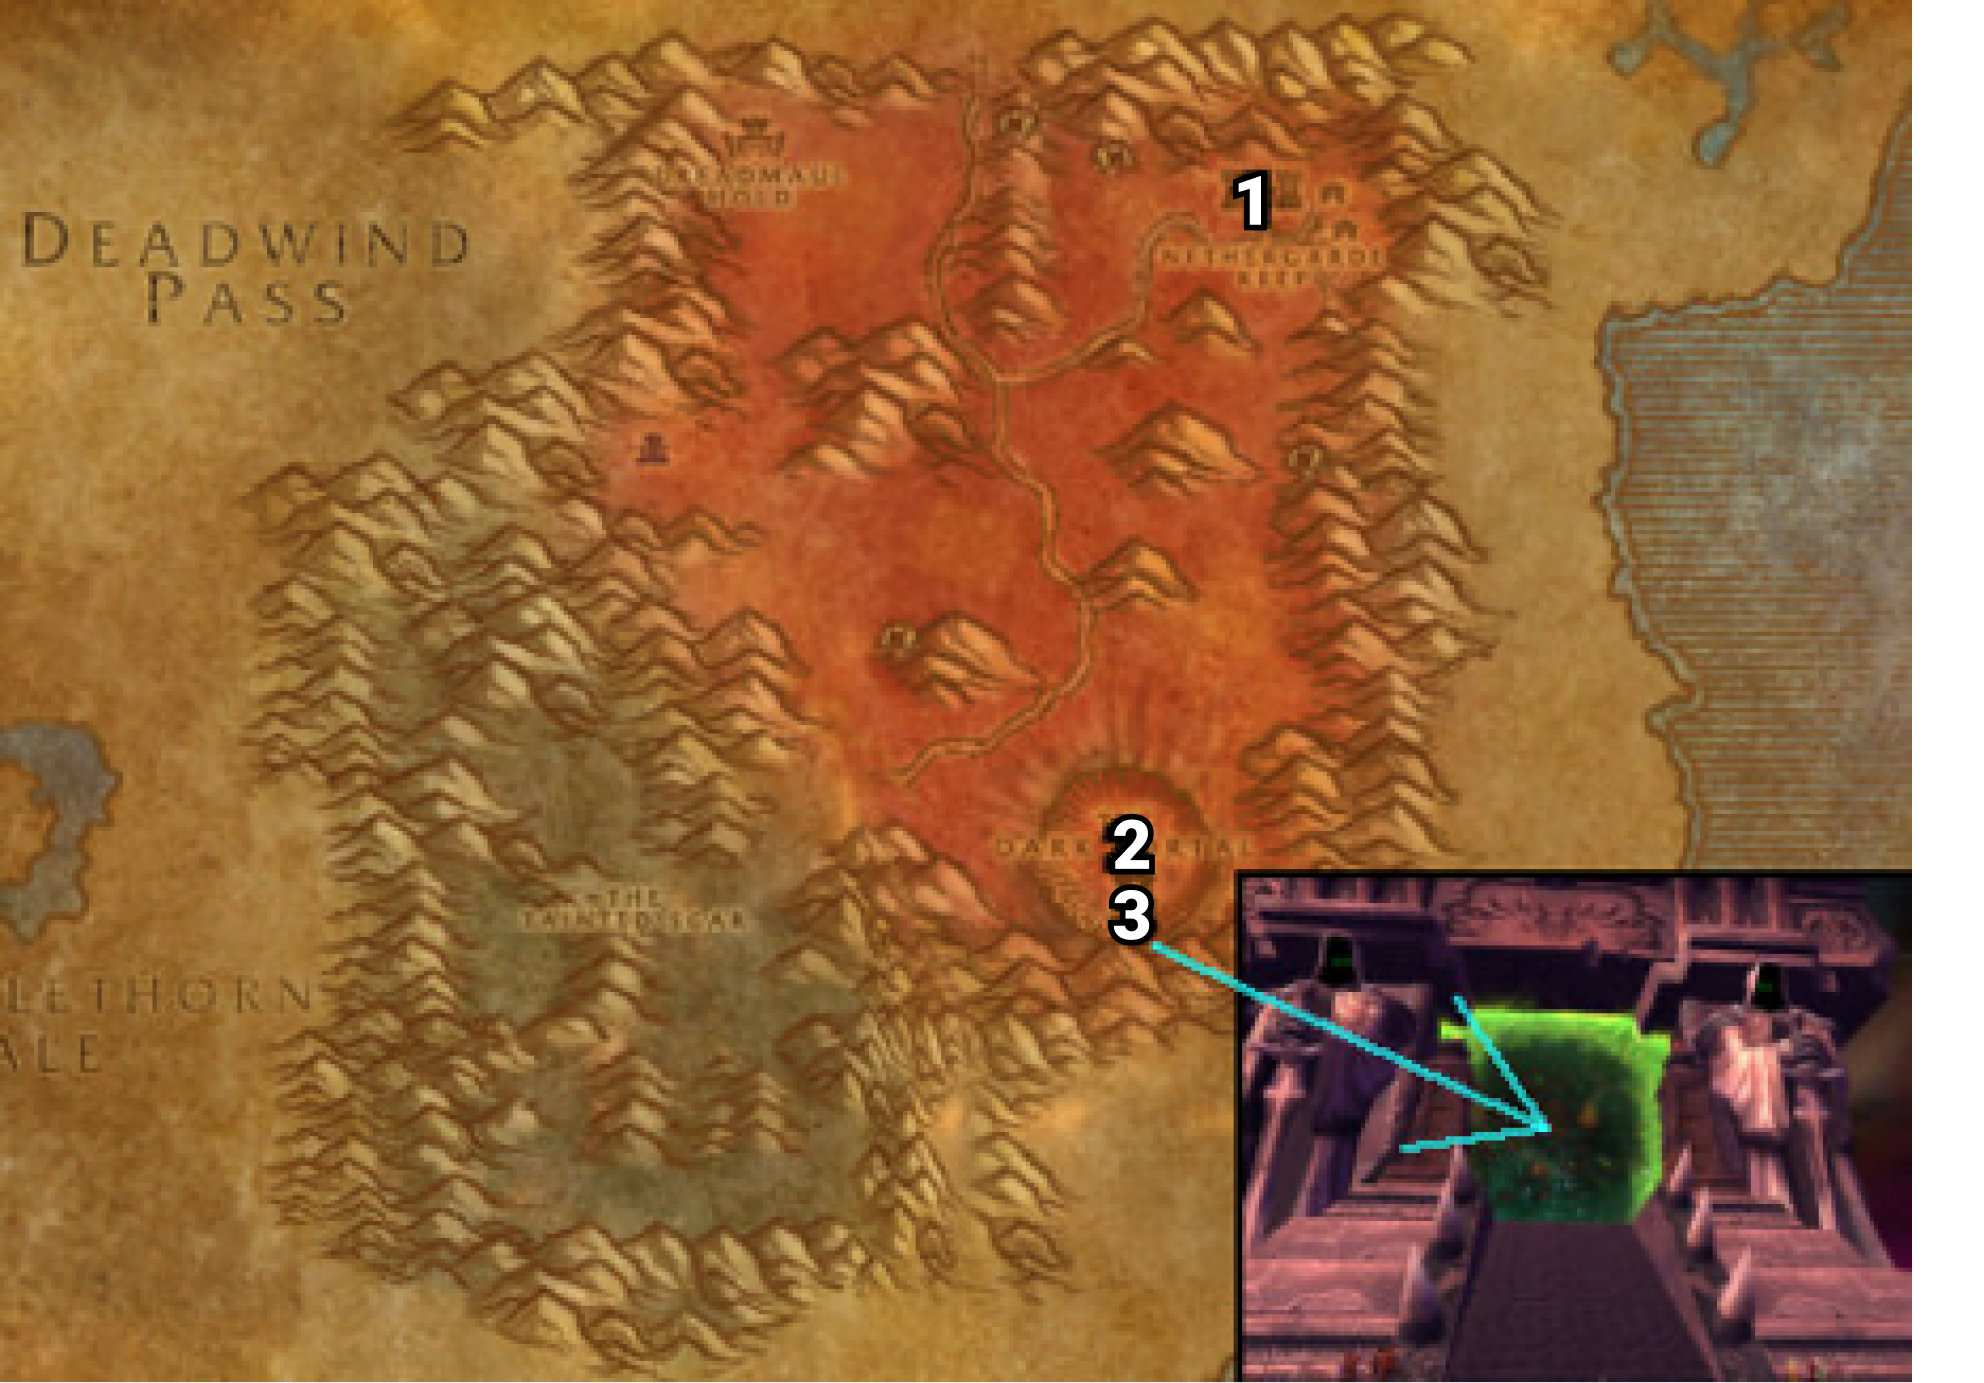
WoW TBC Classic Horde 60-70 Leveling Guide: 60-61 Hellfire Peninsula

Dark Portal

01) Go south in Blasted Lands and accept “Through the Dark Portal” from Warlord Dar’toon (58.56 in Blasted Lands). NOTE: If you happen to have the quest “Warchief’s Command: Outland!” than abandon it because you get more XP doing “Through the Dark Portal” instead.
02) Now go through the Dark Portal to enter Outland (59.60 in Blasted Lands).
03) First thing you’ll notice in front of you is a bunch of HUGE demons killing a bunch of NPCs, no need to worry about it now.
04) Go down the steps and turn in “Through the Dark Portal” (87.50 in Hellfire Peninsula), accept “Arrival in Outland“.
05) Just north of you at the Wind Rider Master, turn in “Arrival in Outland” 87.48 , accept “Journey to Thrallmar“.
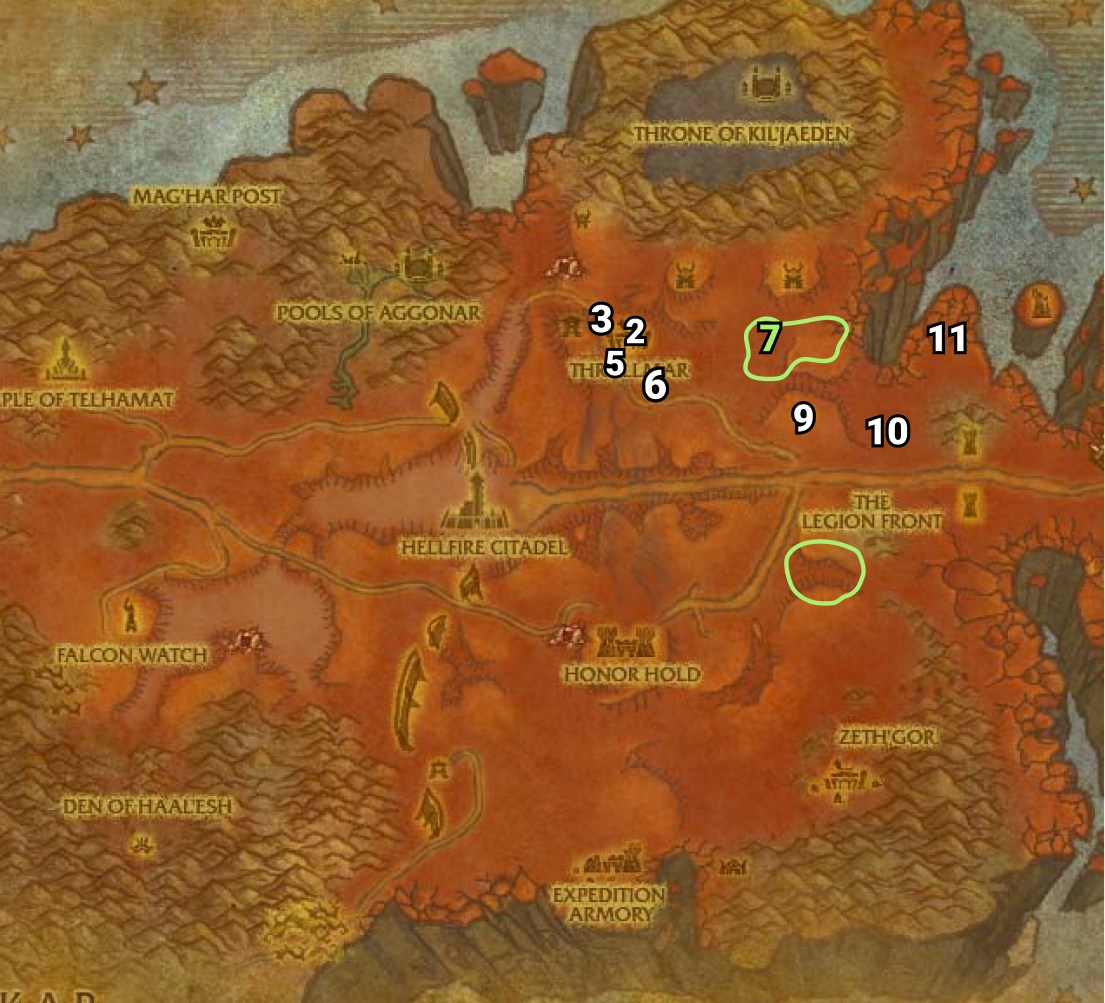
06) Then fly to Thrallmar, Hellfire Peninsula.

Thrallmar

01) When you land turn in “Journey to Thrallmar” 56.37, accept “Report to Nazgrel“.
02) Go in the Inn and talk to the Innkeeper 56.7 37.5 to make Thrallmar your new home for your Hearthstone.
03) Go into the barracks next to you at Thrallmar and turn in “Report to Nazgrel” 55.36, accept “Eradicate the Burning Legion“.
04) Next to you, accept “Bonechewer Blood” 55.36.
05) In the middle of town by the fireworks wagon, accept “I Work… For the Horde!” 55.39.
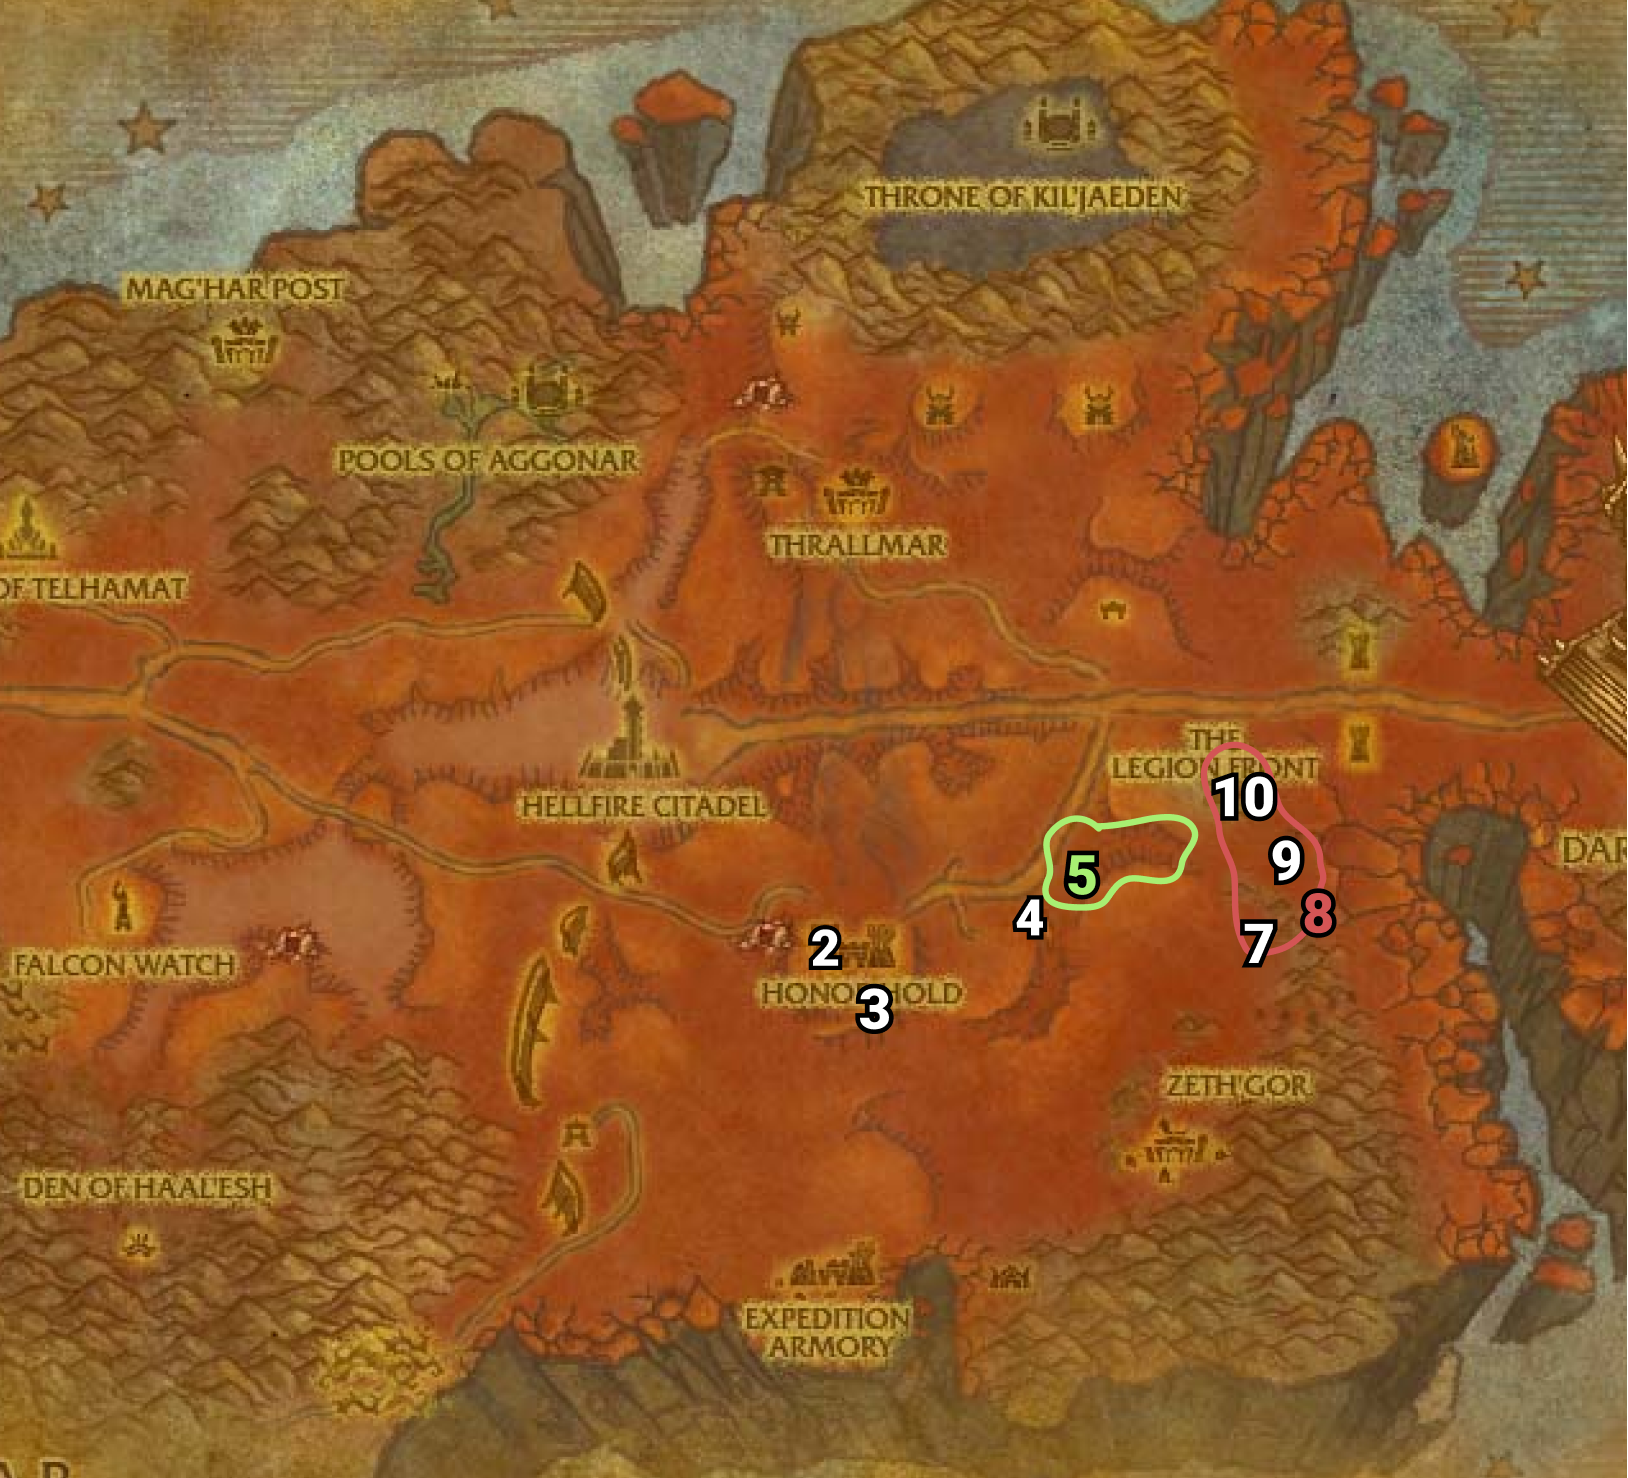
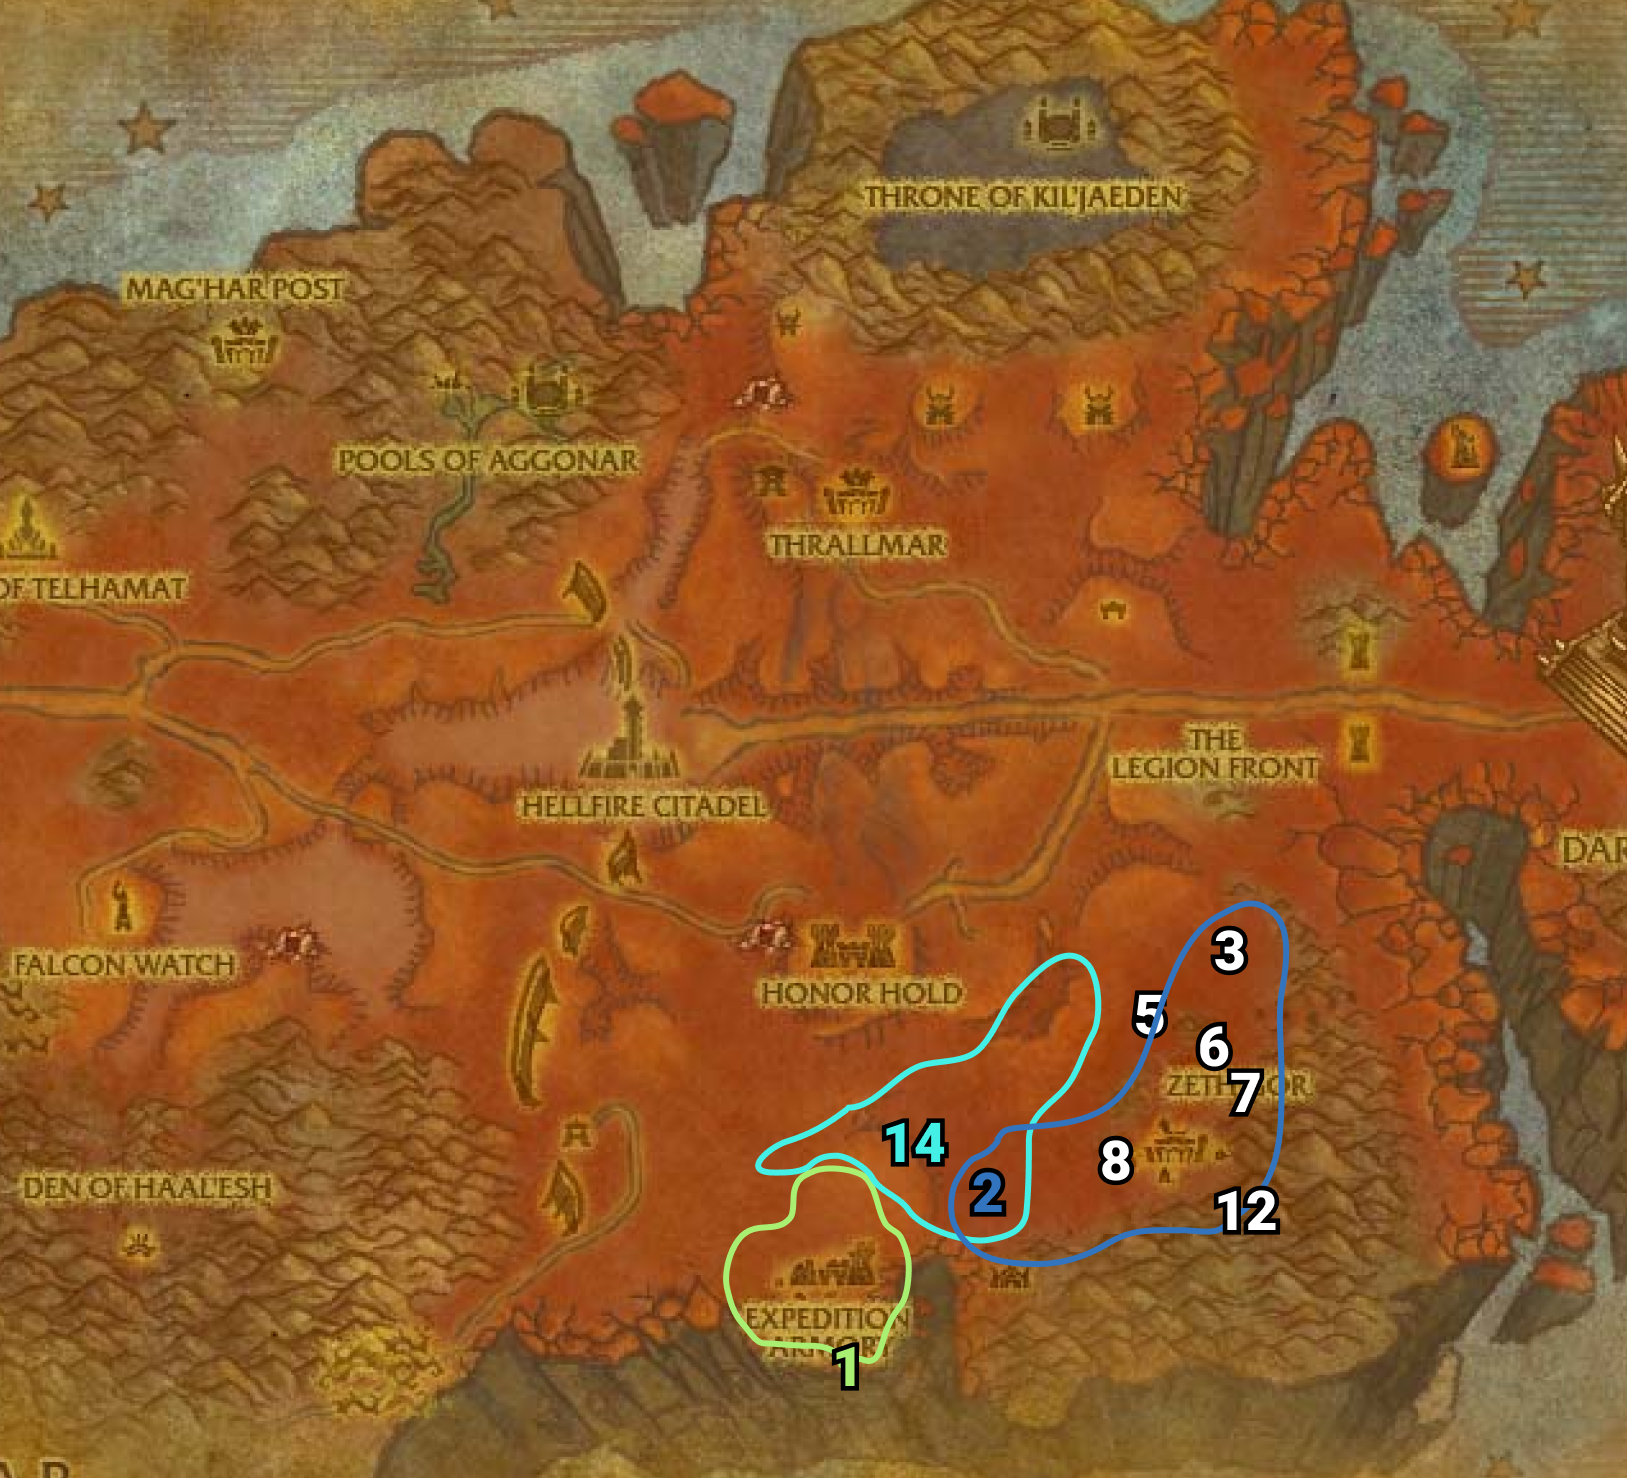
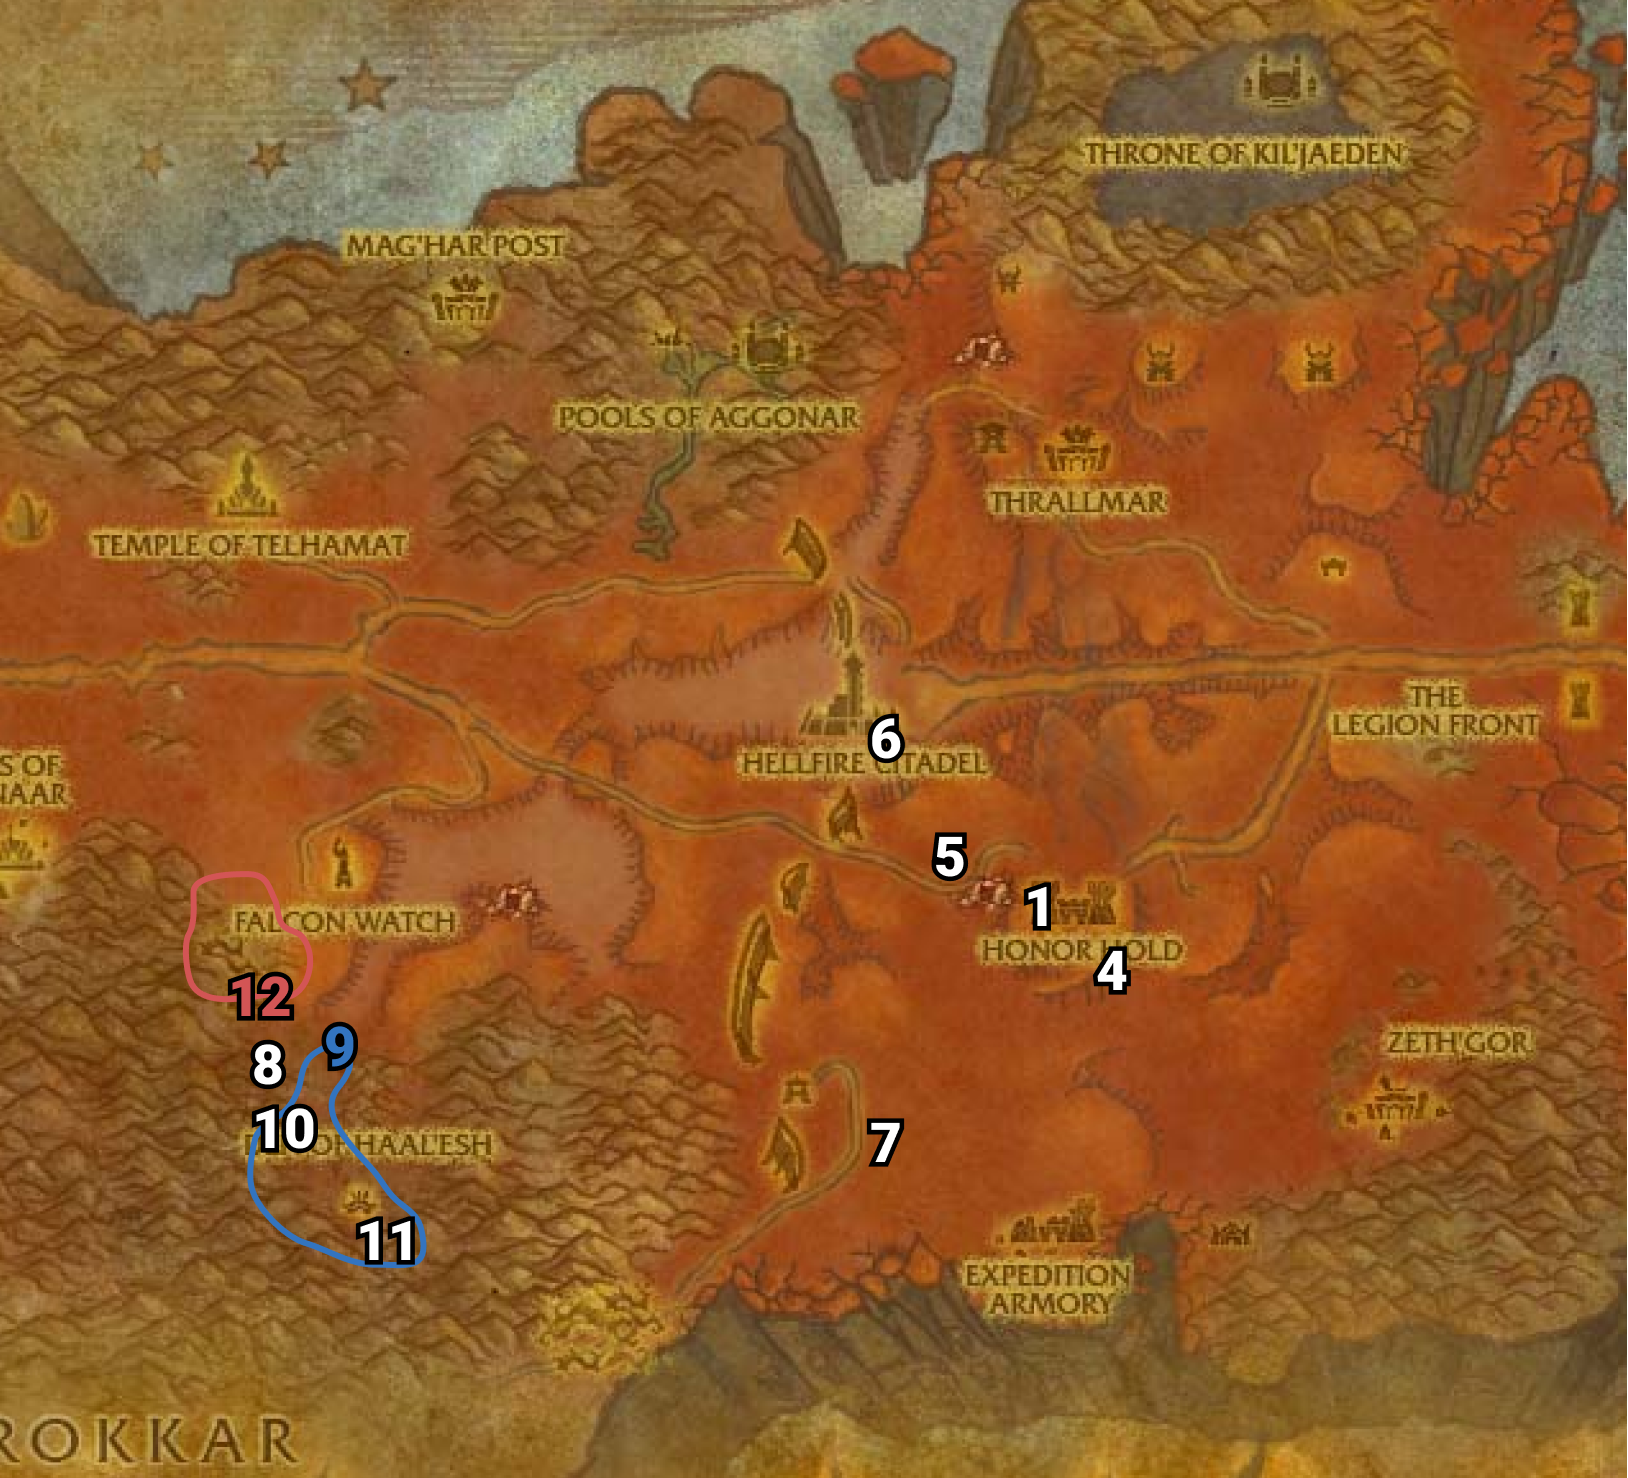
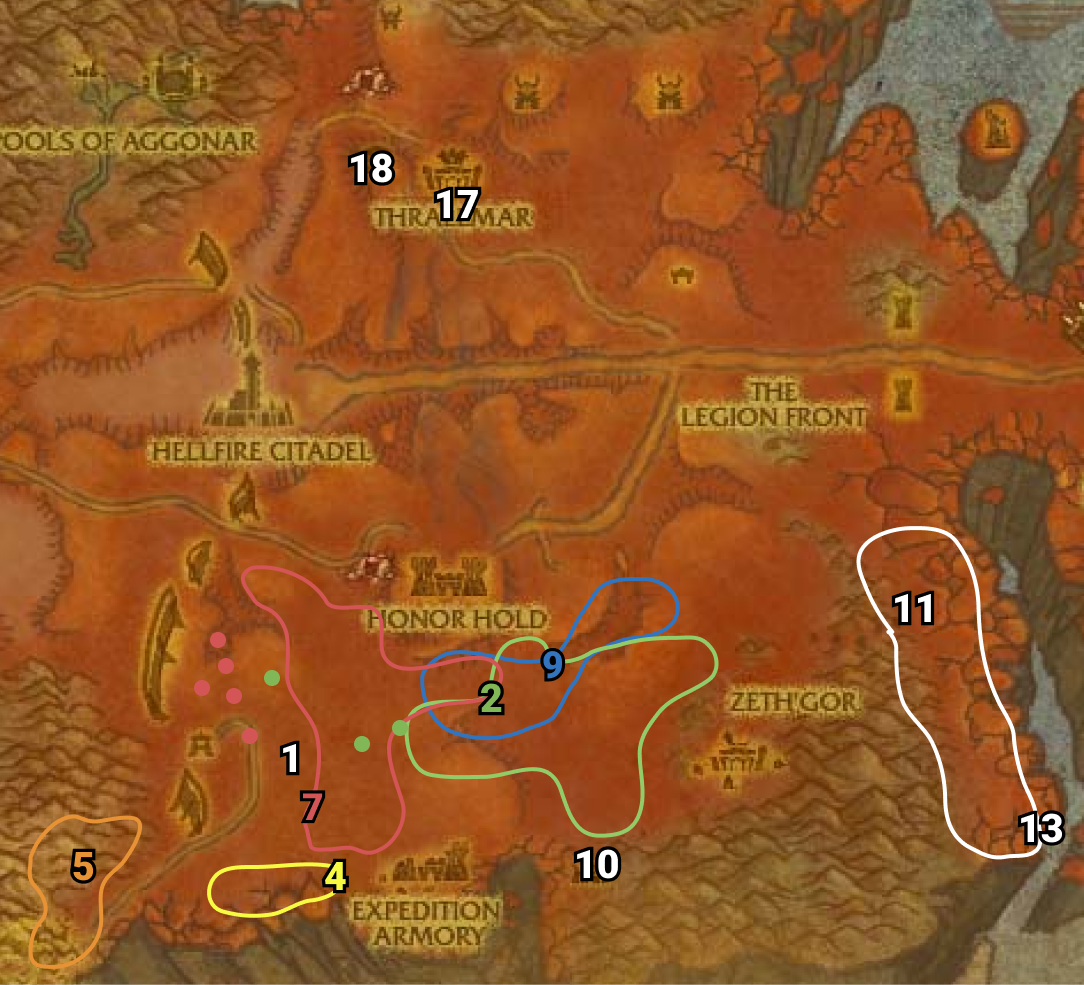
06) SE just outside of Thrallmar, turn in “Eradicate the Burning Legion” 58.41, accept “Felspark Ravine“.
07) Go east just a bit to Felspark Ravine around 62.39 and do “Felspark Ravine“: kill the required amount of demons.
08) Go back west just outside of Thrallmar and turn in “Felspark Ravine” (58.41, #6 on map), accept “Forward Base: Reaver’s Fall“.
09) Head east to Reaver’s Fall and turn in “Forward Base: Reaver’s Fall” 66.44, accept “Disrupt Their Reinforcements“.
10) Just east at The Legion Front do “Disrupt Their Reinforcements“: kill/loot the demon mobs to obtain Demonic Rune Stones and then click on the two portals (each requiring 4Demonic Rune Stones). Click on Portal Xilus 71.45 .
11) Click on Portal Kruul 74.39.
12) Go back west to Reaver’s Fall and turn in “Disrupt Their Reinforcements” (66.44, #9 on map), accept “Mission: Gateways Murketh and Shaadraz“.
13) Do “Mission: Gateways Murketh and Shaadraz“: next to you, talk to Wing Commander Brack 66.44 to start this quest. Then use your Seaforium PU-36 Explosive Nether Modulator quest item to bomb the two green portals next to the main path once you get to them.
14) Turn in “Mission: Gateways Murketh and Shaadraz“, accept “Mission: The Abyssal Shelf“.
15) Do “Mission: The Abyssal Shelf“: next to you, talk to Wing Commander Brack 66.44 to start this quest. This is similar to the previous quest, except you have to bomb a bunch of mobs with theArea 52 Special quest item during the automated flight. See if you can do this all in one go!
16) Turn in “Mission: The Abyssal Shelf” (66.44, #9 on map). Accept “Return to Thrallmar“. NOTE: “Return to the Abyssal Shelf” is a repeatable quest for reputation only, not giving any XP.
17) Use Hearthstone to Thrallmar.

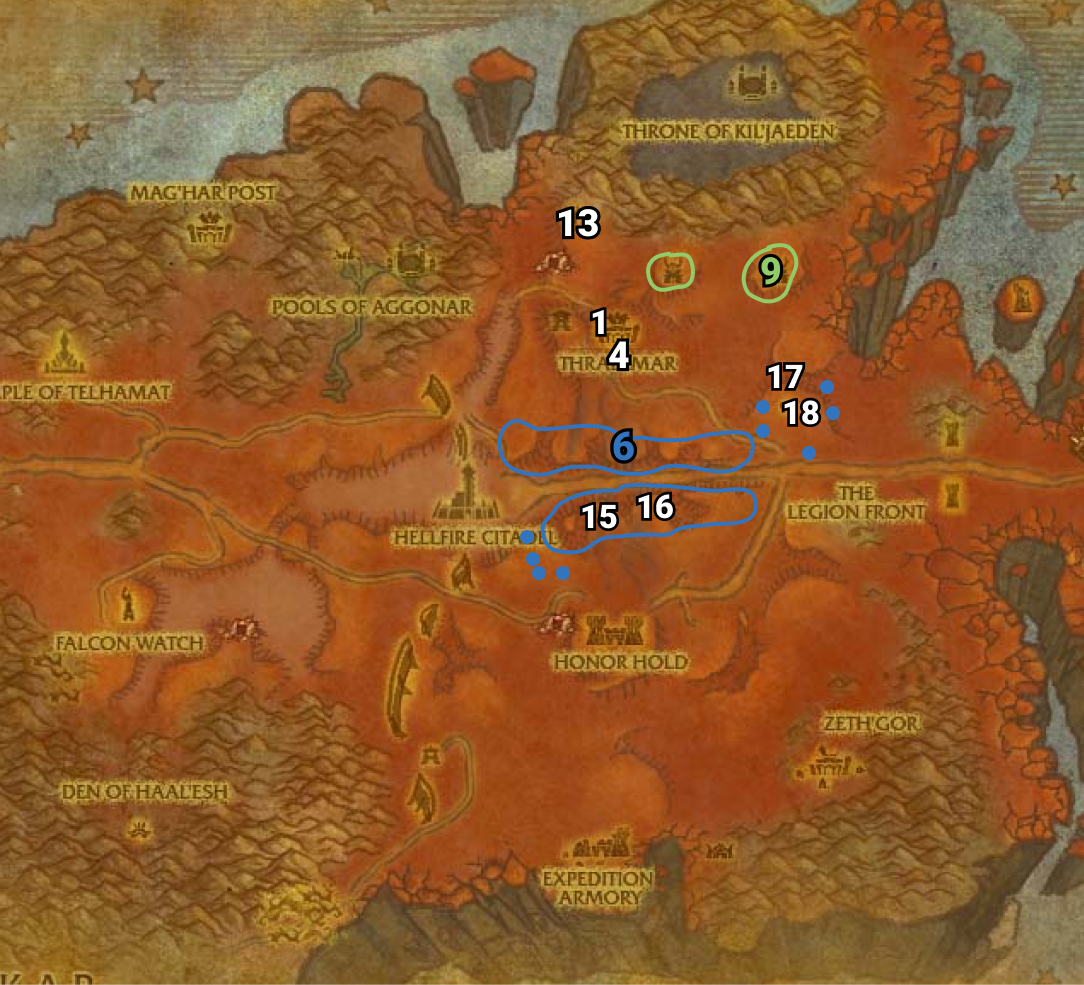
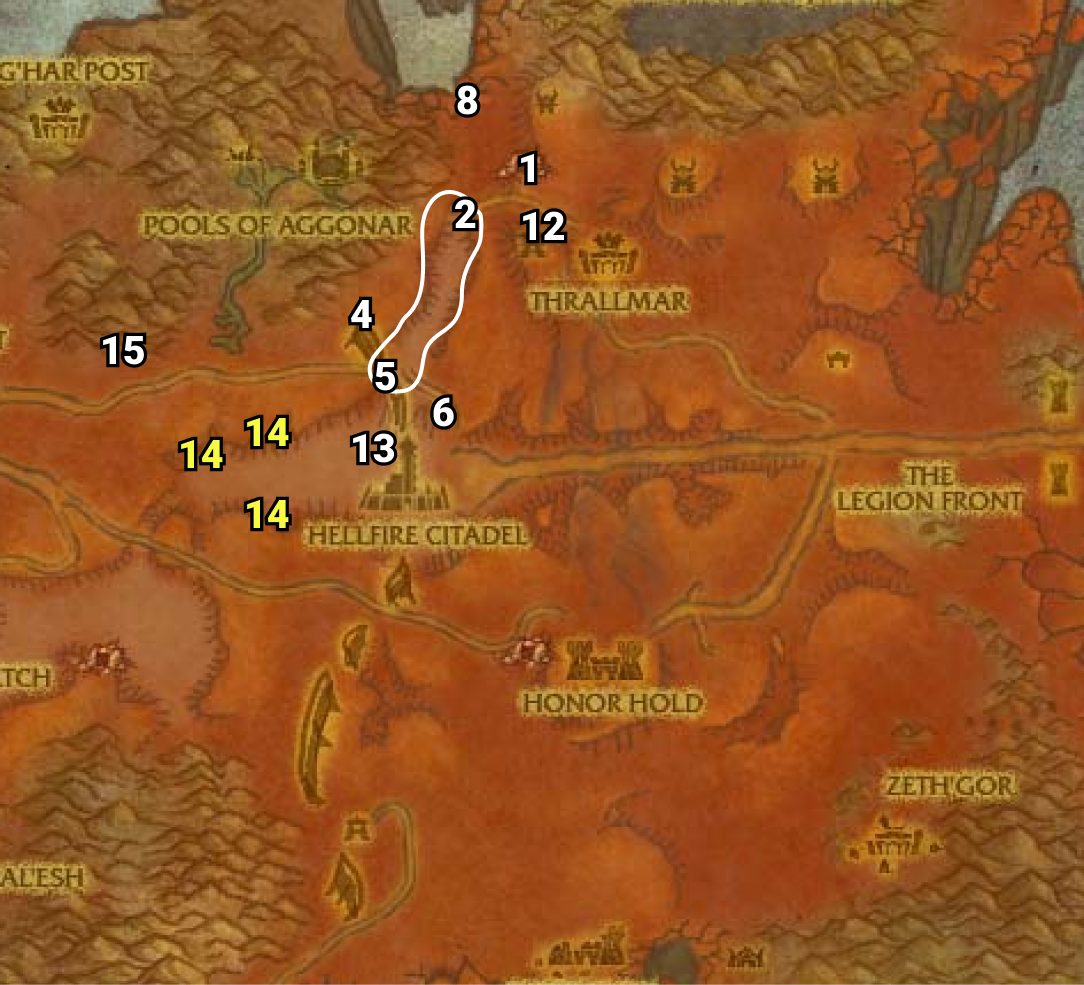
01) In the barracks next to the Inn, turn in “Return to Thrallmar” 55.36, accept “Forge Camp: Mageddon“.
02) If you are level 60 then accept (from the same NPC) “The Assassin” (If not get it later once you are level 60).
03) Next to you, accept “Weaken the Ramparts” (This is a Dungeon quest and can be done later with a full group).
04) Exit the barracks and in the middle of town from the male blood elf, accept (if or when you are lvl 60) “Falcon Watch” 55.39.
05) From the female orc, accept “Hellfire Fortifications” 56.39.
06) South of Thrallmar around 58.47, all around the old catapults, do “Bonechewer Blood” along with “I Work… For the Horde!“: pick up 8 Salvaged Metal and 8 Salvaged Wood, along with kill/looting the Bonechewer Scavengers (red skin orcs).
07) Back north at Thrallmar by the fireworks wagon, turn in “I Work… For the Horde!” (55.39, #4 on map), accept “Burn It Up… For the Horde!“.
08) In the barracks, turn in “Bonechewer Blood” (55.36, #1 on map), accept “Apothecary Zelana“.
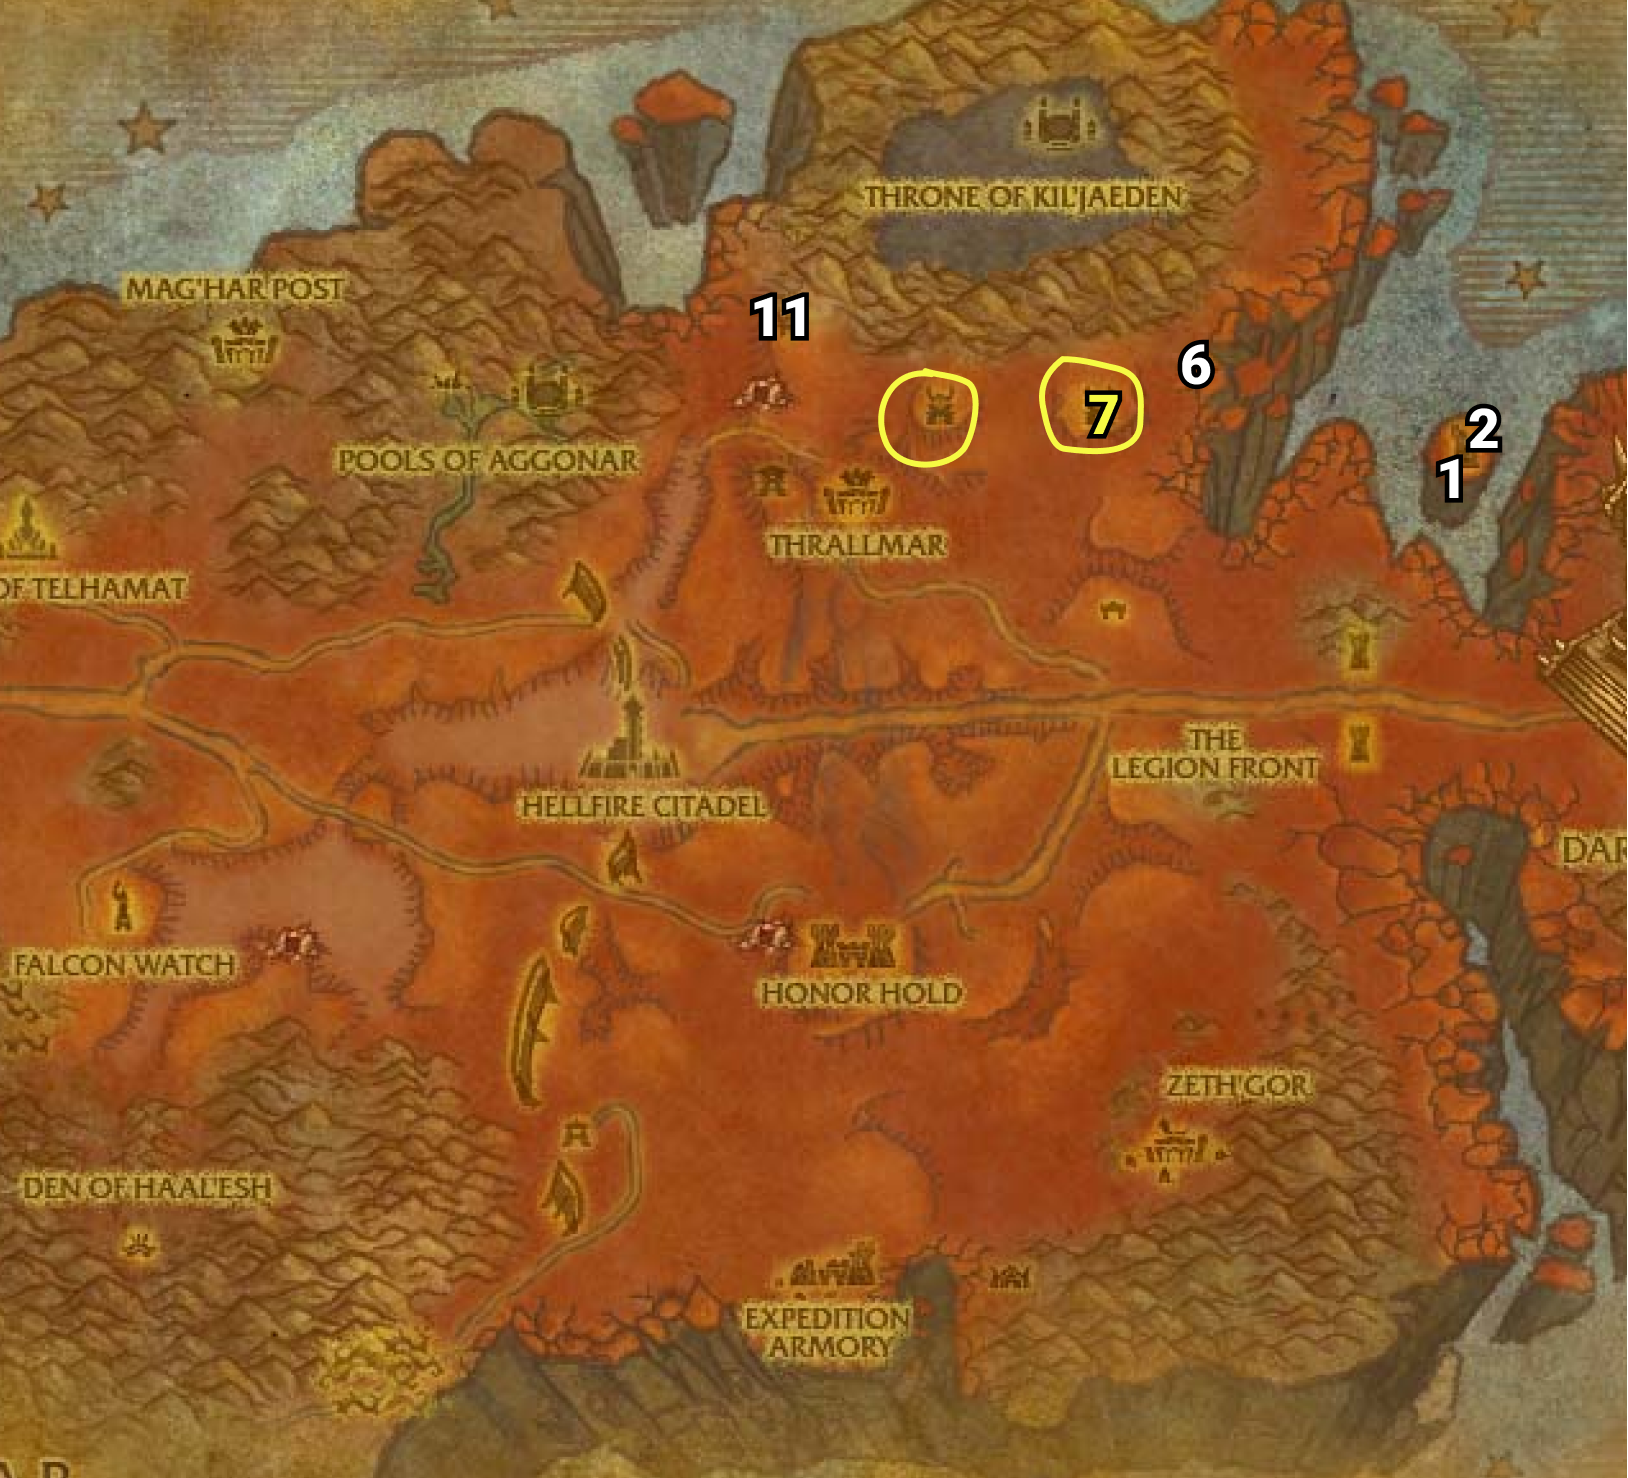
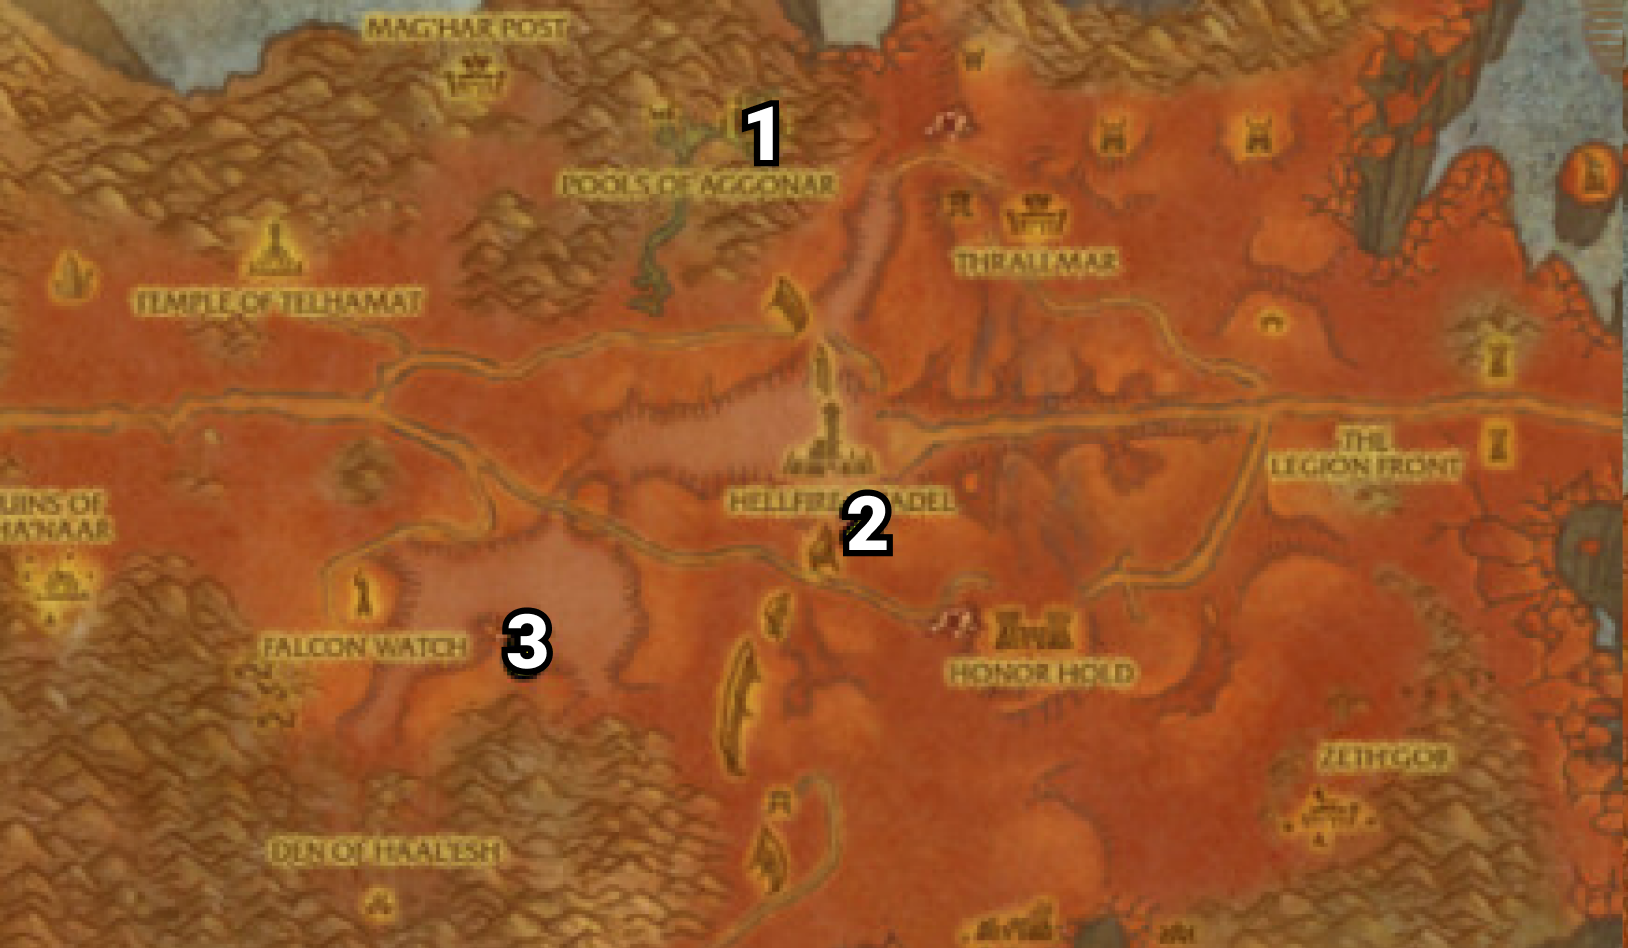
09) NE of Thrallmar do “Forge Camp: Mageddon“: kill 10 Gan’arg Servants and kill/loot Razorsaw /target 65.32, and he drops an item which starts “Vile Plans“, accept it.
10) Use Hearthstone (or go back SW) to Thrallmar and in the barracks (55.36, #1 on map) turn in “Forge Camp: Mageddon“, accept “Cannons of Rage“. And turn in “Vile Plans“.
11) Go NE to Forge Camp: Rage (around 65.32, #9 on map) and do “Cannons of Rage“: kill 3 Fel Cannon MKIs (around the cliff edges).
12) Use Hearthstone (or go back SW) to Thrallmar and in the barracks (55.36, #1 on map) turn in “Cannons of Rage“, accept “Doorway to the Abyss“.
13) Go up north to Invasion Point: Annihilator and do “Doorway to the Abyss“: kill/loot Warbringer Arix’Amal /target 53.26. Then click on the Forge Camp: Portal Glyph (big green portal) in that area.
14) Use Hearthstone (or go back south) to Thrallmar and in the barracks (55.36, #1 on map) turn in “Doorway to the Abyss“, accept “Cruel’s Intentions“. And next to you accept “The Agony and the Darkness“.
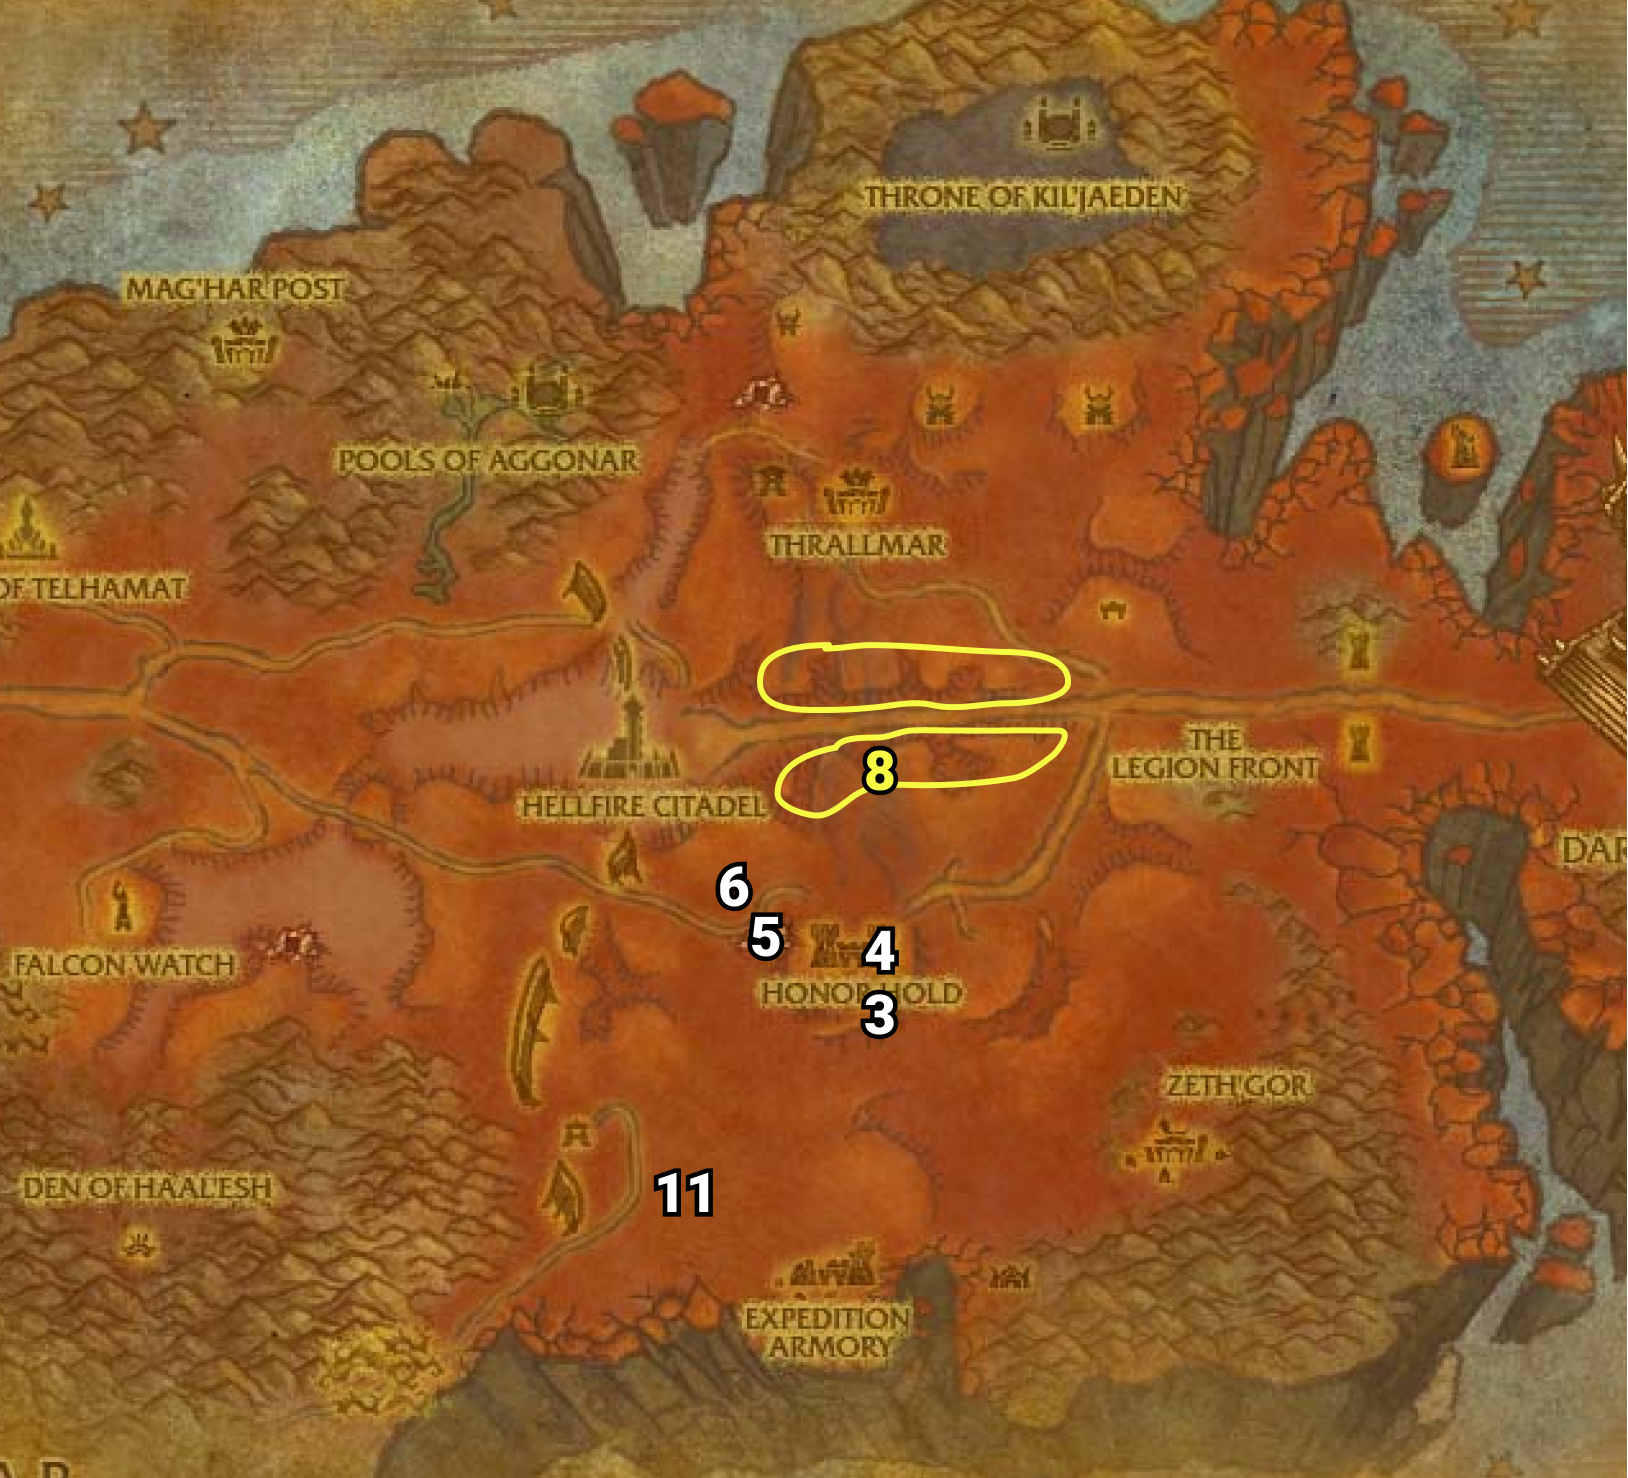
15) Bellow Thrallmar, do “Burn It Up… For the Horde!“: use the Flaming Torch quest item at the two big cannons. The Western Cannon is at 55.54, and:
16) The Eastern Cannon is at 61.52.
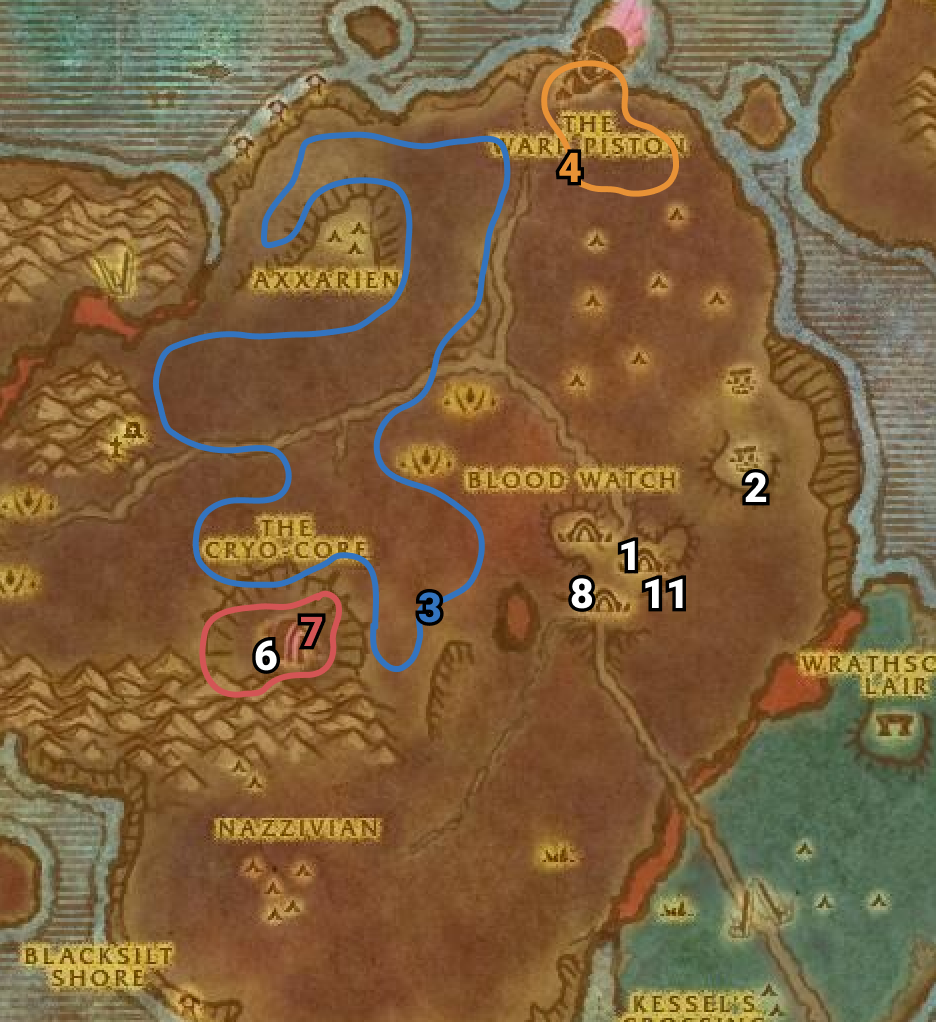
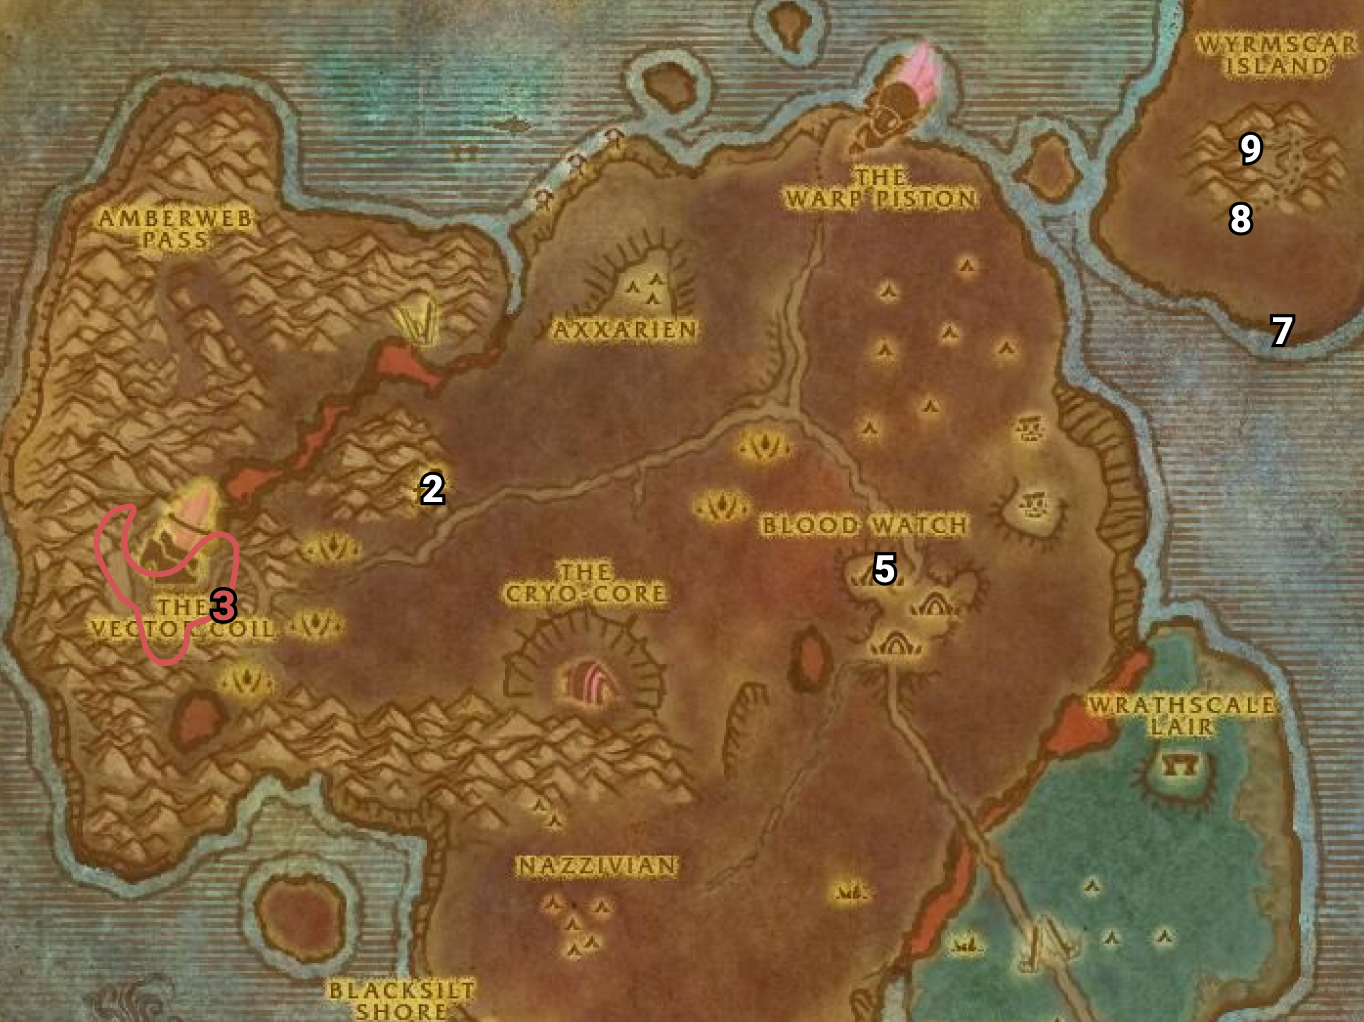
17) Go NE to Reaver’s Fall and turn in “Apothecary Zelana” 66.42, accept “Spinebreaker Post“.
18) Talk to Wing Commander Brack 66.44 to fly you to Spinebreaker Post.

Spinebreaker Post

01) Get the Flight Path from the Wind Rider Master 62.81.
02) Next to you, accept “The Warp Rifts” and “Make Them Listen” 62.82.
03) Turn in “Spinebreaker Post” 61.82, accept “Boiling Blood“.
04) Next to you accept “Preparing the Salve“.
05) From the Wanted Poster by the town entrance, accept “Wanted: Worg Master Kruush” 61.81.
06) Along the way do “Preparing the Salve” by picking up any Hellfire Spineleafs you see.
07) Go west to Expedition Armory around 56.79 and do “Make Them Listen“: kill the required amount of undead mobs. While doing this you will find an item that drops from the Knights, which starts “Decipher the Tome“, accept it.
08) Back east at Spinebreaker Post (62.82, #2 on map) turn in “Make Them Listen” and “Decipher the Tome“, accept “The Battle Horn“.
09) Back west at Expedition Armory do “The Battle Horn“: kill/loot Lieutenant Commander Thalvos /target (male dwarf at 55.84).
10) Back east at Spinebreaker Post (62.82, #2 on map) turn in “The Battle Horn“, accept “Bloody Vengeance“.
11) Just NE (at the old wooden structure, 63.77), do “Bloody Vengeance“: use the Unyielding Battle Horn quest item at this spot, then Kill Urtrak.
12) Back SW at Spinebreaker Post (62.82, #2 on map) turn in “Bloody Vengeance“, accept “Honor the Fallen“.
13) NW in the tower at Expedition Armory turn in “Honor the Fallen” 57.77.
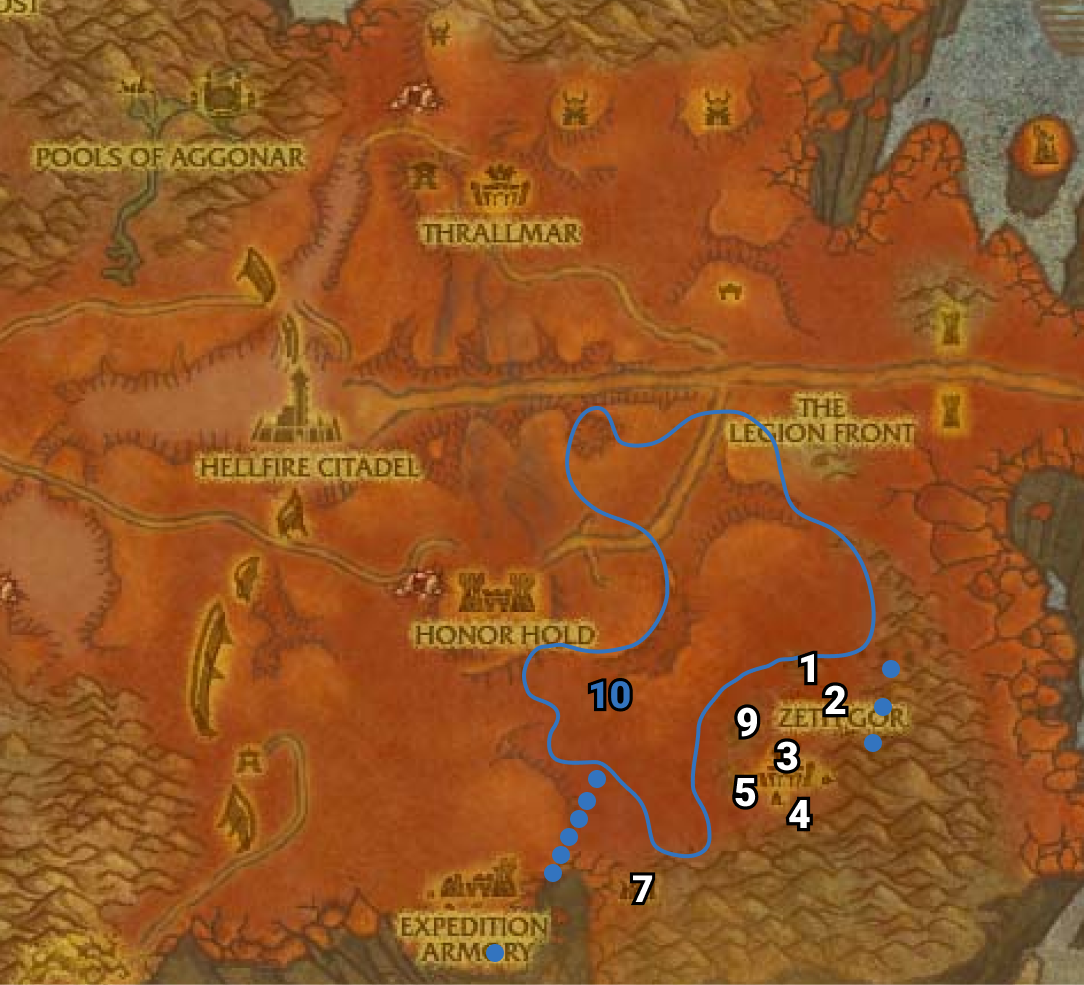
14) Head east to Zeth’Gor and do “Wanted: Worg Master Kruush“: kill/loot Worg Master Kruush /target (at the worg stables, 68.74).
15) Do “Boiling Blood“: kill the Bleeding Hollow mobs (orcs) to obtain Bleeding Hollow Blood, then boil that blood in the Cursed Cauldron 65.71.
16) Back SW at Spinebreaker Post, at the Bonfire turn in “Wanted: Worg Master Kruush” (61.81, #2 on map).  Accept “Zeth’Gor Must Burn!“.
17) Turn in “Boiling Blood” 61.82, accept “Apothecary Antonivich“.
18) Also accept “The Eyes of Grillok” 62.82.

01) Go back NE to Zeth’Gor and do “Zeth’Gor Must Burn!“: kill Bleeding Hollow Peons /target to obtain torches, and ignite them at the Heated Forge 69.69.  Then use the ignited torches to burn these 4 buildings (also keep step #6 in mind as its done in the same area).
02) Torch the Eastern Hovel 70.70.
03) Torch the Stable 68.74.
04) Torch the Barracks 70.76.
05) Torch the Western Hovel 67.76.
06) In the immediate area do “The Eyes of Grillok“: use the Zezzak’s Shard quest item on an Eye of Grillok /target (green eyeballs floating around Zeth’Gor entrances). NOTE: You can tell it got absorbed by the buff at the top of the screen.
07) Go to the Cauldron in Spinebreaker Post 62.82 to extract the Eye of Grillok into it, then turn in “The Eyes of Grillok“, accept “Grillok ‘Darkeye’“.
08) By the Bonfire, turn in “Zeth’Gor Must Burn!” 61.81 .
09) Go NE, down at the small cave and do “Grillok ‘Darkeye’“: kill/loot Grillok “Darkeye” 66.71. NOTE: He has a lot of hit points so be care.
10) Finish “Preparing the Salve“: pick up 12 Hellfire Spineleafsfrom the ground.
11) Back at Spinebreaker Post turn in “Preparing the Salve” (61.82 #7 on map), accept “Investigate the Crash“.
12) Turn in “Grillok ‘Darkeye’” 62.82.

Zeppelin Crash

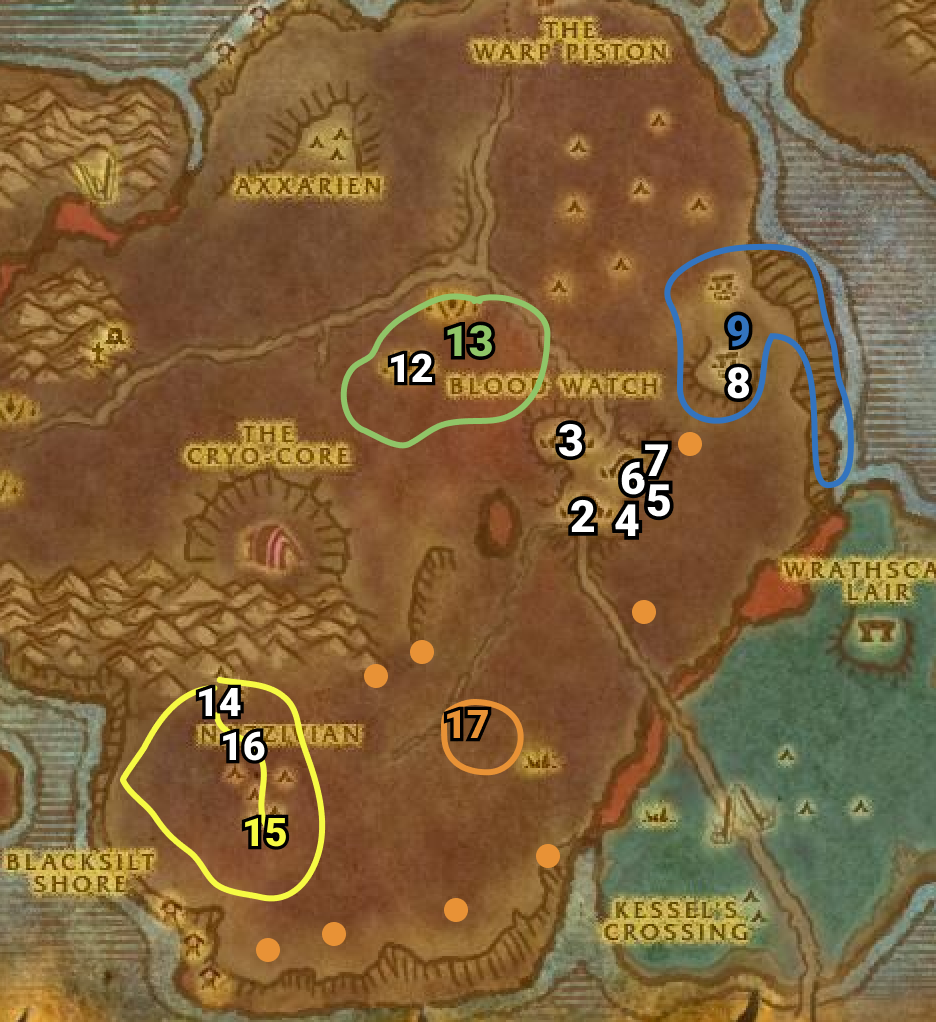
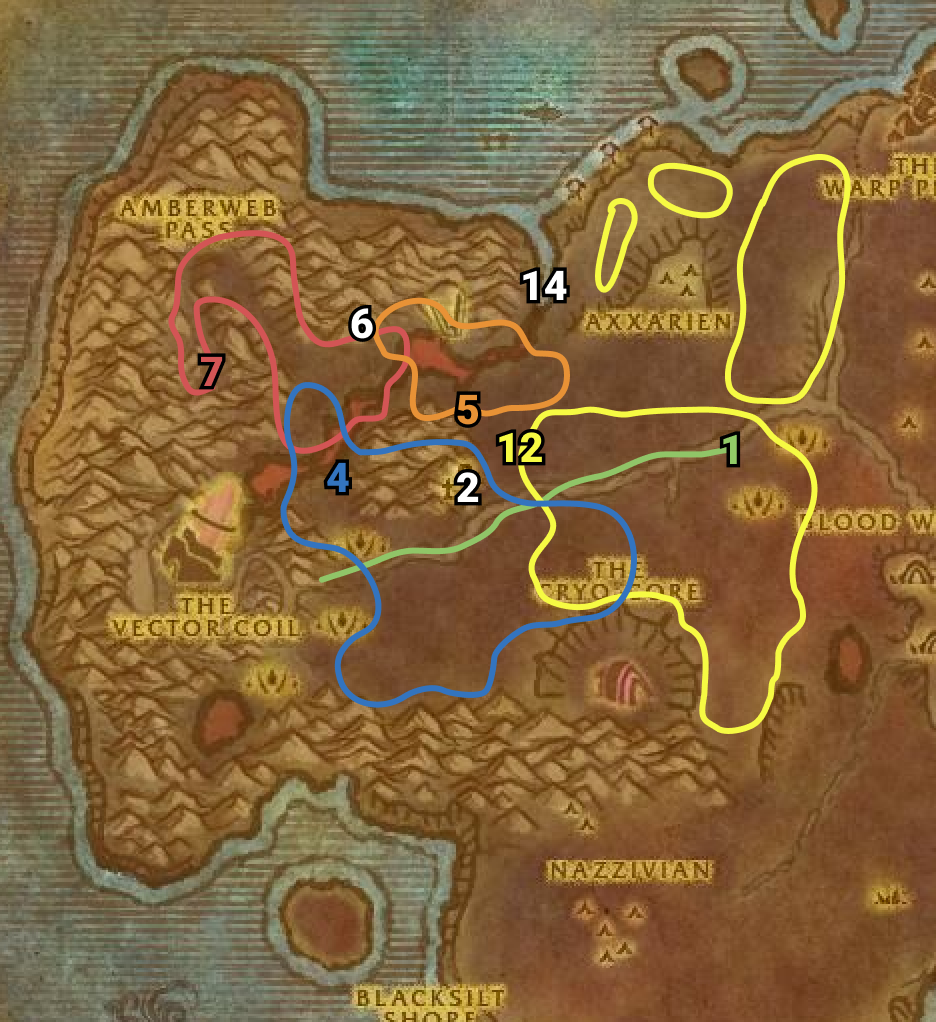
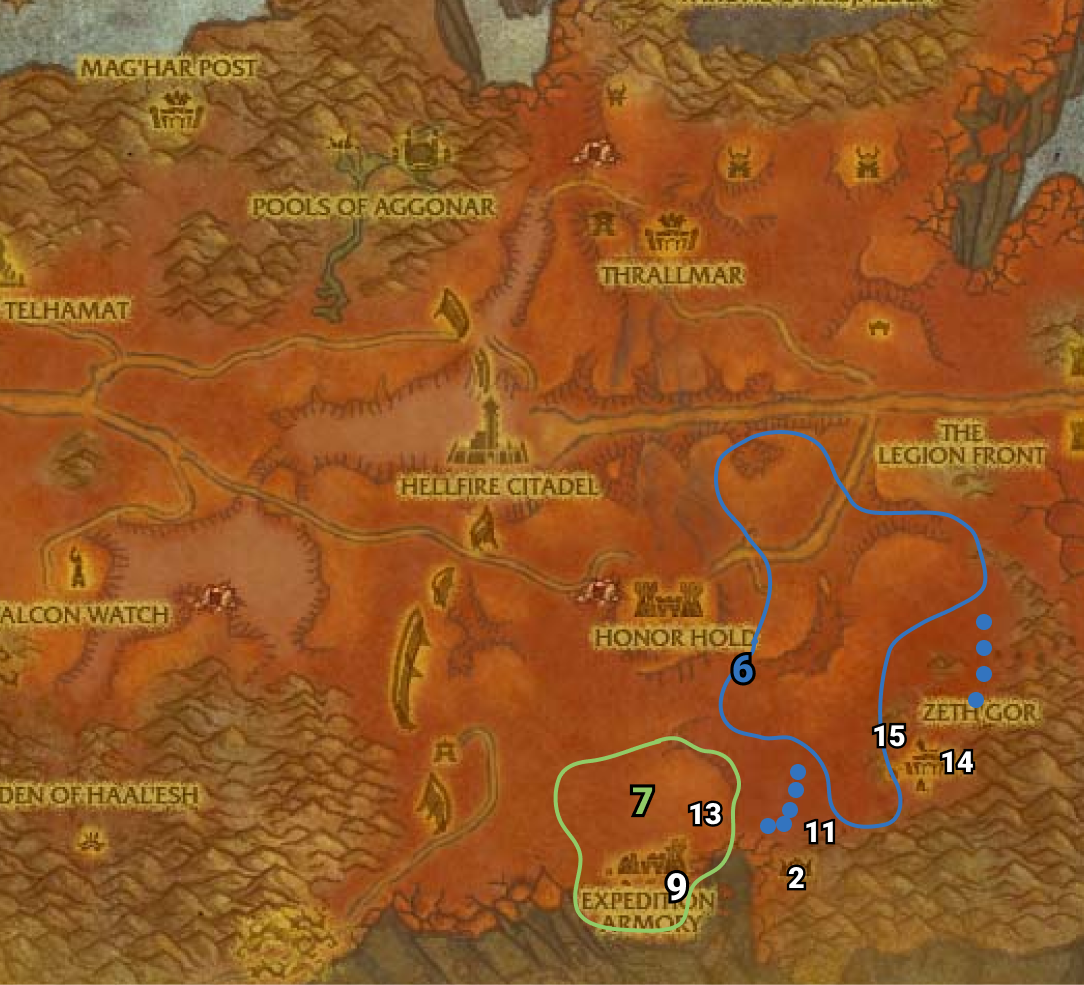
01) Head NW to the Zeppelin Crash and turn in “Investigate the Crash” 49.75, accept “In Case of Emergency…“. And next to you accept “Ravager Egg Roundup“.
02) Just to the east of you do “In Case of Emergency…“: pick up 30 Zeppelin Debris around the area.
03) Back west at the Zeppelin Crash turn in “In Case of Emergency…” (49.75, #1 on map), accept “Voidwalkers Gone Wild“.
04) Go south to The Warp Fields around 47.82 and do “Voidwalkers Gone Wild” along with “The Warp Rifts“: kill/Loot the Voidwalkers in the area. And use your Unstable Warp Rift Generator quest item in that area, then kill/loot the Unstable Voidwalkers that spawn in.
05) Go SW to Razorthorn Trail (starting around 41.84) and do “Ravager Egg Roundup“: kill/loot the Razorfang Ravagers (the bigger ravager mobs). You can also find the Eggs from ground pick-ups.
06) Back NE at the Zeppelin Crash (49.75, #1 on map) turn in “Voidwalkers Gone Wild” and “Ravager Egg Roundup“, accept “Helboar, the Other White Meat“.
07) Just to the east and SE of you do “Helboar, the Other White Meat“: kill/loot the Helboars, then use the Purification Mixturequest item to purify the Tainted Helboar Meat.
08) Back at the Zeppelin Crash (49.75, #1 on map) turn in “Helboar, the Other White Meat“, accept “Smooth as Butter“.
09) Go east to Valley of Bones (area just below the Honor Hold Alliance town, around 59.70) and do “Smooth as Butter“: kill/loot Bonestripper Buzzards.
10) Go south to Spinebreaker Post and turn in “The Warp Rifts” 62.81, accept “Void Ridge“.
11) Go east to Void Ridge (see shortcut on map to get there) and do “Void Ridge“: kill/loot the voidwalker mobs along the ridge around 77.67.
12) Back west at Spinebreaker Post turn in “Void Ridge” (62.81, #10 on map), accept “From the Abyss“.
13) Go back east to Void Ridge (see shortcut on map to get there) and do “From the Abyss“: use the Warp Rift Generatorquest item at the purple crystals 81.79, then kill/loot Void Baron Galaxis when he spawns.
14) Back west at Spinebreaker Post turn in “From the Abyss” (62.81, #10 on map).
15) NW at the Zeppelin Crash turn in “Smooth as Butter” (49.75, #1 on map).
16) Use Hearthstone to Thrallmar.
17) In the middle of town by the fireworks wagon, turn in “Burn It Up… For the Horde!” 55.39.
18) Turn in (at the bottom of the tower) “Apothecary Antonivich” 52.37, accept “A Burden of Souls“.
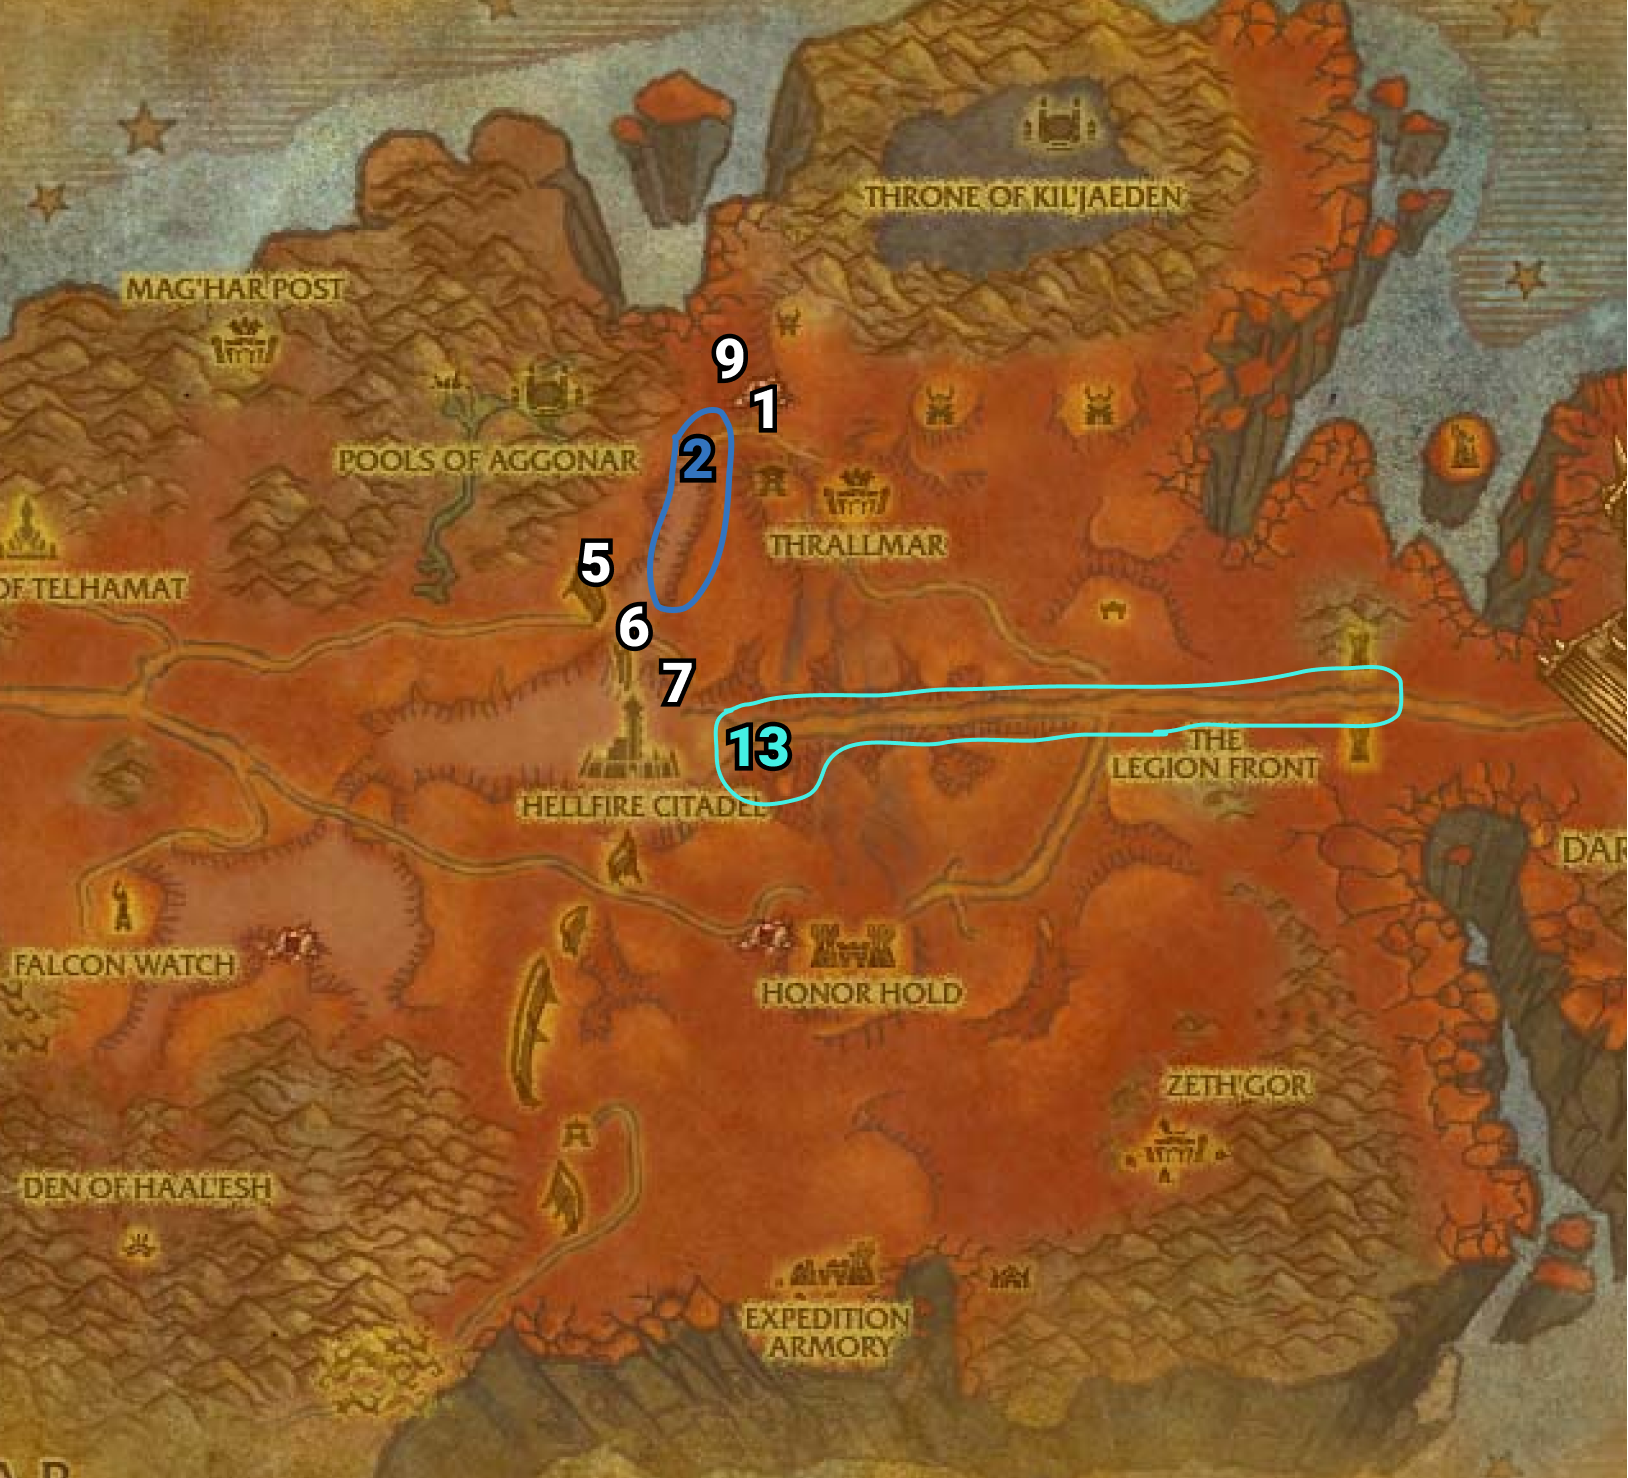
Stonescythe Canyon

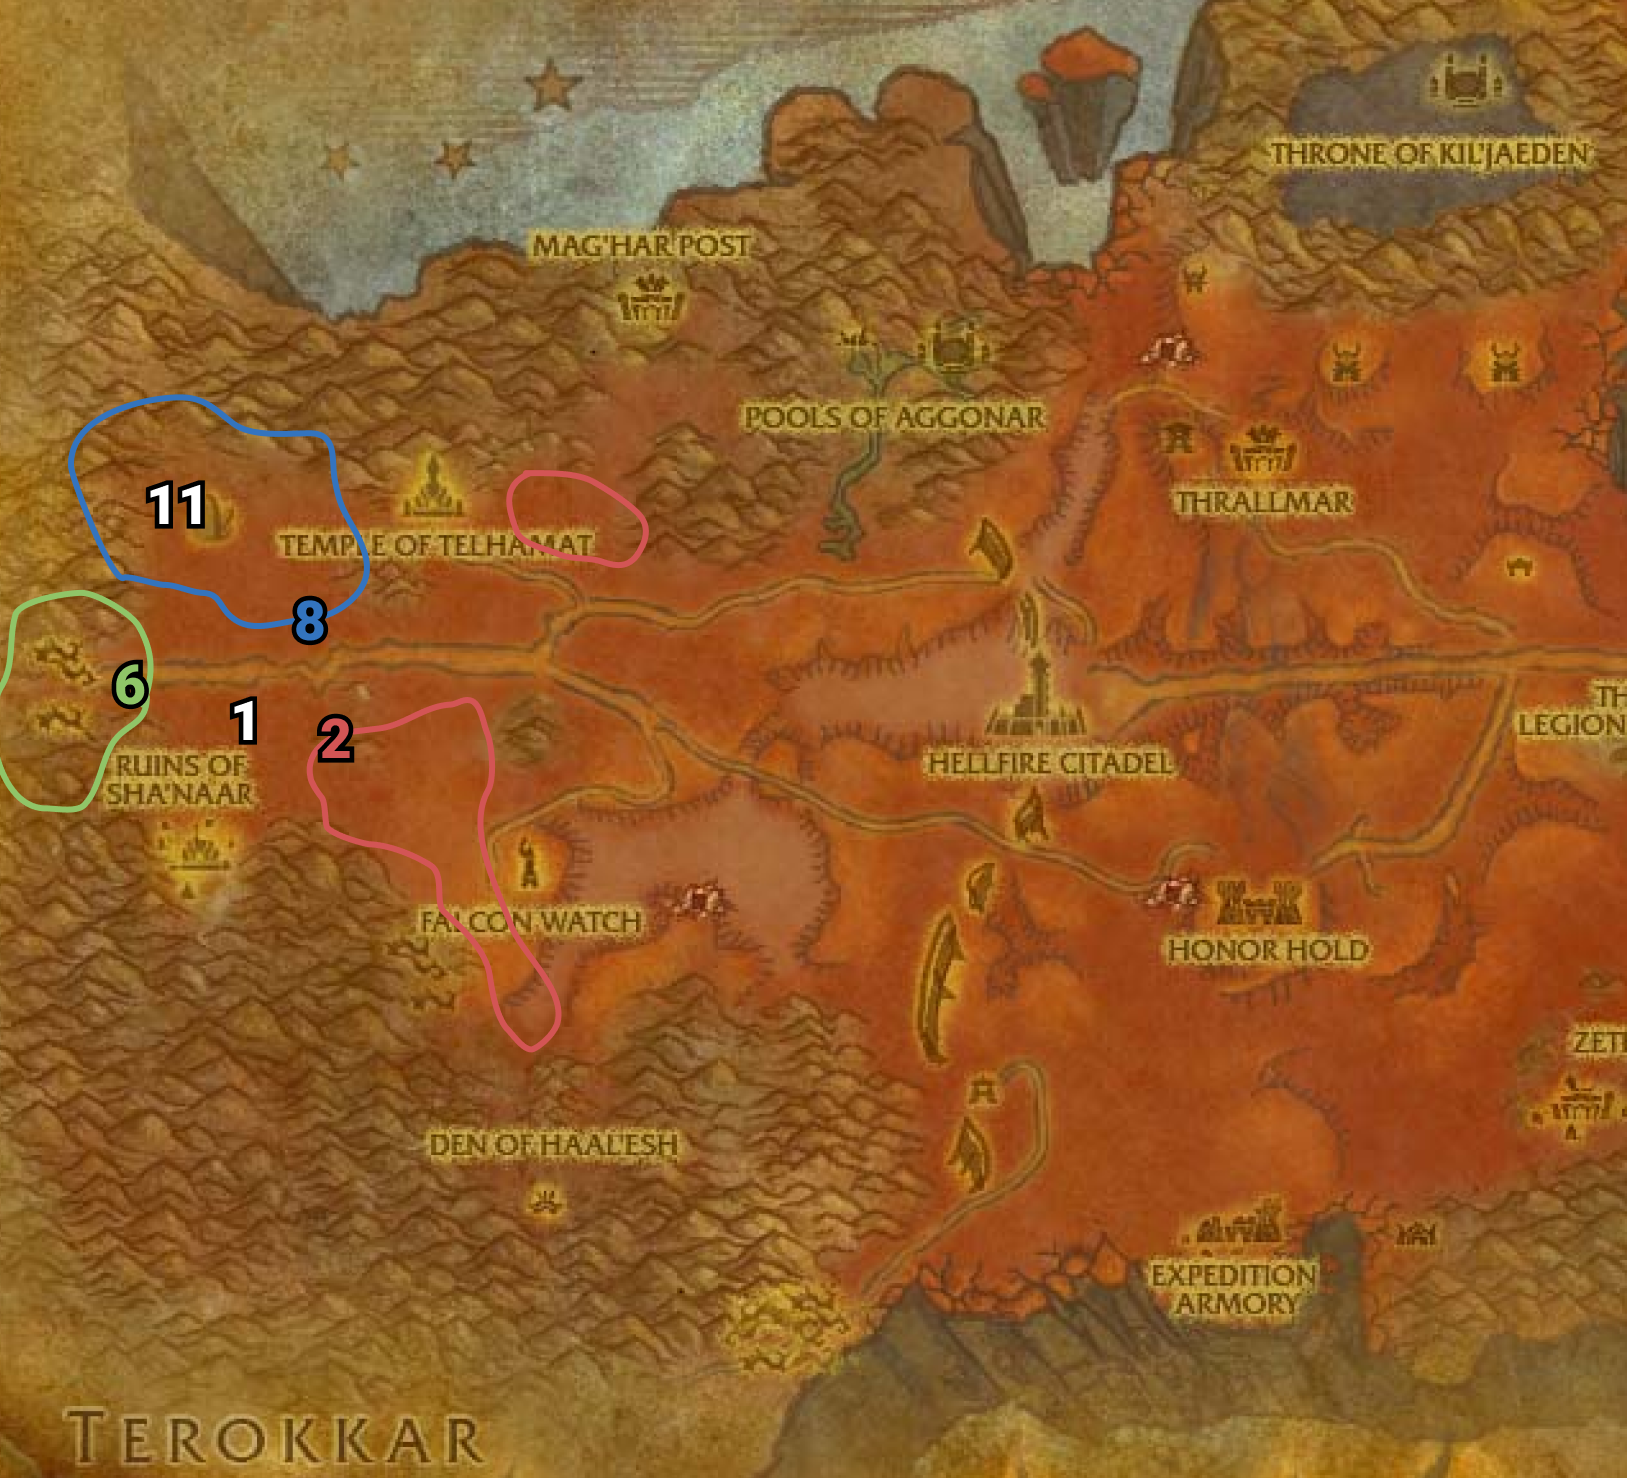
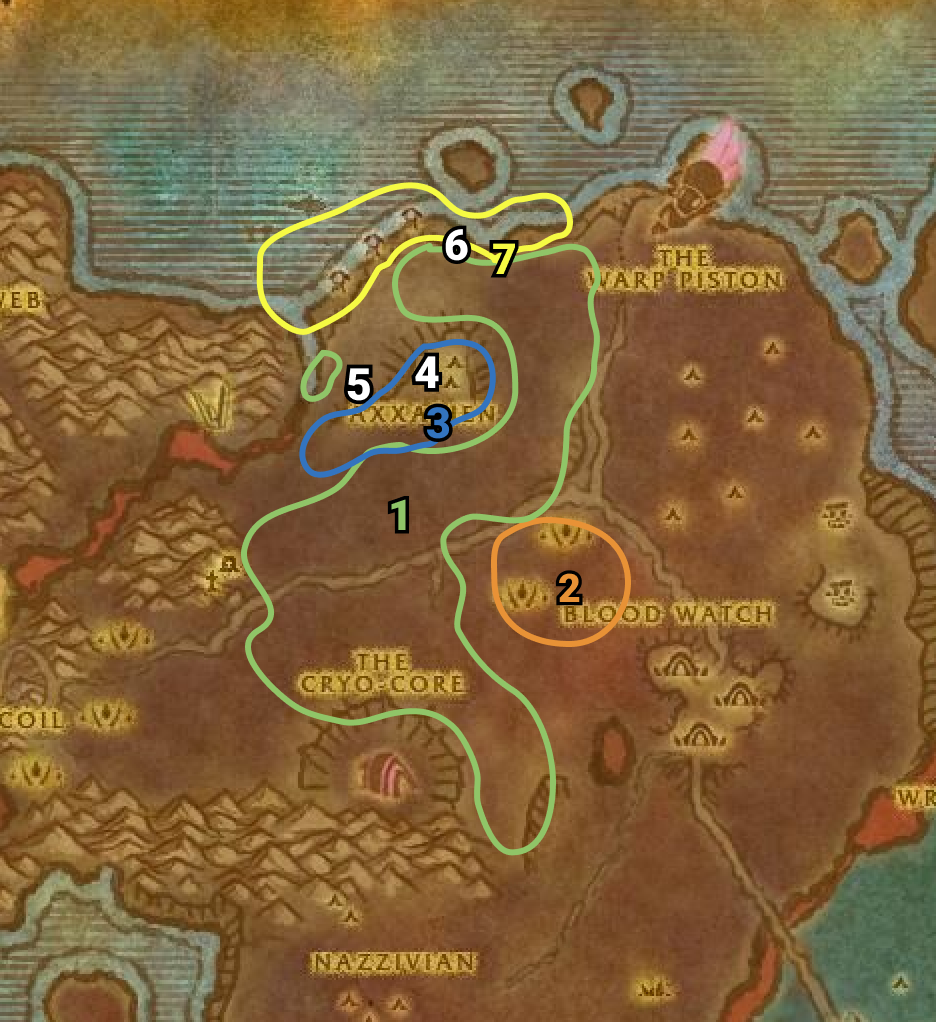
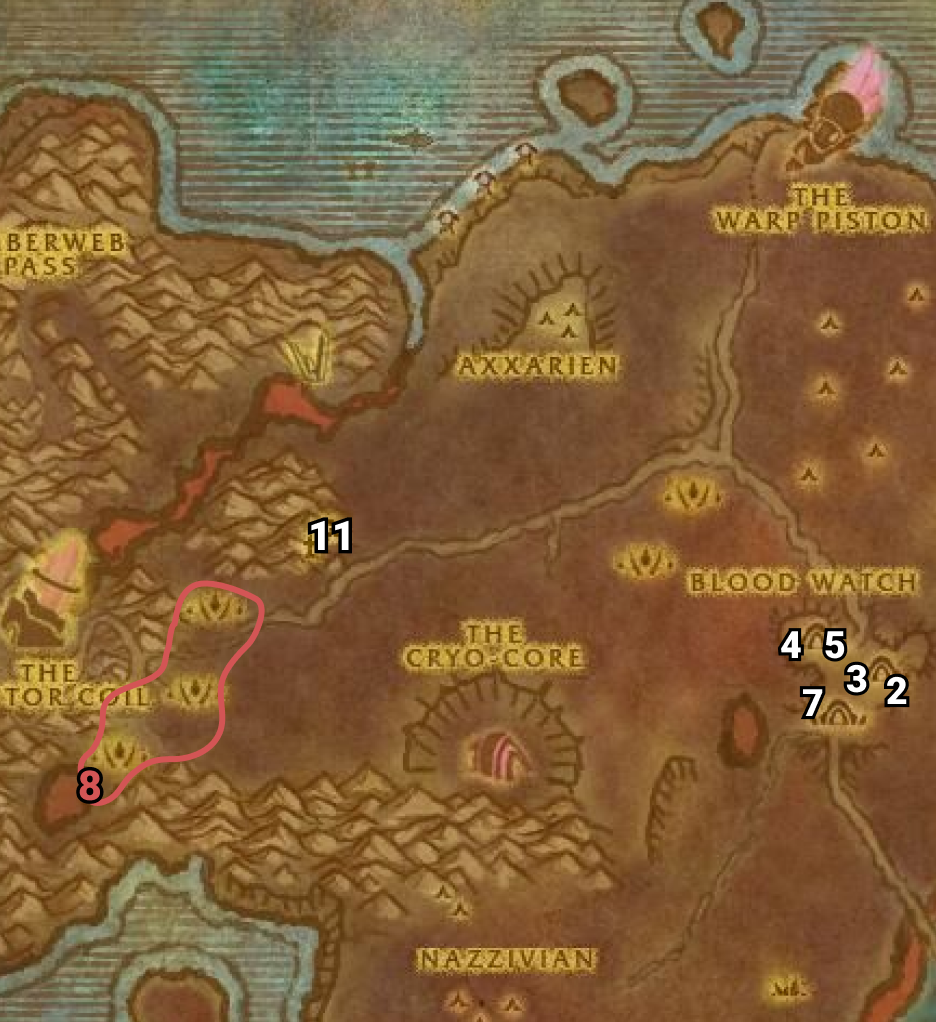
01) NW of Thrallmar by the mine entrance, accept “Outland Sucks!” 51.30.
02) Around 49.38 do “Outland Sucks!“: pick up Shredder parts in those boxes from the ground.  Also while doing this quest, kill Marauding Crust Bursters (those worm mobs underneath the ground) until one of them drops an Eroded Leather Case, which starts “Missing Missive“, accept it.
03) Back by the mine entrance, turn in “Outland Sucks!” (51.30, #1 on map), accept “How to Serve Goblins“.
04) Do “A Burden of Souls” along with “How to Serve Goblins“: kill 20 Shattered Hand orcs (any type) in the area, and save the 3 NPCs by clicking on their cages. First one to save is Manni 45.41, and for the others:
05) Save Moh 46.45.
06) Save Jakk 47.47.
07) Back by the mine entrance, turn in “How to Serve Goblins” (51.30, #1 on map), accept “Shizz Work“.
08) Do “Shizz Work“: first use your Felhound Whistle quest item at the quest giver to summon a fel hound, then just north of you around 50.30  kill Deranged Helboars and then loot their poop until you get the key.
09) Back by the mine entrance, turn in “Shizz Work” (51.30, #1 on map), accept “Beneath Thrallmar“.
10) Enter Thrallmar Mine next to you and do “Beneath Thrallmar“: keep right in the mine and at the end of it kill Urga’zz /target 54.32.
11) Leave the mine and just outside of it turn in “Beneath Thrallmar” (51.30, #1 on map).
12) Go south to Thrallmar and at the bottom of the tower turn in “A Burden of Souls” 52.36, accept “The Demoniac Scryer“.
13) GROUP 2+ Players : Go SW to Hellfire Basin around 44.49 and do “The Demoniac Scryer“: use the Demoniac Scryer quest item at this area, and protect it for about 5 minutes. Once it starts spewing up blue stuff, go up and talk to it to complete the quest.
14) Optional PVP Quest: You could do “Hellfire Fortifications“. This is a PvP quest that’s done in the middle of this zone and can be skipped.  
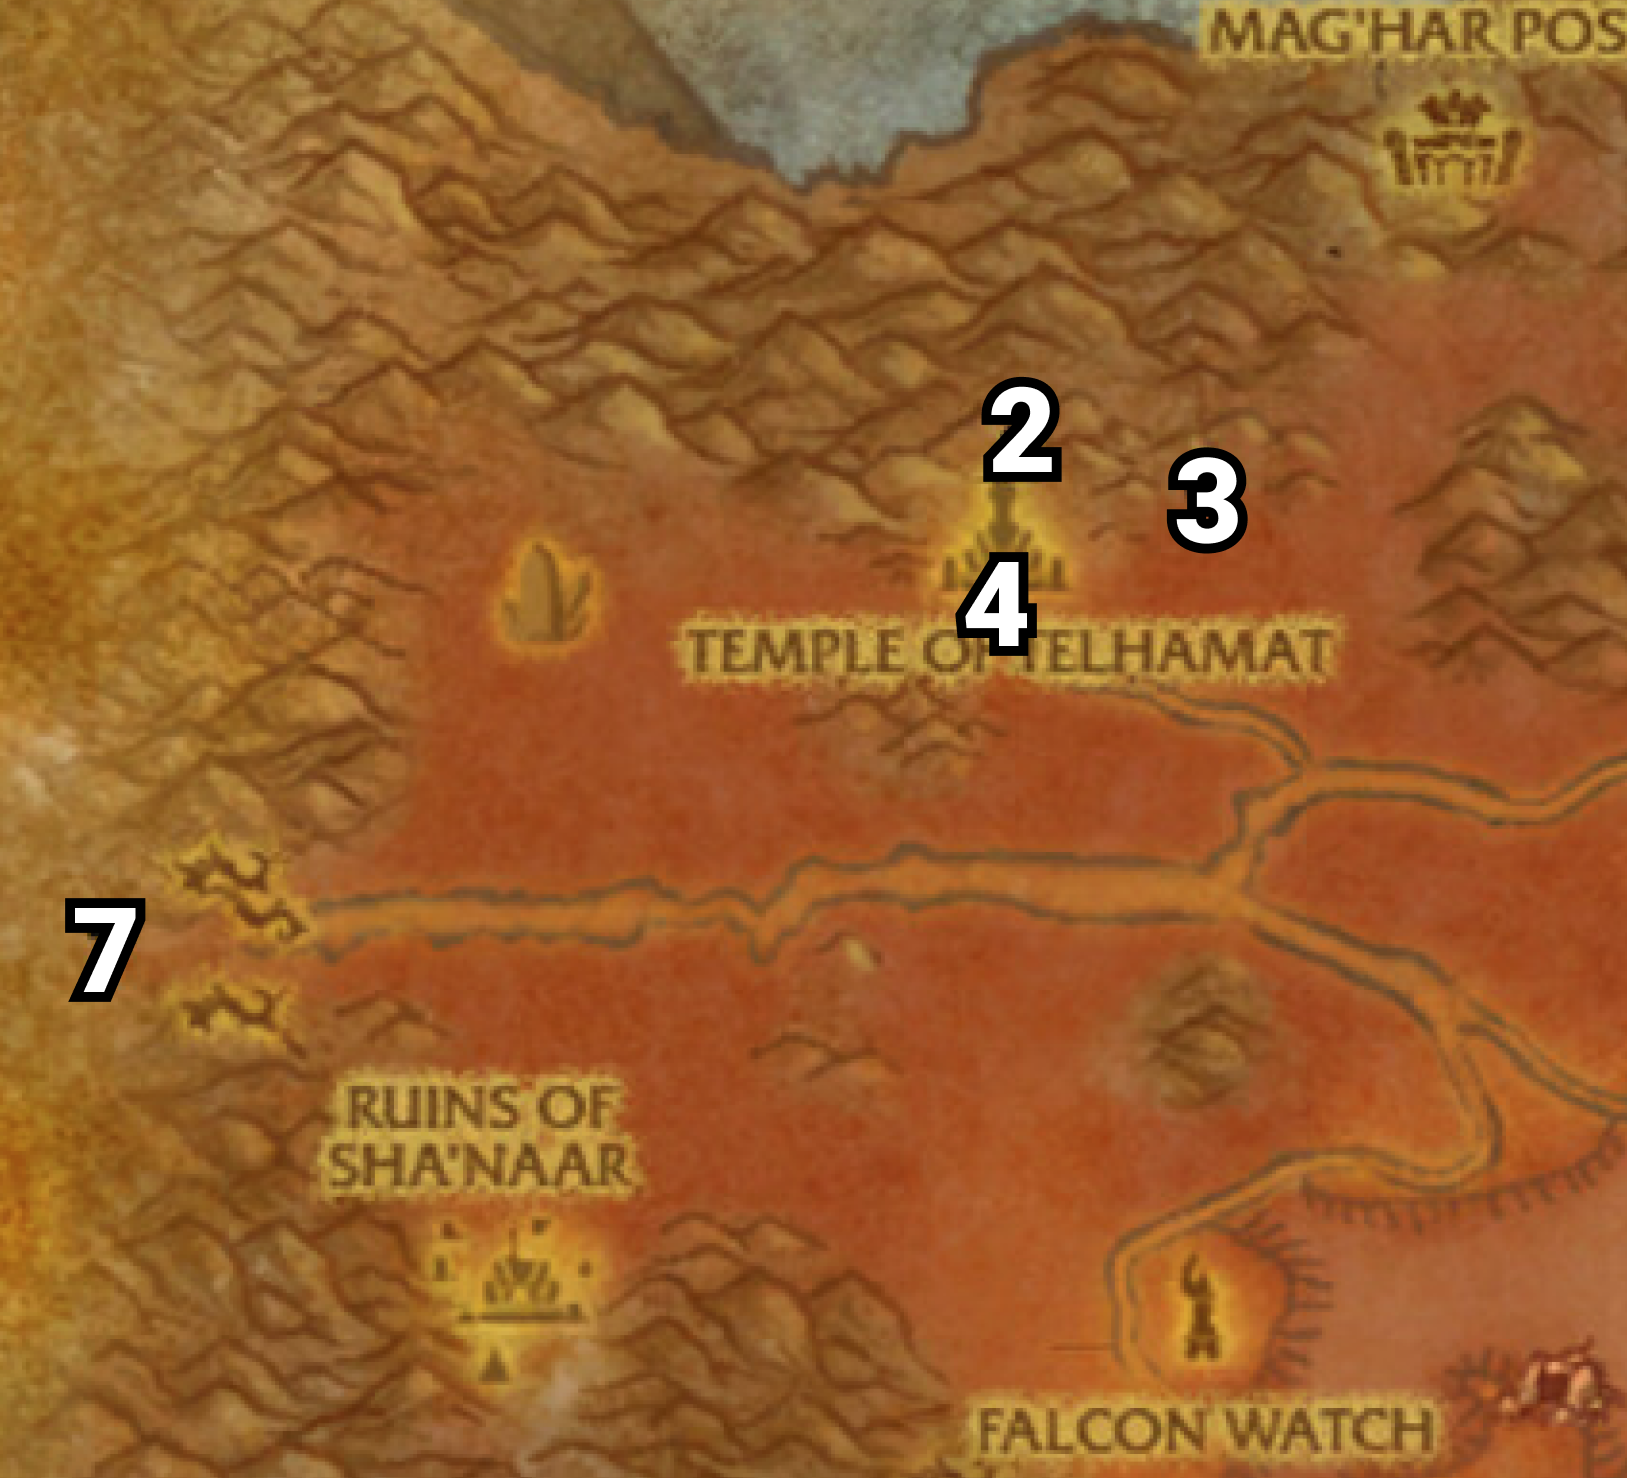
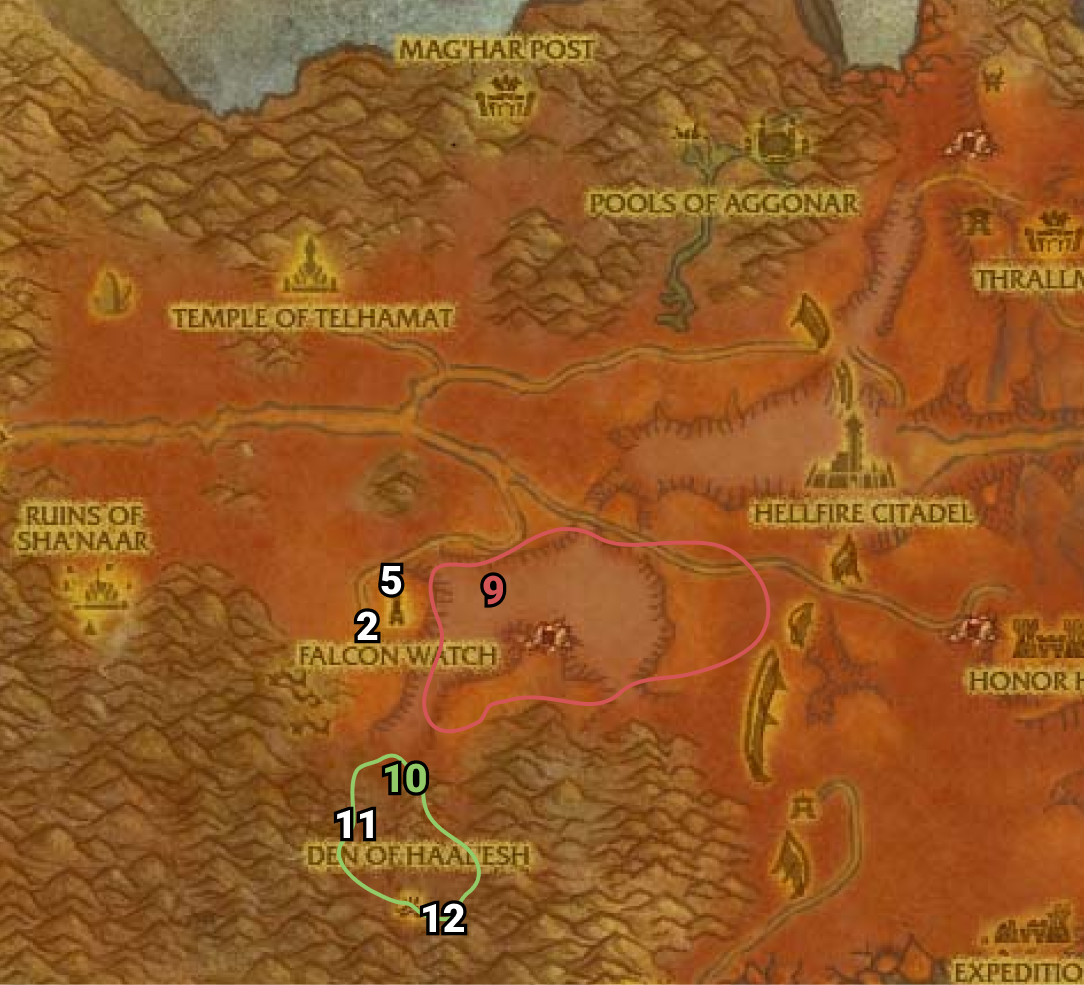
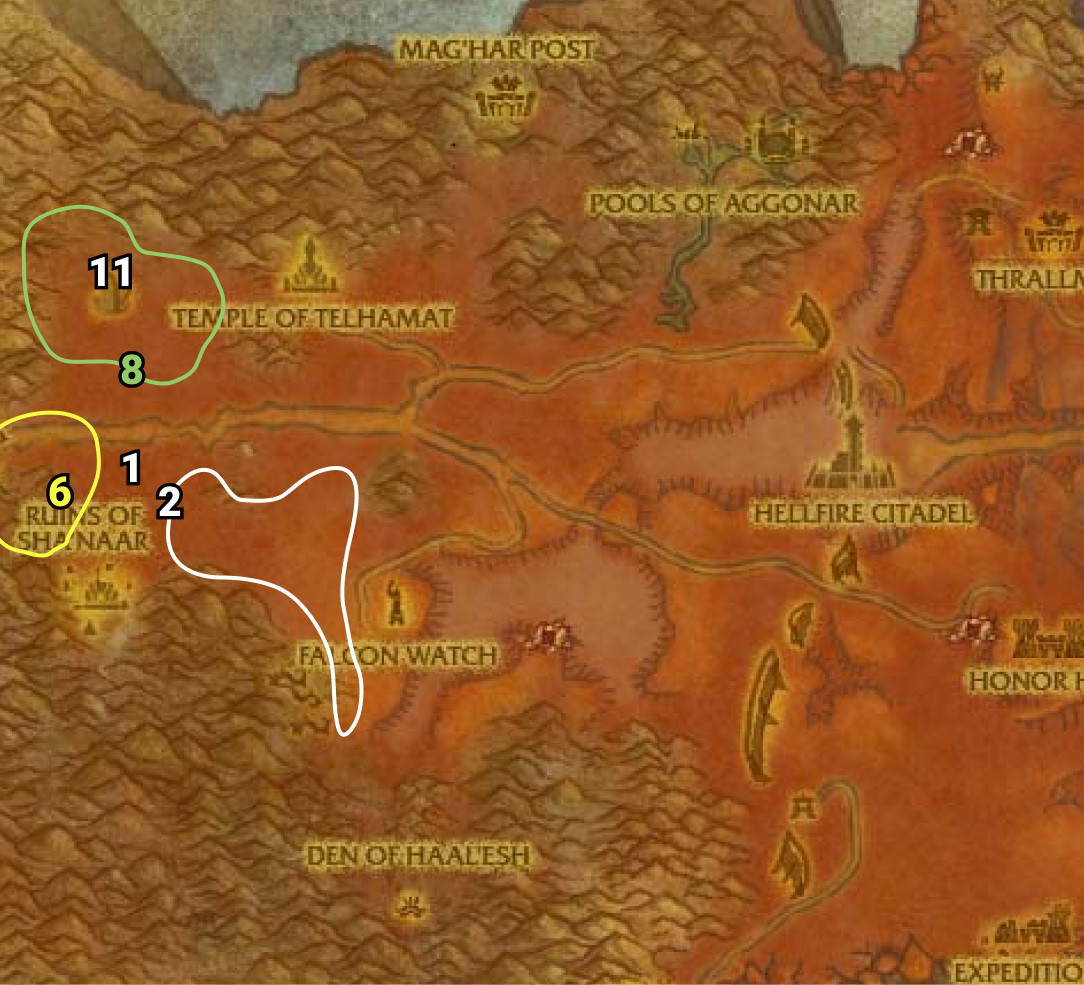
15) Go NW and from the Fel Orc Corpse turn in “The Assassin” 34.44, accept “A Strange Weapon“.
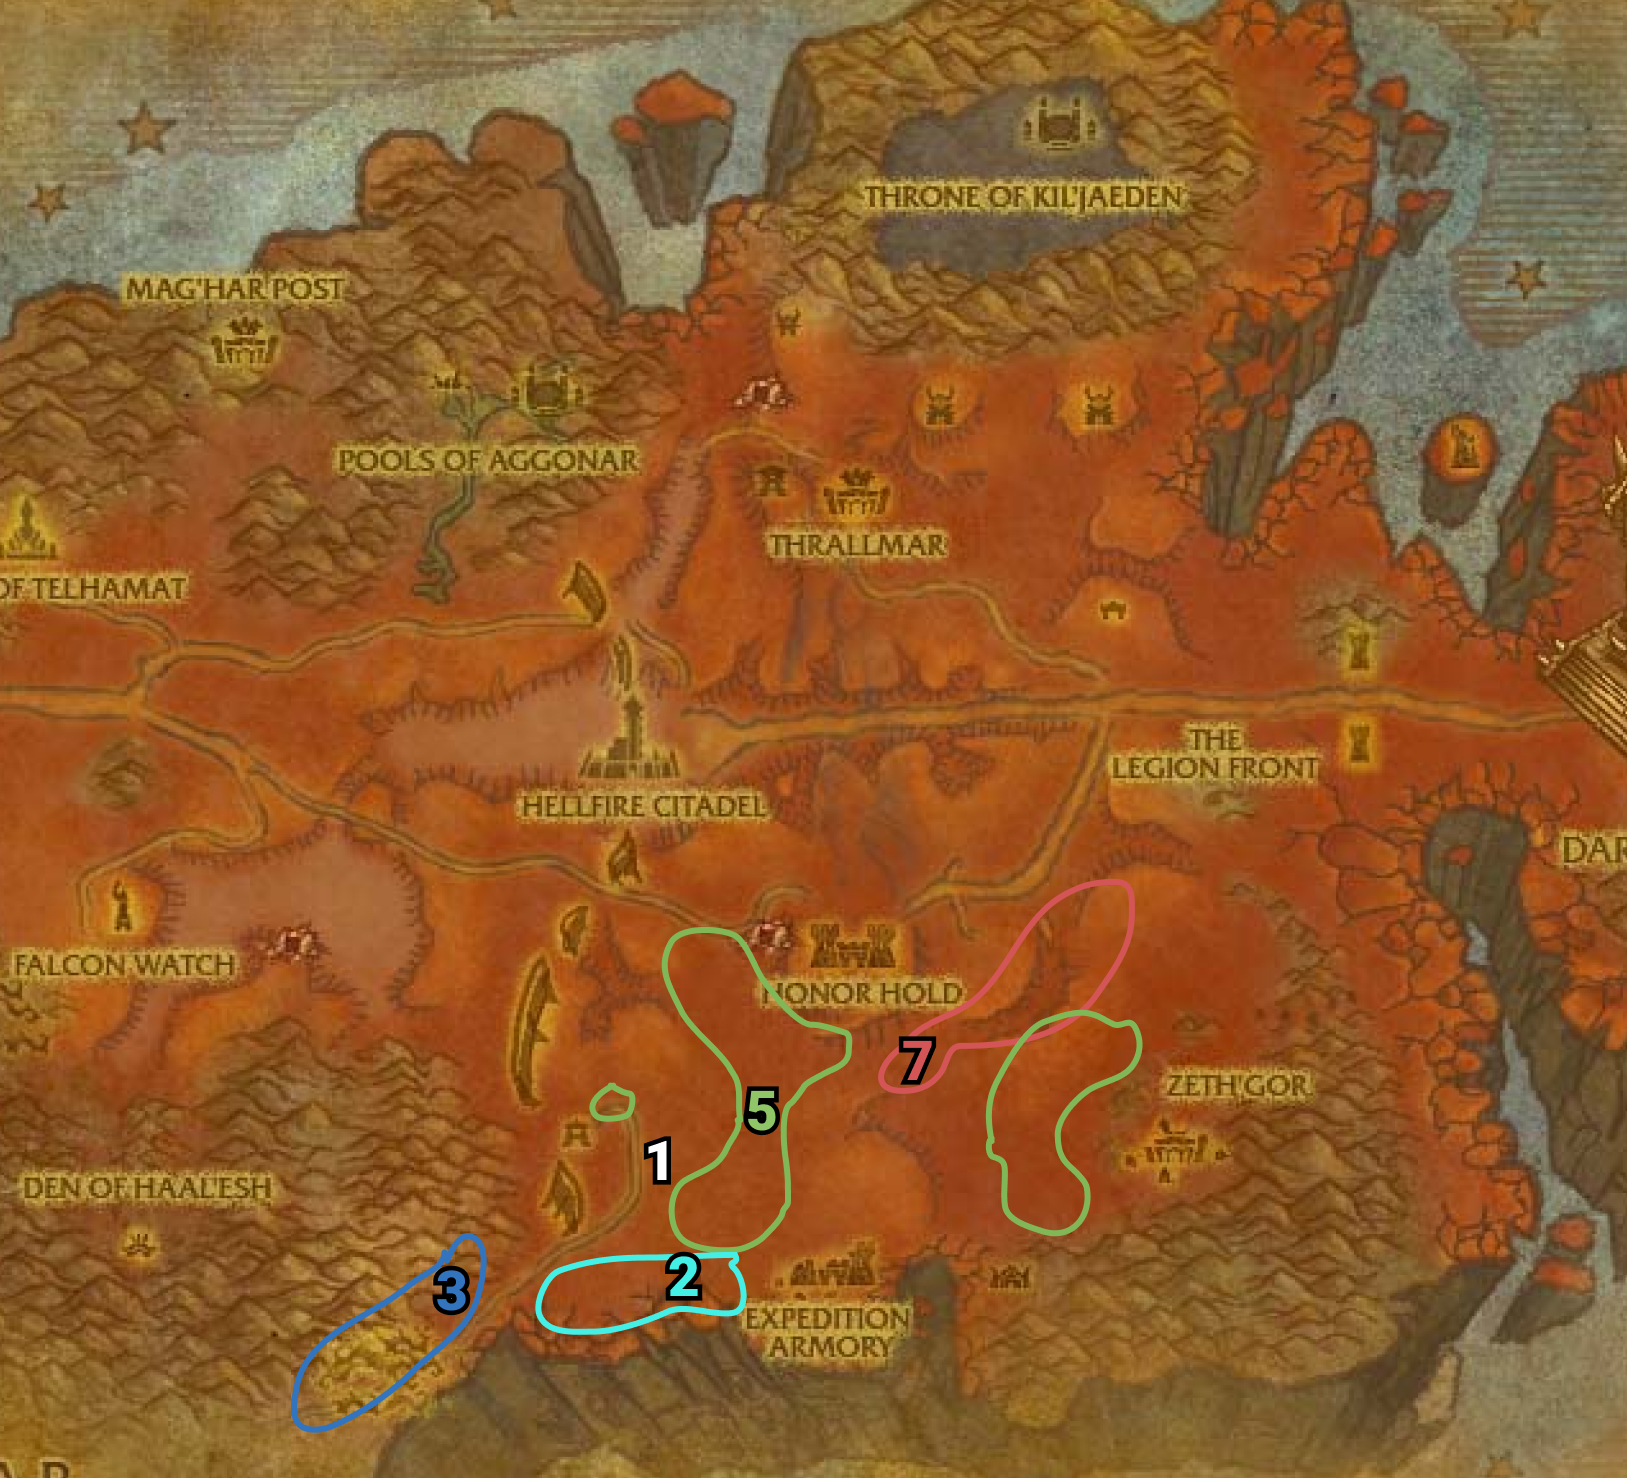
Falcon Watch

01) If you are only a few bars away from level level 61, then grind to it.
02) Go SW to Falcon Watch and as you enter stop at the Medic /target 26.62 to build up your First Aid.
03) Accept “Arelion’s Journal” 26.60.
04) In the hut/Inn next to you 27.60 accept “Magic of the Arakkoa“, “In Need of Felblood” and “Source of the Corruption“.
05) Go up in the town 28.60 and accept “Trueflight Arrows” (requires lvl 61), “Birds of a Feather” and “Helping the Cenarion Post” (requires lvl 61).
06) Get the Flight Path from the Wind Rider Master 28.60.
07) Accept (from the Wanted Poster) “Wanted: Blacktalon the Savage” 28.60.
08) Go in the tower and click on the Orb of Translocation 28.60 to take you to the top of the tower, then turn in “Falcon Watch“, accept “The Great Fissure” and “Report to Zurai“. Then use the Orb of Translocation to go back down.
09) At The Great Fissure do “The Great Fissure” Kill 8 Stonescythe Whelps and 3 Alphas within the ravine. NOTE: The Whelps are on the ground, and the Alphas are walking around up on hills and mountain cliffs.
10) Go south to Den of Haal’esh (starting around 26.74) and do “Magic of the Arakkoa” with “Birds of a Feather“: kill/loot the Haal’eshi mobs, and click on a Kaliri Nest, then use your Empty Birdcage quest item on the Female Kaliri Hatchling that spawns in. Keep the next 2 steps in mind.
11) At the Den go up the ledges ramp entrance at 25.78 and kill Avruu /target (lvl 63 arakkoa). He is soloable, but hits hard and heals himself so be prepared.  He drops an item which starts, “Avruu’s Orb“, accept it.
12) Go SE and click on the Haal’eshi Altar 29.81. Aeranas(water elemental) will spawn, then attack it until its health gets to around 20%, you will then be able to turn in “Avruu’s Orb“.
13) Down in the Den, accept and do the escort from the cagedblood elf 25.76 “The Road to Falcon Watch” (requires lvl 61): escort her back to Falcon Watch, there will be a few mob spawns along the way.
14) At Falcon Watch turn in (if you did it) “The Road to Falcon Watch” (26.62, #2 on map), accept “A Pilgrim’s Plight“. NOTE:This NPC patrols around.
15) In the hut/Inn turn in “Magic of the Arakkoa” 27.60.
16) Go up in the town and turn in “Birds of a Feather” (28.60, #5 on map).
17) Go in the tower next to you and click on the Orb of Translocation 28.60 to take you to the top of the tower, then turn in “The Great Fissure“, accept “Marking the Path“.

01) Go SW to Dustquill Ravine and do “A Pilgrim’s Plight“: pick up the Torn Pilgrim’s Pack on the purple blanket 22.68.
02) Go NE to The Great Fissure and do “Marking the Path” Use the Lit Torch quest item at the 3 locations. Light the Western Beacon at 30.61, and:
03) Light the Central Beacon 34.60.
04) Light the Southern Beacon 36.65.
05) GROUP with 2+ Players : “Wanted: Blacktalon the Savage“: kill/loot Blacktalon the Savage /target (at the end of the cave). The cave entrance is at 34.64. NOTE: If you can’t do it now we can try this again later
06) Go back to Falcon Watch and turn in “A Pilgrim’s Plight” 26.62. NOTE: This NPC patrols around.
07) Go up in town and use the Orb of Translocation 28.60 to take you to the top of the tower, then turn in “Marking the Path” and (if you did it) “Wanted: Blacktalon the Savage“. If you didn’t, turn it in if or when you do it.
08) NOTE: While accepting and turning in the next couple of quests, watch out for all the mobs and even the elite one walking around:
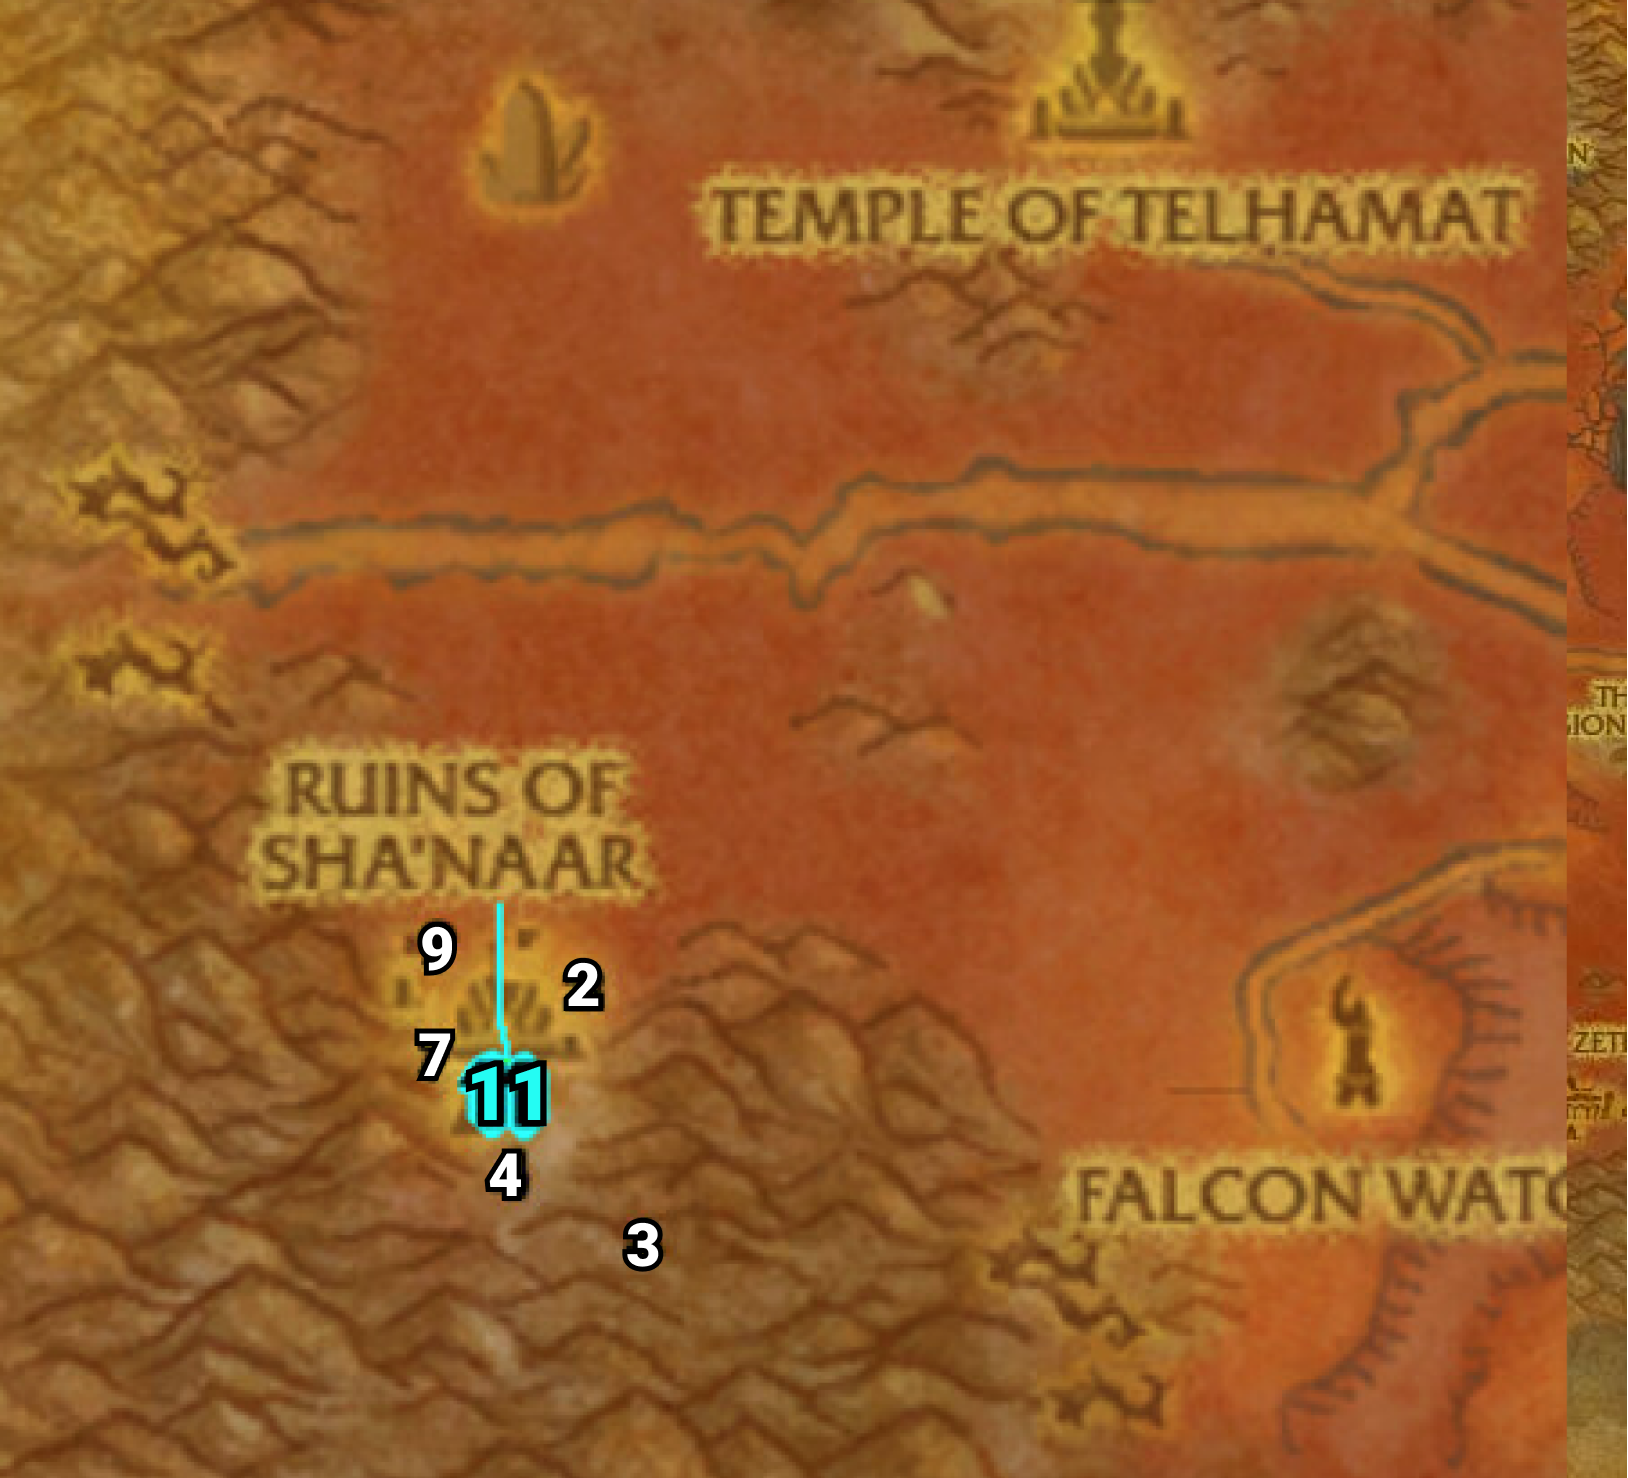
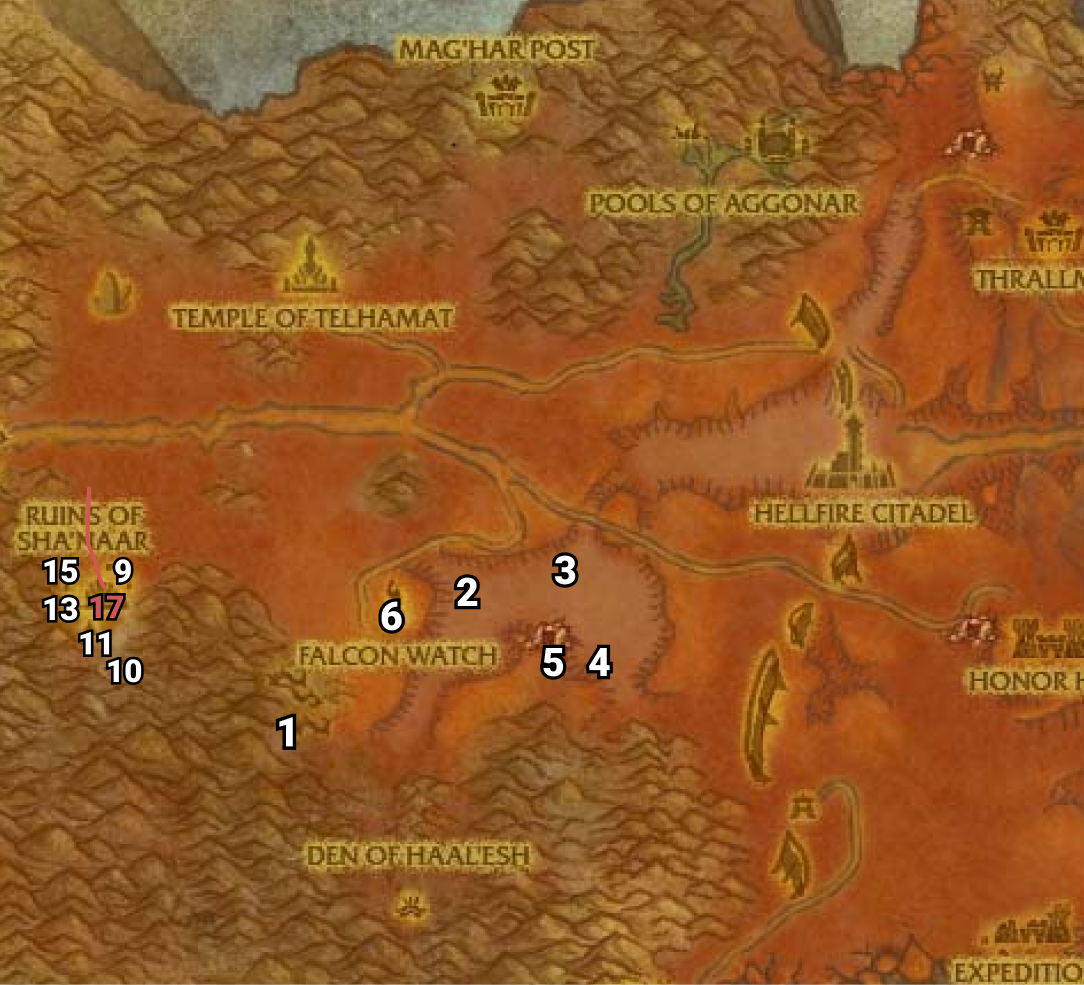
09) Go west to Ruins of Sha’naar and accept “Naladu” (in the hut, 16.59).
10) Work your way deeper in the ruins and in the hut turn in “Naladu” 16.65, accept “A Traitor Among Us“.
11) Just NW of you do “A Traitor Among Us“: loot the Metal Coffer (chest) in the hut 14.63.
12) Back at Naladu (in the hut 16.65, #10 on map), turn in “A Traitor Among Us“, accept “The Dreghood Elders“.
13) Around the ruins do “The Dreghood Elders“: talk to and free 3 NPCs. Talk to and Free Morod the Windstirrer (in the hut, 13.61), and:
14) Talk to and Free Akoru the Firecaller (in the hut, 16.59, #9 on map).
15) Talk to and Free Aylaan the Waterwaker (in the hut, 13.58).
16) Back at Naladu (in the hut 16.65, #10 on map), turn in “The Dreghood Elders“, accept “Arzeth’s Demise“.
17) Do “Arzeth’s Demise“: use the Staff of the Dreghood Elders quest item on Arzeth the Merciless (the big blue elite demon, he patrols) to weaken him, then kill him.
18) Back at Naladu (in the hut 16.65, #10 on map), turn in “Arzeth’s Demise“.
19) Around the ruins finish up “Source of the Corruption“: kill/loot Illidari Taskmasters (the blue demons).
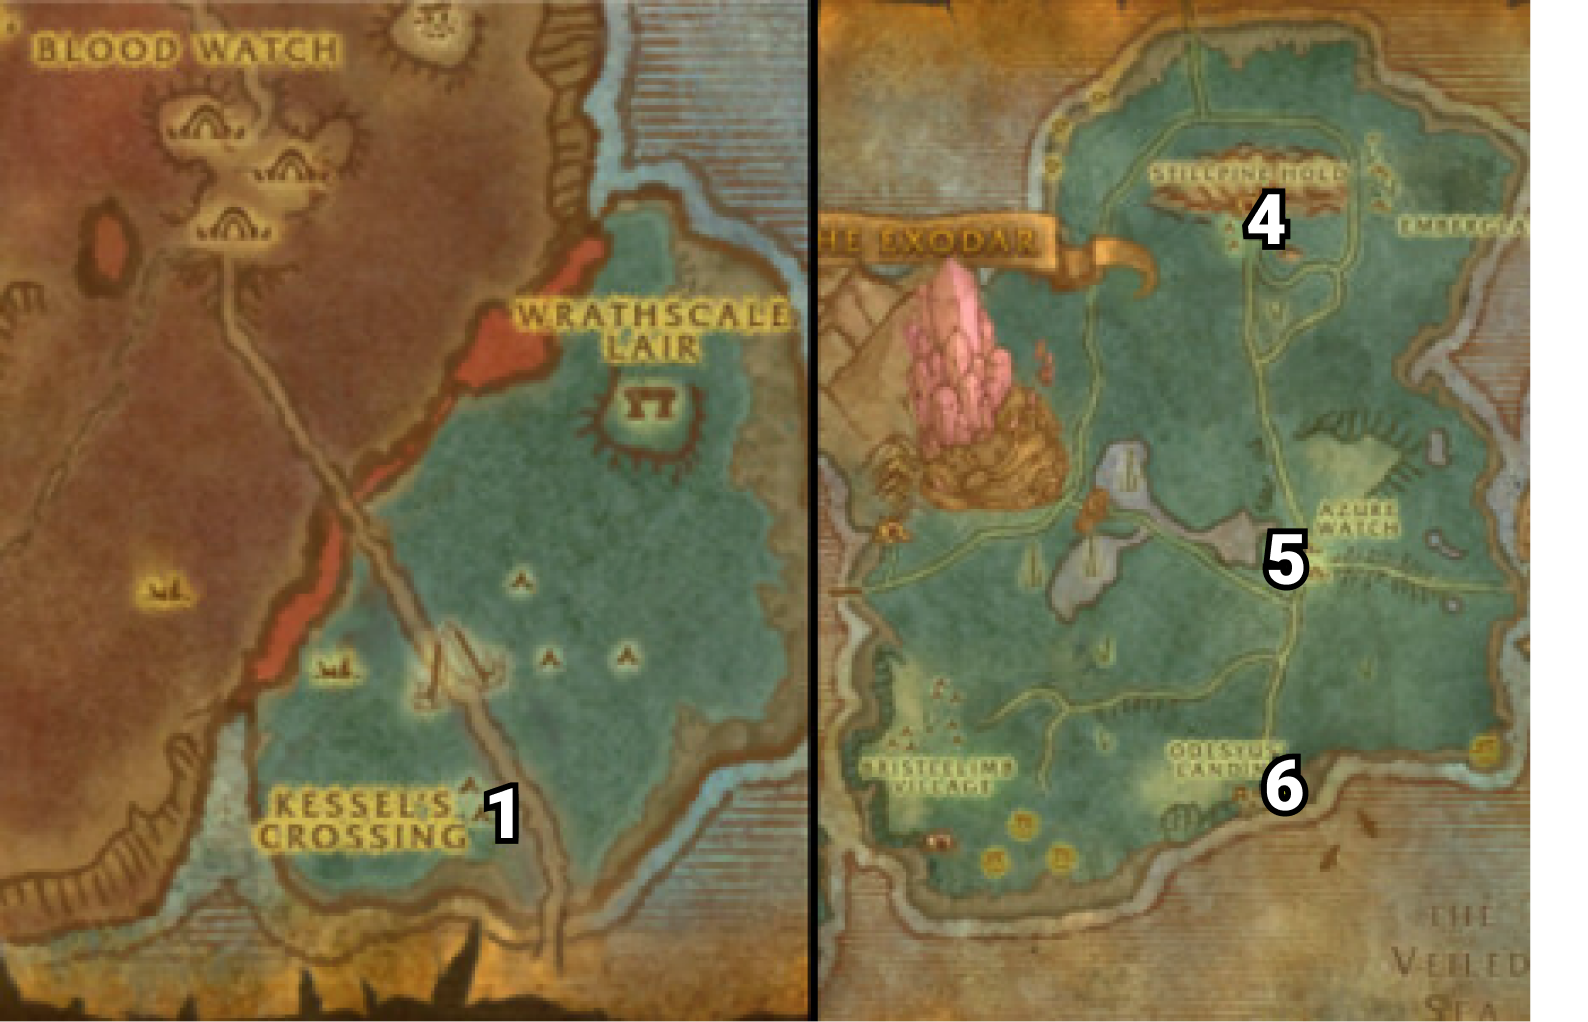
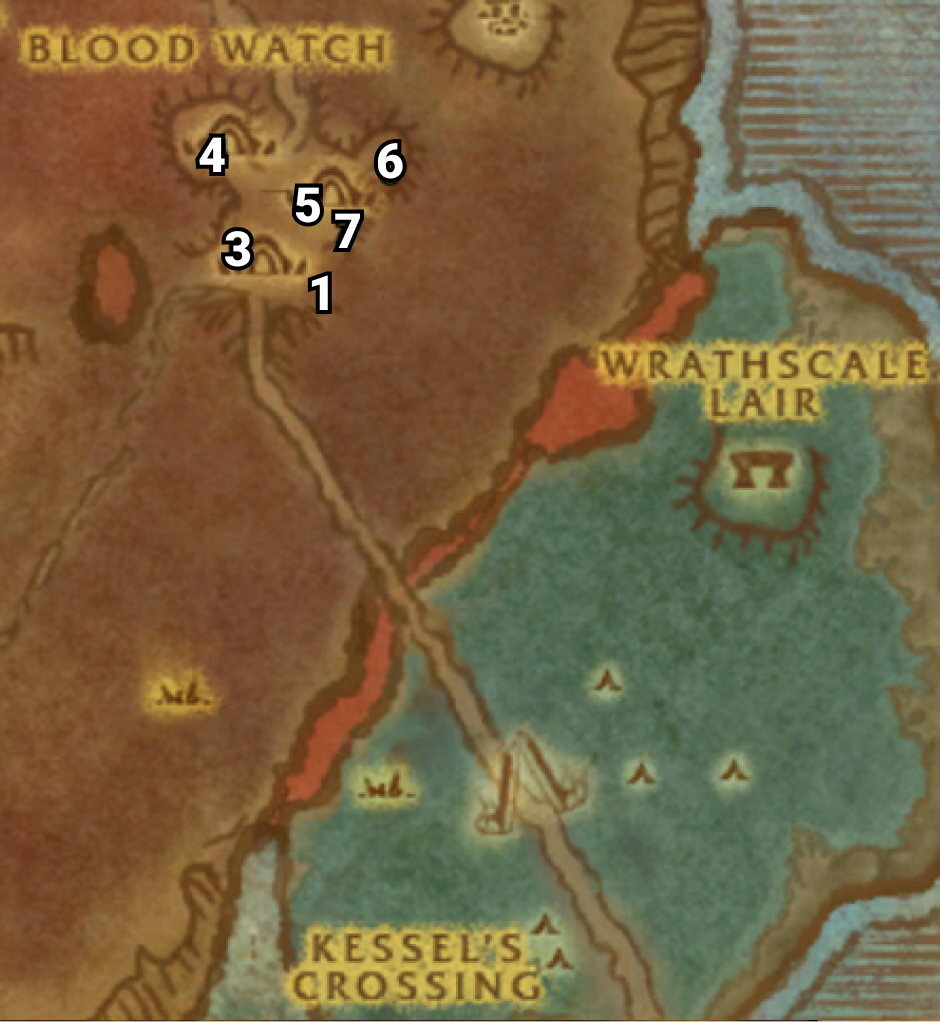
Cenarion Post

01) Go to Cenarion Post 16.52 and turn in all quests and accept new ones: Turn in “Missing Missive” and “Helping the Cenarion Post“, accept “Demonic Contamination“. And accept “Colossal Menace” , “Keep Thornfang Hill Clear!” and “The Cenarion Expedition“.
02) Just to the east of you around 18.55 do “Demonic Contamination“: kill/loot the Hulking Helboars.
03) Back at Cenarion Post (16.52, #1 on map) turn in “Demonic Contamination“, accept “Testing the Antidote“.
04) Go back just to the east of you (around 18.55, #2 on map) do “Testing the Antidote“: just use the Cenarion Antidote quest item on a Hulking Helboar then kill the mob.
05) Back west at Cenarion Post (16.52, #1 on map) turn in “Testing the Antidote“.
06) Go west to Thornfang Hill around 10.52 and do “Keep Thornfang Hill Clear!“: kill 8 Thornfang Ravagers and 8 Venomspitters.
07) Back east at Cenarion Post (16.52, #1 on map) turn in “Keep Thornfang Hill Clear!“.
08) Go north to Fallen Sky Ridge around 14.44 and try to kill at least one Raging Colossus (lvl 63 Elite giant), so that the Crimson Crystal Shard item drops, which starts “Crimson Crystal Clue“, accept it.  
09) Back south at Cenarion Post (16.52, #1 on map) turn in “Crimson Crystal Clue“, accept “The Earthbinder“.
10) Next to you at the top of the hill turn in “The Earthbinder” 16.52. Once the NPC walks down the hill and spawns a giant, kill it, then accept “Natural Remedies“.
11) GROUP: Do “Natural Remedies” along with finishing up “Colossal Menace“: up north at Fallen Sky Ridge (around 14.44, #8 on map) kill 4 more Raging Colossus and use the Seed of Revitalization quest item at the green circle (at 14.39, #11 on map), then kill Goliathon (a red lvl 63 elite giant) once he spawns in. 
12) Back south at Cenarion Post (16.52, #1 on map) turn in (if you did any of them) “Natural Remedies” and “Colossal Menace“.

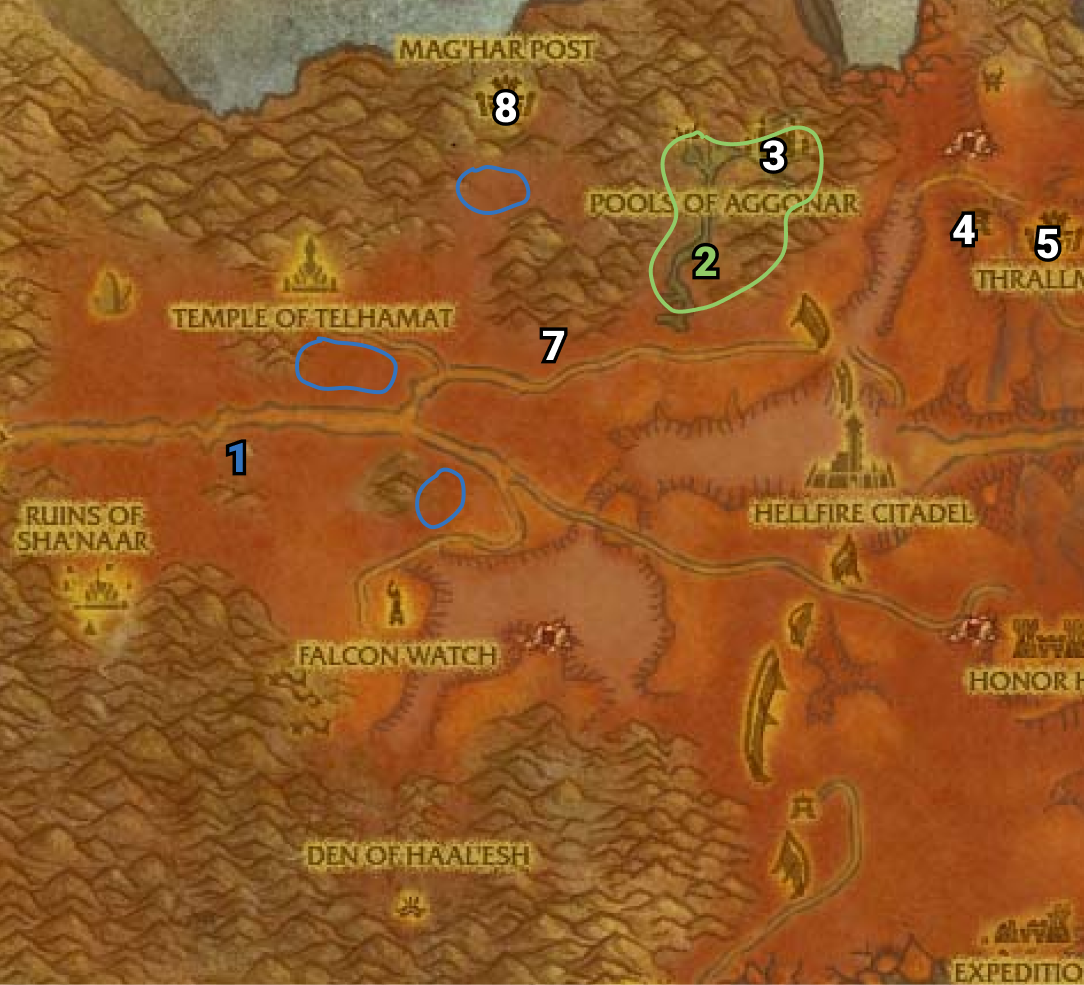
01) Go east a bit (starting around 21.52) and do “Trueflight Arrows“: kill/loot Bonestripper Vultures. NOTE:  There are 3 other small camps of these mobs (see map for locations).
02) Go NE to Pools of Aggonar and do “The Agony and the Darkness” along with “In Need of Felblood” and “Arelion’s Journal“: kill/loot the Terrorfiends (demons). And loot Arelion’s Knapsack for the journal (its either hanging on a bramble 40.37 , #2 on map, or it can drop from a Blistering Oozeling).
03) GROUP: Do “Cruel’s Intentions“: kill Arazzius the Cruel (lvl 63 elite big reddish demon at 44.32).  
04) Go east to Thrallmar (Don’t hearth).  And at the bottom of the tower, turn in (if you did it) “The Demoniac Scryer” 52.36, accept “Report to Nazgrel“.
05) In the barracks 55.36 turn in “A Strange Weapon” (accept “The Warchief’s Mandate“), (if you have it) “Report to Nazgrel” (accept “The Foot of the Citadel“) , “The Agony and the Darkness” and (if you did it) “Cruel’s Intentions“.
06) Make a right out of the barracks and turn in “The Warchief’s Mandate” 54.38, accept “A Spirit Guide“.
07) Go west to the Fel Orc Corpse 34.43 and do “A Spirit Guide“: use the Ancestral Spirit Wolf Totem quest item at the corpse, then follow the spirit wolf to the next step.
08) Once you get to Mag’har Post turn in “A Spirit Guide” 32.28, accept “The Mag’har“.
09) Use Hearthstone to Thrallmar.
10) In the barracks, turn in “The Mag’har” (55.36, #5 on map), accept “Messenger to Thrall“.
11) NOTE: “Messenger to Thrall” gets turned in at Thrall in Orgrimmar. I recommend doing this when you are level 62 so you can get new spells/abilities while you are at it. After turning this in then accept “Envoy to the Mag’har” from Thrall. Remember there is a portal to Orgrimmar east in Hellfire Peninsula (at The Stair of Destiny, 89.48).  
12) Go to the Wind Rider Master 56.36 and fly to Falcon Watch, Hellfire Peninsula.

Falcon Watch

01) Turn in “Trueflight Arrows” 28.60.
02) Go down and turn in “Arelion’s Journal” 26.60, accept “Arelion’s Secret“.
03) Go in the hut/Inn next to you and turn in “In Need of Felblood” 27.59, accept “The Cleansing Must Be Stopped“. And next to you turn in “Source of the Corruption“.
04) Do “Arelion’s Secret“: talk to Magister Aledis /target, then beat the NPC in a dual. He patrols the path following out of Falcon Watch all the way to the entrance of the zone Zangarmarsh to the west, so just follow the path and you will get to him (see path on map). NOTE:  If he dies, he spawns inside Falcon Watch. Once done, turn in “Arelion’s Secret“, accept “The Mistress Revealed“.
05) Go NE to Pools of Aggonar and do “The Cleansing Must Be Stopped“: use the Signaling Gem quest item at the Altar of Aggonar 39.40, then kill all the Draenei mobs that come attack you. NOTE: It could take up to a minute for them to come to you.
06) Go SW to Falcon Watch and turn in “The Mistress Revealed” (26.60, #2 on map), accept “Arelion’s Mistress“.
07) In the hut/Inn next to you 27.60 turn in “The Cleansing Must Be Stopped“.
08) Hellfire Peninsula is Finished for now! NOTE:  If you didn’t do these, you can Abandon these quests: “Weaken the Ramparts“, “Hellfire Fortifications“, “Cruel’s Intentions“, “The Foot of the Citadel“, ” Natural Remedies” and “Colossal Menace“. NOTE:  Hold on to the rest as we can work on them later.
09) Now lets head directly west on the main path to Zangarmarsh…

WoW TBC Classic Alliance 60-70 Leveling Guide: 60-61 Hellfire Peninsula

Dark Portal

01) Go to Blasted Lands and stop at Nethergarde Keep. Enter the northern Keep and make two sharp left turns to Bernie Heisten /target (Food & Drink vendor, 63.17) and on his last page of items, purchase a Nethergarde Bitter. This will save us a trip later as this will be used for a later quest in Hellfire Peninsula.  And remember to hold on to this and do NOT sell this to a vendor!
02) From Watch Commander Relthorn Netherwane (58.56 in Blasted Lands) accept “Through the Dark Portal“.
03) Go through the Dark Portal to enter Outland (59.60 in Blasted Lands).
04) First thing you’ll notice in front of you is a bunch of HUGE demons killing a bunch of NPCs, no need to worry about it now.
05) Go down the steps and turn in “Through the Dark Portal” (87.51 in Hellfire Peninsula), accept “Arrival in Outland“.
06) Just south of you at the Gryphon Master 87.52, turn in “Arrival in Outland“, accept “Journey to Honor Hold“.
07) Then fly to Honor Hold, Hellfire Peninsula.

Honor Hold

01) In front of you turn in “Journey to Honor Hold” 55.63, accept “Force Commander Danath“.
02) Go in the Inn next to you and talk to the Innkeeper /target 54.64 to make Honor Hold your new home.
03) Exit the Inn then go upstairs in the Keep and turn in “Force Commander Danath” 57.67 . Accept “The Legion Reborn” and “Know your Enemy“.
04) Go to East Supply Caravan and turn in “The Legion Reborn” 62.61, accept “The Path of Anguish“.
05) Go east a bit around 66.60 and do “The Path of Anguish“: kill the required amount of demons.
06) Return to East Supply Caravan to turn in “The Path of Anguish” (#4 on map 62.61), accept “Expedition Point“.
07) Grind to Expedition Point and turn in “Expedition Point” 71.63, accept “Disrupt Their Reinforcements“. And next to you, accept “Zeth’Gor Must Burn!“.
08) Just NE at The Legion Front around 72.60 do “Disrupt Their Reinforcements“: kill/loot the demon mobs to obtain Demonic Rune Stones and then click on these two portals (each requiring 4 Demonic Rune Stones).
09) Click on Portal Kaalez at 73.59.
10) Click on Portal Grimh at 71.55.
11) Back south at Expedition Point turn in “Disrupt Their Reinforcements” (#7 on map 71.63). Accept “Mission: The Murketh and Shaadraz Gateways“.
12) Do “Mission: Gateways Murketh and Shaadraz“: next to you, talk to Wing Commander Dabir’ee 71.62 to start this quest. Then use your Seaforium PU-36 Explosive Nether Modulator quest item to bomb the two green portals next to the main path once you get to them.
13) Turn in “Mission: Gateways Murketh and Shaadraz“, accept “Shatter Point“.
14) At Expedition Point talk to Wing Commander Dabir’ee 71.62 to send you to Shatter Point.

Shatter Point

01) Once at Shatter Point, from the Gryphon Master, turn in “Shatter Point” 78.35, accept “Wing Commander Gryphongar“.
02) At the broken tower turn in “Wing Commander Gryphongar” 79.34 . Accept “Mission: The Abyssal Shelf“.
03) Do “Mission: The Abyssal Shelf“: go back down and talk to Gryphoneer Windbellow /target 78.34 to send you to the Abyssal Shelf to start. Then use your quest item Area 52 Special to kill the required amount of mobs during the automated flight. See if you can do this all in one go!
04) At the broken tower turn in “Mission: The Abyssal Shelf” (#2 on map 79.34). Accept “Go to the Front“.
05) Go down and talk to  Gryphoneer Windbellow 78.34 to send you to Honor Point. NOTE: “Return to the Abyssal Shelf” is a repeatable quest for reputation only, not giving any XP.
06) Once you land turn in “Go to the Front” 68.28, accept “Disruption – Forge Camp: Mageddon“.
07) Just SW at Forge Camp: Mageddon do “Disruption – Forge Camp: Mageddon“: kill 10 Gan’arg Servants. And kill Razorsaw /target, he is walking around this area 65.32 .
08) Back NE turn in “Disruption – Forge Camp: Mageddon” (#6 on map 68.28), accept “Enemy of my Enemy…“.
09) Back SW at Forge Camp: Mageddon do “Enemy of my Enemy…“: kill 3 Fel Cannon MK1s (#7 on map around 65.32).
10) Back NE turn in “Enemy of my Enemy…” (#6 on map 68.28), accept “Invasion Point: Annihilator“.
11) Go west to Invasion Point: Annihilator and do “Invasion Point: Annihilator“: kill/loot Warbringer Arix’Amal /target 53.26 , he drops an item that starts “The Dark Missive“, accept it.
12) Click on the Forge Camp: Portal Glyph (big green portal, 53.28) in that area.
13) Back east turn in “Invasion Point: Annihilator” (#6 on map 68.28).

Honor Hold

01) Use Hearthstone to teleport to Honor Hold.
02) In the Inn accept “The Longbeards” and “An Old Gift“.
03) Go upstairs in the Keep and turn in “The Dark Missive” 57.67, accept “The Heart of Darkness” and “The Path of Glory“. And next to you accept “Overlord“. NOTE: “Weaken the Ramparts” is a dungeon quest  (you can do it later to gain xp and items).
04) Exit the Keep and in the middle of town accept “Hellfire Fortifications” 56.63 . NOTE: This is a optional Daily PvP quest that’s done in the middle of Hellfire Peninsula (can be skipped).
05) Just west at the Honor Hold Mine entrance accept “A Job for an Intelligent Man” and “When This Mine’s a-Rockin” 52.63.
06) Go north to the broken tower and at the entrance accept “Waste Not, Want Not” 51.62.
07) In the tower turn in “Know your Enemy” 51.60, accept “Fel Orc Scavengers“. Next to you accept “Unyielding Souls“.
08) Just north around the old catapult parts around 51.57 do “Fel Orc Scavengers” with “Waste Not, Want Not“: kill 20 Bonechewer orcs (any type). And pick up 8 Salvaged Metal and 8 Salvaged Wood from the ground.
09) Back at the broken tower NW of Honor Hold turn in “Waste Not, Want Not” (#6 on map 51.62), accept “Laying Waste to the Unwanted“.
10) Inside the tower turn in “Fel Orc Scavengers” 51.60, accept “Ill Omens“.
11) Go south to the Zeppelin Crash 49.75 and accept “Ravager Egg Roundup” and “In Case of Emergency…“.

Zeth’Gor

NOTE:  While doing follow up quests, do “In Case of Emergency…” by looting any Zeppelin Debris you see along the way (#14 on map).

01) Go SE to Expedition Armory and do “Unyielding Souls” with “An Old Gift“: kill the required amount of undead mobs. And all the way south at the armory, at the front steps of the old cabin, loot theMysteries of the Light 55.87 .
02) Go east to Zeth’Gor around 65.74 and do “Ill Omens“: kill/loot the orcs until you get the Cursed Talisman. 25% drop rate. Be care, the NPS’ spawn time is really short!
03) NE at Expedition Point turn in “Ill Omens” 71.63 . Accept “Cursed Talismans“.
04) Back SW at Zeth’Gor start working on “Cursed Talismans“: kill/loot the orcs (#2 on map). While working on this do “Zeth’Gor Must Burn!“: use your quest item Smoke Beacon under these 4 towers below.
05) Mark the Northern Tower 68.67.
06) Mark the Forge Tower 70.69.
07) Mark the Foothill Tower 71.71.
08) Mark the Southern Tower 66.76.
09) Make sure “Cursed Talismans” is finished: kill/loot the orcs (#2 on map).
10) Back NE at Expedition Point turn in “Cursed Talismans” (#3 on map 71.63), accept “Warlord of the Bleeding Hollow“.
11) At Expedition Point turn in “Zeth’Gor Must Burn!” 71.62.
12) SW at Zeth’Gor, go inside the middle of the barracks and do “Warlord of the Bleeding Hollow“: kill/loot Warlord Morkh 70.77.
13) Back NE at Expedition Point turn in “Warlord of the Bleeding Hollow” (#3 on map 71.63), accept “Return to Honor Hold“.
14) Finish “In Case of Emergency…“: loot 30 Zeppelin Debrisaround the open fields north of Zeth’Gor.

Honor Hold

01) Go north of Honor Hold down The Path of Glory, around 58.50 click on the Trampled Skeletons on the ground. NOTE: Only just do a few along the way to the next quest.
02) Go north up to the ledges just south of the Horde town Thrallmar and do “Laying Waste to the Unwanted“: use your quest item Flaming Torch on the 4 Blade Throwers below:
03) Burn the Eastern Thrower 59.48.
04) Burn the Central Thrower 56.48.
05) Burn the Central Western Thrower 54.48.
06) Burn the Western Thrower 53.48.

Thrallmar Mine

01) Go north (stay on the lower path: watch out for the Horde town Thrallmar) and by the mine entrance accept “Outland Sucks!” 51.30.
02) West at the ravine around 49.38 do “Outland Sucks!“: pick up 6 Shredder parts in those boxes all along the ravine. While doing that start working on “A Job for an Intelligent Man” by killing the Marauding Crust Bursters (they pop out of the ground). Also the Marauding Crust Bursters has a chance to drop an Eroded Leather Case, which starts “Missing Missive“, accept it if you can find it (we will have more chances later to find this).
03) Back by the mine entrance, turn in “Outland Sucks!” (51.30, #1 on map), accept “How to Serve Goblins“.
04) Do “How to Serve Goblins“: save these 3 NPCs by clicking on their cages (and continue working on “A Job for an Intelligent Man” while doing these):
05) Save Manni 45.41 .
06) Save Moh 46.45 .
07) Save Jakk 47.47 .
08) Back by the mine entrance, turn in “How to Serve Goblins” (51.30, #1 on map), accept “Shizz Work“.
09) Do “Shizz Work“: first use your Felhound Whistle quest item at the quest giver to summon a fel hound, then just north of you around 50.30 kill Deranged Helboars and then loot their poop until you get the key.
10) Back by the mine entrance, turn in “Shizz Work” (51.30, #1 on map), accept “Beneath Thrallmar“.
11) Enter Thrallmar Mine next to you and do “Beneath Thrallmar“: keep right in the mine and at the end of it kill Urga’zz /target 54.32.
12) Leave the mine and just outside of it turn in “Beneath Thrallmar” (51.30, #1 on map).
13) Go south and down to The Path of Glory around 52.51 finish “The Path of Glory“: click on the Trampled Skeletons on the ground. NOTE: The click range is about 15 yards.

Honor Hold

01) Go south to the broken tower and turn in “Laying Waste to the Unwanted” 51.62.
02) Inside the tower turn in “Unyielding Souls” 51.60, accept “Looking to the Leadership“.
03) In the Honor Hold Mine (entrance at 52.62) finish (if you still need to) “When This Mine’s a-Rockin“: kill 12 Gan’arg Sappers inside the mine.
04) Back outside the mine turn in “When This Mine’s a-Rockin” (#3 on map 52.63), accept “The Mastermind“.
05) Inside the Honor Hold Mine next to you do “The Mastermind“: kill Z’kral /target, he patrols around the center of the mine counter-clockwise 55.63.
06) Back outside the mine turn in “The Mastermind” (#3 on map 52.63).
07) West of Honor Hold finish “A Job for an Intelligent Man“: kill 15 Marauding Crust Bursters (they pop out of the ground). Also keep kill/looting the Marauding Crust Bursters until one drops an Eroded Leather Case, which starts “Missing Missive“, accept it (if you haven’t yet).
08) At the Honor Hold Mine entrance turn in “A Job for an Intelligent Man” (#3 on map 52.63).
09) Go south and do “Looking to the Leadership“: kill Arch Mage Xintor /target (male human wizard 54.81). 
10) Kill Lieutenant Commander Thalvos /target (male dwarf 55.84).
11) Use Hearthstone to teleport to Honor Hold.
12) Inside the Inn turn in “An Old Gift” 54.64.
13) Upstairs in the Inn turn in “Return to Honor Hold“. Accept “Fel Spirits” and “Digging for Prayer Beads“.
14) Outside behind the Inn do “Digging for Prayer Beads“: loot Fei Fei’s Cache (dirt mound, 54.63). If the mound is NOT there, that means that you must do the following to make it appear there: In such case go upstairs in the inn and purchase a Silken Thread from the Tailoring Trainer, go down outside to Warrant Officer Tracy Proudwell /target 56.63 (She’s the one that gives the daily PvP quest), click the marks to redeem, and buy the Fei Fei Doggy Treat, and feed it to the dog Fei Fei /target right next to you there. Then go back (outside behind the Inn 54.63 ), and in a few minutes or so the mound behind the inn will spawn, loot it.
15) Around 45.75 do “Fel Spirits“: use your quest item Anchorite Relic on the ground in this area. A blue beam will hit the Shattered Hand Berserkers that are close by. Kill these mobs, then kill 10 Fel Spirits that spawns.

Zeppelin Crash

01) Go east to the Zeppelin Crash and turn in “In Case of Emergency…” 49.75, accept “Voidwalkers Gone Wild“.
02) Go south to The Warp Fields around 47.82 and do “Voidwalkers Gone Wild“: kill/loot the Voidwalkers in the area.
03) Go SW to Razorthorn Trail (starting around 41.84) and do “Ravager Egg Roundup“: kill/loot the Razorfang Ravagers (the bigger ravager mobs). You can also find the Eggs from ground pick-ups.
04) Back NE at the Zeppelin Crash (49.75, #1 on map) turn in “Voidwalkers Gone Wild” and “Ravager Egg Roundup“, accept “Helboar, the Other White Meat“.
05) Just to the east and do “Helboar, the Other White Meat“: kill/loot the Helboars, then use the Purification Mixturequest item to purify the Tainted Helboar Meat.
06) Back at the Zeppelin Crash (49.75, #1 on map) turn in “Helboar, the Other White Meat“, accept “Smooth as Butter“.
07) Go east to Valley of Bones (area just below Honor Hold, around 59.70) and do “Smooth as Butter“: kill/loot Bonestripper Buzzards.

Honor Hold

01) Use Hearthstone (if you can), then go upstairs in the Inn 54.64 and turn in “Fel Spirits” and (if you did it) “Digging for Prayer Beads“. If you turned both in accept “The Exorcism of Colonel Jules“.
02) In the west room next to you do (if you have it) “The Exorcism of Colonel Jules“: talk to Anchorite Barada /target 54.64 to start the ritual. Then use your quest item Ritual Prayer Beadson Anchorite Barada to heal him during the exorcism. Kill the skulls and slimes when they spawn.
03) Back in the next room turn in “The Exorcism of Colonel Jules” 54.64, accept “Trollbane is Lookin for You“.
04) Exit the Inn and go upstairs in the Keep to turn in “The Path of Glory” 57.67, accept “The Temple of Telhamat“. And turn in “Trollbane is Lookin for You“, accept “Drill the Drillmaster“.
05) At the broken tower turn in “Looking to the Leadership” 51.60.
06) GROUP with 2+ players to do “Drill the Drillmaster“: kill Drillmaster Zurok /target, lvl 62 Elite orc 48.56 .
07) Go south to the Zeppelin Crash and turn in “Smooth as Butter” 49.75.
08) Head west to the small alliance camp and turn in “The Longbeards” 24.72, accept “The Arakkoa Threat“, “Rampaging Ravagers” and (next to you) “Gaining Mirren’s Trust“. With the item we obtained earlier at Blasted Lands / Nethergarde Keep (very first step in this guide), turn in “Gaining Mirren’s Trust“, accept “The Finest Down“.
09) Go down into the Den of Haal’esh around 26.74 and do “The Arakkoa Threat” along with “The Finest Down“: kill 4 Haal’eshiWindwalkers and 6 Talonguards (arakkoa mobs). Also kill/loot the Kaliri (birds mobs); you can spawn these by clicking on the Kaliri Nests. Keep the next 2 steps in mind.
10) At the Den go up the ledges ramp entrance at 25.78 and kill Avruu /target (lvl 63 arakkoa). He is soloable, but hits hard and heals himself so be prepared.  He drops an item which starts, “Avruu’s Orb“, accept it.
11) Go SE and click on the Haal’eshi Altar 29.81. Aeranas(water elemental) will spawn, then attack it until its health gets to around 20%, you will then be able to turn in “Avruu’s Orb“.
12) Go up NW to Dustquill Ravine around 23.69 and do “Rampaging Ravagers“: kill 10 Quillfang Ravagers.
13) South at the small Alliance camp (#8 on map 24.72) turn in “The Arakkoa Threat” and “Rampaging Ravagers” and “The Finest Down“.

Temple of Telhamat

01) Head north to Temple of Telhamat 23.40, make a left at the entrance and accept “Cruel Taskmasters“, “The Rock Flayer Matiarch” and (next to you) “In Search of Sedai“.
02) From Scout Vanura /target who patrols up and down the steps, accept “Deadly Predators” 23.38.
03) Up the steps in the Inn turn in “The Temple of Telhamat” 23.37.  Accept “The Pools of Aggonar” and “Helping the Cenarion Post“.
04) Next to you in the Inn accept “An Ambitious Plan“.
05) Talk to the Innkeeper /target next to you to make Temple of Telhamat your new home.
06) East in town get the Flight Path from the Hippogryph Master25.37.
07) Turn in “In Search of Sedai” 27.37, accept “Return to Obadei“.
08) Back in Temple of Telhamat (#1 on map 23.40) , make a left at the entrance and turn in “Return to Obadei“.
09) Next to you accept “Makuru’s Vengeance” 23.40.
10) Go NE up to Mag’har Grounds (ramp entrance at 30.33) and do “Makuru’s Vengeance“: kill/loot Mag’har Grunts or Debilitated Mag’har Grunts.
11) Go east to Pools of Aggonar drop shortcut at 36.37 and do “The Pools of Aggonar” along with “The Heart of Darkness“: kill 10 Terrorfiends and 6 Blistering Rots.

GROUP QUESTS

01) GROUP with 3/4+ Players: NE in Pools of Aggonar do “Overlord“: kill Arazzius the Cruel (lvl 63 elite big reddish demon at 44.32). NOTE: You will return back to this area at the end of the next section.
02)  Down the ravine in the middle of Hellfire Peninsula do “Drill the Drillmaster“: kill Drillmaster Zurok /target, lvl 62 Elite orc 48.56 ).
03)  South at The Great Fissure, in the cave (entrance at  34.64) do “The Rock Flayer Matiarch“: kill/loot Blacktalon the Savage /target (at the end of the cave).  

01) While here do “Deadly Predators“: kill 8 Stonescythe Whelps and 4 Alphas. NOTE: The Whelps are on the ground, and the Alphas are walking around on hills and mountains.
02) Go SE to The Warp Fields around 49.82 and do “An Ambitious Plan“: use your quest item Sanctified Crystal on an Uncontrolled Voidwalker /target when it’s almost dead. Then click on the Glowing Crystal when it appears.
03) Go north to Honor Hold and up in the Keep turn in “The Heart of Darkness” 57.66.
04) Next to you, turn in (if you did any of them) “Overlord” and “Drill the Drillmaster“.
05) Use Hearthstone to teleport to Temple of Telhamat. If you can’t do it, then go to the Gryphon Master /target 55.62 and fly to Temple of Telhamat.
06) At Temple of Telhamat, in the Inn turn in “An Ambitious Plan” 23.37. Next to you turn in “The Pools of Aggonar“, accept “Cleansing the Waters“.
07) From Scout Vanura /target who patrols up and down the steps, turn in “Deadly Predators” 23.38.
08) Go down the steps and turn in “Makuru’s Vengeance” 23.40. Also turn in next to you (if you did it) “The Rock Flayer Matriarch“.
09) Wait a few seconds, then next to you accept “Atonement” 23.40.
10) Back up the steps in the Inn turn in “Atonement” (#6 on map 23.37), accept “Sha’naar Relics“.
11) Go back east to Pools of Aggonar and do “Cleansing the Waters“: use your quest item Cleansing Vial at the base of the giant skeleton 40.30. Then, kill Aggonis.

Cenarion Post

01) Use Hearthstone (if you can), then/or go SW to Cenarion Post 16.52 and turn in all quests and accept new ones: Turn in “Missing Missive” and “Helping the Cenarion Post“, accept “Demonic Contamination“. And accept “Colossal Menace“, “Keep Thornfang Hill Clear!” and “The Cenarion Expedition“.
02) Just to the east of you around 18.55 do “Demonic Contamination“: kill/loot the Hulking Helboars.
03) Back west at Cenarion Post (16.52, #1 on map) turn in “Demonic Contamination“, accept “Testing the Antidote“.
04) Go back just to the east of you (around 18.55, #2 on map) do “Testing the Antidote“: just use the Cenarion Antidote quest item on a Hulking Helboar then kill the mob.
05) Back at Cenarion Post (16.52, #1 on map) turn in “Testing the Antidote“.
06) Go west to Thornfang Hill around 10.52 and do “Keep Thornfang Hill Clear!“: kill 8 Thornfang Ravagers and 8 Venomspitters.
07) Back east at Cenarion Post (16.52, #1 on map) turn in “Keep Thornfang Hill Clear!“.
08) Go north to Fallen Sky Ridge around 15.47 and try to kill at least one Raging Colossus (lvl 63 Elite giant), so that the Crimson Crystal Shard item drops, which starts “Crimson Crystal Clue“, accept it. It’s highly recommended to be done, cause this quests chain gives good experience and items.
09) Back south at Cenarion Post (16.52, #1 on map) turn in “Crimson Crystal Clue“, accept “The Earthbinder“.
10) Next to you at the top of the hill turn in “The Earthbinder” 16.52. Once the NPC walks down the hill and spawns a giant, kill it, then accept “Natural Remedies“.
11) GROUP with 2+ Players: Do “Natural Remedies” along with finishing up “Colossal Menace“: up north at Fallen Sky Ridge (around 14.44, #8 on map) kill 4 more Raging Colossus and use the Seed of Revitalization quest item at the green circle (at 14.39, #11 on map), then kill Goliathon (a red lvl 63 elite giant) once he spawns in.  
12) Back south at Cenarion Post (16.52, #1 on map) turn in (if you did any of them) “Natural Remedies” and “Colossal Menace“.

Ruins of Sha’naar

01) NOTE: While doing this section watch out for all the mobs and even the elite one walking around and start working on “Sha’naar Relics” by looting the Sha’naar Relics from the ground.
02) Go west to Ruins of Sha’naar and accept “Naladu” (in the hut, 16.59).
03) Work your way deeper in the ruins and in the hut turn in “Naladu” 16.65, accept “A Traitor Among Us“.
04) Just NW of you do “A Traitor Among Us“: loot the Metal Coffer (chest) in the hut 14.63.
05) Back at Naladu (in the hut 16.65 , #3 on map), turn in “A Traitor Among Us“, accept “The Dreghood Elders“.
06) Around the ruins do “The Dreghood Elders“: talk to and free these 3 NPCs.
07) Talk to and Free Morod the Windstirrer (in the hut, 13.61).
08) Talk to and Free Akoru the Firecaller (in the hut, 16.59, #2 on map).
09) Talk to and Free Aylaan the Waterwaker (in the hut, 13.58).
10) Back at Naladu (in the hut 16.65, #3 on map), turn in “The Dreghood Elders“, accept “Arzeth’s Demise“.
11) Do “Arzeth’s Demise“: use the Staff of the Dreghood Elders quest item on Arzeth the Merciless (the big blue elite demon, he patrols) to weaken him, then kill him.
12) Back at Naladu (in the hut 16.65, #3 on map), turn in “Arzeth’s Demise“.
13) Around the ruins finish up “Cruel Taskmasters” and “Sha’naar Relics“: kill 4 Illidari Taskmasters (the blue demons) and loot 10 Sha’naar Relics from the ground.

Temple of Telhamat

01) Use Hearthstone to Temple of Telhamat.
02) In the Inn 23.37 turn in “Cleansing the Waters” and “Sha’naar Relics“, accept “The Seer’s Relic“.
03) Just east drop down and do “The Seer’s Relic“: use the Seer’s Relic quest item on Sedai’s Corpse 27.37 , then wait until the quest completes.
04) Go back into Temple of Telhamat, make a left and turn in “Cruel Taskmasters” 23.40.
05) Up the steps in the Inn turn in “The Seer’s Relic” (#2 on map 23.37).
06) Hellfire Peninsula is Finished! NOTE:  You can safely abandon any quests in Hellfire Peninsula that you didn’t do. Make sure you keep “The Cenarion Expedition“. You can also come back and solo the Elite group quests yourself at like level 65+ if you like.
07) Head west on the main path to get to Zangarmarsh…

New World Overview and Gameplay Mechanics

Would you like to know how to play New World MMORPG and level up quickly? We have been waiting for months for the release date, September 28, and finally we are very close to it. New World is based all around PVP system, so this is a number one thing to stay ahead of others to survive and not to lose speed.

There are three things to level up in New World: your character’s base stats, weapon skills, and trade skills. Of course, each of them has own and individual way how to level, but if you are not familiar with game mechanics and basic elements, it may slow you down dramatically.

Not to lose time at the start, you are at the right place to get acquainted with all those mentioned above. In this guide you find how acquire XP, level up trade skills and weapon mastery. No doubts, it will let you know to access raid content, called “Expeditions” way faster than others.

NEW WORLD LEVELING Mechanics

Every time you level up, you can put a point into one of five stats. In the end there are a total of 71 points you can acquire while leveling. In-game items you equip also add points while you are using them. As extra, there are item socket slots where you are able to put gem stones to increase your attribute stats.

Make sure to put points into attributes to improve your main attack method. For example, melee weapons increase their attack power if you skill up your strength, magic by focus, and ranged weapons by dexterity.

Here are a list of New World attributes and what they increase:

  • Constitution: increases health points
  • Dexterity: increases ranged weapon damage
  • Focus: increases mana and reduces cooldown time
  • Intelligence: increases magic attack power
  • Strength: increase melee weapon damage

NEW WORLD LEVELING TIPS

Here are some New World leveling tips:

  • Any time you leave the game and log off, leave your character in a settlement: you earn rested XP bonus meanwhile
  • Quests you can find in the Town Project Board is the best way to level up. Sometimes you can buy items in the auction shop to complete quests and save time
  • Build your own town standing and increase possible amount of XP you can gain in the area to receive a bonus for XP rewards completing quests
  • Pick up secondary quests along the way while doing main quest chain. It will not take much time.
  • Hit a monster if some other player is fighting it to gain extra XP and increase weapon mastery. Other players still get XP and weapon mastery while killing them, so you are not stealing anything from them
  • You can take up 12 town missions at a time. It will give you enough XP, coins, and reputation.
  • Completing faction quests from your chosen New World faction representative in every town provides you with some XP as well. Besides, faction missions scale with your current zone, so higher-level zones give you more XP.
  • You can get bonus XP from faction quests if there are any daily events available in the faction board (it is displayed at the top of the screen when talking to your faction’s NPC).
  • Finding travel shrines will help you to move to different regions quickly. Also, consider having a home in a separate town from the inn you use will let you travel faster.
  • If you are leveling up trade skills along, you also get some amount of XP
  • Your weapons level up separately from your character level, and PVP is the best way to get experience and learn new skills.

NEW WORLD LEVELING REWARDS

You access new modes, quests, and item slots whenever you reach a particular level. Here is a list of New World leveling rewards:

  • Level 5: second weapon available and survivalist quest (camp tier upgrade)
  • Level 10: duels and first bag slot
  • Level 15: first house, third consumable slot, and survivalist quest (camp tier upgrade)
  • Level 20: ring slot available and main story quest (Azoth Staff tier one)
  • Level 25: fourth consumable slot and survivalist quest (camp tier upgrade)
  • Level 30: second bag slot and main story quest (Azoth Staff tier two)
  • Level 35: second house
  • Level 40: earring slot available, survivalist quest (camp tier upgrade), and main story quest (Azoth Staff tier three)
  • Level 45: third bag slot
  • Level 50: invasions
  • Level 55: third house and survivalist quest (camp tier upgrade)
  • Level 60: outpost rush

TERRITORIES

You can also get a tip of which zones you can safely travel to by checking leveling rewards screen:

  • Level 5+: Firstlight, Everfall, Monarch’s Bluffs, and Windsward
  • Level 25+: Brightwood and Cutlass Keys
  • Level 30+: Weaver’s Fen
  • Level 40+: Restless Shore and Great Cleave
  • Level 45+: Mourningdale
  • Level 50+: Edengrove and Ebonscale
  • Level 60+: Reekwater and Shattered Mountain

HOW TO LEVEL UP TRADE SKILLS

Every trade skill requires a specific action to increase its XP level. For example, crafting skills need you to make items using an appropriate facility in towns. Same way refining skills need you to turn raw reagents into valuable crafting items. Crafting and refining trade skills level up quicker than gathering skills.

CRAFTING

Making new weapons and armor pieces requires lots of reagents. To get back some of the materials you already used, immediately salvage all items you craft.

  • Weaponsmithing – craft weapons at a forge
  • Armoring – craft armor at an outfitting station or a forge
  • Engineering – craft engineering items in a workshop or forge
  • Jewelcrafting – craft amulets and other jewellery at an outfitting station
  • Arcana – craft items and potions at an arcane repository
  • Cooking – cook food or ingredient in a kitchen or a camp place
  • Furnishing – craft furnishing items in a workshop

REFINING

  • Smelting – smelt ores into bars or turn wood into charcoal
  • Woodworking – turn green wood into timber in a woodshop
  • Leatherworking – turn raw hides into leather in a tannery
  • Weaving – turn fibres into linen at any loom
  • Stonecutting – turn mined minerals into blocks at a stonecutting table

GATHERING

To gather reagents and materials you only need basic flint/wood tier-one tools, higher tier tools you craft with iron or made of wood will improve whole process to make it faster. Good thing to know, the size of the resource you collect has an influence on how much XP you receive for that gathering skill. For example, chopping a thick tree gives you more XP than chopping down a thinner one. For fishing you can use lures applied to your fishing pole to improve fish bites.

How you can level up New World gathering trade skills:

  • Logging – use a logging axe to chop wood
  • Mining – use a mining pick to mine veins
  • Fishing – use a fishing pole at any water pond
  • Harvesting – gather herbs from any farm or land location
  • Tracking & Skinning – slain and skin animals

WoW TBC Classic: 12-20 Alliance Leveling Guide (Bloodmyst Isle)

Kessel’s Crossing

01) Once you enter Bloodmyst Isle, accept “A Favorite Treat” 63.89.
02) Next to you turn in “Elekks Are Serious Business” 63.88 . Accept “Alien Predators“. And next to you accept “The Kessel Run“.
03) Do “The Kessel Run“: talk to the follow 3 NPCs below at Azuremyst Isle. NOTE: You will get a 100% mount to do this quest but there is a timer of 15 minutes.  If done quickly you should be able to do this in about 6 minutes.
04) Talk to High Chief Stillpine /target at Stillpine Hold 47.21.
05) Talk to Exarch Menelaous /target at Azure Watch 47.51.
06) Talk to Admiral Odesyus /target at Odesyus’ Landing 47.70.
07) Return to Kessel’s Crossing in Bloodmyst Isle and turn in “The Kessel Run” (#1 on map 63.88), accept “Declaration of Power“.

Blood Watch

01) Go north into Blood Watch, make a right into the Inn and make Blood Watch your new home. Also accept “Beds, Bandages, and Beyond“.
02) Make a right out of the Inn and from the Wanted Poster accept “WANTED: Deathclaw” 55.59.
03) Accept “Catch and Release” 53.58.
04) At the building 53.53, accept “What Argus Means to Me“. And next to you accept “Learning from the Crystals“.
05) In the middle of the town turn in “What Argus Means to Me” 55.55, accept “Blood Watch“. Also accept (if you are level 13) “Irradiated Crystal Shards“. 
NOTE: “Irradiated Crystal Shards” suppose to kill/looting almost any mob in Bloodmyst Isle. You can also start collecting the shards without accepting the quest.
06) Turn in “Beds, Bandages, and Beyond” to the Hippogryph Master 58.54, SKIP “On the Wings of a Hippogryph” (for now).
07) Accept “Mac’Aree Mushroom Menagerie” 56.57.

01) Just SE of Blood Watch do part of “Mac’Aree Mushroom Menagerie“: loot a Blood Mushroom. Look for them under the trees, grinding to 64.61.
02) At the blood river you can do part of “Mac’Aree Mushroom Menagerie“: try to loot a Aquatic Stinkhorn. It can spawns at 64.62 . If not we will try again later.
03) Go to Wrathscale Lair and do “Declaration of Power“: kill Lord Xiz /target (lvl 13 naga at the temple 69.68) then use the Draenei Banner quest item on his corpse. Do the next step around.
04) Loot a Ruinous Polyspore for “Mac’Aree Mushroom Menagerie“: here is most of the possible spawns: 69.65, 68.67, 67.70, 69.72 .
05) If you still need part of “Mac’Aree Mushroom Menagerie“: loot a Aquatic Stinkhorn (#2 on map).
Try these possible spawns: 61.68, 58.73, 57.76, 57.79, 55.82 . NOTE: The Stinkhorn Striker (fishes) can drop this shroom as well.
06) Around Kessel’s Crossing do “A Favorite Treat” along with “Alien Predators“: loot 10 Sand Pears. And kill 10 Bloodmyst Hatchlings (these are found mostly west of the path around Kessel’s Crossing). 
07) Just NW of Kessel’s Crossing do “Learning from the Crystals“: use your quest item Crystal Mining Pick at the Impact Site Crystal (red crystal 58.83).
08) Turn in “A Favorite Treat” 63.89 .
09) Also turn in “Alien Predators” and “Declaration of Power“, accept “Report to Exarch Admetius“.
10) Go west and do the last part of “Mac’Aree Mushroom Menagerie“: loot a Fel Cone Fungus. Try these possible spawns: 44.82, 43.81, 41.80, 43.84, 44.86 .
11) Go south to Blacksilt Shore around 44.94 and do “Catch and Release“: use your quest item Murloc Tagger on 6 Blacksilt Scouts /target (purple colored murlocs). NOTE: The range for the quest item is about 30 yards.

01) Use Hearthstone (or die on purpose and ressurect at spirit) to Blood Watch.
02) Turn in “Catch and Release” 53.58, accept “Victims of Corruption“.
03) In the building NW in town 53.53 turn in “Report to Exarch Admetius” and “Learning from the Crystals“, accept “The Missing Survey Team“.
04) Accept “Know Thine Enemy” 55.58.
05) Turn in “Mac’Aree Mushroom Menagerie” 56.57.
06) In the middle of the town accept (if you haven’t yet, you should be lvl 13 by now) “Irradiated Crystal Shards” 55.55 . 
REMINDER: “Irradiated Crystal Shards” involves kill/looting almost any mob in Bloodmyst Isle and will naturally get done by doing the other quests at the same time. You may already have enough to turn this in. Turn these in as you get them.
07) NE in town by the Forge accept “Explorers’ League, Is That Something for Gnomes?” 56.54.
08) At Ruins of Loreth’ Aran turn in “The Missing Survey Team” 61.48, accept “Salvaging the Data“.
09) Nearby Ruins of Loreth’ Aran do “Salvaging the Data“: kill/loot the Wrathscale naga until you get the Survey Data Crystal.
10) Use Hearthstone (or go back SW) to Blood Watch, and in the building NW in town turn in “Salvaging the Data” (#3 on map 53.53), accept “The Second Sample“.
11) If you are level 14: East in town accept “Constrictor Vines” and “The Bear Necessities” (#5 on map 56.57). NOTE:  If you were able to accept this now then keep in mind to kill/loot any Elder Brown Bears and Mutated Constrictors (pink flowers) you see on your way.
12) Go west to Bladewood and do “The Second Sample“: use your Crystal Mining Pick quest item at the Altered Bloodmyst Crystal 46.48.
13) While here complete “Blood Watch“: kill 10 Sunhawk Spies.
14) Go SW to Nazzivian and do “Know Thine Enemy“: loot the Nazzivus Monument Glyphs (wall plaque 37.71). Keep the next step in mind.
15) At Nazzivian see if you can find and then kill/loot Tzerak /target. This felguard demon spawns at 38.82 then walks north to where the wall plaque is at with the previous step. When he is summoned he yells “Fools! Weaklings! Tzerak has no need of your assistance!”. If you can find/kill/loot him, he drops an item that starts “Signs of the Legion“, accept and then do it by killing 8 Nazzivus Satyr /target and 8 Nazzivus Felsworn /target around Nazzivian. Keep the next step in mind.
16) At Nazzivian do “Victims of Corruption” kill/loot the Corrupted Treants. There is a few of these mob spawns around the red crystal tree around 36.75.
17) Grinding to Middenvale  50.74 and finish “Victims of Corruption“: kill/loot Corrupted Treants.
18) Use Hearthstone (or go back) NE to Blood Watch and turn in “Victims of Corruption” (#2 on map 53.58).
19) Turn in “Know Thine Enemy” (#4 on map 55.58). Wait a few seconds then accept “Containing the Threat“. Also turn in (if you did it) “Signs of the Legion“.
20) Near you accept (if you haven’t yet) “Constrictor Vines” and “The Bear Necessities” (#5 on map 56.57).
21) Turn in “Blood Watch” (#6 on map 55.55). Accept “Intercepting the Message“. Also turn in (if its finished) “Irradiated Crystal Shards“. NOTE: “More Irradiated Crystal Shards” is a repeatable quest for a buff item only, no XP.
22) In the building NW in town turn in “The Second Sample” (#3 on map 53.53), accept “The Final Sample“.

01) Start doing “The Bear Necessities” along with “Constrictor Vines” by kill/looting Elder Brown Bears and Mutated Constrictors (pink flowers) you may come across.
02) Go NW to Bladewood around 49.48 and do “Intercepting the Message“: kill/loot the Sunhawk blood elves until you get the Sunhawk Missive (5% drop rate). NOTE: If you run out of mobs to kill you can go SW to The cryo-Core around 40.60 and kill/loot the Sunhawk Reclaimers (they are a few levels higher though).
03) At Axxarienand do “Containing the Threat“: kill 5 Axxarien Shadowstalkers, 5 Hellcallers, loot 5 Corrupted Crystals and kill Zevrax (purple satyr standing at 42.30). 
04) Also at Axxarien do “The Final Sample“: use your Crystal Mining Pick quest item at the Axxarien Crystal (big red crystal 41.30).
05) Go west and do “WANTED: Deathclaw“: kill/loot Deathclaw /target. This lvl 17 bear patrols around 37.30.
06) Go NE to The Bloodwash and under the large turtle shell turn in “Explorers’ League, Is That Something for Gnomes?” 42.21. Accept “Pilfered Equipment” and “Artifacts of the Blacksilt“. NOTE:  You can get get restocked at this NPC.
07) Along the shore do “Pilfered Equipment” with “Artifacts of the Blacksilt“: loot Clopper’s Equipment. This box has 4 possible spawn locations around the murloc huts: 40.20, 38.22, 44.22, 46.20 . Also kill/loot the Blacksilt Seers for the 3 Idols and kill/loot Blacksilt Warriors and Blacksilt Shorestrikers for the 6 Knives.
08) Return to the shell (#6 on map 42.21 ) and turn in “Pilfered Equipment“. Also turn in “Artifacts of the Blacksilt“. Turning this in rewards you an item that starts “A Map to Where?“, accept it.
09) Finish “Constrictor Vines“: kill/loot Mutated Constrictors (pink flowers). These are #1 on map. Finish this as you go back to Blood Watch.

01) At Blood Watch, In the middle of town turn in “Intercepting the Message” 55.55, accept “Translations…“. 
ALSO: While at Blood Watch keep an eye out for Messenger Hermesius /target, he patrols around the town, from him accept/complete “Urgent Delivery“.
02) Turn in “Translations…” 54.54, accept “Audience with the Prophet“.
03) In the building NW at Blood Watch 53.53 turn in “The Final Sample” and “WANTED: Deathclaw“. IF you are level 16 accept “Talk to the Hand“.
04) IF you are level 16: SW in town accept “The Missing Expedition” 53.57.
05) Take “Searching for Galaen” 53.58.
06) Turn in “Containing the Threat” 55.58.
07) SE in town 56.57 turn in “Constrictor Vines” and (if you did it) “The Bear Necessities“. Accept “Culling the Flutterers“.
08) East in town accept “Ysera’s Tears” 56.57.
09) You should have found Messenger Hermesius /target  by now, he patrols around the town, from him accept/complete (if you haven’t yet) “Urgent Delivery“.  Then stop at the Mailbox (by the Inn 55.59) and retrieve the Admiral Odesyus letter, from it accept “The Bloodcurse Legacy“.
10) Grind to Ruins of Loreth’Aran and up in the old temple, from the Battered Ancient Book on the ground 61.42, turn in “A Map to Where?“, accept “Deciphering the Book“.
11) Go NE to the southern edge of Wyrmscar Island and accept “Restoring Sanctity” patrols around 75.34.
12) At the Ragefeather Ridge do “Restoring Sanctity“: loot 8 Dragon Bones from the ground.
13) Back east at the southern edge of Wyrmscar Island turn in “Restoring Sanctity” (#11 on map patrols around 75.34). Accept “Into the Dream“.
14) On the Island do “Into the Dream” along with “Ysera’s Tears“: kill 5 Veridian Whelps and 5 Broodlings. Also loot 2 Ysera’s Tears (green mushrooms) from the ground, here are some possible locations: 70.26, 68.22, 72.12, 75.16, 77.22 .
15) Eastside turn in “The Bloodcurse Legacy” 79.23, accept “The Bloodcursed Naga“.
16) In the sea 81.23 do “The Bloodcursed Naga“: kill 10 Bloodcursed Naga. NOTE: Accepting this quests gives you a swim speed & water breathing buff that has a 20 minute timer. You can always go back to the quest giver to obtain it again and replenish the 20 minute timer for it if you need to.
17) Back at the eastern side of Wyrmscar Island turn in “The Bloodcursed Naga” (#15 on map 79.23), accept “The Hopeless Ones…“.
18) Again in the sea do “The Hopeless Ones…“: kill/loot Bloodcursed Voyager /target. These neutral male humans are down at the sea floor.
19) Talk to Captain Edward Hanes (#15 on map 79.23) to buff you again (you will not be able to obtain it again). Then turn in “The Hopeless Ones…“, accept “Ending the Bloodcurse“.
20) Swim SE to Bloodcurse Isle (entrance at 83.49).
21) Follow the path up the hill then do “Ending the Bloodcurse“: click on the Statue of Queen Azshara 86.54 then kill Atoph the Bloodcursed.
22) Swim to the southern edge of Wyrmscar Island and turn in “Into the Dream” (#11 on map patrols around 75.34 ).
23) Go NE to the eastern side of Wyrmscar Island and turn in “Ending the Bloodcurse” (#15 on map 79.23).
24) Die on purpose and ressurect at spirit.
25) At the east side of town turn in “Ysera’s Tears” 56.57.
26) In the middle of town, from the First Aid Trainer /target 55.54, turn in “Deciphering the Book“.
27) Accept (if you haven’t yet) “Talk to the Hand” in the building NW in town (#3 on map 53.53).
28) Back at the  First Aid Trainer /target  in the middle of town accept “Nolkai’s Words” 55.54.
29) Up NE in town, from the Hippogryph Master /target 58.54 accept “On the Wings of a Hippogryph” (no exclamation mark). Then have him fly you to The Exodar.

The Exodar

01) Enter The Exodar (entrance at 33.44 in Azuremyst Isle).
02) In The Exodar go to Seat of the Naaru and turn in “On the Wings of a Hippogryph” 57.50, SKIP “Hippogryph Master Stephanos“.
03) Go to The Vault of Lights and turn in “Audience with the Prophet” 33.54, accept “Truth or Fiction“.
(GET NEW CLASS ABILITIES) Find your class trainer to learn new spells/abilities. You can find an Exodar Peacekeeper /target to find your class trainer.
04) NOTE: One thing that can be done in the city is to learn new weapon abilities at the Weapon Master /target up at Trader’s Tier 53.86. You can learn Daggers or Two-Handed Swords from him.
05) Use Hearthstone to Blood Watch.

Blood Watch

01) In the middle of town turn in “Truth or Fiction” 55.55, accept “I Shoot Magic Into the Darkness“.
02) Go NE to Ruins of Loreth’Aran and from the Mound of Dirt 61.50 turn in “Nolkai’s Words“.
03) Start doing “Culling the Flutterers” by killing any Royal Blue Flutterer (blue moths) you see along the way.
04) Go north to The Warp Piston 52.22 and do “I Shoot Magic Into the Darkness“: kill 5 Void Anomaly.
05) Use Hearthstone (or run back) to Blood Watch and in the middle of the town turn in “I Shoot Magic Into the Darkness” (#1 on map 55.55). Then next to you accept “The Cryo-Core“.
06) Go west to The Cryo-Core and inside the building turn in “Searching for Galaen” 37.61, accept “Galaen’s Fate“. And next to you from Galaen’s Journal on the ground accept “Galaen’s Journal – The Fate of Vindicator Saruan“.
07) Around The Cryo-Core do “Galaen’s Fate” along with “The Cryo-Core“: keep kill/looting Sunhawk Reclaimers until you get Galaen’s Amulet (5% drop rate) along with the 12 Medical Supplies. NOTE:  The Medical Supplies can also be found in containers around the area.
08) Use Hearthstone (or go back) to the SW part of Blood Watch and turn in “Galaen’s Fate” 53.58.
09) In the middle of town turn in “The Cryo-Core” and “Galaen’s Journal – The Fate of Vindicator Saruan” (#1 on map 56.55). Accept “Matis the Cruel“.
10) Next to you accept “Don’t Drink the Water“. NOTE: If you are lvl 18, we will cover “What We Know…” later.
11) SE in town turn in (if its finished) “Culling the Flutterers” 56.57.
12) Accept (if you haven’t yet) SW in town “The Missing Expedition” (#8 on map 53.57).

Vindicator’s Rest

01) Try to do “Matis the Cruel“: go west and along the path starting at 41.45 keep an eye out for Matis the Cruel /target (male blood elf on a fiery horse, see patrol path on map). If you see him use your Flare Gun quest item near him to spawn friendly NPCs to tank him then simply get his health down half way to complete the quest. He spawns at 27.52 . If you could not find him yet, then keep an eye out for him while doing this section.
02) Head west to Vindicator’s Rest 31.47 and accept “Fouled Water Spirits” and “Oh, the Tangled Webs They Weave“.
03) Next to you there turn in “Talk to the Hand” 30.46 . Accept “Cutting a Path“. And next to you accept “Critters of the Void“.
04) Start doing “Cutting a Path” along with “Oh, the Tangled Webs They Weave” by killing Enraged Ravagers and Mutated Tanglers (purple flowers) you see along the way.
05) North at The Foul Pool around 29.38 do “Fouled Water Spirits“: kill 6 Fouled Water Spirits. Work your way to the next step while finishing this one.
06) Accept “They’re Alive! Maybe…” 25.34.
07) Go to Amberweb Pass (path entrance at 21.36) and do “The Missing Expedition” along with “They’re Alive! Maybe…“: kill 8 Myst Leechers, 8 Spinners and Zarakh (patrols at the end of Amberweb Pass around 18.38). Also destroy the Webbed Creatures until you have freed 5 researchers. 
TIP: Hitting the webs from a distance will allow you to not need to attack a mob if one comes out.
08) Back at the cliff turn in “They’re Alive! Maybe...” (#6 on map 25.34).
09) Go back to Vindicator’s Rest 31.47 finishing “Cutting a Path” along with “Oh, the Tangled Webs They Weave“: kill 10 Enraged Ravagers and 8 Mutated Tanglers (purple flowers). These are #4 on map.
10) At Vindicator’s Rest (#2 on map 31.47) turn in “Oh, the Tangled Webs They Weave” and “Fouled Water Spirits“.
11) Next to you there turn in “Cutting a Path” 30.46.
12) Finish (if you still need to) “The Bear Necessities” with “Culling the Flutterers“: kill/loot Elder Brown Bears and kill 10 Royal Blue Flutterer (blue moths). 
13) You can try again for “Matis the Cruel” (if you have not done this yet): see if you can find Matis the Cruel (male blood elf on a firey horse, his patrol path is #1 on map). If you see him use your Flare Gun quest item near him to spawn friendly NPCs to tank him then simply get his health down half way to complete the quest. If you could not find him yet, then it can be skipped or tried again later (but my guide wont mention it again).
14) Go to The Bloodwash’s waterfall and do “Don’t Drink the Water“: use your Water Sample Flask quest item at the bottom of the waterfall 34.34.

01) Hearth to Blood Watch.
02) East in town turn in (if you still need to) “The Bear Necessities” and “Culling the Flutterers” 56.57.
03) In the middle of town 55.55 turn in “Don’t Drink the Water” (accept “Limits of Physical Exhaustion“) and (if you did it) “Matis the Cruel“. Also accept “What We Know…
04) In the building NW in town turn in “What We Know…” 53.53, accept “What We Don’t Know…“.
05) Do “What We Don’t Know…“: talk to the Captured Sunhawk Agent to get disguised as a blood elf, go in the cage at Blood Watch 54.54.
06) Back in the building NW in town turn in “What We Don’t Know…” (#4 on map 53.53), accept “Vindicator’s Rest“.
07) SW in town turn in “The Missing Expedition” 53.57.
08) Go to 21.62 and do “Limits of Physical Exhaustion” along with “Critters of the Void“: kill 10 Sunhawk Pyromancers and 10 Defenders. Also kill 12 Void Critters (tiny low level demons around actual #8 on map).
09) Use Hearthstone (or run back) to Blood Watch and in the middle of town turn in “Limits of Physical Exhaustion” (#3 on map 56.55), accept “The Sun Gate“.  Also turn in “Critters of the Void“.
10) Head back west just south of The Vector Coil around 20.64 and do “The Sun Gate“: click on the 4 Sunhawk Portal Controllers (purple diamonds) next to the lake. Then go in the lake and click on the The Sun Gate. This is around actual #8 on map.
11) Head NE to Vindicator’s Rest and turn in “Vindicator’s Rest” 31.47.

Group Quests

01)  The quests below require to have 2+ Players for each of these quests. If you can’t find a party, just skipю
02) At Vindicator’s Rest accept “Clearing the Way” and next to you accept and do the escort “Ending Their World” 31.47. If Demolitionist Legoso (escortee) /target is not there means someone else is currently doing the escort. NOTE: Legoso is a beefy NPC, so let him do most of the tanking while you stay the distance and either heal or provide some DPS for him. If you are careful enough this can be soloed.
03) At The Vector Coil around 22.54 finish “Clearing the Way“: kill 8 Sunhawk Agents and 8 Saboteurs.
04) Back east at Vindicator’s Rest turn in “Clearing the Way” 31.47.
05) Use Hearthstone (or run back) to Blood Watch and in the building NW in town turn in (if you did it) “Ending Their World” 53.53, accept “The Unwritten Prophecy“.
06) In the middle of town turn in “The Sun Gate” 56.55.
07) At the Island accept “Razormaw” 75.34.
08) Go to the mountain entrance at 72.26.
09) Go to the top of the mountain and do “Razormaw“: click on the Ever-burning Pyre 73.21 and then kill Razormaw (lvl 20 Elite undead dragon) when he comes down. With good skill, most classes could solo this.
10) Back at the southern edge of Wyrmscar Island turn in “Razormaw” (#7 on map 75.34).

Finishing Bloodmyst Isle

01) At this point make sure you are level 20. Keep grinding on any mobs until you are.
02) Use Hearthstone or go to Blood Watch and accept “Newfound Allies” 55.54.
03) In the middle of town turn in (if you haven’t yet) “The Sun Gate” 55.55 . Also turn in any remaining Irradiated Crystal Shards in for “More Irradiated Crystal Shards“.
04) Bloodmyst Isle is now FINISHED! You can abandon any quests you did not do for Bloodmyst Isle (EXCEPT for “Newfound Allies” and “The Unwritten Prophecy” if you have them).
05) Up NE in town, have the Hippogryph Master 58.54 fly you to The Exodar.

The Exodar

01) Enter The Exodar (entrance at 33.44 in Azuremyst Isle).
02) (IF YOU HAVE IT): Go to The Vault of Lights and turn in “The Unwritten Prophecy” 33.54.
(GET NEW CLASS ABILITIES) Find your class trainer to learn new lvl 20 spells/abilities. You can find an Exodar Peacekeeper /target to find your class trainer.
03) Take the ramp exit at 35.74.
04) Go up the ramp to exit The Exodar then go south a bit to turn in “Newfound Allies” 24.54, accept “The Way to Auberdine“.
05) Go west a bit to the end of the dock 20.54 and wait for the boat to arrive to take you to Auberdine, Darkshore.

Auberdine, Darkshore

01) Left the dock accept “Journey to Astranaar” 34.42. NOTE: Remember to turn this in when you get to Astranaar.
02) Go in the Inn and talk to the Innkeeper /target 37.44 to make Auberdine your new home.
03) Just south of the Inn, go up on the platform and from the Hippogryph Master 36.46, get the Flight Path.
04) There on the hippogryph dock accept (no exclamation mark /target) “Washed Ashore” 37.46.
05) Do “Washed Ashore“: go along the shore to the Beached Sea Creature 36.51 and stand in the middle of it where the neck meets the body and then click on it to loot the Sea Creature Bones.
06) Go back north to Auberdine and on the Hippogryph dock, turn in “Washed Ashore” (#3 on map 37.46), accept the next part.
07) Go west out in the sea and do “Washed Ashore“: loot the Skeletal Sea Turtle’s head 32.46.
08) Back east on the Hippogryph dock turn in “Washed Ashore” (#3 on map 37.46). NOTE:  Doing this quest chain will open up many easy to do quests later on!
09) Just outside of the Inn, from the WANTED: Murkdeep! sign 37.44, accept “WANTED: Murkdeep!“.
10) Next to the mailbox accept “Cave Mushrooms” 37.44.
11) Go north across the bridge and on your left accept “The Absent Minded Prospector” 37.42 .
12) Go north in the merchant building and turn in “The Way to Auberdine” 37.40 . Accept “Onward to Ashenvale“. 
NOTE: Remember to turn this in when you get to Astranaar.
13) in the SE building go upstairs and accept “The Tower of Althalaxx” 39.43.


01) Go NE along the shore, to the Beached Sea Creature 42.31, click on it to accept “Beached Sea Creature“.
02) Go north on the shore and click on the Beached Sea Turtle’s arm 44.21 to accept “Beached Sea Turtle“.
03) Go east along the shore and click on the Beached Sea Turtle’s head 53.18 to accept “Beached Sea Turtle“.
04) Go SE and just off the main path next to a rock, turn in “The Tower of Althalaxx” 55.25, accept the next part.
05) Go SE a bit (around the tower, 55.27) and do “The Tower of Althalaxx“: kill/loot Dark Strand Fanatics (female humans).
06) Turn in “The Tower of Althalaxx” (55.25, #4 on map), accept the next part.
07) Go south, then up and through the waterfall in front of the cave (path entrance at 55.32) do “Cave Mushrooms“: loot the mushrooms on the ground in the cave.
08) Use Hearthstone (or go back) to Auberdine and up on the hippogryph dock turn in ALL “Beached Sea” quests you have 37.46.
09) Just outside of the Inn by the mailbox turn in “Cave Mushrooms” 37.44 , accept “Onu“.

WoW TBC Classic: 1-12 Alliance Leveling Guide (Azuremyst Isle)

1-6 – Ammen Vale, Azuremyst Isle

01) At Megelon accept “You Survived!” 83.44.
02) Go down and turn in “You Survived!” 80.46, accept “Replenishing the Healing Crystals“.
03) Do “Replenishing the Healing Crystals“: kill/loot the Vale Moths around 80.43.
04) Return and turn in “Replenishing the Healing Crystals” (#2 on map 80.46), accept “Urgent Delivery!“.
05) Go in the Crash Site and find the NPC that patrols around 80.49 to turn in “Urgent Delivery!“, accept “Rescue the Survivors!“.
06) Accept “Spare Parts” at 79.51.
07) Next to you accept “Inoculation” 79.52.
08) At Botanist Taerix  accept “Botanist Taerix” (#2 on map 80.46).
09) At the small Draenei camp, turn in “Botanist Taerix“. Accept “Volatile Mutations” 79.47.
10) Do “Volatile Mutations“: kill 8 Volatile Mutations scattered all around the starting zone. Keep the next step in mind.
11) Do “Rescue the Survivors!“: use your racial ability Gift of the Naaru on one of the Draenei Survivors /target. TIP: Look for a reddish glow, here are some locations: 83.50, 79.55, 81.56 .
12) Go to Nestlewood Hills entrance at 81.59 do “Spare Parts” (loot the Emitter Spare Parts off the ground) along with “Inoculation“: use your quest item Inoculating Crystal on 6 Nestlewood Owlkins (They are the light colored owlkins).
13) Once everything is completed, use your Hearthstone.
14) Go down into the Crash Site and turn in (from the NPC that patrols around) “Rescue the Survivors!” (#5 on map around 80.49).

01) Turn in “Spare Parts” 79.51 and (next to you) “Inoculation” then accept “The Missing Scout“.
02) At the small Draenei camp turn in “Volatile Mutations” 79.47, accept “What Must Be Done…” and (next to you) “Botanical Legwork“.
03) Go SW to Ammen Fields around 75.49 and do “What Must Be Done…” along with “Botanical Legwork“: kill/loot Mutated Root Lashers and loot 3 Corrupted Flowers off the ground.
04) Go south to Tolaan 72.61 and turn in “The Missing Scout“, accept “The Blood Elves“.
05) At 71.63 do “The Blood Elves“: kill 10 Blood Elf Scouts.
06) Return to Tolaan (#4 on map 72.61) and turn in “The Blood Elves“, accept “Blood Elf Spy“.
07) Go to the top of Shadow Ridge and do “Blood Elf Spy“: kill Surveyor Candress /target 69.66. She will drop an item that starts “Blood Elf Plans“, accept it.
08) Use Hearthstone (or die on purpose and then ressurect at spirit) then turn in “What Must Be Done...” (accept “Healing the Lake“) and next to you “Botanical Legwork“.
09) Turn in “Blood Elf Spy” (#1 on map 79.51) and “Blood Elf Plans“. Accept “The Emitter“.
10) Next to you, turn in “The Emitter“. Accept “Travel to Azure Watch“.
11) Go SW to Silverline Lake and do “Healing the Lake“: simply click on the big purple Irradiated Power Crystal in the lake 77.59.
12) Use Hearthstone (if you can). Or go east to the owls and die 79.60 on purpose, then ressurect at spirit.
13) Turn in “Healing the Lake” (#2 on map 79.46).
14) Leave this area, on the way accept “Word from Azure Watch” 64.54.
15) Just across the river accept “Red Snapper – Very Tasty!” 61.54.

Azure Watch

01) Follow the path at the Azure Watch accept “The Great Moongraze Hunt” 50.52.
02) Also take “Medicinal Purpose” 48.52. Take First Aid Profession from this NPC!
03) NW in town right before the Inn’s entrance, turn in “Travel to Azure Watch” 49.50.
04) Go inside the Inn next to you and turn in “Word from Azure Watch” 48.49 . Also make this place your new home at the Innkeeper.
(GET NEW ABILITIES) Make sure you are level 6 then find your class trainer around town to get new spells/abilities. TIP: You can talk to an Azuremyst Peacekeeper /target to help you find your class trainer faster.
05) South of Azure Watch do “Medicinal Purpose” along with “The Great Moongraze Hunt“: kill/loot Root Trappers and Moongraze Stags.
06) Return to Azure Watch and turn in “The Great Moongraze Hunt” (#1 on map 50.52), accept “The Great Moongraze Hunt” (part 2).
07) West in town, turn in “Medicinal Purpose” (#2 on map 48.52). Then next to you accept “An Alternative Alternative“.
08) SE of Azure Watch do “An Alternative Alternative“: loot 5 Azure Snapdragons (flowers) from around the trees. There is a large amount around 52.59.
09) Use Hearthstone (or go back) to Azure Watch and turn in “An Alternative Alternative” (#2 on map 48.51). Accept “The Prophecy of Velen“.

Odesyus’ Landing

01) Go south to Odesyus’ Landing and turn in “The Prophecy of Velen” 47.70 . Accept “A Small Start“.
02) At the camp also accept “Cookie’s Jumbo Gumbo” 47.71.
03) Go just south to the shore around 47.73 and start working on “Cookie’s Jumbo Gumbo“: kill/loot Skittering Crawlers along the shore. 
04) Grinding to the Geezle’s Camp to do “A Small Start“: loot the Nautical Map (under a green canopy, 59.66), and:
05) Under a blue canopy (60.68.), loot the Nautical Compass.
06) Work your way back west to Odesyus’ Landing while continuing “Cookie’s Jumbo Gumbo“: kill/loot Skittering Crawlers along the shore. Once at Odesyus’ Landing turn in “A Small Start” (#1 on map 47.70), accept “I’ve Got a Plant“. Then next to you accept “Reclaiming the Ruins“, and “Precious and Fragile Things Need Special Handling“.
07) At the camp turn in (if its finished) “Cookie’s Jumbo Gumbo” 47.71.
08) North side do “I’ve Got a Plant“: loot 5 Piles of Leaves off the ground and loot a Hollowed Out Tree (4 total possible spawns: 48.63, 49.63, 46.62, 46.66).
09) Back south at Odesyus’ Landing turn in “I’ve Got a Plant” (#1 on map 47.70), accept ” Tree’s Company“.
10) Continue grinding along the shore go to the #10 on map to do “Reclaiming the Ruins” along with “Precious and Fragile Things Need Special Handling“: kill the required amount of Wrathscale naga and loot the Ancient Relics. While doing this, you should find an item that starts “Rune Covered Tablet“, accept it.
11) Use Hearthstone (or die on purpose and res at spirit) and at Azure Watch in the middle of town accept “The Missing Fisherman” 49.51 and “Learning the Language” 49.51.
12) Do “Learning the Language“: open your backpack and click on the Stillpine Furbolg Language Primer quest item. Then turn in “Learning the Language” at the totem in the middle of town (#11 on map 49.51), accept “Totem of Coo“.

01) Just north 50.45 or NW 45.44 of Azure Watch kill/loot Infected Nightstalker Runts until one drops an item that starts “Strange Findings“, accept it. Also start working on “The Great Moongraze Hunt” by kill/looting the Moongraze Bucks. Once you get “Strange Findings” go to the next step.
02) Use Hearthstone (or run back) and west in Azure Watch by the cliff, turn in “Strange Findings” 47.50, accept “ Nightstalker Clean up, Isle 2…“.
03) Start working on “Nightstalker Clean up, Isle 2…” along with continuing “The Great Moongraze Hunt“: kill Infected Nightstalker Runts (#2 on map) and kill/loot the Moongraze Bucks (#3 on map). While working on these, continue to the next steps.
04) Go to the top of the hill and turn in “Totem of Coo” 55.42, accept “Totem of Tiki“.
05) Return to the shore and start working on “Red Snapper – Very Tasty!“: use Draenei Fishing Net quest item on the School of Red Snappers.  

NOTES:  Sometimes an Angry Murloc will spawn from the School of Red Snappers

06) Go east down to the shore and turn in “Totem of Tiki” 64.40, accept “Totem of Yor“.
07) Continue doing “Red Snapper – Very Tasty!“: use Draenei Fishing Net quest item on the School of Red Snappers. Work your way to Diktynna (Fishing Trainer) to turn this in 61.54, accept “Find Acteon!“.
08) At #8 under the water turn in “Totem of Yor” 63.68, accept “Totem of Vark“.

01) Work your way west to Odesyus’ Landing 47.70 while finishing (if you still need to) “Cookie’s Jumbo Gumbo“: kill/loot Skittering Crawlers along the shore.  Once at Odesyus’ Landingturn in “Precious and Fragile Things Need Special Handling“, “Reclaiming the Ruins“, and “Rune Covered Tablet“. Wait here for a moment until you are able to accept “Warlord Sriss’tiz“.
02) At the camp turn in (if you still need to) “Cookie’s Jumbo Gumbo” 47.71.
03) Go west to Bristlelimb Village and turn in “Totem of Vark” 28.62, accept “The Prophecy of Akida“.
04) While here do “The Prophecy of Akida“: kill/loot the Bristlelimb furbolgs for the Bristlelimb Keys to free 8 Stillpine Captives in the cages. Continue working on “Nightstalker Clean up, Isle 2…” along with “The Great Moongraze Hunt“: kill Infected Nightstalker Runts and kill/loot the Moongraze Bucks (these are #5 on map).
05) Make sure “Nightstalker Clean up, Isle 2…” along with “The Great Moongraze Hunt” is now finished: kill Infected Nightstalker Runts and kill/loot the Moongraze Bucks. You can find a large concentration of these mobs around 30.57.
06) Go south and enter Tides’Hollow (cave entrance at 27.76).
07) Go straight in the cave then jump down at 26.74 to do “Warlord Sriss’tiz“: kill Warlord Sriss’tiz /target 24.74.
08) Work your way up to leave the cave, then swim to Silvermyst Isle and do “Tree’s Company“: use your Tree Disguise Kit quest item by the Naga Flag (at the shore 18.84) then wait for the quest to complete.
09) Follow the shore SW and on the dock turn in “The Missing Fisherman” 17.95, accept “All That Remains“.
10) Grind your way to the north side of Silvermyst Isle and by the shore try to do the escort “A Cry For Help” at 14.73 : Escort Magwin /target to the dock south on the Isle. Most classes should be able to solo this, but you might need help from another player, if not then skip it. If you did it turn it in.
11) All around Silvermyst Isle finish “All That Remains“: keep killing any of the Owlbeasts in the area around 15.91 until you loot the Remains of Cowlen’s Family (you may have already found this by now).
12) Back south on the dock turn in “All That Remains” (#9 on map 17.95).

01) Use Hearthstone (or die on purpose and ressurect at spirit) to Azure Watch, then turn in “The Prophecy of Akida” 49.51, accept “Stillpine Hold“.
02) Turn in “Find Acteon!” 50.52 and “The Great Moongraze Hunt“.  
03) Turn in “Tree’s Company” 47.70, accept “Show Gnomercy” and turn in “Warlord Sriss’tiz“.
04) Along the shore do “Show Gnomercy“: speak to Engineer “Spark” Overgrind /target (he’s a gnome that patrols up and down the shore, around 49.72) then kill/loot him.
05) Go back to Odesyus’ Landing and turn in “Show Gnomercy” (#3 on map 47.70), accept “Deliver Them From Evil…“.
06) Make sure you are level 10 then use Hearthstone (or die on purpose and ressurect at spirit) to Azure Watch, then west in town at the cliff turn in “Deliver Them From Evil…” 47.50. Accept “Coming of Age“. Also turn in “Nightstalker Clean up, Isle 2…“.
07) It’s time to start focusing on doing your class’s level 10 class quests along with getting new spells/abilities. Work on them now then go ahead and then continue on below afterwards. 

Stillpine Hold

01) Go to Stillpine Hold 45.24 and accept “Beasts of the Apocalypse!” and next to you “Murlocs… Why Here? Why Now?“.
02) NE at the hold turn in “Stillpine Hold” 47.21.
03) East of Stillpine Hold do “Beasts of the Apocalypse!“: kill/loot Ravager Specimens around 53.22.
04) Go back west to Stillpine Hold and turn in “Beasts of the Apocalypse!” (#1 on map 45.24).
05) Along the shore do “Murlocs… Why Here? Why Now?“: kill/loot the murlocs. Also while you are here, find and kill Murgurgula /target (a big grayish-purple murloc that patrols up and down the shore), he drops an item that starts “Gurf’s Dignity“, accept it. He spawns at (actual #5 on map 35.22).
06) Return (#1 on map 45.24) and turn in “Murlocs… Why Here? Why Now?” and “Gurf’s Dignity“.
07) Accept “Search Stillpine Hold” (#2 on map 47.21) and next to you “Chieftain Oomooroo“.
08) Enter the cave at Stillpine Hold (entrance at 45.18).
09) Inside the cave do “Chieftain Oomooroo“: kill 9 Crazed Wildkin while following the path to the right, stay up, cross the small bridge and then kill Chieftain Oomooroo /target (white colored owlbeast, 47.14). Keep the next step in mind.
10) Deep in the cave, in the water, from the Blood Crystal turn in “Search Stillpine Hold” 51.12, accept “Blood Crystals“.
11) Leave the cave and back in town (#2 on map 47.21), turn in “Blood Crystals” and “Chieftain Oomooroo“.
12) Accept “The Kurken is Lurkin” 46.22.
13) Return to the cave (entrance at 45.18 , #8 on map), follow the left path down, and do “The Kurken is Lurkin“: kill/loot The Kurken 50.13.
14) In town 46.22, turn in “The Kurken is Lurkin“, accept “The Kurken’s Hide“.
15) Accept “Warn Your People” (#2 on map 47.21).
16) Turn in “The Kurken’s Hide” (#1 on map 45.24).
17) If you are not level 12, then grind to it.
18) Use Hearthstone (or run back) to Azure Watch and west at the cliff, turn in “Warn Your People” 47.50.
19) Stop at the First Aid Trainer /target 48.52 and upgrade First Aid.
20) Find your class trainer and learn your level 12 spells/abilities.
21) Go west to The Exodar (city of the Draenei) and just outside of the city, turn in “Coming of Age” 82.51, accept “Elekks Are Serious Business“.

Leveling Options

01) Now you can go to Auberdine, Darkshore or Bloodmyst Isle.
02) If you are going to Auberdine, Darkshore then get on the boat west at the end of the docks to get there, skip “Elekks Are Serious Business” quest. Once at Auberdine, follow the docks east, and on your right accept “For Love Eternal” (on the dock, 36.44).
03) Continue east on the dock toward the Inn, but go upstairs and accept “Buzzbox 827” 37.44.
04) Just south of the Inn, go up on the platform and from the Hoppogryph Master (36.46 ), get the Flight Path.
05) If you are going to continue on with the Draenei TBC content, then head north into Bloodmyst Isle (bridge entrance at 65.95).

WoW TBC Classic: 12-20 Horde Leveling Guide (Ghostlands)

01) Continue south on the path until you run into Tranquillienand, the first NPC you see at 46.28 is Arcanist Vandril, turn in “Delivery To Tranquillien“. Accept “The Forsaken“.
02) At 45.32 turn in “The Forsaken“, accept “Return to Arcanist Vandril“.
03) Go back and turn in “Return to Arcanist Vandril” (46.28, #1 on map), accept “Suncrown Village“.
04) Next to you by the purple covered wagon accept “Tomber’s Supplies” at 47.29.
05) Next to you from the General Goods vendor, accept “Goods From Silvermoon City” at 47.29.
06) Go in the Inn on the east side and talk to the Innkeeper to make Tranquillien your new home.
07) Accept “The Plagued Coast” at 48.35.
08) NW in town get the Flight Path discovered from Bat Handler at 45.31 and turn in “Goods From Silvermoon City“, SKIP “Fly to Silvermoon City“.
09) Head NE to Suncrown Village and accept “Anok’Suten” at 58.15.
10) Just east a bit do “Suncrown Village” along with “Anok’Suten” (Elite): kill 10 Nerubis Guards and kill Anok’Suten /target (lvl 11 elite that patrols clockwise around the circle path at the village). NOTE: Most classes should be able to do solo Anok’Suten, but be prepared and group if you can.
11) Along the shore find the blood elf camp and accept “Dealing with Zeb’Sora” at 69.15.
12) At the little island accept “Forgotten Rituals” at 72.19.
13) Go south to Farstrider Enclave and by the bonfire accept “Bearers of the Plague” at 72.32.
14) From Ranger Kenn’an accept “Spirits of the Drowned” at 72.30.
15) In the Lake Elrendar and start working on “Spirits of the Drowned” along with “Forgotten Rituals“: kill Ravening Apparitions and Vengeful Apparitions, also loot the Glistening Mud around the bottom of the lake. While working on this, move NE to the Zeb’sora.
16) At the Zeb’Sora around 75.12 do “Dealing with Zeb’Sora“: kill/loot Shadowpine trolls for the ears.
17) Grind west across the lake to the blood elf camp and turn in “Dealing with Zeb’Sora” (69.15, #11 on map), accept “Report to Captain Helios“.
18) In the lake finish “Forgotten Rituals“: loot the Glistening Mud (#15 on map). It’s at the bottom of the lake, then turn this in at the little island in the middle of the lake (72.19, #12 on map) and accept “Vanquishing Aquantion“.
19) Just a bit to the north at the bottom of the lake do “Vanquishing Aquantion“: click on the Altar of Tidal Mastery (statue, 71.15), then kill Aquantion (water elemental) who spawns in.
20) Go back up to the little island and turn in “Vanquishing Aquantion” (72.19, #12 on map).
21) Work your way back south to Farstrider Enclave while finishing up “Spirits of the Drowned“: kill 8 Ravening Apparitions and 8 Vengeful Apparitions (#15 on map).
22) Just south of Farstrider Enclave do “Bearers of the Plague“: kill 10 Ghostclaw Lynx /target.
23) Go back to Farstrider Enclave and by the bonfire turn in “Bearers of the Plague” (72.32, #13 on map), accept “Curbing the Plague“.
24) Turn in “Spirits of the Drowned” and “Report to Captain Helios” 72.30.

01) Hearth to Tranquillien.
02) Outside the Inn at Cooking Trainer & Supplies accept “Culinary Crunch” at 48.31.
03) At the NPC on the north side of town turn in “Suncrown Village” at 46.28, accept “Goldenmist Village” and turn in “Anok’Suten“.
04) Accept all other available quests at Tranquillien, which include “Salvaging the Past” (middle of town, 46.32). “Investigate An’daroth“, “Trouble at the Underlight Mines“. And if you are level 14 accept “Troll Juju” and “Investigate the Amani Catacombs“.
05) SW in town by the well accept “Down the Dead Scar” at 46.34.
06) Go just west of Tranquillien to The Dead Scar around 40.34 and do “Down the Dead Scar“: kill 10 Risen Hungerers and 10 Gangled Cannibals. NOTE: Save any Rotting Hearts you find, you will use them for a later quest, (don’t sell them to a vendor).
07) Continue killing mobs and do “Culinary Crunch” by kill/looting any spiders you come across. These spiders are all around the open fields of Ghostlands.
08) Go west to Sanctum of the Moon around 33.34 and do “Salvaging the Past“: kill/loot the mobs around the sanctum.
09) Just north a bit do “Tomber’s Supplies“: loot Rathis Tomber’s Supplies (box) on the wagon 34.27.
10) Grind NE to An’daroth and do “Investigate An’daroth“: kill 12 Sentinel Spies and to Investigate An’daroth simply go towards the white crystal structure 37.16.
11) Go west to Goldenmist Village around 27.17 and do “Goldenmist Village“: kill 6 Quel’dorei Ghosts and 4 Quel’dorei Wraiths.
12) Along the shore do “The Plagued Coast“: kill/looting the murlocs moving to the next step.
13) Grind SE to Underlight Mines and accept “Underlight Ore Samples” at 31.48.
14) Around 29.48 do “Trouble at the Underlight Mines” with “Underlight Ore Samples“: keep kill/looting the Blackpaw GnollScavenger and Shamans until these are completed.
15) North and west of Underlight Mines around 29.41 do “Curbing the Plague“: kill 10 Vampiric Mistbats and 8 Spindleweb Lurkers.
16) In the open fields of Ghostlands, finish “Culinary Crunch“: kill/loot any spiders, especially the Spindleweb Lurkers (#15 on map). There are some lower level spiders north of the river. NOTE:  Remember not to sell your Crunchy Spider Legs!

01) Go to Tranquillien (don’t teleport) and turn in ALL quests and accept ALL new ones, which include the following steps.
02) Turn in “Goldenmist Village” at 46.28, accept “Windrunner Village“.
03) By the wagon, turn in “Tomber’s Supplies” at 47.28.
04) Just outside of the Inn at the Cooking Trainer & Supplies vendor turn in “Culinary Crunch” at 48.31.
05) Just outside of the Inn’s entrance from the Wanted Poster, accept “Wanted: Knucklerot and Luzran” at 48.32.
06) Go up the spiral ramp just outside of the Inn and accept “Rotting Hearts” and “Spinal Dust” at 49.31.
07) SE in town turn in “The Plagued Coast” at 48.35.
08) SW in town by the well turn in “Down the Dead Scar” at 46.34.
09) In the middle of town turn in “Salvaging the Past” at 46.32.
10) In the hut west in town turn in “Investigate An’daroth” at 45.32, accept “Into Occupied Territory“.
11) Next to you in the hut turn in “Trouble at the Underlight Mines“. If you haven’t yet, accept “Troll Juju” and “Investigate the Amani Catacombs“.
12) Also accept “Retaking Windrunner Spire“.

01) Lead to the Shalandis Isle and do “Into Occupied Territory“: loot the 3 Plans on the ground. They have slightly different spawn locations. Night Elf Plans: An’daroth is around the SE part of the isle around 15.27. 
02) Night Elf Plans: An’owyn is around the middle of the Isle 13.25.
03) Night Elf Plans: Scrying on the Sin’dorei is at the top of the boat at 10.23.
04) Go south to Windrunner Village around 19.43 and do “Windrunner Village“: kill/loot Phantasmal Seekers and Stonewing Slayers for the items you need.
05) Go to the entrance at 18.58 and do “Retaking Windrunner Spire“: kill 8 Deatholme Acolytes and 10 Fallen Rangers. While doing this you should get an item which starts “The Lady’s Necklace“, accept it.
06) Teleport to Tranquillien.
07) North in town from the NPC, turn in “Windrunner Village” at 46.28.
08) In the hut west in town turn in “Into Occupied Territory” at 45.32, accept “Deliver the Plans to An’telas“. And turn in “Retaking Windrunner Spire” and “The Lady’s Necklace“.
09) In the building accept “The Farstrider Enclave” at 55.49. Next to you turn in “Underlight Ore Samples“.
10) Go north to An’telas and turn in “Deliver the Plans to An’telas” at 60.35, accept “Deactivate An’owyn“.

01) Go NE to Farstrider Enclave and by the bonfire turn in “Curbing the Plague” at 72.32.
02) Next to you accept “Attack on Zeb’Tela” at 72.31 and (from the Wanted Poster) “Bring Me Kel’gash’s Head!“.
03) Accept “Shadowpine Weaponry” from Captain Helios.
04) Go up the western spiral ramp 72.30 and turn in “The Farstrider Enclave“, accept “The Traitor’s Shadow“.
05) Go down and then up the eastern spiral ramp 73.30 and accept “A Little Dash of Seasoning“.
06) Go to Dawnstar Spire and upstairs  turn in “The Traitor’s Shadow” at 80.18, accept “Hints of the Past“.
07) Go south to Zeb’Tela around at 78.36 and do “Attack on Zeb’Tela” along with the first half of “Shadowpine Weaponry“: kill 8 Shadowpine Shadowcasters & 8 Headhunters, also obtain 3 Headhunter Axes and 3 Shadowcaster Maces from these mobs.
08) Go NW to Farstrider Enclave and turn in “Attack on Zeb’Tela” (72.31, #1 on map), accept “Assault on Zeb’Nowa“.
09) Go up the western spiral ramp 72.30 and turn in “Hints of the Past“, accept “Report To Magister Kaendris“.
10) At the Amani Catacombs (entrance at 66.29) do “Investigate the Amani Catacombs” along with “Troll Juju“: click on the Mummified Troll Remains and kill/loot the trolls. Keep the next step in mind.
11) In the Amani Catacombs accept and do the escort (if she /target is there in the cage 63.33) “Escape from the Catacombs“.
12) Once you get back to Farstrider Enclave turn in (if you did it) “Escape from the Catacombs” (72.30, #3 on map).
13) Go south to Zeb’Nowa and do the half of “Shadowpine Weaponry” (claws and staves) along with “Assault on Zeb’Nowa” (kill 10 Shadowpine Catlords and 10 Hexxers). While working on these do “A Little Dash of Seasoning“: loot the 3 racks. First one is the Fresh Fish Rack in a hut (68.58).
14) Raw Meat Rack (between two small huts, 65.67).
15) Smoked Meat Rack (between two small huts, 63.75).
16) For this step you should find a group: in the southern hut at Zeb’Nowa do “Bring Me Kel’gash’s Head!” (Elite): kill/loot Kel’gash the Wicked /target (lvl 20 elite up at 65.80). If it’s too hard, thank can skip, there is no follow up quest to it.
17) Finish up “Shadowpine Weaponry” (claws and staves) along with “Assault on Zeb’Nowa” (kill 10 Shadowpine Catlords and Hexxers, #13 on map).
18) Go west a bit to An’owyn and do “Deactivate An’owyn“: kill/loot the Sentinel Infiltrators until the Crystal Controlling Orb drops and then click on the Night Elf Moon Crystal at 58.65.

01) Go NE to Farstrider Enclave and turn in “Assault on Zeb’Nowa” at 72.31.
02) Out on the ledge next to the Brazier 72.30, turn in “Shadowpine Weaponry” and (if you did it) “Bring Me Kel’gash’s Head!“.
03) Go up the eastern spiral ramp 73.30 and turn in “A Little Dash of Seasoning“.
04) At the An’telas turn in “Deactivate An’owyn” at 60.36.
05) Go SW to Sanctum of the Sun and in the building turn in “Report To Magister Kaendris” at 55.49, accept “The Twin Ziggurats“. Upstairs accept “War on Deatholme“.
06) At the Andillien Estate accept “Clearing the Way” at 46.56.
07) Around the southern open fields of Ghostlands do “Clearing the Way“: kill 10 Greater Spindlewebs and 10 Ghostclaw Ravagers.
08) Go back to Andillien Estate and turn in “Clearing the Way” (46.56, #6 on map).
09) GROUP: If you can find a group, you can tackle the quest “Wanted: Knucklerot and Luzran“: kill/loot Knucklerot /target and Luzran /target (these elites patrol around 37.50). This is optional and can be skipped. If you did it, then turn it in the next time you go back to Tranquillien.
10) Go inside the Howling Ziggurat and do part of “The Twin Ziggurats“: loot the Worn Chest at 40.50.
11) Go out and grind west to the Bleeding Ziggurat and do the last part of “The Twin Ziggurats“: loot the Dented Chest at 34.48.
12) Go east to The Dead Scar and kill/loot skeleton mobs for “Spinal Dust” along with “Rotting Hearts” (kill/loot zombies).
13) At the Deatholme (entrance at 35.75) and kill 5 Eye of Dar’Khan, 6 Nerubis Centurions and 6 Wailers for “War on Deatholme“.
14) Teleport to Tranquillien.
15) Go up the spiral ramp outside of the Inn and turn in “Rotting Hearts” with”Spinal Dust” at 49.31. NOTE: “More Rotting Hearts” & “More Spinal Dust” are repeatable for reputation.
16) At 45.32 turn in “Troll Juju” and “Investigate the Amani Catacombs“.
17) Go SE to Sanctum of the Sun and in the building turn in “The Twin Ziggurats” (55.49, #5 on map), accept “The Traitor’s Destruction“. NOTE: The quest reward can help you kill Dar’Khan Drathir later on.
18) Go up the spiral ramp and turn in “War on Deatholme“, accept “Dar’Khan’s Lieutenants” and (next to you) “A Restorative Draught“.
19) Go back NW to Tranquillien and SE in town turn in “A Restorative Draught” at 48.35, accept “Captives at Deatholme“.

01) Go to Deatholme (entrance at 35.75) and do “Captives at Deatholme” along with “Dar’Khan’s Lieutenants“: around Deatholme kill the named mobs and freeing the captives. 
Keep in mind two of the named mobs have two spawn locations, so if the named NPC is not there then move on to the next spot and come back to these spots again if you didn’t see them the first time around. I also recommend using your two quest reward items before entering Deatholme (Scourgebane Draught and Scourgebane Infusion) to help you out.
02) Kill Mirdoran the Fallen /target in the building at 37.79.
03) Free Apprentice Varnis /target up in the slaughterhouse 41.83. Also, you might see Borgoth the Bloodletter /target there as well, kill him. (or he’s at 33.90)
04) Kill Masophet the Black /target in the ziggurat 36.89. NOTE: He has a another spawn location. (map #6 29.89.)
05) Free Ranger Vedoran /target in the slaughterhouse 33.90. Also, if you haven’t yet killed Borgoth the Bloodletter /target you might see him in there as well.
06) If you have not killed Masophet the Black /target yet, you might see him in the ziggurat at 29.89.
07) Free Apothecary Enith /target down in the crypt 32.74. Also kill Jurion the Deceiver /target there as well.
08) GROUP 3+ Players: Down in the building in the middle of Deatholme do “The Traitor’s Destruction” (Elite): kill/loot Dar’Khan Drathir /target (lvl 21 elite down at 33.81). Remember to use your quest reward you got early on to help you kill him.
09) Make sure you have both “Captives at Deatholme” along with “Dar’Khan’s Lieutenants” finished, then keep grinding until you are at LEAST 3 bars away from level 20.
10) Die on purpose (or attempt to kill Dar’Khan /target for “The Traitor’s Destruction” [previous step, #8 on map] while doing it). Then resurrect at Spirit Healer.


01) At the Sunctum Turn in (if you did it) “The Traitor’s Destruction” at 55.49, accept (if you can) “Hero of the Sin’dorei“.
02) Upstairs turn in “Captives at Deatholme” and “Dar’Khan’s Lieutenants“.
03) Hearth or run to Tranquillien. Turn in (if you did it) “Wanted: Knucklerot and Luzran” at 46.34.
04) In the hut west in town accept “Journey to Undercity” at 45.32.
05) Fly to Silvermoon City.
06) Entrance at 57.49 in Eversong Woods.
07) In Silvermoon City, go to the First Aid Trainer /target at 78.71 and skill up First Aid. Get new spells/abilities for your class as well.
08) Turn in (if you have it) “Hero of the Sin’dorei” at 54.20, accept (if you can) “Envoy to the Horde“.
09) Go NW a bit more and click on the Orb of Translocation at 49.15 to teleport you to The Undercity.
10) Now you can go to Hillsbrad Foothills, or to Stonetalon Mountains/Southern Barrens. Stonetalon Mountains/Southern Barrens are away from the Alliance, so you can focus on faster leveling, if you’re more of a PVP you can go to Hillsbrad instead (that is if you are on a PVP server of course). Take  “Journey to Undercity” and “Envoy to the Horde” if you go HF. 

Guide continues to The Barrens…
11) Leave Undercity by heading north out of Ruins of Lordaeron and then get on the western zeppelin (61.59 in Tirisfal Glades) to go to Orgrimmar.
12) In Orgrimmar at Grommash Hold accept “The Spirits of Stonetalon” at 39.38.
13) Discover the Flight Path at 45.64.
14) Leave Orgrimmar south and then run SW through Durotar and then all the way to Ratchet in The Barrens and get the Flight Path there from the Flight Master (63.37 in The Barrens).
15) Next to you accept “Ziz Fizziks” at 63.37.
16) Next to Ratchet’s bank accept “Deepmoss Spider Eggs” at 62.38.
17) Go to The Crossroads and make it your home.
18) At the bottom of the watch tower accept “Report to Kadrak” at 51.31.
19) Get the Flight Path from the Wind Rider Master at 51.30.
20) Go west and turn in “The Spirits of Stonetalon” at 35.28, accept “Goblin Invaders“.

WoW TBC Classic: 1-12 Horde Leveling Guide (Eversong Woods)

1-5 – Sunstrider Isle, Eversong Woods

01) Once you start, right in front of you, accept “Reclaiming Sunstrider Isle”  from Magistrix Erona at 38.21.
02) Go to Burning Crystals and do “Reclaiming Sunstrider Isle“: kill 6 Mana Wyrms around.
03) Return and turn in “Reclaiming Sunstrider Isle” (38.21, #1 on map). Accept “Unfortunate Measures” and your class quest from Erona.
04) Go in The Sunspire building next to you 39.21, find your class trainer and turn in your class quest. NOTE: In-depth class quests are coming later! You will need to do these on your own for now!
05) Also accept from your class trainer “Well Watcher Solanian“.
06) Go up the spiral ramp and turn in “Well Watcher Solanian” to Solanian 39.19, accept “Solanian’s Belongings” and “The Shrine of Dath’Remar“.
07) Jump right down outside in front of you and accept “A Fistful of Slivers” 38.19 at Arcanist Ithanas.
08) Also accept “Thirst Unending” 37.19.
09) Do part of “Solanian’s Belongings“: south a bit next to the burning crystal, loot Solanian’s Journal 38.25. While doing the parts of this quest start working on the following 3 quests together:
10) “Thirst Unending“: use Mana Tap on Mana Wyrms (#2 on map).
11) “A Fistful of Slivers” (kill/loot creatures with mana). Same mobs from previous step!
12) “Unfortunate Measures” (kill/loot Springpaw Cubs & Lynxes [cats]):
13) Do part of “Solanian’s Belongings“: loot the Solanian’s Scrying Orb at 35.29.
14) Finish “Solanian’s Belongings“: NW by the fountain, loot Scroll of Scourge Magic at 31.23.
15) Continue “Thirst Unending” (use Mana Tap racial on 6 creatures with mana, #2 on map), “A Fistful of Slivers” (kill/loot creatures with mana), “Unfortunate Measures” (kill/loot Springpaw Cubs & Lynxes [cats], #12 on map).
16) Go back east and turn in “Thirst Unending” (37.19, #8 on map).
17) Also Turn in “Unfortunate Measures” (38.21, #1 on map), take “Report to Lanthan Perilon“.
18) In the building next to you and up the ramp, turn in “Solanian’s Belongings” (39.19, #6 on map).
19) Jump outside in front of you and turn in “A Fistful of Slivers” to Arcanist Ithanas (38.19, #7 on map).
20) You should be level 4 now, get new spells/abilities for your class.
21) Go to the middle of Sunstrider Isle and turn in “Report to Lanthan Perilon” at 35.22, accept “Aggression” (map).
22) Do “Aggression“: kill 7 Tenders & 7 Feral Tenders (tree elementals) on your way to Shrine of Dath’Remar (map).
23) Once you there do “The Shrine of Dath’Remar“: click on the The Shrine of Dath’Remar plaque at 30.19.
24) Go SE to the middle of Sunstrider Isle and turn “Aggression” to Lanthan Perilon (35.22, #21 on map), accept “Felendren the Banished“.
25) Go west to Falthrien Academy (entrance at 32.26) and do “Felendren the Banished“: kill 8 Arcane Wraiths, 2 Tainted Arcane Wraiths, and work your way to the top to kill/loot Felendren the Banished /target. While doing this quest you should loot an item that starts “Tainted Arcane Sliver“, accept it.
26) Use Hearthstone to return to the starting area.
27) Go in the building and up the spiral ramp to turn in “The Shrine of Dath’Remar” (39.19, #6 on map).
28) Downside turn in “Tainted Arcane Sliver” (37.19, #8 on map).
29) East to the middle of Sunstrider Isle turn in “Felendren the Banished“, accept “Aiding The Outrunners” (35.22, #21 on map). 
30) Now we leave this area, across the bridge turn in “Aiding The Outrunners” at 40.32, accept “Slain By The Wretched“.

5-6 – Ruins of Silvermoon

01) Turn in “Slain By The Wretched” to Slain Outrunner, accept “Package Recovery“.
02) Go back and turn in “Package Recovery” at 40.32, accept “Completing The Delivery“.
03) By the fountain accept “Major Malfunction” at 47.46.
04) Just east at the building entrance 48.46, accept “Unstable Mana Crystals” and from the Wanted Sign “Wanted: Thaelis The Hungerer“.
05) Go to the Inn (map) talk to the Innkeeper to turn in “Completing The Delivery” and make this Inn your home.
06) Upstairs learn First Aid from the First Aid Trainer.
07) You can also learn Cooking here.
08) If or when you are level 6, find your class trainer to learn your spells/abilities.
09) Start working on “Major Malfunction” and “Unstable Mana Crystals” among the  Ruins of Silvermoon: kill/loot Arcane Patrollers and loot 6 Unstable Mana Crystal Crates
10) North side in the Commons Hall building do “Wanted: Thaelis The Hungerer“: kill/loot Thaelis The Hungerer /target at 45.38.
11) Make sure all quests are completed then go back SE at the fountain and turn in “Major Malfunction” (#3 on map), accept “Delivery To The North Sanctum“.
12) Just east at the building entrance (48.46, #4 on map), turn in “Unstable Mana Crystals“, accept “Darnassian Intrusions“.
13) Next to you, down the steps, turn in “Wanted: Thaelis The Hungerer” at 48.47.

6-12 – Eversong Woods

01) Leave south out of Falconwing Square and along the path accept “Roadside Ambush” 45.56.
02) Go to North Sanctum (map) and turn in “Delivery To The North Sanctum” accept “Malfunction at the West Sanctum“.
03) At 37.57 turn in “Malfunction at the West Sanctum“, accept “Arcane Instability“.
04) Around the West Sanctum do “Arcane Instability” with “Darnassian Intrusions“: kill the needed mana elementals and kill/loot a Darnassian Scout /target.  The scouts are around the tops of cliffs outside, they drop an item which starts “Incriminating Documents“, accept it.
05) Go back to the entrance of the West Sanctum (#3 on map) and turn in “Arcane Instability” and “Darnassian Intrusions“.
06) Go west and take “Fish Heads, Fish Heads...“.
07) Along the shore do “Fish Heads, Fish Heads…“: kill/loot the Grimscale Murlocs. While doing this quest you could find an item which starts “Captain Kelisendra’s Lost Rudders“, accept it if you are able to find it (we will have more chances later to find it).
08) Go back up the cliff and turn in “Fish Heads, Fish Heads…” (30.58, #6 on map), accept “The Ring of Mmmrrrggglll“.
09) If you found Captain Kelisendra’s Lost Rudders turn it in at 36.67. Accept “Grimscale Pirates!” and next to you “Lost Armaments“.
10) Head SE to Fairbreeze Village and along the path next to a wagon accept “Pelt Collection” at 45.70.
11) Take “The Wayward Apprentice” at 44.71.
12) And “Situation At Sunsail Anchorage” at 43.71.
13) Go down in the Inn and from the Innkeeper /target 44.71 make Fairbreeze Village your new home.
14) Follow the path north and just across the bridge, turn in “Roadside Ambush” at 45.61, accept “Soaked Pages“.
15) Go loot the Soaked Tome at 44.62.
16) Just across the bridge, turn in “Soaked Pages” (45.61, #14 on map), accept “Taking The Fall“.

01) Return to Falconwing Square turn in “Incriminating Documents“, accept “The Dwarven Spy“.
02) Get new spells/abilities while you are there (if you are not lvl8 yet, don’t worry, you’re about to come right back as LVL 8).
03) At the North Sanctum do “The Dwarven Spy“: talk to Prospector Anvilward (dwarf with white shirt at 45.53), then follow him up the spiral ramp and near the top kill/loot him.
04) Turn in “The Dwarven Spy” (map). Remember to get LVL 8 spells/abilities if you haven’t yet.
05) Lead to The Dead Scar and accept “The Dead Scar” 50.51.
06) Just south of you along The Dead Scar do “The Dead Scar“: kill 8 Plaguebone Pillagers (skeletons).
07) Go back and turn in “The Dead Scar” (50.51, #5 on map).
08) Head SE to Stillwhisper Pond and turn in “Taking The Fall” 56.55, accept “Swift Discipline“.
09) Head SE to Farstrider Retreat and inside by the bonfire accept “Amani Encroachment” at 60.63.
10) Just west a bit on the ledge accept “The Spearcrafter’s Hammer” at 60.63.
11) Go up the northern spiral ramp and accept “The Magister’s Apprentice” at 60.61.
12) Head SW to the East Sanctum and turn in “The Wayward Apprentice” 54.71, accept “Corrupted Soil“.
13) Around the East Sanctum in the scarred area do “Corrupted Soil“: loot the Tainted Soil Samples (green glowing dirt piles).
14) Go back and turn in “Corrupted Soil” (54.71, #12 on map), accept and do “Unexpected Results“, you have to protect Apprentice Mirveda from one wave of mobs. Then turn it in and accept “Research Notes“.

01) Teleport back to Fairbreeze Village.
02) At the Innkeeper accept “Ranger Sareyn” 44.71 and next to you accept “The Scorched Grove“. While you here, highly recommended you to buy healing potion, for future quests.
03) Outside turn in “Research Notes” 44.71. Accept “Saltheril’s Haven“.
04) Head west to Saltheril’s Haven (kill any cats along the way for “Pelt Collection“, #11 on map) and in the building turn in “Saltheril’s Haven” 38.73, accept “The Party Never Ends“.
05) Grind your way to the Golden Strand shore around 26.68 and do “Grimscale Pirates!” along with “The Ring of Mmmrrrggglll“: for the cargo kill/loot the Grimscale murlocs and/or loot the barrels spread around the shore. And kill/loot Mmmrrrggglll /target(larger orange colored murloc that patrols up and down the shore). TIPS:  Be sure to use your Arcane Torrent racial ability to stop Mmmrrrggglll from healing himself, and you might need a healing potion as well.
06) Go NE up on the cliff and turn in “The Ring of Mmmrrrggglll” at 30.58.
07) Go south around 32.70 and do “Lost Armaments” along with “Situation At Sunsail Anchorage“: loot the Weapon Crates and Weapon Containers and kill the required amount of Wretched mobs.
08) Go slightly NE to the small blood elf camp and turn in “Lost Armaments” at 36.67, accept “Wretched Ringleader“. Also turn in “Grimscale Pirates!“. 
NOTE: You may have found an item (if you haven’t already) which starts “Captain Kelisendra’s Lost Rudders“, accept it and turn it in there at the camp.
09) Go back and do “Wretched Ringleader“: kill/loot Aldaron the Reckless (33.69#7 on map) /target. TIP: If you are going solo its usually best to quickly kill/loot him and escape out of there quickly avoiding other mobs. One of his 3 guards patrols up and down the ramp, so you might want to kill him first.
10) Return to the camp and turn in “Wretched Ringleader” (36.67, #8 on map).
11) All around the open fields of Eversong Woods finish “Pelt Collection“: kill/loot Springpaw Stalkers /target and Elder Springpaws (cats).
12) Teleport (or run) to Fairbreeze Village and along the path next to a wagon turn in “Pelt Collection” at 45.70.
13) Accept “Missing in the Ghostlands” (44.71, #3 on map).
14) Just up the spiral ramp next to you turn in “Situation At Sunsail Anchorage” 43.71.
15) SE of Fairbreeze Village along the path, turn in “Ranger Sareyn” 47.72. Accept “Defending Fairbreeze Village“.
16) At the Inn’s entrance from General Goods vendor (/target 44.70, #3 on map) buy the Bundle of Fireworks item for part of the quest “The Party Never Ends“.
17) Follow the path north and just across the bridge, do part of “Swift Discipline“: use the Antheol’s Disciplinary Rod quest item on Apprentice Meledor at 45.61.
18) Go north along the path a bit, next to a red wagon and do the last part of “Swift Discipline“: use the Antheol’s Disciplinary Rod quest item on Apprentice Ralen at 45.56.
19) Go east to Stillwhisper Pond and turn in “Swift Discipline” at 55.54.
20) You should now be level 10, if not grind to it. It’s time to start focusing on doing your class’s level 10 class quests. Do what you need to do for that then continue on with the next section. 

01) Go SE to Farstrider Retreat and inside next to the bonfire, from the Food & Drink vendor 60.62, buy a Springpaw Appetizers item for part of the quest “The Party Never Ends“.
02) Go SW and along the main path before Ghostlands, turn in “Missing in the Ghostlands” at 49.89. Then next to you, accept “The Fallen Courier“.
03) Go south across the bridge and right when you enter Ghostlands do “The Fallen Courier“: kill/loot any mobs to obtain the 4 Plagued Blood Samples you need.
04) Return to turn in “The Fallen Courier” (49.89, #2 on map). Then next to you accept “Delivery To Tranquillien“.
05) Head west and start working on “Defending Fairbreeze Village” by killing the needed undead mobs in The Dead Scar area, frind your way west to the Runestone Falithas and accept “Powering our Defenses” at 44.85.
06) Continue grinding to 55.84 and do “Powering our Defenses“: use the Infused Crystal quest item at the big runestone then survive a few waves of mobs. It’s better to find a party to complete this quest. It is not easy.
07) Grind north through The Dead Scar area and finish “Defending Fairbreeze Village“: kill the needed undead mobs.
08) Go north to enter Silvermoon City.

01) At the Wine & Spirits Merchant buy a Suntouched Special Reserve to finish the quest “The Party Never Ends“.
02) Get new spells/abilities for your class!
03) Leave Silvermoon City by heading south 73.91.
04) Turn in “The Magister’s Apprentice” at 67.56, accept “Deactivating the Spire“. Also accept “Where’s Wyllithen?“.
05) Do “Deactivating the Spire“: go up the stairs and click on the Orb of Translocation 69.52. It will take you to a floating platform, from there keep following it upwards clicking on the 3 Power Sources. Also while at the 2nd Power Source, you will see a small purple journal, accept “Abandoned Investigations” from it.  After clicking the 3rd Power Source, click the Orb of Translocation next to it to teleport you back down.
06) Head north a bit and turn in “Where’s Wyllithen?” at 69.47, accept “Cleaning Up The Grounds“.
07) In the immediate area do “Cleaning Up The Grounds“: kill 6 Mana Serpents and 6 Ether Fiends.
08) Turn in “Cleaning Up The Grounds” (69.47, #6 on map).
09) Go south along the path and turn in “Deactivating the Spire” (67.56, #4 on map), accept “Word From The Spire“.
10) Turn in “Word From The Spire” and “Abandoned Investigations” at 60.61.
11) Go SE to Tor’Watha and killing Amani Beserkers and Amani Axe Throwers (you will find more of these mobs on the next steps): 
12) Do “The Spearcrafter’s Hammer“: kill/loot the named mob Spearcrafter Otembe (at 70.72 /target). Keep the next step in mind:
13) Very close to Spearcrafter Otembe’s spawn point, you will see a caged troll (70.72, #12 on map), accept “Zul’Marosh” from him.
14) Go across the lake at Zeb’Watha and upstairs in the hut do “Zul’Marosh“: kill/loot Chieftain Zul’Marosh /target 62.80. He drops an item which starts “Amani Invasion“, accept it.
15) Make sure “Amani Encroachment” is finished by killing 5 Amani Beserkers and 5 Amani Axe Throwers (#11 on map).
16) Go back east to Tor’Watha at the caged troll (70.72, #12 on map), and turn in “Zul’Marosh“.
17) Go back to Farstrider Retreat and inside at the bonfire (60.63, #10 on map) turn in “Amani Encroachment” and “Amani Invasion“, accept “Warning Fairbreeze Village“.
18) Just west a bit on the ledge turn in “The Spearcrafter’s Hammer” at 59.63.

01) Teleport to Fairbreeze Village.
02) Once at Fairbreeze Village, go up the spiral ramp and turn in “Warning Fairbreeze Village” at 43.71.
03) East along the path a bit, turn in “Defending Fairbreeze Village” at 47.72.
04) Turn in “The Party Never Ends” at 38.73. NOTE: The quest reward Saltheril’s Haven Party Invitation just allows you to pick up the party goods on the tables at the party, but nothing more.
05) Go south and in the hut turn in “The Scorched Grove” at 34.80, accept “A somber Task“.
06) Just south a bit do “A somber Task“: kill 10 Withered Green Keepers. Also while you are there, kill Old Whitebark /target (he patrols around 35.85, actual #6 on map), he drops an item which starts “Old Whitebark’s Pendant“, accept it.
07) Go back north to the hut and turn in “A somber Task” and “Old Whitebark’s Pendant” (34.80, #5 on map), accept “Whitebark’s Memory“.
08) Go SE in The Scorched Grove at the big runestone 37.87 and do “Whitebark’s Memory“: use Old Whitebark’s Pendant there and then Whitebark’s Spirit will appear, fight him until his health gets low, then talk to him to turn this in.
09) Go turn in “Powering our Defenses” at 44.85.
10) Congratulations! Eversong Woods is now finished. Now lead to Ghostlands.